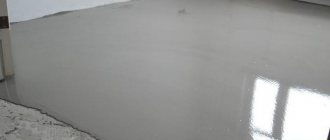
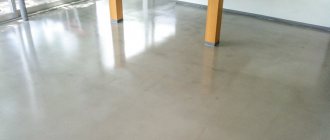
The main advantage of self-leveling floors is a perfectly flat surface after pouring. Self-leveling floors are used to prepare the base for finishing coatings or as a base material. The main reasons for the need to pour a second layer are gross violations of the recommended technology or a complete lack of construction experience among the performers. In order to make a decision about pouring the second layer, you need to know the features of bulk materials and how to use them.
Is it possible to pour a self-leveling floor in two layers?
Self-leveling floor - impeccable work
Rating of cement self-leveling floors for outdoor use
May is already pampering us with consistently warm and dry weather, which means that soon there will be a desire and opportunity to carry out repair work not only inside, but also outside.
And this is a whole complex of repair and construction work. This includes leveling and repairing concrete and cement-sand foundations poured last season for subsequent laying of finishing coatings, be it tiles, porcelain stoneware or rubber crumbs on sports fields. For the repair and operation of concrete and cement-sand bases outside buildings, or inside unheated premises (garages, basements, basements, industrial and domestic premises), only cement-based leveling mixtures are suitable. Such mixtures are resistant to moisture and temperature changes.
For the convenience of readers, we have analyzed and rated such materials taking into account their cost and strength characteristics, as well as the manufacturer’s recommendations. To our surprise, there were not as many self-leveling floors made with pure cement binder, without the addition of gypsum, as expected.
So, below is a list of high-strength self-leveling floors with a cement binder for outdoor use; I would like to note that among them there are also new products that have not previously been presented on the market of dry construction mixtures:
2.
PERFEKTA Hardlayer
– high-strength self-leveling cement floor. Designed for high-quality finishing leveling of floors used under conditions of moderate and medium loads (residential, office, administrative, commercial and public, domestic premises, “wet areas”), before installing finishing coatings, it is recommended for installing sports surfaces, coatings with rubber crumbs. For interior and exterior use.
Before purchasing, we need to clearly define for ourselves what result we want to see in the end and what loads the coating will be subjected to in the future. So, if only foot traffic is planned, followed by laying any floor coverings, then you can get by with materials with a compressive strength of up to 20 MPa.
If we plan on active use of the site, including loads from passenger cars or heavy equipment, as well as the use of polymer and paint coatings, then we should choose mixtures with a compressive strength after 28 days of at least 25 MPa.
However, no matter what material we choose, we must strictly follow the instructions for preparing the mixture, as well as the conditions for applying and operating the coating. Particular attention should be paid to the fact that not all mixtures are suitable for use without a final protective coating (be it paint, tiles, rolled materials). The mechanical strength and durability of the finished floor depends on all these nuances.
Source
Options for materials used
Before waterproofing a self-leveling floor, it is worth understanding the types of materials used for this.
Film
This is the simplest option, and also the cheapest. In this case, thick polyethylene film is used. It is laid with a margin (overlapping the walls) by 10-15 cm. Lay the sheets overlapping on the floor to prevent leaks. In order for the film to adhere well to the base, it is glued with a special compound that improves adhesion. Otherwise, it may come off and crack, which will lead to the waterproofing layer losing its properties.
Waterproofing film
Coating
Polymer (liquid) coating waterproofing is a convenient solution that will help qualitatively protect the base. The mixture is sold in dry form; it is dissolved with water in accordance with the instructions until the required consistency is obtained. Then the mixture is allowed to sit for several minutes, during which time the chemical additives have time to become active.
This waterproofing is applied in 1-3 layers, depending on the tasks assigned to it:
- 1 layer has a thickness of 1 to 2 mm. However, the possibility of leakage remains.
- 2 layers – 2-3 mm. Can withstand occasional or continuous contact with water, but should not be under pressure.
- 3 layers – 3-5 mm. Withstands constant contact with water.
Particular attention is paid to joints and corners; it is recommended to start processing from them. To prevent leakage, these areas are reinforced with tape, which is embedded in a layer of putty. The areas on top of the tape are additionally coated.
Apply the composition with a brush, spatula, or roller. In this case, the movements must go in one direction.
If the coating is applied in several layers, then each layer is allowed to dry for at least 24 hours. The next one is applied perpendicular to the previous one.
Important! The insulation must not be allowed to dry out too quickly; to do this, it is sprayed with water or covered with film for several days.
After complete hardening, the waterproofing layer is checked for leaks. To protect it from mechanical damage, a layer of concrete screed is poured on top.
Coating waterproofing in the bathroom
Pasting with roll insulation
This option is easy to implement; the essence of such insulation is to overlap the roll material and insulate the joints. The edges of the insulator need to be placed 10-15 cm on the walls. Before laying, the rolls are checked for defects.
Rolled waterproofing insulators have an adhesive strip along the edges, with which they are firmly connected to each other.
Self-leveling floor and low temperatures
Floors for lazy people - what is the easiest to maintain?
Some materials are more capricious to the effects of liquids and special materials.
What is Janka Hardness Test?
Buyers will be sincerely surprised when choosing hardwood parquet.
How the Graduate Oxford Hotel made parquet a central design element
Architects and interior designers working with the Graduate Oxf Hotel.
French herringbone versus English. Choosing a parquet pattern
The base for the tiles is important
But the beauty and durability of a tile floor largely depends on the base. An uneven surface of the subfloor will prevent an inexperienced craftsman from laying out the surface of the tiles perfectly horizontally, and this will affect the uniform thickness of the tile joints and the correct arrangement of the rows. Visually, such a floor will be far from perfect (read: “Leveling a floor under tiles: how to do it yourself”).
The strength of the base also affects the quality of the cladding - a loose base surface will cause the tile, as builders say, to “swell”, but simply it will begin to lag behind the surface and eventually crack from a small load, for example, under someone’s foot.
Polina Yavorskaya
The strength of the floor is the main indicator of its long-term operation. In Russia, low winter temperatures create a constant risk factor when installing floors on the outside of buildings and structures.
Extreme operating conditions in winter force manufacturers to solve the problem by creating especially durable frost-resistant coatings. A modern, sought-after solution is self-leveling floors with the necessary characteristics.
Liquid insulation
A very modern and in demand today method of waterproofing a floor, which is based on the use of liquid solutions, followed by their application by one of two methods - cast or impregnated.
Now this method is very popular and in demand.
If in the first case the mixture is heated to 140 degrees and evenly poured over the floor surface, followed by leveling with a spatula, then the impregnation technique requires the use of a sprayer that creates a layer of liquid polymer primers on its base. After hardening, they form a reliable waterproof surface. It is possible to apply several layers, with them alternately reinforced with a metal mesh, which prevents spreading or deformation of the solution, which could compromise the integrity of the self-leveling floor.
Another type of liquid floor waterproofing method is the use of film-forming compounds, which are applied using painting tools or the same spatulas. A serious advantage of the technology is the speed of its hardening, which is only two days from the moment the work is completed.
With this method, the layer hardens very quickly
Performance properties of frost-resistant self-leveling floor
Self-leveling floor technology involves the use of ready-made mixtures with high plastic and strength properties.
Frost-resistant self-leveling flooring for outdoor use has special properties that allow the coating to withstand low temperatures and other adverse environmental factors without damage, while maintaining its original quality and appearance.
A high-quality frost-resistant outdoor self-leveling floor can easily withstand numerous freeze-thaw cycles without deformation, loss of performance or visual appeal.
The materials contain special components that maintain the strength of the coating in the most unfavorable weather conditions. Snow, rain, and temperature changes will not affect the strength and integrity of the coating in any way.
General provisions
- This does not depend on the selected type of waterproofing; its layer must be continuous in order to completely eliminate the possibility of water penetrating into the base.
- At the junctions with walls or other vertical surfaces, the insulating layer should cover them vertically upward by approximately 10–15 centimeters.
- If there is no doubt about the quality of the base, then waterproofing the floor is done using electrical tape: it covers the joints of the slabs and covers them with a layer of mortar.
- In order to protect yourself from the seepage of the finished mixture into the junction areas next to the walls, a specialized impermeable tape is laid along the entire perimeter of the room, which is attached to the wall using a construction stapler.
In general, if floor leveling is being carried out, it is recommended to install it in advance, then you will not need to use such a film when installing the final coating.
Scope of application of self-leveling frost-resistant coating
The main task of a self-leveling floor is to provide a smooth, durable and dust-free floor covering without potholes or changes in height.
When it comes to the external arrangement of buildings, we have to take into account extreme weather factors or specific operating conditions of the premises. For example, self-leveling floors for cold storage plants must initially be resistant to low temperatures due to the special purpose of the workshops.
Most often, a layer of frost-resistant composition is applied to a standard concrete base, providing protective functions and an attractive appearance.
A special self-leveling floor in winter is required for the installation of:
In residential construction, this type of flooring is in demand when arranging a terrace, gazebo, home parking, area near a cottage or house.
Why is it not recommended to fill the screed in parts?
Screed - created from cement-sand mortar, which is poured in several layers onto the floor.
The flooring is laid on top of this material. The product can be purchased ready-made or you can make the solution yourself.
Important! The advantage of the factory mixture is that it contains special components that accelerate the hardening rate and increase the elasticity of the composition, thus simplifying the application and leveling of the concrete base.
The screed should be poured immediately, the entire surface at the same time. Why you can’t apply the material in parts will be discussed in this article.
Types of self-leveling floors for outdoors
Frost-resistant self-leveling flooring includes special fillers that provide the desired effect at any layer thickness: from 0.3 cm to 10 cm. Mixtures for street coverings include different polymers.
Polyurethane flooring has the highest wear resistance.
In addition to resistance to low-temperature environments, they are resistant to chemicals.
Metal acrylic flooring is environmentally friendly, durable, and beautiful.
Even a fairly thin frost-resistant protective layer (no more than 0.5 cm) can withstand multi-ton loads without deformation.
Acrylic-cement flooring copes well with humidity and temperature changes.
The material retains its original qualities at ultra-low temperatures, which can reach 60 degrees below zero. The unique properties of frost-resistant self-leveling floors guarantee long-term flawless operation and safety for human health.
Still have questions? Write about them in the comments!
Source
Film membranes
Diffuse membranes, perforated on one or both sides, are designed for hydro- and vapor barrier of the room and promote proper air circulation. Multilayer membranes contain an anti-condensation layer in their structure, which is capable of retaining and gradually evaporating excess moisture. The universal vapor barrier membrane Izospan protects insulated structures from moisture evaporation, prevents the accumulation of condensate, and protects metal elements from corrosion.
Example of vertical laying of a film membrane
The “intelligent” film membrane Izover is capable of reacting differently to the influx of moisture in winter and summer. In winter, with the help of the Izover membrane, excellent vapor barrier and absence of condensation are obtained, and in summer the membrane becomes vapor-permeable, the membrane micropores of the membranes increase, and moisture evaporates at an accelerated pace. Thus, at any time of the year, a healthy microclimate is created in the room, since the spread of mold stains and the penetration of extraneous unpleasant odors, for example, from the basement, are excluded. Variable vapor permeability reduces the possibility of walls freezing in cold weather and allows you to do without repairing the floor covering for a long time.
Important! Bitumen-polymer membranes with an adhesive base, which have heat-resistant properties and are inert to aggressive chemicals, are in great demand. They are much stronger than thick polyethylene film and are not susceptible to tearing when pulled.
A film made of foamed polyethylene with a thickness of up to 10 mm, which is not only a waterproofing, but also a heat-saving material, has proven itself to be excellent. The porous structure of the film dampens the propagation of sound and impact noise, thereby increasing the soundproofing parameters of the floor covering. The connection of strips of film made of foamed polyethylene can only be done end-to-end, and not overlapping, so that unevenness does not form under the final coating.
Which self-leveling floor to choose for outdoor use - available options
Self-leveling floors for interior work have already been appreciated by professionals and home craftsmen. Finely dispersed mixtures are easy to work with and form an even and smooth surface. Now manufacturers have gone further and offer self-leveling floors for outdoor use. Having the advantages of interior mixtures, outdoor floors have increased strength, resistance to temperature changes and wear resistance.
Compositions for outdoor work are relevant for installing floors in unheated rooms (warehouses, garages), on balconies and open terraces, in production workshops, stadiums, for installing yard coverings (about
Preparatory work
Before waterproofing work is carried out, the subfloor should be properly prepared. It is important that it is perfectly smooth and clean, well dried. Leveling, if necessary, is carried out using a self-leveling mixture, and only after it has dried, the rest of the work is carried out.
The subfloor is cleaned of debris and dust, it is advisable to even wash it. However, if there are any defects on the floor - cracks, potholes - then they are first sealed with sealant or cement plaster. It also rounds all the corners somewhat.
Preparing the base for self-leveling floor
Cement-based mixtures
Floors in which cement is the binding component have strength, good setting speed, ductility, and relatively low cost (for more details: “How to make a cement-based self-leveling floor with your own hands”). In addition, they have all the advantages of self-leveling floors: they do not form cracks on the surface after drying, and are convenient for DIY and industrial installation.
They can be used as a finishing coating to create a smooth surface, or for leveling with subsequent tiling. The self-leveling floor for external use is frost-resistant, its range of applications is very wide: from the floor in the garage to the courtyard or parking lot.
The most famous brands of self-leveling floors of this type:
To improve the performance characteristics of the surface, manufacturers offer a hardening coating - topping. The mixture is rubbed into a fresh screed, giving the top layer increased wear resistance, impact resistance, and resistance to temperature fluctuations. In addition to cement, the topping contains dyes, plasticizers, and additives to increase strength. The consumption of such mixtures is 3 – 9 kg per 1 m of surface.
The disadvantage is poor resistance to chemical reagents, the presence of seams and the difficulty of partial repairs with small surface defects. As a rule, to eliminate a damaged area of topping, it is necessary to dismantle the entire floor area. A representative of this group of street mixtures is Corund ot Solidtop.
In rooms where the reinforcement of the surface layer is not enough, polymer additives are used in concrete. The technology allows you to strengthen the floor to the entire thickness of the screed. The mixture is added to the concrete in a proportion of about a third to the amount of cement and mixed thoroughly. The floor receives increased strength against compression, wear, and exposure to chemical agents. The most famous additives are: “Polyplast 107”, “Elastoconcrete”.
Conditions for using the technology
A self-leveling floor is a quick way to create a perfectly flat surface. The composition sets very quickly, after which you can begin construction or finishing work. Self-leveling material is poured for the following purposes:
- organizing a screed to level the concrete in preparation for the finishing coating. The idea of pouring a thin layer from 2 to 30 mm is a way to eliminate unevenness of the old surface;
- performing a screed when laying waterproofing from roll, film materials on oiled concrete or wood. The layer should be 30-60 mm;
- performing thermal insulation before insulation. Monolithic self-leveling floors rise 30-60 mm above the main surface;
- laying water or electric heated floors. Self-leveling material hides communications. The fill should not be more than 30 mm.
Important! The total surface layer in the latter case is no more than 60 mm. This way less energy is consumed.
Polymer self-leveling floors
The range of polymer-based self-leveling floors is wide and increasing every year. Such floors were created for industrial enterprises with high surface loads and increased requirements for chemical resistance. Having successfully withstood tests under conditions of increased loads, such floors began to be used for outdoor work.
Polymer floors for outdoor use are classified according to their composition:
It is noteworthy that when producing external coverings, manufacturers do not forget the aesthetic component - they are often made in color. It is worth looking at color photos of self-leveling floors to make a clear choice in their favor.
Reasons why you should not fill the screed in parts
- poorly leveled building foundation;
- the floor may not rise to the required level. By pouring the material in parts, the surface may turn out to be lumpy and not level;
- Screed in parts will not create a slope angle if necessary;
- cracks may appear on the surface after drying;
- the floor will not be perfectly flat;
- minor defects and irregularities may remain on the surface;
- The solution can be applied in parts, only room by room. If one room is flooded in stages, once a day, the effect will be the opposite.
Methyl methacrylic floors
The floors can withstand enormous loads, are resistant to acids, prolonged exposure to hot and cold water, and ultraviolet rays. In addition, they are simply beautiful: you can choose the color and surface structure (smooth or rough).
Methyl methacrylic floors have reliable adhesion to any substrate. Hardening and readiness of the floor for use is record-breaking - no more than 2 hours.
The disadvantage is the strong toxic odor of the mixture, so when working with it it is necessary to use protective equipment: a respirator, gloves.
Instructions for creating a screed
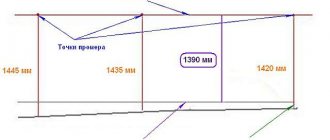
- first you need to find the highest point on the floor and push off from it;
- if the floor is very crooked, you can make beacons. To do this, at the highest point of the floor you need to make a hole using a hammer drill and screw a self-tapping screw into it;
- now you should take the opposite side of the floor covering and make a second beacon;
- between two beacons you need to stretch a fishing line or nylon thread. Thus, 10-15 beacons can be made over the entire surface of the floor, along which it is easier to make a screed;
- Now you need to leave a mark on the wall, usually at a distance of 1.5-2 cm from the floor, and use a laser to transfer the mark to other walls. The floor should be leveled according to these marks;
- After this, you need to dilute the solution and fill the entire floor surface. If the room is large, it should be filled piece by piece, but evenly;
- After the work has been done, the floor should be left to dry;
- After 15-20 hours, use hard sandpaper to walk over the entire surface for perfect leveling and leave the floor to dry for another 7 days.
Important! If the screed is made at 1-2 centimeters, then 3 days will be enough for the floor to dry.
Now you know how to make a rough screed and why you shouldn’t apply it in parts.
Polyurethane compounds
The basis of this type is heterochain two-component polymers. The coating is resistant to abrasion, chemical influences, and waterproof. Polyurethane floors are not demanding on the base - the porous structure, small cracks or unevenness will not interfere with the strong adhesion of the self-leveling floor to the surface.
More often, polyurethane floors are used for interior work; pouring the floor outdoors is allowed, but the area must be protected from precipitation (canopy, roof). Like all self-leveling floors, the polyurethane surface has no seams. Polymerstone-2, Poliplan - representatives of polyurethane compounds.
Waterproofing installation diagram
The first thing you need to do is prepare the base - level it if necessary, repair defects and level differences. The floor may differ in level by no more than 4 mm per 1 m2 of area. If leveling is required, subsequent work is possible only after the screed has completely dried.
If a screed is not required, then the base must be cleaned of layers, dust, dirt, and old paint. The main task is to remove everything that may interfere with the adhesion of the waterproofing to the base.
Waterproofing tape is glued at the junction of the wall and the floor
Next is the primer. By using special primers, it is possible to close pores and small irregularities. This ensures final leveling of the base. The primer provides good adhesion and becomes an additional waterproofing layer.
After these preparatory works, waterproofing is carried out with the selected material and the floors are poured.
Acrylic-cement mixtures
Composition of the self-leveling floor: polyacrylate copolymer, cement, high-strength filler. The coating was created for food industry workshops, so the emphasis was on resistance to chemicals (treatment with disinfectants), mechanical abrasion (transportation of heavy loads), water resistance (frequent washing or spilling of liquids).
The coating was used in refrigerators, so its heat resistance makes it suitable for outdoor use. The list of advantages includes an anti-slip surface - spilled blood, oil, or any other liquid will not make the floor slippery.
Environmental friendliness (the surface, after drying, does not emit harmful substances even in microdoses), lack of peeling (even with a cracked base) allow the floor to be used for surfaces with the highest hygiene requirements. The disadvantage of cement-acrylic compositions is the rather labor-intensive process of their construction. You can find acrylic-cement mixtures of the MONILE brand on sale.
Whatever type of floor is chosen, it will cost more than a simple screed for external use made of sand and cement. However, if the technology for constructing a self-leveling floor is followed, it will last for several decades, maintaining its visual appeal.
Source
General recommendations
- Regardless of which waterproofing material is chosen, its layer must be continuous. If joints form, they are sealed, and the material itself is overlapped.
- To prevent leaks in the most difficult places on the floor - the joints of the wall and floor - a special sealing tape is installed around the entire perimeter. It is attached to the wall using a stapler.
- Rolled materials of any type should extend 10-15 cm onto the wall.
- In exceptional cases, if the quality of the base is high, only waterproofing tape can be applied to the joints of the base slabs.
- The insulation should only be laid on a flat and clean base.
Characteristics of self-leveling rough-type mixtures
What are self-leveling floors for preparatory work?
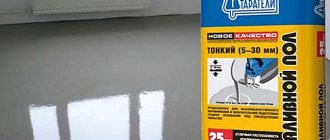
This group includes compositions based on cement, cement-gypsum and gypsum. Scope of application - leveling the base for further finishing with laminate, parquet boards, linoleum, carpet, etc. They are also used to repair the underlying layer and eliminate minor defects on it. Mixes with water to form a highly mobile (liquid) solution that is easily applied and distributed over the floor. After hardening, a strong, even, dry base is obtained that meets the requirements of building regulations.
If you are faced with the question of which mixture to use for outdoor work , listen to the manufacturers' recommendations. - only cement self-leveling floor for the street. The composition is selected in such a way as to form a dense, moisture-resistant coating 6-10 cm thick, withstanding a compressive load of at least 200 kg/cm 2 (20 MPa).
Let us explain why you need to pay attention to this indicator when choosing a mixture. The load factor directly indicates the area of application of the building material. Let's give an example: Bergauf Erste Grund is declared as a self-leveling mass that works up to 8 cm thick. The strength of the finished coating after 28 days is determined by the manufacturer to be 20 MPa. That is, self-leveling flooring from Bergauf is suitable for constructing garden paths, areas for utility and entertainment purposes, and so on. Can be used as a screed for open gazebos, patios, etc.
For parking lots, open garages, campsites, finishing areas near residential, industrial and public buildings, Bergauf Boden Street is better suited, the compressive strength coefficient of which starts from 30 MPa, and the permissible layer thickness is from 6 to 70 mm.
Advice! All manufacturers of bulk mixtures for industrial use strongly recommend using a final protective coating for streets after curing (topping, polymer mastics, etc.).
Another important factor is frost resistance, designated by the letter F. The number of freezing-defrosting cycles that the canvas will withstand when completely immersed in water is always indicated next to it.
This characteristic largely depends on the type and amount of modifying additives used. Of course, the more expensive the mixture, the better the components used. So, for Osnovit Nipline T42 the declared coefficient is F50, and for Ceresit CN178 – F100. If you are not sure whether the purchased mixture can be used outdoors, and the degree of frost resistance of the material is not indicated on the packaging, check it yourself. The test is very simple:
Pieces of self-leveling floor are tested for water permeability.
A rough self-leveling floor on the street can also be formed from dry polymer-cement mixtures. Their difference from analogues is that a small percentage (from 5 to 15%) of the binder is replaced by synthetic water-soluble elastomers, which interact well with the cement “dough”.
The so-called polymer-cement stone is characterized by excellent adhesion to most substrates, low water permeability, chemical resistance, increased ductility and, most importantly, exceptional strength.
This type of mixture is used for finishing floors at industrial facilities, forming tanks for water and oil products, airfield runways, parking lots for large-capacity vehicles, etc. It is practically not used at home or for small jobs. Firstly, there is no need, since there are many suitable products in small and medium packaging. Secondly, it is very expensive. For example, floor leveling compound Remmers Multiplan 25 kg costs from 4,200 rubles/bag. And since it is used in combination with a primer costing more than 3,000 rubles. and a polymer coating with a price tag of 10,000 rubles, it becomes obvious that the floor finish for a private owner will come out just golden.
Let's summarize the above. Self-leveling floors marked “for outdoor use” are mixtures exclusively based on cement. The advantages:
Technology for pouring rough self-leveling floors on the street
Terrace in front of the house made of self-leveling floor.
Private parking lots, garden paths, sports and entertainment grounds, areas around buildings, commercial parking lots - the foundation of any object is formed according to the following scheme:
Step 1. Preparing the base
The construction of a self-leveling floor for external use differs significantly from the classical process. First of all, this is directly related to the base. Its temperature must be no lower than +5 ºС, and the humidity must comply with SP 29.13330.2011. The latter indicator is checked with a contact or non-contact moisture meter. The grade strength of the surface, according to the standards, is set in the range of M150 and above.
Recommended conditions: temperature from +5 to +30 ºС, relative air humidity – from 40 to 80%.
The base screed or concrete slab must be cleaned of dirt, dust, adhesive, oil and paint contaminants. That is, everything that can interfere with the adhesion of materials must be removed.
Grinding the concrete base.
Irregularities, protrusions, and weak areas are sanded with an emery belt, or even better, with a mosaic sander. Cracks and potholes are opened and filled with quick-drying compounds. The resulting dust and small debris is removed with a powerful construction vacuum cleaner. Next, the surface is treated with a deep penetration primer in 2-3 layers. All this work should be carried out a day before pouring.
Important! Priming is a mandatory process. If you skip this step, there is a high probability that the spreadability of the solution will worsen, and cracks and weak areas will form during the hardening period.
Natural or bulk soils (including weak ones) must be thoroughly compacted with a vibrating rammer or an artificial embankment must be created from crushed stone, gravel, or sand. The thickness of the underlying layer is calculated based on the expected loads according to the above sanitary rules. If there is a possibility of capillary rise of water (capillary suction), the base must be protected with cement waterproofing compounds (Bergauf Hydrostop, Penetron) or with a separating layer (polyethylene film, geotextile).
To limit the pouring area, wooden formwork can be installed around the perimeter.
Step 2. Preparation of the solution
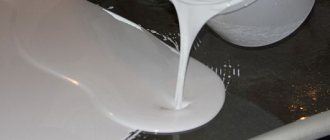
All tools and containers must be clean. Pour water at a temperature of +10 to +20°C into a bucket in a pre-calculated amount (see instructions for the bulk mixture). Observe the proportions strictly, since excess leads to delamination and cracking, and deficiency leads to a decrease in strength.
Next, you need to add the dry component and mix thoroughly with a construction mixer or drill with an attachment at a speed of approximately 400-600 rpm. The solution should be homogeneous, without lumps. Wait a few minutes and stir again. The mixture is ready and should be processed within 30-40 minutes.
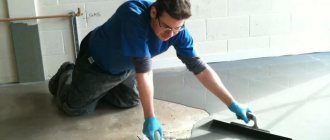
Step 3. Formation of self-leveling floor
Carefully pour the solution, spread it with a spatula and level the squeegee with the extension handle. In the first 4-5 days after pouring, drafts and direct sunlight are contraindicated for the new floor, so the surface must be rolled with a needle roller to remove bubbles and covered with film or an awning (after the floor has set).
Cutting shrink seams.
Installation of roll waterproofing
Self-adhesive bitumen-polymer material is an excellent alternative to cement mixture. Working with him is faster and more pleasant.
Step 1. The base surface is prepared for work. It is thoroughly cleaned of debris.
The foundation is being prepared
Step 2. A bitumen-emulsion primer is applied to the surface. This will be the primer layer. Drying time is about 30 minutes. Apply the substance with a brush or roller to the walls (10 cm from the floor) and the floor along the wall, and then to the entire remaining surface of the floor. All corners are coated well.
Application of bitumen emulsion primer
Advice! You can check whether the primer has dried or not with a cotton swab - blot the surface with it, and if there are no traces of bitumen on it, then you can continue working.
Step 3. The rolled material is rolled out on the floor surface with the adhesive (but now protected) side down. A piece of the required length is cut off. The material is given time to rest for a while, after which the roll is twisted on both sides towards each other.
Rolling out a roll of waterproofing
The material has rested and is curled on both sides
Step 4. The anti-adhesive film on the surface of the roll is cut in its central part.
The anti-adhesive film is cut
Step 5. The film is carefully pulled towards itself - this is how the material is rolled out.
The film must be carefully pulled towards you
Step 6. To remove all bubbles, the material is treated with a special roller or brush.
Removing air
Step 7. The next piece of material is glued overlapping the previous one (at least 10 cm, end overlap - at least 15 cm). The overlap area is additionally treated with bitumen mastic or primer.
The pieces are laid with overlap
The overlap area is treated with a primer
Step 8. The walls are waterproofed. The height of laying the material is at least 20 cm. The material is cut into pieces of the required size - 30 cm. In this case, 10 of them will be laid on the floor, and 20 will be placed on the walls.
Cutting waterproofing material
Step 9. The blanks are bent along the transition line, and the protective film is cut along it.
The protective film is cut
Step 10. The material is laid on a vertical and then on a horizontal surface. The horizontal overlap area is coated with primer.
Laying the material
Step 11. The material is also processed with a roller.
Processing with a small roller
Features of self-leveling floors for finishing
Self-leveling finishing mixtures: characteristics and types
Polyurethane self-leveling floor for outdoor use.
This category includes thin-layer, highly mobile polymer-based compounds. After curing, a seamless coating with increased strength properties is formed. They are used at the final stage to protect the surface from abrasive loads, strengthen and remove dust from concrete. They are often used to create an anti-slip floor with a beautiful decorative effect. In demand in garages, parking lots, terraces, home areas, etc.
Self-leveling finishing floors are one- or two-component compounds. In the first case, polymerization occurs as a result of the elastomer binding moisture from the air. In the second, the process begins by mixing the hardener (activator) with the base. There are mixtures:
The first two types are most widespread, since the rest are used mainly at large industrial facilities.
Epoxy self-leveling floor for outdoor use.
According to experts, polyurethane-based compounds are more elastic and cover small cracks and minor defects in the base well. Recommended for areas completely or partially protected from direct sunlight, as the coating turns yellow over time under their influence. Used for covered verandas, balconies, street cafes, exhibition facilities, etc.
Epoxy compounds create a very abrasion-resistant film, so they are well suited for parking lots, home areas with a high level of foot traffic, roadways, entertainment complexes, etc. The surface is partially repairable.
A coating based on epoxy resins can be used without a protective canopy, since neither heat nor rain and snow are harmful to such a floor. Many formulations contain UV protective additives, so they “hold” the color for a long time.
The difference between mixtures for interior and exterior use is frost resistance. To prevent the finished coating from cracking due to temperature changes, modifying additives are added to the compounds to provide the necessary elasticity to the coatings.
Polymer compositions are convenient because they can be applied to almost any material of mineral, cement or organic type: concrete, brick, stone, asphalt, slate, metal, wood and others. Some compounds work even on such capricious surfaces as marble and polished ceramic tiles. After application, the compound seals and strengthens the base and removes dust. Monolithic coating is very easy to keep clean, but difficult to damage. Minimum service life is 10 years or more.
Selection of materials and technology
In order to carry out waterproofing work before installing the self-leveling floor, it is necessary to purchase certain materials and tools. The set will differ depending on the chosen method of moisture protection.
Needle roller
In general, you may need:
- brushes and spatulas for applying compositions;
- construction mixer;
- needle roller;
- the waterproofing material itself - building mixture, roll of waterproofing, etc.;
- a primer that is applied to the subfloor for better adhesion between it and the waterproofing layer;
- primer – water emulsion prepared from bitumen;
- waterproofing tape.
Example of coating waterproofing
You should choose the method by which floor waterproofing will be carried out at the stage of developing a floor design project. It is important to consider how exposed the room is to water, whether the base is resistant to cracks, what temperature effects the floors will be exposed to, etc. An important aspect is the budget for the entire renovation.
In apartments, you can make bitumen-polymer insulation, use bitumen plaster, and paint with polymer substances. Any roll insulation will do; you can also use cement-based insulation if your budget allows.
Bitumen-polymer mastic
primer bitumen technoNIKOL
Preliminary preparation of the subfloor
Before pouring self-leveling floors, prepare the base for the floor step by step:
- Work begins by removing the old flooring along with the baseboards.
- Clean the surface from oil stains and dust.
- The coating that peels off is completely removed.
- Cracks and potholes are sealed with mortar. This is done at least a day before the start of work on the floor.
Before creating a self-leveling floor covering, tools and equipment are selected.
A young competitor to the classic screed
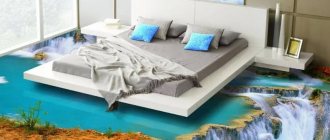
That’s why a relatively new material, self-leveling flooring, is becoming increasingly relevant in today’s market. Having a liquid consistency, such a floor perfectly fills all the depressions and mounds, forming with its upper surface an absolutely flat horizontal plane.
Advantages of self-leveling floor as a base for tiles:
- Strength - the composition of the mixtures is designed so that self-leveling floors can withstand heavy loads.
- Versatility - any surface is suitable for leveling. Wood, concrete, old tiles are poured if dismantling is not possible and the base is not loose or crumbling. Therefore, whether it is possible to fill a self-leveling floor with a second layer is not a question - it is possible. The main thing is to ensure adhesion to the base using a special primer or to provide a slight surface roughness mechanically.
- Hardening speed - the next day after pouring, the floor can be walked on.
- Convenience and ease of use - you don’t need any special skills to get a perfectly flat horizon.
- Possibility of filling in a small layer . The mixture, unlike cement-sand screed, retains its strength characteristics with a minimum layer thickness (up to 0.3 - 0.5 mm).
Tools
To create a self-leveling floor, the following tools are required:
- Containers for stirring mixtures, water;
- Construction mixer, electric drill with attachment;
- Putty knife;
- Raklya;
Roller, paint shoes
- Needle roller to remove air from the solution;
- Special shoes with spikes for walking on mortar;
- Typically, building level;
- Electronic humidity meter;
- Primer roller.
After preparing the tools, materials, and base for work, the pouring of the self-leveling floor begins.