An electric boiler is an effective solution to the problem of hot water supply for a private home. Such equipment, however, like any other, periodically breaks down.
If you wish, you can repair the water heater yourself, provided that the breakdown is simple. But serious damage will have to be repaired at a service center.
In this article, we will analyze common types of breakdowns and provide recommendations for eliminating them, which will allow any more or less experienced technician to cope with the repair.
What to do first
If the unit leaks, it should be immediately disconnected from the electrical network, and then a visual inspection of the entire device should be carried out to determine the location of the leak. If leakage occurs from the side or top of the device, this indicates the formation of a hole in the body.
Important! The appearance of water stains indicates internal problems with the product that require urgent intervention, otherwise, in the worst case, you will have to purchase a new device.
Regardless of the cause of the leak, you should dismantle the device : drain the liquid, remove it from the fasteners, disassemble it according to the instructions to determine the cause of the breakdown.
What tools will you need?
You can dismantle the equipment using the following tools:
- an adjustable wrench of the appropriate size to remove the large nut;
- specialized multimeter, tester;
- screwdriver;
- knife;
- set of tubular keys;
- rubber tube to drain water during the working process.
Mixer dirty
The liquid will flow in a weak stream if the mixer spout
a traffic jam has formed. The pressure will be equally bad for both cold and hot water. To fix the problem, it is necessary to carry out a number of procedures.
- Close the riser to turn off the water.
- Carefully remove the mixer.
- Unscrew the spout from the general body.
- Remove the mesh and rinse it under running water. If salt deposits or heavy dirt forms, let it soak in a special cleaning solution.
- Rinse the faucet spout thoroughly and clean the insides of dirt using a brush.
- Reassemble the mixer in reverse order and install it in place. Don't forget to open the riser.
This procedure may take some time; alternatively, you can simply replace the clogged faucet with a new one. Experts recommend replacing worn parts every few years to avoid serious damage in the future.
The main causes of leaks and methods for eliminating them
In the process of leaking the device, it is first necessary to establish the source of the negative factor. They can differ significantly in characteristics, so they can be identified quickly and without professional skills. It is best to study the water heater according to the instructions included with the unit. Most models have a warranty card designed for such situations. To avoid aggravating the problem, the device must not be opened.
Hull deformation
The outer shell of the equipment may become deformed after installation. The cause of the unfavorable behavior of the device is considered to be incorrect installation of the unit. Often the consumer forgets to connect the safety valve. The product is located on the main liquid supply between the shut-off valve and the valve element. This part is designed to protect the tank from overfilling; it is during this process that deformation occurs.
If the valve is installed, but water also flows through the supply pipe, this fuse should be removed and a new one installed. Repairs will not take much time and do not require professional knowledge of the device.
Another reason for deformation is the use of low-quality pipes during installation. Powerful hydraulic shock with pressure changes slowly destroys the structure of the product.
Healthy! If the body is deformed, the boiler cannot be repaired; it must be replaced with a new model, while observing the correct connection technology.
Manufacturing defects
The leakage may be from the top of the housing; if in this situation there are no visual deformations of the unit, and the magnesium rod was mounted during connection, then a manufacturing defect of the equipment is possible. During warranty service, it can be returned back to the supplier.
Modern models are designed with designs in which the tank cannot be repaired. The container cannot be welded, because during the welding process, a layer of enamel breaks off, after which corrosion forms, spreading over the entire surface of the device.
Spent heating element
Poor installation of the device
Another reason that occurs quite often is a loose connection to the cold water inlet and hot water outlet pipes. Such signs may appear when installing the device yourself, when low-quality fittings or incorrect materials for seals are used.
Gasket wear
A leak in the inspection hole located in the plastic cover at the bottom of the equipment indicates a loss of elasticity of the rubber gasket on the flange. An accurate determination of this cause can be carried out after turning off the equipment: the lower cap is removed and the problem area is visually examined.
Replacement of the sealing gasket must be carried out strictly in accordance with the boiler model number, so that the product fits tightly to the working parts.
Can a leaking tank be fixed?
In most cases, incorrect installation leads to disastrous results, due to which the boiler cannot be repaired. This is due to the following factors:
- Modern devices have an internal coating made of glass enamel. Such surfaces, when interacting with welding electrodes, are quickly destroyed, and it is completely impossible to restore them;
- There are models with an internal surface made of stainless metal or plastic. Such copies cannot even be checked, so all attempts at dismantling will be a waste of time;
- A water heater with a tank is a single structure that cannot be disassembled without mechanical damage to the shell, leading to corrosion.
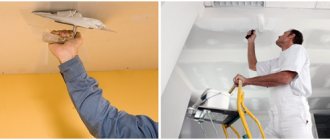
Removing the Housing Cover
Inexpensive heaters without adjustment devices usually have two screws on the bottom cover of the housing. They need to be twisted with a Phillips screwdriver and the cover removed. If the cover is too tight, you can pry it off with flat-head screwdrivers.
A special place is occupied by models with oval flanges. They are dismantled directly on the wall; it is not advisable to turn them upside down with the fittings. Near the fittings (they are marked in blue and red) there are two bolts, unscrewing which you can remove the cover.
On some models it is not immediately possible to immediately find the screws to remove the cover. They are hidden under stickers. After removing the stickers, you can unscrew the housing cover. Sometimes, before removing the cover, you need to remove the plastic shields and plugs from the screws.
Preventing the life of the boiler
You can extend the service life of the device and ensure proper maintenance of the equipment by following the following recommendations:
- the internal water pressure must be below 3 atmospheres, otherwise a reduction reducer should be installed, which will be placed between the supply pipe and the inlet branch of the device. The optimal gearbox setting corresponds to 2 atmospheres;
- The tank located inside and the heating element must be cleaned frequently to remove scale and salt deposits. This will increase the service life of the unit;
There are many reasons that influence the leakage of the device, however, if any of them occurs, you should immediately disconnect the device from the electrical network, and then carry out a visual inspection. Without accurately determining the cause of the problem, it is prohibited to open the equipment so as not to aggravate the situation, which could get out of control.
Only compliance with the rules of use and proper maintenance of the water heater will help extend its service life. If problems arise with self-inspection of the unit, you should seek the help of professional specialists. They will quickly determine the cause of the failure and notify you about the possibility of repairing the boiler.
When your water heater leaks, you need to find the source of the problem as quickly as possible and fix it. If this is not done, the consequences can be the most unpredictable, and you will have to spend a lot of nerves and money to eliminate them. A faulty boiler can cause flooding not only of your own apartment, but also of your neighbors’ homes if you live in a multi-story building. There is also a risk of electric shock.
One of the most common breakdowns of devices is water leaking out of their top or bottom, which makes it impossible to operate the equipment normally. You need to look for why the boiler is leaking after it has been disconnected from the network and the water supply has been shut off.
Dirty and foul-smelling water from the heater
If, when you turn on the hot water, something similar to kvass flows out of the tap, having a characteristic swamp smell, then it’s time to clean the heater. This situation occurs when sediment accumulates inside a closed tank and flows through the pipes. Visually this may not be noticeable, but debris tends to accumulate and settle not only on the heating element, but also on the walls of the boiler.
The problem should be solved in two stages:
- Place a filter at the cold water inlet: it will trap debris and dirt, as well as bacteria that can live in a closed tank system. The water will become much cleaner, and preventative cleaning of the boiler will be needed less often.
- Clean the boiler: you can pour special disinfectant solutions through the supply tube, then drain the contents into a bucket. There are a lot of special products to clean your boiler.
The cleaning procedure will not cause any particular difficulties. The sequence of actions depends on the chosen tool:
| Name | Quantity | Sequencing |
| Lemon acid | 20 g of powder for every liter of water | Mix the required amount of citric acid with 2 liters of water, then introduce the solution through the water supply hose. Plug in and set the maximum values on the relay. Let it boil for 3-4 hours, then open the hot water tap and completely drain the water from the boiler. |
| Vinegar essence | 10 ml for every liter of water | Vinegar should be introduced into the boiler through a hose, and then connect the hose to the pipeline. Set to maximum temperature and drain completely after 4 hours |
| Acidic solvents for cleaning boilers | Please refer to the instructions for proportions. | The product is poured into the boiler and left for 1-2 hours, after which the water is completely drained |
The most common causes of leakage
There are several reasons why a boiler leaks. The ability to make repairs yourself depends on how quickly and correctly they are identified.
Deformation of the outer shell
This problem can arise if the rules for installing the boiler are violated, and not through the fault of the manufacturer. Dripping water on the outer shell of a water heating device can be noticed almost immediately after its installation. The whole point is that there is no safety valve or it is broken.
Even after the use of the water heater has been stopped and the water supply has been turned off, hot water still remains in it.
When water cools, its volume decreases and the tank of the device contracts. After all the liquid has been drained from the system, a vacuum occurs inside the tank. If at this time the safety valve is broken or missing, the container will become deformed. Further, when the boiler is filled and turned on, the water expands, heating up, and the pressure increases, which leads to expansion of the tank. Such malfunctions explain why the boiler is dripping.
Storage tank leaking
If liquid flows through the liner, it is the storage tank that is leaking. This problem may arise due to gross violations of installation or connection rules. When connecting a water heating device, it is highly undesirable to use plastic pipes. If pipes of this type are nevertheless used because they look more attractive, the hydraulic shock will be transmitted to the tank, which will gradually destroy it.
Heating element leaking
Not all models have a special hole through which water flows when the heating element begins to leak. You need to check its availability when purchasing a boiler.
Safety valve leaking
This boiler element is a small tap with a hole in it. The problem can be easily fixed by replacing the part with a new one.
Storage tank lid leaking
If such a problem is observed, it may be a leaking heating element, which can be caused by the accumulation of a large amount of scale.
After replacing the heating element, the problem will be resolved.
Leakage from under the heating element seal or under its bolts
If water flows from under the seal, you just need to slightly tighten the nuts that secure it. In the second case, the heating element needs to be replaced.
Supply channels are not tightly connected
This is the most common reason why a boiler leaks. It is not difficult to fix, you just need to check all connections.
Inlet connections
Leakage at the top without visual damage
If leakage appears in the upper part of the water heater, and no deformations were detected during visual inspection, installation and connection were performed correctly, the magnesium rod was checked and replaced, it is better to return such a device to the store before the warranty period expires. A leak can only be repaired if the tank is made of stainless steel.
The magnesium rod must be changed periodically. If this is not done, the surface of the device will become unusable after some time, and you will have to buy a new device.
Lack of preventive maintenance
Too hard water or the presence of a large amount of impurities in it affects the quality of the boiler. During its operation, it is necessary to periodically carry out preventive maintenance, cleaning from contamination and replacing worn out elements.
Diagnostics
What to do if an electrical appliance that was working yesterday shows no signs of life?
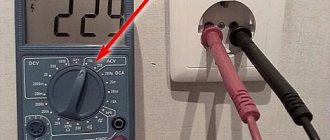
First of all, you need to check the input electrical circuits.
- sounds trivial - but look to see if the electricity in the house is turned off (after turning on the boiler);
- we check the circuit breaker on the line to which the water heater is connected;
- in 90% of cases (especially if you have an instantaneous water heater), the connection is made through an RCD: we also check this circuit breaker;
- We look at what temperature the thermostat is set to (sometimes in a hurry the user forgets to set the required mode);
- inspect the plug and socket of the storage water heater (under high loads, the contacts may “burn out”).
If there are no external causes or have been eliminated (you turned on the machine, etc.), and the water heater still does not work, we will deal with the electrical appliance. Of course, you can call a specialist or take the equipment to a workshop. However, this will incur additional costs. Despite the apparent complexity of the design, repairing a water heater with your own hands is possible, even in the absence of special equipment. You will need a set of wrenches, a good screwdriver, pliers and a multimeter, and you may need a soldering iron. If you have one and you know how to use it, your chances of repairing the boiler yourself are significantly greater.
There are no fundamental differences in the design of electric heaters. The Polaris water heater has the same heating element and control element as Ariston. Moreover, many brands are united by large corporations (costs of globalization), so the design of household appliances can be absolutely the same. The only exceptions are little-known Chinese brands, or Japanese models imported unofficially. They contain design solutions that cannot be found on the Thermex or Electrolux water heater.
Although the repair of such electrical appliances follows a general logic, it would still be better to find branded electrical circuits.
Is it possible to fix a leaking boiler?
Once the reason why the water heater is leaking has been accurately determined, you need to choose the optimal solution to fix the problem. When starting to find the cause of the breakdown, you need to prepare the tools that may be needed in the process:
- water drainage hoses;
- screwdriver, adjustable, tubular and socket wrenches;
- multimeter
The design of a boiler is not as simple as it seems at first glance. If you do not have certain skills, if you detect a water heater leak, it is better to seek help from specialists.
The first thing to do if a leak is noticed is to disconnect the device from the power supply and drain all the water so that the tank is empty. Only after this can we begin an examination to determine the cause. Depending on what caused the leak, next steps will be determined. In some cases, you can solve the problem with simple repairs, in others, you will need to replace the boiler with a new one. It's better to do this before the warranty period expires.
So, due to the leakage of the device, in particular the tank, as evidenced by the appearance of water leaks from the joints of the pipes, it is impossible to repair it, so replacement is required.
Leakage from above, if all maintenance rules were followed and the magnesium rod was changed in a timely manner, also requires replacement of the boiler, because repair is impossible. Replacing the boiler will also be required in cases where the magnesium rod has not been changed for a long time, which has led to rotting of the tank (if the inner surface is without enamel).
Alteration of the water supply system is also necessary in cases where the rules for connecting the boiler to it are violated, especially when using plastic pipes and the absence of a special safety valve.
The boiler tank is working properly when only the valve itself is leaking.
To eliminate a leak in the tank cap of a water heater, in most cases it is necessary to replace the heater.
If the tank itself is leaking, it is almost impossible to repair it, because the boiler is a monolithic structure, the inside of which is covered with enamel. If the enamel inside the water heater is damaged, it can no longer be repaired. In this case, you will need to buy a new boiler.
Conclusions and useful video on the topic
A detailed video on diagnosing the condition, maintenance and self-repair of household water heaters can be viewed here:
Repairing a water heater is not so difficult if we are talking about replacing some of its elements. In the event of a serious breakdown, it would be wiser to contact a specialized service center. Proper operation of the device and its timely maintenance will save you from many problems and expenses.
Have you been repairing water heaters for a long time and want to supplement our material with useful tips and professional secrets for eliminating various types of breakdowns? Or is this the first time you’ve encountered a malfunction and can’t find its cause? Write your comments, ask questions, share your opinion below the article.
Tips for extending service life
For the longest service life of the water heater without breakdowns, it is important to follow the manufacturer’s recommendations for its installation and use. This applies to any equipment that provides heating or water heating. When installing a boiler, it is important to provide grounding, a magnesium anode, and a safety valve.
- Before installing the device, be sure to check what pressure is in the system. Normal value: up to two atmospheres. If the value is exceeded by more than 3 atmospheres, this pressure must be reduced, for which a reducer is installed in front of the device, which will prevent the temperature from rising.
- The optimal temperature for the boiler is up to 50 °C; it is not recommended to set it above this value.
- Clean it periodically (2-3 times a year); it is important to monitor the condition of the rod.
- It is recommended to connect the device to the water supply system through a special magnesium filter, which is best purchased at the same time as purchasing a water heating device. This will reduce water hardness levels if they are very high or there are a large number of impurities in the water.
If the boiler is leaking, you need to try to determine the cause of this unpleasant phenomenon as quickly as possible and eliminate it. And in order to avoid breakdowns of this kind, you need to follow the operating rules of the water heater, periodically clean it, and replace worn out elements.
Determining our capabilities
If you have never repaired equipment and have never held a screwdriver in your hands, then it is better to naturally turn to a qualified plumber.
But if you can repair the faucet in your apartment or even your own car, then sometimes you can solve this problem yourself. We warn you right away, although the water heater is quite simple in its design, its repair requires special knowledge, both in electrical engineering and in the field of thermal devices. Sometimes there have been cases when a master, having correctly repaired an electric water heater
made a mistake in connecting it to the heating circuit and caused a disruption of the entire system.
What tools will you need if your boiler is leaking?
It's good if you have all this at home. If not, you can buy them; most likely, they will come in handy more than once. But today, even at the house management, you can rent many tools, which is also very convenient.
So, to fix a leak, you need:
- An adjustable wrench (larger than the largest nut in the boiler);
- Set of tubular keys;
- Electronic tester;
- Socket wrenches;
- Rubber hose to drain water from the tank;
- Knife;
- Screwdriver.
Disconnecting from the electrical network
Start of disassembling the Ariston water heater
Before any work involving electrical appliances, you must first de-energize them.
If the water heater is powered by a separate cable from the electric meter, then it is connected through a two-pole circuit breaker and must be turned off.
If the water heater is connected to a regular outlet, you simply need to remove the plug from the outlet.
After this, you can safely begin disassembling the Ariston water heater:
- First, the lid is unscrewed; it is secured with several screws.
- Further, if there is a danger that something could be mixed up during subsequent assembly, it is advisable to photograph the existing position of the parts from several angles.
- The next stage: disconnecting 3 electrical cables, 1 – phase, 2 – neutral, 3 – ground. This is easy to do with a screwdriver. Since we disconnected the first two wires from the thermostat and freed it, we can now pull it out of the tube with a little effort.
- This completes all electrical procedures. You can start draining the water.
Why does the boiler leak from below or from above?
When you see that the boiler is leaking, disconnect it from the network. Then carefully inspect the device - determine the location and possible cause of the leak. If the boiler is leaking from above, then there can only be one reason: a hole has definitely formed in the tank.
Why holes may appear in the tank:
- A manufacturing defect cannot be ruled out;
- The device has been used for a long time, no preventive maintenance or inspections have been carried out;
- The tank does not have a magnesium rod;
- The water coming from the pipeline is not of the highest quality;
- There was no grounding of the heater tank.
Whatever it is, the boiler will have to be repaired. If water flows from under the plastic cover, then the reason is serious - perhaps the boiler is completely broken. If the seal of the tank is broken, water flows out from under the plugs and moves through the water drainage hoses. The water heater needs replacing. Most often, the heating element “flies” - the very element that heats the water. It needs to be constantly descaled, then it will serve for a long time. In a word, everything is like in a washing machine, according to the same principle.
What to do: Thermex water heater is leaking
It all depends, of course, on the boiler model. One or the other has typical causes of leakage. If, for example, one Termex heating element is dry, then a common cause of leakage in this case is damage to the bulb covering the heating element. Usually, in this situation, the flange with the flask is removed, and it is checked for the presence of fistulas. The fistulas can be soldered or sealed with cold welding. But one that can withstand the temperature of the water.
There may also be a problem with the gasket on the flange:
- If the rubber gasket is destroyed, water will drip from below;
- To replace the gasket, you need to disconnect the device from the network, drain the water, remove the protective cover, and disconnect all wires;
- Then the nuts are unscrewed around the circumference and the flange itself is removed;
- It is not difficult to see the gasket - if it is deformed or torn, you will have to buy a new one (when purchasing, take with you the old one that has failed);
- After replacement, you need to fill the tank with water and check for fistulas.
If one of the pipe connections begins to leak, it will become noticeable by smudges on the pipes. The connection should be untwisted, the old fum tape is removed, and a new one is wound. Then open the water and check the unit again. But if a leaking tank is a problem, the repair is not so simple. Fistulas are more difficult to deal with.
Briefly about the main thing
If the water heater is leaking from below , depends on the type of damage. If the replacement elements are damaged, they can be replaced. The boiler often leaks from below; what to do is determined after inspection. If the boiler is leaking from below, the reason may be deformation of the casing, a worn-out heating element, or divergence of seams during installation. You can solve some problems yourself, but sometimes you need to replace the device.
What do you think, if the boiler leaks from below, what should I do?
Read later
We will send the material by email
Instructions: Ariston water heater is leaking, what to do
Most often, an Ariston boiler leaks because its internal parts are not cleaned or are not cleaned in a timely manner. Scale forms, destroying the parts of the water heater. This happens due to a large percentage of salts in tap water, excessively high heating temperatures, and, of course, untimely replacement of the anode.
Problems with transportation should not be ruled out. It happens that just at this moment the boiler receives a strong blow.
The welds lose their integrity, and it is through them that water will leak. And, of course, it’s also worth talking about incorrect installation. For example, if a safety valve was not installed, the parameters of this valve are not equal to the pressure in the water supply line.
Replacing the thermostat
To replace the thermostat, follow these steps:
- Remove the fixing ring (clamping) near the heating element.
- Remove the sensor adjustment unit and the thermostat itself.
- Install a new element.
- Secure it with a clamping ring.
- Check the condition (position) of the safety valve.
Please note that after replacing the thermostat, it is not recommended to immediately start operating the device! Check that cold water is flowing correctly inside, check that the connecting element does not hiss. The hot tap is then opened to release any air that has accumulated inside the boiler. Only after this can a test run be carried out .
How to care for your boiler
To prevent leaks from happening, and at one point, the boiler does not give you, let’s say, a savings bill, you need to take care of it correctly and in a timely manner. For example, always before introducing a pipe into a water heater, you need to install a high-quality ball valve or valve. This part must easily withstand constant loads from water pressure.
Boiler care:
- The gap between the boiler and the valve is a place for cleaning filters;
- Replace filter membranes with new ones from time to time;
- Grounding is carried out strictly according to the instructions, use safety precautions.
To frequently flush the boiler, you just need to connect a hose to the lower outlet pipe of the heater, let the water be supplied into the housing under strong pressure. The anode rod needs to be cleaned very often, and it is recommended to change it every year of operation. And the immersion pipe should also be cleaned in a timely manner.