Gable roofing is very widespread in private construction. Thanks to its stable shape, it withstands even strong winds and protects against precipitation, which is quickly removed by gravity. The upward pointing top gives the building a skyward appearance, as opposed to a flat surface that makes the building appear squat. A do-it-yourself gable roof is not an easy task, but it can be done. Our instructions will help you deal with it quickly and without errors.
Gable roof design
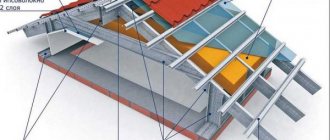
It is based on a rafter system - a frame that absorbs forces from its own weight, roofing, snow and wind loads. The rafters are arranged in pairs and connected to each other by a ridge, purlins, and sheathing.
Main components of the rafter system:
- Mauerlat is a supporting beam or board laid along the perimeter of the structure and transferring the load from the roof to the walls.
- Rafters (rafter legs) are inclined beams resting on the Mauerlat and connected at the ridge. They are installed in increments of 0.8-2 m, which depends on the current loads and the cross-section of the beams.
- Racks, crossbars, tie rods, struts, purlins are elements that relieve the system and give it stability. They can be positioned vertically, horizontally or inclined.
- Ridge - a horizontal beam at the top point of the roof that serves as a support for the rafter legs.
- Lezhen - laid on the internal load-bearing wall, used in addition to the Mauerlat to redistribute the load over a large span.
- Sheathing - either sparse flooring for laying roofing materials, or a solid slab or shield for flexible tiles, ondulin. Additionally increases the rigidity of the structure.
Most often, the rafter system is made from atmospheric-dried wood of grades II-III. It is undesirable to use raw material due to its tendency to twist and crack. Nails, bolts, staples, linings, sliding supports for shrinkage are used as fasteners during assembly. It is also possible to manufacture a frame from metal profiles, but in private construction metal structures are rarely used due to the higher price and complexity of installation.
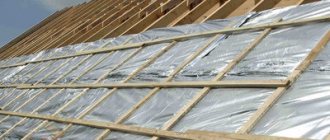
If the attic is intended to be used as an attic, when installing a gable roof, insulation with protection from moisture and steam is laid between the rafters. In this case, a counter-lattice is first installed along the rafters, which provides ventilation and condensate removal, and then the lathing.
Dependence of rafter pitch on roofing material
There are a large number of types of roofing coverings. Most of them are noticeably outdated and are little used in modern construction. The most popular today are:
- Profiled sheet.
- Corrugated sheet.
- Metal tiles.
It is necessary to take into account that corrugated sheets and corrugated sheets represent one group of profiled coating. Some sources consider them to be different names for the same material, others divide them by wave height. The corrugated sheet has a higher wave height, and the corrugated sheet is somewhat flatter. The first type can be used not only as a roofing covering, but also as a material for the construction of fences, fencing, metal garages, etc.
Corrugated sheeting Source plantu.ru
Corrugated sheeting has a smaller wave and is intended for installation as a roof. Both materials have a common specific feature - profiling is performed only in the longitudinal direction, which expands their capabilities and makes it possible to make roofing for round roofs and canopies.
Corrugated roofing Source kostromaremont.ru
Slope angle
The slope of a gable roof in construction is set at the design stage. Structures with an angle of up to 30° are considered flat, 30-45° - with an average slope, 45-60° - steep.
The choice of slope of the slopes is determined by:
- Wind loads. The higher the roof rise, the higher the windage and the stronger the impact of the wind. In areas where hurricanes often rage, the optimal angle is 15-20°.
- Snow loads. Here the relationship is inverse. The lower the slope, the more precipitation accumulates on the roof. To take the weight of snow, a more powerful structure is required, which is impractical. In snowy regions, the most favorable slope slope is about 25-40°.
- Type of roofing material. For each type, recommendations have been developed on the maximum and minimum permissible installation angles. If they are not followed, the tightness and appearance of the roof may suffer.
- Design features. In house designs with a gable roof and an attic, the slope of the slopes should provide the required height of the room. Sometimes the roof is made broken so as not to raise the ridge too much.
The most universal angle of inclination of a gable roof is 20-45°.
There are also multi-slope roofs, where each slope is located at its own angle. But such systems must be used very carefully, since in terms of architecture they are quite non-standard, and their installation is more difficult than symmetrical structures.
Decoration of overhangs
Roof overhangs, both gable and eaves, in addition to a purely decorative function, are intended to protect walls and foundations from water or snow. Their sizes are usually 50–60 centimeters. The design of overhangs is made using various materials:
- planed board, installed end-to-end or overlapped;
- tongue and groove lining;
- block house lining;
- sheet plastic;
- sheet profiled or smooth metal;
- finished products made of metal or plastic - soffits.
There are several ways to install overhangs:
- Along the rafters. In this case, the lining of the space under the roof on the overhang is carried out with fastening directly to the projections of the beams.
Hemming along the rafters is done along the lower edge of the rafter leg - Along the rafters inside. Planks are attached to the rafter leg, to which the board is hemmed. The lower part of the rafter remains open, and the opening under the roof is closed.
When hemming the rafters from the inside, the rafter beams remain open - In the box For this method, a plank is installed from the end of the rafter perpendicular to the wall. The second plank is installed on the wall and attached to the rafter. Sometimes a jib is installed between them. The hemming is done to these planks.
To frame the box, it is necessary to make a frame from mutually perpendicular bars
Ventilation holes must be made along the hem. They can be of any size, but large ones must be covered with a fine-mesh mesh made of any material. This allows you to avoid birds and harmful insects from entering the under-roof space. Soffits are sold with ready-made ventilation grilles.
Ventilation is installed only on eaves overhangs; it is not needed for gable overhangs.
When finishing with soffits, there is no need to drill ventilation holes - they are already made at the factory
How to calculate the angle
The slope of the slope is used when calculating the elements of the rafter system. It is defined in degrees or percentages, so you need to do some math.
A gable roof in cross-section is an isosceles triangle (if the slopes are the same). It can be conditionally divided into 2 right triangles. One of the sides H is the height to the level of the ridge, the other L is half the span of the house. They are measured against the finished walls and gable. It is necessary to calculate the length of the rafter B, which can be found based on trigonometric formulas.
Tangent of the slope angle relative to the horizontal:
tgα= H/L
Using the Bradis table or using an engineering calculator, we find the corresponding angle value in degrees. For example, the roof height is 3 m, the width of the house is 9 m, half the span is 9/2 = 4.5 m.
tgα=3/4.5=0.6667
This tangent corresponds to an angle of 34°, that is, the roof has an average slope. You can use the cosine function and calculate the length of the rafter as B= L / cos 34° = 4.5/0.829 = 5.42 m.
Also, information about the angle of inclination is needed to navigate roofing materials.
To calculate the length of the rafters (and check), you can use the second method - the Pythagorean theorem:
B²=H²+L²= 9+20.25=29.25, from where B =√29.25=5.41 m is the length of the rafter (without overhang).
To prevent precipitation from getting on the walls, you need to add at least 40 cm for overhang. We obtain for our building a minimum rafter length of 5.81 m with a slope angle of 34°. For convenience, you can take B = 6 m, which corresponds to a standard board.
Method for calculating the distance between rafters
There are two calculation options:
- Engineering calculation using appropriate formulas and techniques.
- Using online calculators that give the answer after entering your own initial data.
The first method is only suitable for a professional roofing system designer. For an untrained person, it is extremely difficult to perform such calculations, since various specific data, coefficients, and tabular values are needed, which are difficult to find and must be used correctly. Calculations obtained using online calculators are also not recommended for use in real construction, but rather used as an option for clarifying or checking the results of calculations performed by specialized organizations.
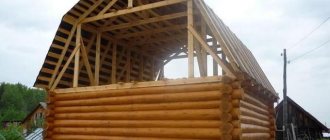
Roof installation Source tues.ru
Types of rafter systems
Depending on the design solution, the rafters can be layered, hanging or combined. When selecting a design, you need to take into account the size of the span and the presence of internal load-bearing walls.
Construction of a gable roof rafter system
Layered rafter system
This type of structure consists of rafter legs resting on external and internal walls. The beams seem to “lean”, while in the system there are no horizontal pushing forces, which are perceived only by capital supports.
A variant of the simplest layered system
Due to lower voltages, the “layered” system has a simpler and cheaper design. Mauerlat can be laid both along the perimeter of the building (if the walls are not strong enough) and in separate sections - in short pieces of 60-70 cm in places where the rafters support.
To strengthen the system and reduce deflections, purlins, struts, and racks are used. They redistribute stress, which makes it possible to reduce the cross-section of load-bearing elements.
In the ridge unit, the rafters are connected with an overlap or butt. Additionally, linings on bolts or dowels are installed.
In buildings made of timber or logs, the role of the Mauerlat is played by the upper crown. The lower end of the rafters is cut into it, which is additionally secured with wire twists or staples.
Connecting the rafter leg to the mauerlat using cutting and nails
Layered systems are assembled locally at height. All elements are mounted sequentially. For temporary fixation, various devices are used, such as supports or a board screwed to the facade. Assembly is speeded up by laying the purlin (ridge beam) before installing the rafters.
Movable method of fastening rafters and mauerlat Sliding support for rafters 200 mm KUCIS
The advantages of layered structures are the possibility of assembly without lifting mechanisms, less effort in the system and, as a result, the use of small-section lumber. Disadvantage: for spans of 6.5 m or more, an internal load-bearing wall is required.
Hanging rafters
Unlike the layered system, this type is used in the absence of an intermediate capital support and a sufficiently large span (from 6 to 14 m). The forces in the lower belt are significant, so additional elements are introduced - horizontal tie-rods or crossbars, vertical headstocks supported by tie-rods.
Very often, a hanging system combines the functions of a ceiling, that is, the lower beams are used as a basis for the ceiling or floor. For spans up to 5 m, the rafters are connected by tightening, over 6 m - reinforcing crossbars are added, over 9 - the design includes additional inclined and horizontal connections. A separate fragment of a roof made of rafters, ties and ties is called a truss.
Rafter legs fastened with a crossbar
Large sections are assembled on the ground. They are lifted to the roof using mechanized devices and installed on the Mauerlat. A lining of waterproofing materials is first placed on the surface of the wall.
Diagram of a hinged truss with suspension and struts
Since the truss is a rigid element, attachment to the ridge beam is more complex than with the layered version. Here a notch is used, reinforced with wood or metal overlays.
Sometimes both systems are combined. Between the trusses, installed at intervals of 3-4 m, layered rafters are mounted. This somewhat simplifies and reduces the cost of construction.
The advantages of hanging structures are their high load-bearing capacity and the ability to cover large spans without intermediate supports. The disadvantage is that it is difficult to manufacture and install.
DIY installation features
Method of laying rafters on the mauerlat
Nests for supporting rafters should always have horizontal platforms and vertical walls. Violation of the rule leads to loss of stability and displacement of load-bearing elements.
Making a truss template:
- Two boards 25 mm thick, 10 cm longer than the rafters, are fastened at the top with a bolt to allow rotation.
- The estimated height of the system is measured on the rail in the center of the tenon.
- The fastened boards are placed on the end gaps so that their edges rest against the notch.
- Combine the attachment point and the marks on the rail to determine the length of the rafter.
- The size of the tooth is marked on the lower edge, the template is lowered to the ground and the tenon is cut out.
- They try on the workpiece on site, inserting the tenons into the designated notches.
If after installation the vertex does not coincide with the mark on the rail, it is corrected by releasing the bolt, and the new position is marked on the rail. Measure the dimensions of crossbars, racks, fillies, tie rods and other elements of the truss truss. After the required products are manufactured, they are placed in the installation position.
Design and calculation of a gable roof
If you decide to build a roof yourself, you need to perform quite a lot of calculations. To simplify the task, there are special calculator programs on the Internet. Given your initial data, they will produce the result in the form of a layout of all elements and a list (specification) of the main building materials.
To calculate the roof yourself, you will need the following information:
- house dimensions - width and length;
- roof height and overhang size (minimum 40 cm);
- standard rafter section is 50x150 mm with a span of up to 5 m with additional supports;
- with a span of more than 5 m, as well as a pitch of 1 m or a small angle of inclination, the cross-section of the rafters must be at least 50x200 mm;
- the rafter spacing for flat roofs is 60-80 cm, average slope 100 cm, for steep roofs - 100-140 cm, also depends on the presence of insulation;
- lathing made of boards 25x100 or 30x100 mm;
- the distance between the slats is taken depending on the roofing material, for example for metal tiles it is 250 mm (clean);
- Mauerlat - board 50x150 mm or timber 150x150 mm;
- number of sheets of coating - first make an approximate layout taking into account the working width of the material.
If it is planned to install waterproofing, insulation and counter battens, they must also be included in the calculations. For the climatic conditions of Russia, the recommended thermal insulation thickness is 100-200 mm.
Next, a diagram (drawing) of the building’s facade with dimensions, a roof plan, and the layout of the rafter system elements is drawn. Now you can calculate how much and what kind of lumber is required, as well as sheets of covering, insulation, vapor and waterproofing (you need to take into account the overlap).
Upon completion, the number of fasteners, linings, antiseptics, etc. is determined. Enter all results into a table. It is recommended to buy materials with a margin of 10-15%. It is better to order the calculation of the hanging system (trusses) from specialists.
Online calculators vs notepad and pencil
To correctly calculate the cross-section of rafters and the pitch of their installation, today there are many complex formulas. But remember that such formulas were at one time developed more so that it would be possible not so much to perfectly calculate the roof structure, but to study the operation of such elements.
For example, today simple online programs are popular that do a good job of calculating rafter parameters. But it’s ideal if you can set specific tasks yourself and calculate everything you need. It is important to understand down to the smallest detail what exactly happens in the rafter system during operation, what exact forces are exerted on it and what loads. But a computer program cannot always take into account everything that the human brain notices. Therefore, we advise you to make the calculations manually.
How to make a gable roof: step-by-step instructions with photos
The work includes several stages:
- preparation;
- installation of a rafter system;
- laying hydro-, heat- and vapor barriers;
- installation of roofing material.
Lumber must be well dried. They are stored in stacks under a canopy or covered with film or tarpaulin in bad weather.
Preparation
If the walls are made of piece materials - blocks, bricks - it is recommended to install a reinforced concrete belt around the perimeter of the building. This will allow you to assemble the structure together and level the surface for laying the Mauerlat.
At the same stage, studs with a cross section of 10 mm made of galvanized steel are embedded in the fresh solution. You need to start from the corners, the laying step is 60 cm. Subsequently, the Mauerlat will be placed on them and secured with nuts.
To prevent contact between wood and concrete, waterproofing is installed - the surface of the reinforced belt is coated with hot bitumen and covered with 2 layers of roofing material.
Laying the Mauerlat
Holes are drilled in the timber in those places where the studs protrude from the walls. The Mauerlat is laid on the surface of the wall closer to its inner side to avoid demolition during strong winds.
The bars need to be aligned horizontally. You can insert spacers or trim off protruding parts.
It is allowed to lay the Mauerlat not entirely on the wall, but in separate segments directly under the rafters. For brick or concrete walls, fastening with metal plates, wooden plugs and brackets, and curved reinforcement is additionally used.
The length of the beam is joined with an oblique or straight lock. Corner joints are sawed into place and secured to the wall with anchors (studs).
Installation of ridge beams
At the highest points of the roof, a purlin is laid, which is attached to the posts and beams with metal corners and plates. The pitch of the racks is 3-5 m.
You can change the sequence and start by installing rafters at the ends of the building, but then you will have to secure each pair of beams with braces or boards. In the case where there is a ready-made run, the assembly proceeds faster and with better quality.
Installation of ridge beams
Installation of rafters
It is better to prepare rafters using a template. A groove is cut in the lower part to rest on the Mauerlat. The depth of the cut is no more than 1/3 of the width of the board.
2 types of fastening rafters to the Mauerlat
If lumber has to be spliced for rafters, an overlapping or overlay joint is used. It is recommended to make the joint at a distance of at least 1 m from the support points, preferably at about 1/3 of the rafter length. It is impossible to connect the boards in the center, since the maximum bending moment acts in the middle, and the beam can bend at the weakest point.
The assembly of the rafters begins from the gables. First, the first and last fragments are set, then the cord is pulled and markings are made. The studs should not fall into the support areas, so as not to create problems with cutting. Read in detail about attaching rafters to the mauerlat in a separate article.
The rafters are secured to adjacent elements using stops, struts and ties. It is important to firmly fix the system in space.
Fastening the sheathing
The base for laying the roofing covering is made of boards, slats, OSB boards or moisture-resistant plywood. The choice of material depends on the type of coating:
- for metal tiles - boards with a pitch of 35-45 cm, equal to the length of the transverse wave;
- flexible tiles, ondulin, roll roofing - continuous flooring;
- asbestos-cement slate - lathing in increments of 450-750 depending on the angle of inclination.
Boards or slats are laid perpendicular to the rafters. At each fastening point they are screwed with two self-tapping screws. The lathing additionally gives the rafter system rigidity and stability.
Preparatory work
The walls and floors of the building are prepared, although differences may not be visible visually. The difference in height becomes obvious when the support beam is laid in succession. They try to level the corners of the house. The masonry is leveled with mortar, screeding in the right places, and the wooden frame is prepared with the help of linings, and the bulges are trimmed off.
To correct the frame, a cord is used; it is attached to the two outer beams at the required height. The slabs are cut together so that horizontal areas are formed at the edge of the beams. The control template is applied to three beams simultaneously and the horizon level is checked. If the rail with the device is short in length, tie a long block. Mark the sampling points for the rafter teeth, and place pieces of control slats that indicate the central axis.
conclusions
When calculating the pitch of the rafters of a pitched roof or a more complex structure, you must keep in mind:
- It is better to make calculations “with a margin”, since an increase in the load on the supporting structures is still better than the collapse of the roof as a result of insufficient strength of the rafter system;
- When using heavy roofing materials (ceramic tiles, cement-sand tiles), it is better to immediately take the next rafter section in the memo or reduce the step size to the previous value. In any case, it is necessary to check the correctness of the choice using an estimate;
- When taking insulation under a corrugated sheet or under a metal tile, it is worth remembering the need not only for thermal insulation, but also for protection from noise - otherwise the sound of rain or hail on the roof can nullify all the comfort of living. A slight increase in the load on the rafter system in this case is justified.
Sheathing, sheathing, counter-lattice
It is difficult to make accurate calculations here without knowing in advance about the planned work options.
But it’s better to count on the maximum load, so you can take for calculations:
- continuous sheathing made of plywood sheets (thickness of at least 12 mm, weight about 6.5 kg/sq.m.), OSB (same thickness, weight approximately 7.7 kg/sq.m.), gypsum fiber (thickness 12...12.5 mm, weight 12…14 kg/sq.m.);
- obligatory counter-lattice (an option for installing a metal tile roof) made of 50x50 mm timber. Considering that the bars are not packed solidly, but in increments of 300...400 mm, the weight of the counter-lattice per square meter of roof can be taken to be approximately 3...4 kg;
- The interior cladding is often done with clapboard; an option is possible with cladding with sheets of plywood or OSB followed by plaster. In the first case, the weight of the finish will be approximately 6...11 kg/sq.m., in the second - 8...11 kg/sq.m. (taking into account the layer of plaster, the weight of which can be calculated here).
The weight of the fasteners should also be added here - at least half a kilogram per square meter. Result – 16…22 kg/sq.m.
Thus, for the examples already given (Moscow region and Petropavlovsk-Kamchatsky), the load per square meter will already be 195...312 kg/sq.m. and 516…592 kg/sq.m. respectively.