The main purpose of the element is to drain water from window glass and prevent moisture from entering the window sill and window frame. If moisture gets into these places, then processes of accelerated destruction of building materials begin: the plaster of facade walls falls off, window structures become unusable. If the walls are sheathed, then there are even more problems. In addition to their protective function, ebbs serve as an additional element for decorating facades; they acquire a finished look, and the designs of window openings look organic.
Window sills
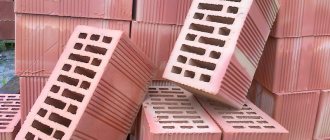
Polymer coated ebbs
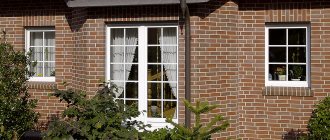
Window with low tide
Flashings can be installed both during the construction of buildings before finishing the façade walls, and after the start of operation. The first option is better - it is possible to use a full range of special measures to seal all joints and seams and do this with minimal loss of money and time. In the second case, the technology becomes somewhat more complicated, but this does not have a noticeable impact on the quality and cost of the work.
Low tide as a decorative window element
What are low tides
The design externally resembles window sills located outside the room. Necessary for removing excess moisture from the window and adjacent wall. If they are not installed, rain and snow will gradually destroy the frame and facade of the building.
They decorate the window opening, giving it a finished look and aesthetics.
Installation of window sills is possible both at the construction stage and a little later. The first case is preferable. It makes it possible to seal seams with less time and financial costs.
Purpose
There are three types of systems that remove moisture from precipitation from the house: storm water, drainage, and roofing. Roof flashing is a drainage system with the help of which precipitation moisture is collected from the roof and its discharge is organized to designated places for receiving. It protects the roof, blind area, and foundation from premature wear and destruction.
Types of tides for windows
Currently, several types are produced, differing in the material of manufacture. There are no functional features of the structures. The essence comes down to protecting part of the structure from adverse external conditions.
When choosing a low tide, you need to pay attention to the parameters of the window opening, the shape of the structure, and the general style of the building. The color and material are matched to the window frame. They must be in harmony. The width of the flashing depends on the thickness of the wall and the design.
White window tints look great with the same plastic frames. If the color is different, then the drainage should be chosen to match or slightly darker.
Bay window openings require an individual order for outlets. Galvanized products coated with a polymer composition look good. They consist of several rounded parts, which together create the desired shape.
Average prices in the Russian Federation
Let's look at the prices in the country for products and their installation.
For the finished product
The pricing policy of manufacturers is quite extensive. The cost of the finished product depends on:
- supplier brand;
- the material from which the part is made;
- water coating;
- the presence of additional elements;
- delivery region;
- product colors.
Estimated prices vary from 480 rubles to 5,000 rubles for one product.
For installation
Approximate installation prices depend on the status of the locality.
For example, installing low tides in Moscow will be more expensive than in Voronezh. Also, the price varies depending on the list of services, the width of the casting and the material. If you need turnkey installation, it will cost from 900 rubles to 1500 rubles.
You can order a ready-made casting with installation. The minimum cost is from 2000 rubles.
Materials for making castings
Manufacturing materials depend on which window is installed, the design of the building, and the design features of the opening.
Plastic
Plastic window sill
The advantage of plastic is unsurpassed sound insulation. Unlike other materials, plastic does not increase the noise from raindrops. The appearance of plastic moldings on the construction market has solved the problem of drumming raindrops forever.
Such products do not fade over time, maintaining their original appearance. They are characterized by sufficient strength, withstand snow loads, the adverse effects of the sun, wind, and temperature changes.
Plastic castings do not require special care. It is enough to regularly wash with water or wipe with a soft cloth. A wide range of colors allows you to choose ebbs in plastic windows of any shade.
Metal
Metal window sill
Made of durable metal alloys. They are durable and have a long service life. Not demanding on care. The disadvantages include a low noise insulation threshold.
Galvanized
Galvanized steel window sill
Made from galvanized metal sheet. The surface of the product is varnished. This is necessary for additional protection of the ebb from mechanical and chemical influences, preventing corrosion and giving a decorative appearance. In addition, the varnish makes cleaning easier.
Such models are durable and resistant to the adverse effects of precipitation. There is only one drawback - they amplify the sound of falling drops of water. This problem is partially solved using a substrate. As a rule, it is made of polyester and is mounted under low tide.
Aluminum
Aluminum window sill
Lightweight and durable. Long service life is the main advantage of the design. Throughout the entire operational period they retain an attractive appearance and do not lose technical characteristics.
Aluminum can deteriorate due to corrosion. To prevent this from happening, treatment with special compounds is required. In this case, the product will delight you for many years.
Made from epoxy resin
Window trim made from epoxy resin
These trims are made from fiberglass and epoxy resin. It features the highest noise absorption of all existing offerings on the market. It can take any shape (at the request of the customer and depending on the need caused by the design features of the opening). Good wear resistance makes it popular among the population. The disadvantages include the above-average price and a small selection of colors. Models are usually made in white, black and brown.
Other material
Granite window sill
Wooden window sill
Copper window sills
In addition to all of the above, there are copper sills. They are quite rare, despite their good performance characteristics. Long service life without loss of quality, easy maintenance, attractive appearance are undeniable advantages. The disadvantage is the high cost.
Stone flashings can be installed on buildings with unusual architecture, such as mansions.
Flashings for PVC profile windows
Window sill on PVC window
Modern apartment buildings are often equipped with a small roof eaves or do not have one at all. Light rain and snow fall on the frame, moisture penetrates the wall, stains and damages the building. There are stains under the window and the plaster is destroyed. Low tides will successfully solve this problem. The most common windows are made of PVC. It is for them that external window sills are most often looked for. First of all, you need to pay attention to the design of the wall, the opening and the color of the frame. Based on this, a decision is made to install the model.
Plastic, metal, aluminum, galvanized types are well suited. They have a lot of advantages without any disadvantages. Looks good with a PVC window. The most common are plastic models. They can be any color, so they will fit with colored frames. Low cost adds to its popularity among the population.
Briefly about the main thing
The foundation is the foundation of the house; the stronger it is, the longer the building will last. The most vulnerable place of its above-ground part is the protrusion under the wall and the joint with it, where rain and snow moisture constantly accumulates. Freezing and thawing, it slowly but surely destroys the base, depriving it of its strength and attractiveness. Something as simple as a plinth molding that covers this projection eliminates this problem. It can be metal, concrete, plastic, made of ceramics and natural stone. You can choose ready-made products in the store or order them to be made according to your sizes.
Source
Flashings for wooden windows
Wooden window with a metallic tint
Modern wooden windows are coated with special compounds that prevent the material from rotting. But with prolonged exposure to moisture, wood deteriorates. For this reason, wooden windows need strong slopes and high-quality installation.
Aluminum slopes are currently popular. This metal is resistant to high humidity and temperature changes. In addition, the product can withstand physical impact. The appearance can be anything. Painting it in different colors adds decorativeness. The most popular are brown, white, black, gray, beige.
No less durable galvanized drains. A polymer coating is applied to the surface, and the sounds of rain become less audible. In addition, it helps to choose the right color. It is recommended to choose a product that matches the color of the window frames or is slightly darker. The slopes fit well with wooden windows and will fulfill their intended function.
The most budget option remains plastic. The cost does not mean that the product is inferior. The price consists of the cost of raw materials and manufacturing technology. Plastic ebbs are durable and are not afraid of the sun, moisture, or frost. Fit tightly. The color range is very wide. The print is applied using lamination. This is a popular option that will suit any windows, including wooden ones.
Domestic manufacturers offer ebb tides made of wood. They look beautiful and fit perfectly on the windows. The downside is sensitivity to temperature changes, direct sunlight, and frost.
They require special care and careful handling. It is necessary to periodically varnish the product. This will extend the service life and maintain the attractive appearance of the natural material.
Such flashings should be installed by a craftsman who has experience working with wood.
Using the lower area for storage
As many have already understood, a loft bed is not just a sleeping place, it is a convenient way to organize space. It's time to talk about how you can use the free space below.
The most obvious solution is to install a closet in which bed linen, clothes and various household items will be folded. It is better to place the closet doors on the side of the bed: this way the second wall will serve as an additional support point, additionally saving space for rational use of the remaining space under the bed.
The option with a longitudinal cabinet arrangement close to the wall is also good. A deep cabinet of this kind is optimal for a children's bed: the side support panels experience minimal load, and the overhanging bed, if high enough, will not interfere with approaching the cabinet.
The fastening of the cabinet walls is identical for all versions of the base: one of the outer sides is simply covered with a sheet of chipboard, shelves are attached to it with confirmations, and a straight panel suitable for hanging doors is attached to the shelves.
Instead of a closet with three doors, the loft bed can be equipped with open shelves or drawers. The panels form a straight box, which can be divided as desired by horizontal and vertical partitions. The remaining space can be used to install a small sofa.
Ebb tides for semicircular or shaped windows
Round window with ebb
Not all window openings have right angles and a linear shape. Curved windows also require drainage. Installation of flashings on non-standard openings should only be carried out by a qualified craftsman with extensive experience.
Products made of metals and plastics are ideal. These are flexible materials that can be shaped into any shape. Slopes made of copper are characterized by the greatest ductility. It easily takes any shape. If such a slope cannot be installed based on the budget, then you should turn to a plastic model.
In any case, a specialist is required to take measurements and make an individual order according to the parameters of the opening.
Choosing a gutter shape
The gutters through which water flows can be:
- rectangular;
- rounded;
- triangular.
It is into the gutters that water enters from the roof surface, which is then discharged in the desired direction. Without them installed, drainage will not flow smoothly and water can cause damage to your home.
The gutters through which water flows can be of various shapes Source staltd.ru
The shape of the gutter plays not only an aesthetic role. It depends on how well the water flows.
Advice! Experienced craftsmen consider a rounded shape to be more functional. It is less likely to cause blockages as a result of debris, dry leaves and dust. Therefore, you will have to clean it less often.
Making metal casting with your own hands
Galvanized metal for casting
Homemade sheet bending machine for bending ebb
In some cases, it may be necessary to make a metal casting yourself. As a rule, they are installed in country houses and utility rooms. For this you will need:
- A metal sheet. It is recommended to use galvanized steel with a thickness of 0.4–0.5 mm. It is better if it is covered with a layer of polymers;
- Metal scissors. Needed for cutting molds. If there are none, take a grinder;
- Square, pliers, pencil, tape measure;
- Mallet.
Measure the window opening with a tape measure. Add 5 cm to the figure. The margin is needed so that it would be possible to bend the metal to the slopes. Experts recommend cutting out the rough blank a little larger. If necessary, it can be trimmed at any time.
Decide on the width of the tide. Measure the width from the window to the edge of the wall. Add 4-5 cm to the result. This will be the overhang of the product for water drainage.
Don't forget about additional benefits:
- 1.5 cm is needed to ensure fastening of the ebb to the plastic window;
- 2.5 cm will be required for a drip with a bend (rolling).
If the pencil is hard to see, use a marker. Traces are erased with alcohol or solvent.
All lines must be on the front side. Otherwise they will not be visible during work. As a rule, it is more convenient to bend the plate by securing it with a clamp between two pieces of wood along the intended bend line.
If you have a sheet bending machine, the process will go faster and better. The optimal manufacturing method is the industrial method. This is the only way to correctly install sills on plastic windows, make the sills efficiently, reliably, beautifully in a short time, without wasting your own time.
Principles of calculations
- The cross-sectional area of the gutter is determined according to SP 17.13330.2011. The following principle is recommended: for 1 m2 of roof area, 1.5 cm2 of gutter cross-sectional area should be provided. For example, for a roof of 100 m2 you will need a rectangular gutter measuring 15 × 10 cm (150 cm2).
- The diameter of drainpipes is determined according to SP 32.13330.2012. The principle is the same as for the gutter. For a roof area of 100 m2, a pipe with a cross-section of 150 cm2 is needed, i.e. with a diameter of at least 138 mm.
- The number of drains is determined from the condition that the length of one gutter should not exceed 10 m. In practice, it is chosen within the range of 5–7 m.
Deciding on the sizes
General scheme for determining the size of the ebb
When taking measurements, you need to consider the following:
- What will be the shape and depth of the slopes. Protruding and shaped slopes require the largest size (for subsequent trimming). Decorative protrusions require overlaps of 3 cm;
- The drip tray should protrude 2-3 cm from the wall;
- The bend angle should not be less than 110 degrees;
- If the ebb for plastic windows is longer than one and a half meters, compensation gaps must be provided at the end of the product. As a rule, they are equal to half a centimeter. Filled with any moisture-resistant sealant.
The size of the house ebb should correspond to the width of the window opening plus an increase for bends. As a rule, the material is cut out with a margin of 15 cm. It is convenient to use the drawing. If the installation of drip tides is ordered by professionals, then you do not need to measure the windows yourself and calculate the required dimensions. After filling out the application, a specialist will arrive at the specified time and measure the window.
Methods for bending drainage edges
Craftsmen use several ways to bend the edge. Each of them chooses the most convenient method.
For example, you can use tools for tin work - special pliers. They have a wide clamping part. Thanks to the larger gripping area, work efficiency increases.
In addition, pincer-shaped clamps are used. They clamp the sheet of metal along the previously drawn bend line and bend the part. It is advisable to use wooden blocks as an auxiliary tool. Work is carried out strictly on a flat surface.
Important! The use of a clamp requires a deviation from the marked fold line of at least 2 mm. This distance is needed to bend the metal sheet as accurately as possible.
The third method requires a stable, flat, horizontal surface, such as an iron table. The fold line should be placed exactly along the edge of the table. The sheet needs to be secured. Bending is done using a mallet. For a more even fold, pass along the sheet 2-3 times.
When a drain is made from a thin sheet, it is bent by hand without the use of tools or technical devices. Gloves must be worn to protect against cuts.
Important! To make the fold as even as possible, make a furrow (deep scratch) on the reverse side with a sharp object in the place of the future fold.
Possible difficulties and errors
Despite the ease of installation of the product, many people make common mistakes:
- Failure to meet installation deadlines. If the installation of the low tide is postponed indefinitely, then the facade will have to be repaired in the future (due to moisture ingress).
This will increase the cost of installation and improvement of the appearance of the window. - Refusal to install a stand profile. This reduces waterproofing and reduces the quality and service life of the window.
- All joints are not sealed. The ebb tide will not perform protective functions, and moisture will begin to penetrate the facade of the building.
- Wrong choice of waterproofing materials. For example, copper or galvanized flashing cannot be tightly attached to brickwork. Therefore, the tightness of the structure will be compromised.
- Incorrect angle setting. Such an error is difficult to correct, and its consequences are serious. Moisture will accumulate on the windowsill or flow inside the window.
Advice. The listed nuances must be monitored during the installation of the ebb tide.
General requirements for installation of ebb and flow sills
basic requirements for installing ebb sills
Installation of ebb sills is carried out upon completion of window installation. It doesn’t matter what material the frames are made of, they must “settle” for 3-5 days. During this time, the foam and other solutions dry. The protrusions of excess mixture are cut off with a knife or chisel.
For high-quality installation of drainage systems you need to know the following:
- According to the technological installation rules, the ebb should be installed so that it enters the walls by 2 centimeters. To do this, make recesses (grooves) where the slope enters the surface.
- It often happens that a product that is correctly made according to the standards does not fit into the grooves. Then you need to clear the recess of debris, level the protrusions with the main surface, and sweep away the crumbs with a brush. The window sill can almost always be trimmed, especially if it is made of metal. You need to do this carefully, without scratching the front part. If the metal is exposed, then this place needs to be painted over.
- After preparation and fitting, you need to proceed to installation. Wet the mounting wall with water. Polyurethane foam adheres better to a wet wall. Installation of ebb tides is usually carried out with its help.
- Insert the outer window sill very carefully into the prepared grooves. Leave minimal gaps. The casting should fit tightly, but without rubbing. This can harm the enamel; it will come off over time and the metal will begin to rot.
- The next step is to set the angle of inclination. Direction: away from the wall to remove moisture. It should flow down. The horizontal slope cannot be done “by eye” but must be carefully measured using a professional building level. The desired slope is found by moving the plates along the plane. The angle should be such that the installed product can be pressed down with several bricks (they should not slide down). Don't forget to wrap them in soft cloth so as not to spoil the appearance of the cast. The bricks will hold the sill in place as the foam begins to expand. Otherwise, the product will tear out of the grooves and the work will be ruined.
- After the foam has dried, you need to check for voids and carefully fill them with the same foam or sealant. This will help eliminate drafts in the room and increase the sound insulation of the product.
- The bricks are removed after 3-5 days. During this period, the foam will set properly. Now you need to rub and putty all the seams around the ebb.
Now the window sill can be wiped with a damp sponge, and it is ready to please the owner for half a century or longer.
Important! It is not necessary to seal the lower profile of the window before the sill is installed. Since the bend of the product will need to be inserted into this opening.
Installation of drip tides can be done not only using foam (installation is the easiest, cheapest, fastest way), but also using self-tapping screws and rivets. Nails cannot be used. The ebb, as well as a regular window sill in a room, must fit tightly to the profile and cut into the side slopes.
Installation of window sills requires a slope. This is a condition for long-term and high-quality operation for many years. You should always make an incline. If you skip this step, then moisture, ice and snow will always accumulate at low tide. Incorrect installation will ruin the ebb and will have to be reinstalled. In addition, if the installation is not correct, moisture will enter the window profile and penetrate the wall. The material will deteriorate and drafts will appear in the house. Expensive repairs will be needed.
If you install the ebb tide yourself, then do not forget to buy a lot of foam. It is worth considering that if there is not enough of it, then after a while the voids can be filled. If the craftsman is too generous, the window sill may become deformed due to the expanding foam. The joints are sealed with quick-drying moisture- and frost-resistant silicone-based sealants.
With this information, you can install window sills with your own hands. But if you want to be sure that the product will not have to be replaced after a few years or months, then entrust such work as installing a low tide to professionals.
A properly installed drip lining will protect the wall and, accordingly, the room. Moisture will not get into the wall cavities and freeze there when frost occurs. This will save the structure from destruction.
Using the lower area for storage
As many have already understood, a loft bed is not just a sleeping place, it is a convenient way to organize space. It's time to talk about how you can use the free space below.
The most obvious solution is to install a closet in which bed linen, clothes and various household items will be folded. It is better to place the closet doors on the side of the bed: this way the second wall will serve as an additional support point, additionally saving space for rational use of the remaining space under the bed.
The option with a longitudinal cabinet arrangement close to the wall is also good. A deep cabinet of this kind is optimal for a children's bed: the side support panels experience minimal load, and the overhanging bed, if high enough, will not interfere with approaching the cabinet.
The fastening of the cabinet walls is identical for all versions of the base: one of the outer sides is simply covered with a sheet of chipboard, shelves are attached to it with confirmations, and a straight panel suitable for hanging doors is attached to the shelves.
Instead of a closet with three doors, the loft bed can be equipped with open shelves or drawers. The panels form a straight box, which can be divided as desired by horizontal and vertical partitions. The remaining space can be used to install a small sofa.
Step-by-step instructions for installing metal flashing
Installation of ebbs and slopes requires careful adherence to technology. Several main stages can be distinguished:
- If you are installing ebb tides on plastic windows yourself, but the product itself is made industrially, then carefully inspect it from all sides and look for a special bend. It is inserted inside the window profile.
- If using a homemade casting, give the metal the desired shape yourself. This is done using metal scissors. It is necessary to make several cuts so that the product fits the slopes as tightly as possible.
- It is very important that the slope is more than 10 degrees. Water and snow should not stagnate on the windowsill. They should flow freely to the ground.
- The bent part must be placed tightly under the frame. Modern plastic windows have holes (grooves) designed specifically for the installation of ebb tides.
Taking these nuances into account, you can design a beautiful window, give it a finished look, and maintain warmth and comfort in the house.
Required tools for installation
Metal shears are used to cut galvanized sheets when making ebbs.
To install ebbs for windows, you need special tools. Order the production and installation of window slopes from professionals. This will eliminate the need to look for missing fixtures. Installation of ebb and flow on windows is carried out using several special devices that are needed for a certain type of work:
- Metal scissors. With their help, sheets are cut and subsequently adjusted to the required parameters and shapes of the opening;
- You will need a screwdriver and a drill. You can combine two tools in one. But not all models are interchangeable, so it’s better to prepare both. They require attachments of various types and lengths. This way you can quickly and firmly fasten all parts of the water drainage structure;
- For wooden frames, use regular wood screws. If the frame is metal-plastic, then you will need metal screws;
- Don't forget about a tape measure, a pencil or marker, and a square, which will be useful for taking measurements and drawing precise markings.
Professionally manufactured and correctly installed slopes will make the repair complete.
Design
The two main elements of low tide are:
- A gutter (tray) collecting water flowing from the roof.
- Gutters through which collected water is directed to the foundation of the house.
Gutters are channels open at the top, attached under the roof overhang. There are semicircular, rectangular, triangular shapes (rarely used). Contains straight and angular elements.
Drains (pipes) are also prefabricated structures of rectangular (rarely used) or cylindrical cross-section. Their elements can be straight or bent (knees).
The plugs prevent water from draining and leaking along the ends of the gutters. There are three modifications of the plugs for installation: universal, right- and left-handed.
Funnels are installed under the gutters; their purpose is to receive and redirect water into the pipes.
The leaf catcher grille protects the system from large debris entering the drainage system, preventing it from clogging.
Tees are parts required to separate the water flow.
The drain elbow is the final part of the drain that directs the flowing water away from the foundation (into the receiving cavity of the storm drain).
Couplings are parts for connection.
Clamps are used to secure the drain to the wall, preventing its vertical movement.
Brackets - fastenings.
Bypasses are used if the drainpipe needs to go around any obstacle.
Installation cost
Drainage sill for a window
The cost of the ordered product and installation work consists of several factors;
- Dimensions of ebb tides;
- Window opening configuration;
- Material of manufacture;
- Production time;
- Other.
As a rule, the master considers the time spent, the complexity of the work and the complexity of the installation. A metal window sill is easier to install than one made from epoxy resin. Therefore, this type of work will be cheaper.
To calculate the cost of installing drip tides, it is best to contact a specialized company. The master will coordinate the visit with you, measure the opening and recommend the material for making the product. The final cost can only be announced after taking into account all the nuances and wishes of the client. You can find out the average cost of installing and manufacturing a particular type of drip sill by calling the company at the number listed on the website.