- Roofing from corrugated sheets How to remove a rectangular chimney pipe
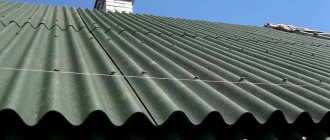
- Ondulin coating
- Extraction through a soft roof
- Passage through ondulin
- Elastic penetrations
- What is the goal?
- Pipe waterproofing Basic installation work
Objects that have a heating function from a boiler, stove or fireplace require normal exhaust of smoke to the outside, which is necessary to maintain the protection and safety of residents. Therefore, it is extremely important to know how to make a chimney pipe pass through the roof and roofing, taking into account all standards.
Basic Rules
If your home has heating, you will need to create optimal conditions for removing flue gases. There are several ways to remove the pipe depending on the installation location. Its choice is influenced by many factors, and the chimney can be installed:
- in the ridge itself;
- at a distance from him.
Each of the described methods has its own differences and features, but preference is given to installation according to the second option. To maintain the required draft force, the total height of the smoke channel must correspond to the limits of 5-10 m.
How to protect your roof from fire
To do this, you need to consider two points:
- Passage through walls and ceilings. Here it is necessary to use polyurethane foam with mineralite, since the outer pipe of the sandwich heats up to a temperature of 200*.
- When passing through the roof, roof trim and all other associated elements are required.
According to the standards, the minimum permissible distance between the chimney and load-bearing beams or rafters should be 130-250 mm. The inside of the structure is filled with heat-resistant material.
You can find passage diagrams in the Ferrum catalog in the “advertising and printing products” section of the website.
Features of this design
Sandwich is a good option for a chimney pipe with insulation. Insulation provides you with the following advantages:
- the possibility of functionality of the chimney pipe when located in a zone of low temperature conditions;
- provides the pipe with the necessary fireproof properties (inside the building).
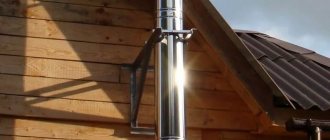
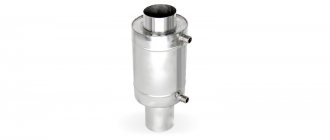
Standard versions of such chimneys have an external galvanized coating. There are also options made of stainless steel, as well as painted in any color suitable for you.
Existing versions of sandwiches made of stainless steel are covered with a special protective film on the outside. The main thing is to remember to remove it before using the chimney for its intended purpose. There are also special adapters on sale that you will need when connecting the boiler and pipe. Be careful when choosing elements for a sandwich chimney.
Scheme of a sandwich pipe.
The necessary tools for work are:
Passage node
One option is to pass through the ridge.
But most often, the installation of a chimney pipe through the roof and roofing is carried out not through the ridge, but at a distance from it. According to SNiP requirements:
- The total length of the smoke channel must be at least 5 m. The only exceptions are houses that do not have attics, but subject to the presence of stable draft.
- The height of the chimney above the roof is at least 0.5 m.
- The chimney rises half a meter or more above the ridge. But if the horizontal distance between it and the ridge ridge does not exceed 105 cm.
- The mouth should be level with the ridge or higher, when the horizontal width is in the range of 1.5 - 3.0 m.
- The chimney outlet must be no lower than the line laid from the ridge towards the eaves overhang at a slope of 10º relative to the horizon.
The disadvantage is the need to compare the height of the chimney, which leads to additional costs. Professionals do not recommend doing it through the valley due to the fact that snow deposits often accumulate in such places, thereby compromising the waterproofing and causing leaks. There are also difficulties in organizing the box. Localizing the chimney in the lower section of the slope also has a significant disadvantage - the likelihood of damage when snow melts.
The installation work is also influenced by the material that forms the basis of the chimney pipe. This can be a metal, brick or ceramic base. Each of the listed options has a different combustion temperature, which you need to know when creating a project. Based on the pipe cross-section, the outlet can be shaped like a square, circle, rectangle or oval. Knowing how to properly vent a chimney through the roof, its installation is carried out in three successive stages, carried out by a specialized specialist:
- Additional rafters are installed on the sides.
- Laying horizontal beams at a distance identical to this hole (calculated according to SNiP and corresponds to the range of 140-250 mm).
- Filling the inner surface of the box with non-flammable insulation material.
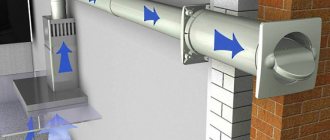
To prevent disruption of normal ventilation, it is recommended to install a separate ventilation system.
Master flush
This penetration can be applied to any type of roof - slate, tile, metal roof, asphalt or tile.
Ideal for sealing stove and fireplace chimneys.
Used for straight roofs and for sloped roofs.
This type of product is an excellent combination of price and quality.
Master Flash is distinguished by high professional reliability and functionality - this is achieved through the use of high-quality materials for use.
The main feature of this penetration is the use of reinforced polymer rubber, which can withstand heavy loads (temperatures up to 138 degrees).
Polymer rubber does not become more flexible due to heat.
Smoke exhaust outlet through various types of roofing
Below are recommendations for installing a smoke exhaust duct depending on the roof material.
Tile roofing
In this option, to process the passage, professionals resort to the use of corrugated, self-adhesive, sheet aluminum or lead.
Exiting a pipe with a cross-section in the shape of a square or rectangle
If the smoke exhaust hole has a brick base, then due to non-standard dimensions, before removal, a small part of the covering sheets must be removed or cut to a larger size. To ensure waterproofing, elastic tapes with an adhesive base are used. They are glued by a specialist to the pipe base and roof sheathing. The upper edge is secured with a metal strip, and the existing connections are sealed with a sealed substance.
To prevent precipitation, it is recommended to install an additional tie.
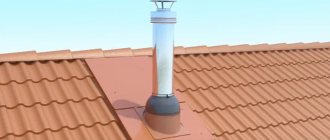
Passage of a round chimney through the roof
This is achieved thanks to a special cap, which is responsible for the smoke exhaust hole. A small and even hole is made in the coating, according to the pipe dimensions. A master flush is put on it, and the existing connections are sealed with a sealed substance.
Preparatory stage of work
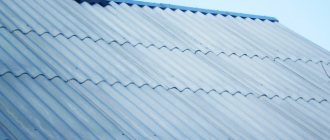
To avoid any difficulties during the pipe installation process, you need to prepare the work site and tools in advance. A hole from corrugated sheeting is cut according to the following technology:
- After determining the configuration of the chimney, they plan where the exit to the roof will be located. Let us remind you that it is better to place the pipe vertically.
- The cross-sectional size of the chimney pipes is selected based on the recommendations of the heating device manufacturer. The thicker and higher the pipe, the better the smoke is removed from the stove.
It is important that all segments are of the same cross-section and fit each other, and are inserted without creating a gap.
- On a corrugated roof, mark the outline of the pipe using a permanent marker.
- Using a grinder with a thin metal cutter, cut out a hole, moving a couple of centimeters inward from the intended line. You should work with corrugated sheeting carefully and slowly so that the edge of the cut is smooth, without jagged edges that could cause injury during the pipe removal process.
- You need to make short cuts in the corners of the hole to bend the edges of the corrugated board upward.
- They cut out the same weight in the ceiling.
- A metal box is installed that will connect the pipe to the rafters. The chimney will pass through the hole inside the box; the distance between their walls should be at least 15 cm.
- The insulation, waterproofing film, and vapor barrier membrane are removed from the hole made in the roof. It is necessary that the hole goes through.
Video material: tightness of a brick chimney through a metal tile
Corrugated roofing
This is a relevant material, often used in construction work. However, when using it, there is a risk of leakage, especially if technical rules are not followed. To prevent this outcome, it is recommended to place it in a vertical position. The roof hole is made with a grinder, but it is necessary to ensure that the resulting corrugated sheet does not have nicks or other irregularities.
How to remove a rectangular chimney pipe
In this situation, professionals recommend using galvanized sheet:
- Cutting four strips for further mounting on each side.
- Laying from the bottom edge to the cornice.
- Attach the strips and bottom fastening to the sheathing.
- Ensure tightness.
Exhaust of a chimney with a cross-section in the shape of a circle
In this case, installing a chimney through the roof requires rolled bitumen insulation or foil tape of the same name. After this, a penetration is installed, glued to the sheathing, and sealed with a heat-resistant sealant. If it is made of a rubber base, there is an increased risk of melting, so it is worth placing a clamp and gasket underneath that can withstand relatively high temperatures.
Fighting joint leaks
To create the maximum possible tightness of the junction of the roofing material and the pipe at the points of contact, an internal apron is made using the lower strips.
Installation of a chimney passage through the roof.
To make an internal apron, you need the following tools:
- marker;
- long metal ruler;
- grinder with a disk 2 mm thick;
- pliers;
- hammer.
In order to do this, the plank is applied to the walls of the chimney pipe, making marks for the top of the plank. The next step is to punch a groove along the previously marked line.
Installation of the inner apron should start from the bottom wall. The edge of the apron is inserted into the groove, after which it is installed on the remaining walls. The overlap should be 15 cm. Then the edge of the film inserted into the groove is sealed. Having trimmed the lower strips, they are installed and then secured with self-tapping screws.
After installing the lower apron, you can begin installing the tie, which is a sheet of waterproofing material placed under the elements of the inner apron from below. The main function of a tie is to drain water.
After completing the installation of the tie and apron that protect the joints, the roofing material is laid. Then the outer apron is installed. To do this, use the upper abutment strips.
The installation of the apron on the outside is similar to the installation of the apron on the inside. The difference is the absence of a groove and the upper edge is fixed directly to the chimney wall.
Important: today the building materials market offers products that are designed specifically for chimneys with a round cross-section. They are roofing passages that consist of a base (flat steel sheet) and an apron cap. A circular chimney is installed inside the passage.
A circular chimney is installed inside the passage.
Video material: tightness of a pipe on a roof made of ondulin
Extraction through a soft roof
A distinctive feature of the material is that it belongs to the category of combustible building materials. Therefore, it is necessary to leave space between the coating and the hole for the chimney (approximately 13-25 mm). Waterproofing is done identically to other options. The difference is the use of a valley carpet or the installation of the coating itself on the pipe.
How to install a chimney through the roof
The work carried out by a specialist proceeds in several stages:
- Determining the best localization of the passage site.
- Installation of the box.
- Cutting a hole in the slope.
- Folding the roofing material outwards and the moisture insulation towards the inside.
- Fixation.
- Sealing the box and filling it with thermal insulation.
- Creating a seal using sealants.
Passage through ondulin
The most important task is to fill the internal cavity with fire-resistant materials as much as possible. Insulation is provided by an apron that goes under the roof. For this purpose, it is worth taking a closer look and purchasing self-adhesive tape “Onduflesh”.
Extraction of a smoke channel in a constructed roof by a master
- Choosing a suitable location.
- Forming a box from beams.
- Creating a hole in the roof.
- Filling the box with non-flammable material.
- Sealing joints with a sealant.
Algorithm of actions for the device
The chimney is installed and fixed in the base area.
During the construction of the canopy, it will be necessary to dismantle the pipe canopy, if it was already attached to it.
Next, perform the following steps:
- The size of the ring on the penetration is determined. It should be 20 percent less than the diameter of the chimney. Using a sharp knife, cut to the desired size. If the gap is unsuccessfully cut, do not rush to throw away the Master. You should try to correct such a flaw using a tightly installed clamp;
- The prepared Master pulls himself onto the pipe and with force lowers himself to the roof level. To make sliding easier, you can use soapy water as a lubricant;
- In the case of making a roof covering from ondulin, tiles, slate and other covering materials laid overlapping, the upper section of the base of the otter must be moved under the adjacent, outermost component of the insulation. This will create conditions for free drainage of water regardless of sealing;
- A moisture-resistant sealant or bitumen is applied under the base, and the flange is secured with self-tapping screws with a large press cap to the roof and sheathing. The distance between the screws should be maintained at 3.5 cm.
Expert advice: you should not screw in a large number of screws, since over time the sealant will gradually begin to lose its insulating qualities, and moisture will begin to enter through multiple punctures from the screws.
It is not recommended to screw self-tapping screws into depressions in the roofing material through which water flows. The flexible, sealing element can be easily bent to fit the roof profile and attached with minimal gaps. This completes the installation process.
In rare cases, a tight fit of the roof to the pipe is not observed. In this situation, the edges of the seal should be tightened with a clamp. This state of affairs serves as proof that the Master Flush was not selected accurately or the installation was carried out with errors.
Such auxiliary parts can be easily completed and installed with your own hands, or can be purchased at specialized construction stores. Such a “plate” is simply strung on the chimney on top of the otter. The size of the metal pad must be accurately selected to prevent it from oscillating due to wind.
The maximum operating temperature of Master Flash shows that the gasket cannot be used on every chimney. The otter will behave well if the chimney is insulated with a sandwich or on a chimney without insulation, which will heat up to no more than 100 degrees.
Expert recommendation: to avoid unpleasant situations - ignition or melting of the “master” during soot burning in an uninsulated pipe (temperature can reach 500-600 degrees), it is necessary to first perform thermal insulation work on the chimney.
For this purpose, basalt fiber is used, which is coated with galvanization.
According to numerous reviews, the widespread use of Master Flash roof seals is due to the convenience and speed of installation. Important advantageous factors are the affordable price, reliability of insulation, and long service life.
And there is no point in attracting highly qualified specialists or additional workers, since the instructions for the seals clearly and clearly describe the installation process, which any layman can handle.
Watch the video in which the master explains how to properly install and secure Master Flash for a chimney:
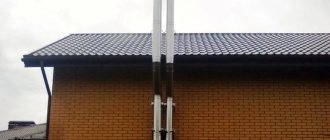
Round pipe
The difference between installation work is the need to use special cutting. The professional conclusion is as follows:
- Arrangement of the box.
- Cutting a hole for the chimney.
- Fastening an iron sheet or installing a ready-made part.
Elastic penetrations
Since it is problematic to install a chimney through the roof without professional help, it is important to pay due attention to the selection of each detail.
Distinctive characteristics are:
- Resistance to adverse weather conditions.
- UV resistant.
- Flexibility.
- Tight fit.
- Aesthetics.
Hard penetrations
There are two main types:
- One-piece - inserted into the upper edge of the chimney, after which a cap or cone is put on top.
- Detachable - its upper part is put on the chimney, and a sealed substance is applied along the edges; strong fixation is ensured with the help of a clamp.
Elastic penetration
Most often in private construction they are faced with the installation of round metal pipes. To ensure the tightness of the passage, a special device is used - an elastic penetration. This is a product made of high-strength silicone or rubber, shaped like a funnel with a wide flange in the form of a square or circle, called an apron. Thanks to its properties, the elastic penetration takes any shape, adapting to the angle of inclination of the slope. It can withstand extremely high or low temperatures, exposure to aggressive chemicals and comes in a wide range.
Installation diagram of elastic penetration
Elastic penetration on metal tiles
When purchasing an elastic penetration, they are guided by the diameter of the pipe and the color of the roofing material. Universal models, in the form of a stepped pyramid, are suitable for any size; adjustment is carried out by trimming the penetration to the desired level. Installing an elastic apron on the roof is very simple, you need to place it on the chimney passage, apply a metal circle with holes for fasteners, treat the joint with fire-resistant sealant and secure it with a screwdriver. For roofs with steep slopes, a special type of plastic penetrations with a specified flange mounting angle is used.
Chimney height and placement
All calculations performed are based on the requirements of SNiP 41-01-2003 and SP (building rules) 7.13130.2009, as well as on recommendations received from manufacturers of heating devices.
When constructing a flat roof, it is assumed to leave a margin of at least 50 cm. For a pitched roof, the following rules from the craftsmen apply, based on the distance between the chimney and the ridge and their location:
- Up to one and a half meters. In this case, the height of the pipe must be at least 50 cm (relative to the last or enclosing parapet).
- Within 1.5-3 meters. Here the height cannot be lower than the ridge.
- If you want to place elements further than 3 meters, then the minimum height will be determined by drawing a line at an angle of 10 degrees relative to the horizon.
Strengthening the rafter system
Often when installing a chimney, the question arises about strengthening and strengthening the rafter system, because it is necessary to form a hole in the roof pie for the pipe. That is, you will need to install a couple of spacers. When creating a roof made of metal tiles, the pitch between the rafters is rare, and the formed opening or the distance between the rafters may be too large. Therefore, it is necessary to install vertical spacers.
Sometimes you have to break the integrity of the rafter leg, that is, cut it. Then, in certain situations, purlins or crossbars are also sawn. In this case, at the place where the rafter leg was cut, it must be fastened to adjacent, undamaged ones. For this, additional spacers are also used, between which bars are inserted vertically. Their function is to replace the rafter leg at the chimney passage.
Fire safety
Some layers of the roofing pie and the wooden rafter system cannot withstand high temperatures, so the likelihood of fire increases. To eliminate this risk, it is necessary to use a special box along the perimeter of the roof opening.
Pipe waterproofing
Protection from moisture is also an important step that should not be skipped when arranging the passage.
Basic installation work
The box is mounted from timber, located level with the sheathing. Vapor and waterproofing is fixed along its edges. To do this, a cross-shaped cut is made in the canvas and a triangle-shaped piece of material is turned into the inner surface. To ensure fixation, you need to stock up on nails with a wide head or construction staples. You will also need sealants and adhesive tape.
Fixing a roof leak near a pipe
To do this, a drainage gutter must be laid. And the hole itself is covered with internal and decorative aprons.
Insulation with bitumen tape
Provides a high level of sealing of any type of surface. It completely eliminates the negative effects of moisture, as it is characterized by significant strength.
Elements used for output and sealing
- The box is galvanized.
- Ceiling overhead sheet.
- Stainless steel clamps become.
Provided that the technical rules are followed correctly, the passage of the chimney through the roof and roofing is characterized by good thermal insulation, which is achieved by filling the internal cavity with basalt wool or other heat-resistant materials. If possible, it is better to leave a small space with air (5-7 cm) between the insulation and the smoke conductor. If penetrations are involved in the installation of the structure, then you should select the required part taking into account the material that makes up the base.
Possible installation errors and how to avoid them
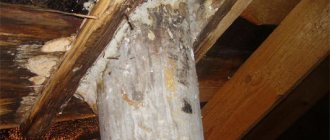
Errors during chimney installation can lead to a fire in the ceiling, roof or wall.
It is important to maintain minimum distances between flammable objects and the chimney
Errors and remedies:
- A common mistake is saving space. Sandwich pipes, as long as they are in good condition, should not heat up. But over time, warm air may pass through the thermal insulation layer. In this case, nearby flammable materials may catch fire. The presence of sufficient space between the chimney and building materials eliminates this possibility.
- Another mistake is neglecting the tightness of the compared parts. It is recommended to cover all joints between the components of the chimney with a layer of sealant, otherwise combustion products may pass from the chimney into the environment. The joints between the pipes can additionally be tightened with special clamps.
- The third common mistake is comparing pipes only by the “smoke” or “condensate” type. Matching “by smoke” means that the socket of the overlying pipe fits onto the underlying pipe. In this case, smoke will not accumulate in the resulting pocket between the pipes, but condensation may drain there. Comparison “by condensate” means that the socket of the underlying pipe fits onto the overlying one. Condensation will not be able to drain into the resulting pocket, but smoke will accumulate there. In the first case, there will be a lot of condensation in the chimney, in the second - soot. In order to take advantage of both options in a sandwich pipe, it is enough to compare the inner cylinders “by condensate”, and the outer ones “by smoke”. Matching both cylinders in the same way can quickly clog the chimney.
- A serious mistake is to use general building insulation instead of thermal insulation. Many insulating materials are used in construction, but when arranging a chimney, it is necessary to choose materials with the best thermal insulation. This material is mineral wool. When installing external insulation, the use of basalt wool is allowed, but if the pipe warms up significantly from the outside, after a few hours the basalt wool will begin to heat up.