Here you will learn:
- Single pipe systems
- Single-pipe horizontal
- Single-pipe vertical
- Scheme "Leningradka"
- Two-pipe system with bottom wiring
- Two-pipe system with top wiring
- Beam system with collectors
- With forced and natural circulation
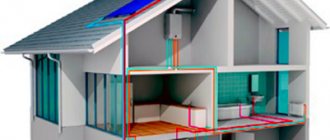
One of the stages of building a private house is the design and creation of a heating system. This is a difficult stage, since you need to not only design the heating, but also save on materials. An important factor is that the heating created must be efficient and economical. We create heating for a private house with our own hands - you can find wiring diagrams (the most basic) in our review.
There are many schemes for laying heating pipes in private households. Some of them are combined, which allows you to increase the efficiency of the system and achieve more uniform heating throughout the house. In our review we will consider only the most basic schemes:
- single-pipe horizontal circuit;
- single-pipe vertical design;
- "Leningradka" scheme;
- two-pipe system with bottom wiring;
- two-pipe system with top wiring;
- beam system with collectors;
- schemes with forced and natural circulation.
Let's look at the features of the presented schemes, and also discuss their advantages, disadvantages and installation features.
Single pipe systems
In single-pipe heating systems, the coolant passes sequentially through all radiators.
When creating heating for a private house with your own hands, the easiest way is to equip a single-pipe heating system. It has many advantages, such as cost-effective use of materials. Here we can save a lot on pipes and achieve heat delivery to every room. A single-pipe heating system provides for sequential delivery of coolant to each battery. That is, the coolant leaves the boiler, enters one battery, then another, then a third, and so on .
What happens in the last battery? Having reached the end of the heating system, the coolant turns around and is sent back to the boiler through a single pipe. What are the main advantages of such a scheme?
- Easy to install - you need to sequentially pass the coolant through the batteries and return it back.
- Minimum consumption of materials is the simplest and cheapest scheme.
- Low location of heating pipes - they can be mounted at floor level or completely lowered under the floors (this can increase the hydraulic resistance and require the use of a circulation pump).
There are also some disadvantages that you have to put up with:
- limited length of the horizontal section - no more than 30 meters;
- The farther from the boiler, the colder the radiators.
However, there are some technical tricks that can mitigate these shortcomings. For example, the length of horizontal sections can be dealt with by installing a circulation pump. It will also help make the last radiators warmer. Bypass jumpers on each radiator will also help compensate for the temperature drop. Let's now discuss certain types of single-pipe systems.
Heating project - a complete package of design documentation
The fourth stage is the implementation of work on drawing up complete specifications for heating equipment and materials, as well as the execution of project documentation in a form that complies with established norms and rules.
Carrying out work in all four stages allows you to create a complete package of design documentation, which is called a heating project. The proposed heating system projects allow us to carry out all further installation work on the installation of equipment with high quality.
Single-pipe horizontal
The simplest version of a single-pipe horizontal heating system with a bottom connection.
When creating a heating system for a private house with your own hands, a single-pipe wiring diagram may turn out to be the most profitable and cheapest. It is equally suitable for both one-story and two-story houses. In the case of a one-story house, it looks very simple - the radiators are connected in series - in order to ensure consistent flow of coolant . After the last radiator, the coolant is sent through a solid return pipe to the boiler.
Advantages and disadvantages of the scheme
First, we will look at the main advantages of the scheme:
- ease of implementation;
- excellent option for small houses;
- saving of materials.
A single-pipe horizontal heating circuit is an excellent option for small spaces with a minimum number of rooms.
The scheme is really very simple and understandable, so even a beginner can handle its implementation. It provides for a serial connection of all installed radiators. This is an ideal heating layout for a small private house . For example, if this is a one-room or two-room house, then “fencing” a more complex two-pipe system does not make much sense.
Looking at the photo of such a circuit, we can note that the return pipe here is solid, it does not pass through the radiators. Therefore, this scheme is more economical in terms of material consumption. If you don’t have extra money, this type of wiring will be the most optimal for you - it will save money and allow you to provide heat to your home.
As for the shortcomings, there are few of them. The main disadvantage is that the last radiator in the house will be colder than the very first one. This is due to the sequential passage of the coolant through the batteries, where it releases the accumulated heat into the atmosphere. Another disadvantage of a single-pipe horizontal circuit is that if one battery fails, the entire system will have to be turned off at once.
Despite certain disadvantages, this heating scheme continues to be used in many small private houses.
Features of installation of a single-pipe horizontal system
When creating water heating for a private house with your own hands, the scheme with single-pipe horizontal wiring will be the easiest to implement. During the installation process, it is necessary to mount the heating radiators, and then connect them with pipe sections. After connecting the very last radiator, it is necessary to turn the system in the opposite direction - it is advisable that the outlet pipe runs along the opposite wall.
A single-pipe horizontal heating circuit can also be used in two-story houses; each floor here is connected in parallel.
The larger your home, the more windows it has and the more radiators it has. Accordingly, heat losses also increase, as a result of which the last rooms become noticeably cooler. You can compensate for the temperature drop by increasing the number of sections on the latest radiators . But it is best to install a system with bypasses or with forced circulation of the coolant - we will talk about this a little later.
A similar heating scheme can be used to heat two-story houses. To do this, two chains of radiators are created (on the first and second floors), which are connected in parallel to each other. There is only one return pipe in this battery connection diagram; it starts from the last radiator on the first floor. The return pipe coming down from the second floor is also connected there.
Tips for installing a home heating system
The heating installation begins with the installation of radiators in pre-prepared places under windows or on corner external walls. The devices are hung on special hooks attached to the structure itself or the plasterboard finish. The unused lower outlet of the radiator is closed with a plug, and a Mayevsky valve is screwed in from above.
The pipeline network is installed according to the assembly technology of certain plastic pipes. To protect you from mistakes, here are some general recommendations:
- When installing polypropylene, take into account the thermal elongation of pipes. When turning, the knee should not rest against the wall, otherwise, after starting the heating, the line will bend like a saber.
- It is better to lay the wiring in an open way (excluding collector circuits). Try not to hide the joints behind the sheathing or embed them in the screed; use them to secure pipes.
- Mains and connections located inside the cement screed must be protected with a layer of thermal insulation.
- If for any reason a loop has formed in the pipeline, facing upward, install an automatic air vent on it.
- It is advisable to install horizontal sections with a slight slope (1-2 mm per linear meter) for better emptying and removal of air bubbles. Gravity flow schemes provide for slopes from 3 to 10 mm per 1 m.p.
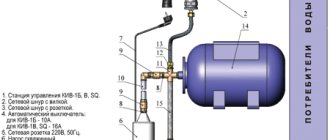
- Place the membrane expansion tank on the return line near the boiler. Provide a valve to shut off the container in the event of a malfunction.
Installation trick. Do not fill the TP screed until you fill the circuits with water and warm up the system. The goal is to increase the pressure in plastic pipes and force them to lengthen, that is, to put them into operating mode. Then the material will not bend under the weight of the monolith and will not float up if the solution turns out to be liquid.
Single-pipe vertical
How else can you heat two-story households with a single-pipe system? There really is an alternative - this is a single-pipe vertical heating system, which is used by many people who are looking for a suitable steam heating scheme in a private home. There are no difficulties in such a scheme; you just need to bring the supply pipe with the coolant to the second floor and connect the batteries located there, and then make branches down to the first floor .
Advantages and disadvantages of a single-pipe vertical scheme
As usual, let's start with the positive features:
In single-pipe vertical heating systems, the coolant flows from the radiator on the top floor to the lower floors.
- greater savings on materials;
- relatively equal air temperature on the first and second floors;
- ease of implementation.
The list of disadvantages is the same as the previous scheme. It included heat losses on the last radiators. And since our coolant is supplied through the upper floor, it can be cooler on the first floor than on the second .
The savings on materials are more than substantial. We only have one pipe going upstairs, from which the coolant is distributed to all the radiators on the second floor (not sequentially). From each upper radiator, pipes go down to the radiators on the ground floor, after which they end up in one common return pipe. Thus, this scheme involves minimal use of materials.
Features of installation of a single-pipe vertical system
When installing a vertical single-pipe system, you will receive as many chains as there are radiators on each floor.
In the previous gas heating scheme in a private house, the pipes sequentially bypassed the radiators on the first and second floors. That is, we got two parallel chains, each of which included several radiators . In the current scheme we also have chains, but they are vertical. For example, if there are four radiators on each floor, then we get four chains connected in parallel.
This scheme assumes one solid supply pipe passing along the top floor. Branches are made from it to each radiator. After passing through the upper radiators, the coolant flows to the lower radiators, and only after that into the return pipe passing along the first floor.
If in the first case the greatest heat losses were observed in the distant radiators of the first and second floors, then in this scheme it will be cooler on the first floor, since part of the heat will be consumed on the second floor.
A single-pipe vertical heating scheme for a private house with a gas boiler can be implemented without forced circulation of the coolant. The thing is that the temperature of the coolant supplied to the radiators on the second floor is the same. A drop in temperature is observed only on the first floor. But if we supplement the radiators with bypass jumpers, then the temperature change will be minimal - it can be neglected.
Thus, this circuit, supplemented by bypass jumpers, will become the most economical and inexpensive among any other circuits. Instead of a gas boiler, any other boiler can be used. The electric heating circuit of a private house is no different from gas heating (except in the type of boiler).
How to heat a country house
A competent project does not stop at the type of equipment that the company is interested in selling to you, but offers different options for heating your home. For example, you have a gas main connected to your house. Gas is a fairly inexpensive type of fuel with a high calorific value. A single or double circuit boiler is installed. Gas boilers are relatively inexpensive, very efficient and operate without replacement for several decades.
Sample diagram of a gas heating project for a house
If we are considering mains gas, it is possible to deliver gas in cylinders.
Disadvantages of autonomous home heating with gas
Gas in cylinders:
- It will require installing an expensive reducer in the boiler to reduce pressure.
- It will fly away like smoke down a chimney, literally. For example, a house of about 150-200 m2 with a double-circuit boiler powered by bottled gas may require 10-14 bottles per week.
These are real life examples. There are houses with not the worst thermal insulation, the temperature outside the window is down to minus 25, the area does not differ critically, but they are unlucky - there is no gas pipeline nearby. Which exit? Use other heat sources or calculate an unconventional heating system.
Scheme "Leningradka"
The Leningradka heating system is an improved single-pipe system.
Both considered schemes have one common drawback - a drop in temperature in the last radiators. In the case of a horizontal circuit, we have cold radiators in horizontal chains, and in the case of a vertical circuit, in vertical chains. That is, in the latter case it is the entire first floor.
The Leningradka heating circuit in a private house allows you to compensate for the cooling of the coolant when passing through the next radiator . How is it implemented? This circuit provides bypass jumpers located under the batteries. What do they give? The jumpers allow you to direct part of the coolant bypassing the radiators, so the coolant at the outlet is as warm as at the inlet (minor deviations can be neglected).
Advantages and disadvantages of the Leningradka scheme
Leningradka promotes more uniform heating of rooms.
Each scheme has its own advantages and disadvantages. What are the advantages of the Leningradka scheme?
- More even heat distribution throughout the house.
- Relatively simple upgrade.
- Possibility of adjusting the temperature in individual rooms (as in two-pipe systems).
Single-pipe heating is not perfect, so the Leningradka scheme allows you to compensate for some of its shortcomings. But she has negative features:
- limited length of the line - if there are many radiators in a horizontal chain, then there will still be losses ;
- the need to use large diameter pipes for more uniform heat distribution.
The last drawback can be eliminated by installing a circulation pump in the system.
Features of installation of "Leningradka"
Connection options for Leningradka in a single-pipe vertical circuit.
When creating heating systems for private houses with their own hands, many people actively use the Leningradka scheme. How is it laid? To create a circuit, it is necessary to place radiators and lay a pipe under them, from which branches are made to the inlets and outlets of the radiators. That is, a jumper is formed under each radiator. In addition, we can install three taps on each radiator - the first two taps are installed at the inputs and outputs, and the third is installed on the jumper itself. What does this give?
- Taps can be used to regulate the temperature in individual rooms.
- The ability to exclude any radiator without shutting down the entire system (for example, if one radiator is leaking and needs to be replaced).
Thus, the “Leningradka” scheme is the optimal scheme for small one-story and two-story houses - you can save on materials and achieve uniform heat distribution throughout the rooms.
Choosing an energy carrier
The main selection criterion is the cost of energy, depending on the country and region of residence. If in the Russian Federation the undoubted leader is natural gas, then in the rest of the states of the former USSR the picture is different - firewood, briquettes and coal take the first place. Don't forget about electricity supplied at half the nightly rate.
When choosing the right type of fuel, it is worth considering five factors (in addition to price):
- efficiency (efficiency) of heating equipment using this energy carrier;
- ease of use;
- how often the units will have to be serviced, prices for calling a technician;
- storage requirements.
Below is a comparative table showing the prices of various energy sources and how much a kilowatt of heat produced in real conditions costs. Building area – 100 m², region – Moscow region.
Note. The calculation results and prices are given as of February 15, 2018. Over time, the data becomes irrelevant, but the difference in the cost of 1 kW remains.
Based on the numbers given in the table, it is much easier to find a suitable option (or several). Just make an adjustment for the cost of energy in your region. Based on other selection criteria, we will give 4 tips:
- It is most convenient to use gas and electric heating equipment. There is no need to store anything, constantly maintain and bother with cleaning water heating devices.
- Burning coal and wood is the most economical way to heat. Saving money will have to be paid for with labor - sawing, carrying, loading the firebox, cleaning the chimney. It is more comfortable to burn briquettes and pellets, but the price of the boiler installation and the fuel itself increases. Plus you will need storage for storage.
- Diesel fuel or liquefied gas is the best solution for providing autonomous and at the same time comfortable heating when other energy sources are not available. The downside is the decent cost of fuel and installation of the fuel tank.
- A proven option is the combination of 2-3 energy carriers. A common example: solid fuel + electricity at night tariff.
Which fuel is best to use in specific conditions is described in detail in a separate material. We also recommend watching the video and listening to useful expert advice:
Two-pipe system with bottom wiring
Next, we will consider two-pipe systems, characterized by the fact that they ensure uniform heat distribution even throughout the largest households with many rooms. It is the two-pipe system that is used for heating multi-storey buildings, in which there are a lot of apartments and non-residential premises - here this scheme works great . We will consider schemes for private houses.
Two-pipe heating system with bottom wiring.
A two-pipe heating system consists of supply and return pipes. Radiators are installed between them - the radiator inlet is connected to the supply pipe, and the outlet is connected to the return pipe. What does this give?
- Uniform heat distribution throughout the rooms.
- Possibility of adjusting the temperature in the rooms by completely or partially closing individual radiators.
- Possibility of heating multi-storey private houses.
There are two main types of two-pipe systems - with bottom and top wiring. First, we will look at a two-pipe system with bottom wiring.
Bottom wiring is used in many private homes, as it makes heating less visible. The supply and return pipes pass here next to each other, under the radiators or even in the floors. Air is removed through special Mayevsky taps. Heating schemes in a private house made of polypropylene most often provide for just such wiring.
Advantages and disadvantages of a two-pipe system with bottom wiring
When installing heating with bottom wiring, we can hide the pipes in the floor.
Let's see what positive features two-pipe systems with bottom wiring have.
- Possibility of masking pipes.
- The ability to use radiators with bottom connections makes installation somewhat easier.
- Heat losses are minimized.
The opportunity to at least partially make heating less visible attracts many people. In the case of bottom wiring, we get two parallel pipes running flush with the floor . If desired, they can be placed under the floors, having provided for this possibility at the stage of designing the heating system and developing a project for the construction of a private house.
If you use radiators with bottom connections, it becomes possible to almost completely hide all the pipes in the floors - the radiators are connected here using special units.
As for the disadvantages, they are the need for regular manual removal of air and the need to use a circulation pump.
Features of installing a two-pipe system with bottom wiring
Plastic fasteners for heating pipes of different diameters.
In order to install a heating system according to this scheme, it is necessary to lay supply and return pipes throughout the house. For these purposes, there is a special plastic fastener on sale. If radiators with a side connection are used, we make a branch from the supply pipe to the upper side hole, and take the coolant through the lower side hole, directing it to the return pipe. We install air vents next to each radiator. The boiler in this scheme is installed at the lowest point.
It uses a diagonal connection of radiators, which increases their heat transfer. Bottom connection of radiators reduces thermal output.
This circuit is most often made closed, using a sealed expansion tank . The pressure in the system is created using a circulation pump. If you need to heat a two-story private house, we lay pipes on the upper and lower floors, after which we create a parallel connection of both floors to the heating boiler.
Prices for heating design
| № | Job title | Description | Unit | Cost in rubles |
| 1 | Heating system design | Project composition:
| m2 | 80 |
| 2 | Design of an underfloor heating system | Project composition:
| m2 | 80 |
| 3 | Design work on the water supply system | Project composition:
| m2 | 50 |
| 4 | Design work on the sewerage system | Project composition:
| m2 | 50 |
| 5 | Design work on the ventilation system | Project composition:
| m2 | 60-120 |
| 6 | Design work on the air conditioning system | Project composition:
| m2 | 70 |
| 7 | Boiler room project | Project composition:
| set | from 7000 |
| 8 | Project of low-current systems. | Project composition:
| m2 | 70 |
| 9 | Visualization of the boiler house project in 3D | Project composition:
| set | from 9600 |
| 10 | Visit of the designer to the site | When concluding a contract, the amount goes towards payment for design work. | 2100 | |
| 11 | Thermal calculation | Calculation of heat losses of a building. | m2 | 25 |
| 12 | Transferring drawings from paper to electronic form | m2 | 25 |
Two-pipe system with top wiring
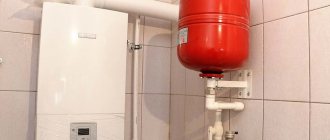
In a two-pipe heating system with overhead wiring, the expansion tank is placed at the highest point.
This two-pipe scheme is very similar to the previous one, only here it is provided for the installation of an expansion tank at the very top of the system, for example, in an insulated attic or under the ceiling . From there, the coolant goes down to the radiators, gives them part of its heat, and then is sent through the return pipe to the heating boiler.
Why is such a scheme needed? It is optimal in multi-storey buildings with a large number of radiators. Thanks to this, more uniform heating is achieved, and there is no need to install a large number of air vents - the air will be removed through the expansion tank or through a separate bleeder that is part of the safety group.
Advantages and disadvantages of a two-pipe system with top wiring
There are a lot of positive features:
- it is possible to heat multi-storey buildings;
- saving on air vents;
- you can create a system with natural coolant circulation.
There are also some disadvantages:
Using vertical wiring will lead to additional difficulties when installing hidden heating.
- pipes are visible everywhere - this scheme is not suitable for interiors with expensive finishing, where elements of heating systems are usually hidden ;
- in tall buildings it is necessary to resort to forced circulation of the coolant.
Despite the disadvantages, the scheme remains quite popular and widespread.
Features of installation of two-pipe systems with top wiring
This scheme eliminates the need to locate the heating boiler at the lowest point. Immediately after the boiler, the supply pipe is diverted upward, and an expansion tank is installed at the highest point. Coolant is supplied to the radiators from above, so a lateral or diagonal radiator connection scheme is used here. After this, the cooled coolant is sent to the return pipe.
Objects
Design is carried out only by qualified specialists with experience and high professional skills in solving engineering problems of any degree of complexity for objects for various purposes :
- Offices and administrative buildings
- Apartments and cottages
- Cafes and bars
- Swimming pools
- Retail premises
- Industrial buildings and premises
- Gyms, fitness centers
- Cultural and entertainment institutions (cinemas, entertainment centers)
- Hotels
- Parking lots, car services, gas stations
- Sanatoriums, boarding houses, holiday homes
- “Clean rooms”, clinics, hospitals
- And other objects...
Our objects
Beam system with collectors
Radiant heating system using a collector.
This is one of the most modern schemes, which involves laying an individual line to each heating device . To do this, collectors are installed in the system - one collector is the supply, and the other is the return. Separate straight pipes diverge from the collectors to the batteries. This scheme allows for flexible adjustment of heating system parameters. It also makes it possible to connect heated floors to the system.
The radial wiring diagram is actively used in modern homes. The supply and return pipes here can be laid in any way - most often they go in the floors, after which they are suitable for one or another heating device. To regulate the temperature and turn on/off heating appliances, small distribution cabinets are installed in the house.
According to heating engineers, this scheme is ideal, since each heating device operates from its own mains and is almost independent of other heating devices.
Advantages and disadvantages of beam systems
There are many positive qualities:
- the ability to completely hide all pipes in the walls and floors;
- convenient system setup;
- possibility of creating remote separate adjustment;
- minimum number of connections - they are grouped in distribution cabinets;
- it is convenient to repair individual elements without interrupting the operation of the entire system;
- almost perfect heat distribution.
When installing a radiant heating system, all pipes are hidden in the floor, and the collectors are hidden in a special cabinet.
There are also a couple of disadvantages:
- high cost of the system - this includes the costs of equipment and installation costs;
- difficulty in implementing the scheme in an already built house - usually this scheme is laid out at the stage of creating a home ownership project .
If you still have to put up with the first drawback, then there is no escape from the second.
Features of installation of radiant heating systems
At the project creation stage, niches are provided for laying heating pipes, and installation points for distribution cabinets are indicated. At a certain stage of construction, pipes are laid, cabinets with collectors are installed, heating devices and boilers are installed, a test run of the system is carried out and it is checked for leaks. It is best to entrust all this work to professionals, since this scheme is the most complex.
Despite its complexity, a radiant heating system with collectors is one of the most convenient and efficient. It is used not only in private homes, but also in other buildings, for example, in offices.
Preliminary design
The preliminary design (ED) of the heating system is intended to determine the requirements for the facility's solutions and confirm the feasibility of its creation. Sometimes the preliminary design stage is skipped and all the work envisaged at this stage is carried out at the feasibility study stage. We do not take this approach.
Our company is ready to offer several options already at the ES stage. The preliminary design is carried out with the preparation of an explication of the main equipment, equipment brand and manufacturer. This allows you to choose the optimal and less expensive way to solve the problem at a very early stage.
With forced and natural circulation
All the schemes presented above can be created on the basis of heating boilers of any type. For example, a stove heating scheme for a private house is built on the basis of a wood or coal stove, and pipe routing can be carried out according to almost any of the schemes described above. True, it would not hurt to add forced circulation to many of them. What is it for?
The main difference between a system with forced circulation of coolant and a system with natural circulation is the circulation pump.
As we remember, single-pipe heating systems are characterized by a decrease in coolant temperature as it moves away from the boiler - part of the heat remains in the radiators. These losses are partially compensated by the Leningradka scheme, but in some cases this is not enough. In order to correct the situation, a circulation pump is installed in the heating system, providing forced circulation of the coolant .
Forced circulation is also necessary in many other schemes, including two-pipe ones. The thing is that the small diameter of modern polypropylene pipes, numerous connections and turns create hydraulic resistance. In addition, the use of forced ventilation allows for faster heating of households.
Advantages and disadvantages of forced and natural circulation
Each system has its own advantages and disadvantages:
When heating a room with a large number of radiators, a circulation pump is simply necessary.
- natural circulation is simpler and cheaper - there are no costs for circulation pumps;
- forced circulation makes it possible to improve heating performance in large buildings - in some cases you can get by with natural circulation, but then the system warm-up time increases;
- forced circulation is characterized by a slight hum – natural circulation is completely silent.
That is, everything has its advantages and disadvantages.
Which heating boiler to choose?
It's no secret that there is a fairly large selection of modern heating boilers. They are divided into types according to the fuel on which they operate. Which one to choose depends on the circumstances. The basis is the fuel that is easiest to find in your region and which is cheaper than all others.
Currently, manufacturers offer combined models that run on two types of fuel. For example, gas and firewood, gas and electricity, coal and electricity, firewood and diesel fuel. When one fuel runs out, it can be replaced with another. Therefore, my advice is to choose the boiler that is convenient for you both in terms of fuel supply and in terms of operation and maintenance.
Electric
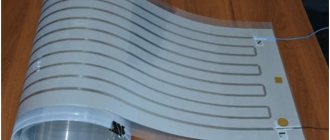
To heat your home, you can use electrical appliances: convectors, long-wave infrared heaters or “warm floor” systems. Also, to achieve maximum effect, it is recommended to combine several electrical appliances.
With any of these methods, large payments for energy consumption cannot be avoided, so it is recommended to install them in cases where there are no alternative heat sources.
Color combinations
Stylists advise taking into account the following nuances:
- direction in the interior;
- combination of shades;
- illumination
It is much easier to choose a palette if the style for the kitchen and living room has already been selected. For example, neoclassicism and Provence have their own combinations. In a classic interior, designers combine pastel colors, pale colors, which are slightly diluted with dark shades. In French country houses you can often see soft blue, pink, and pistachio colors. Art Deco designers make up objects and finishing materials in black and white, sometimes beige and brown or silver and black. The main thing is to choose a shade for the walls. White will become universal, it will expand the space, and later you can paint them with any paint. However, in the cooking area, white ceases to look fresh. Beige or gray shades would be more practical. This background will highlight the other colors. In a monochrome interior, designers recommend gluing wallpaper in an unusual color or with a photo print.