Heavy cast iron and steel engineering systems have been replaced by lighter communications made of polypropylene. Polymers are used for water supply and heating installations in cottages, mansions and even in the country. Connection technology allows you to create reliable networks.
Therefore, it will be useful for developers and future owners of real estate to become familiar with the types and diagrams of systems. This will allow you to control the work of master plumbers or independently create an effective and durable thermal circuit at the site.
Pipeline installation
Installation of a heating pipeline in a private house involves connecting individual elements into a single system. Perform the following operations:
- layout of elements according to the diagram;
- welding or soldering of pipes;
- connection using fittings;
- connection of heating devices.
Since plastic materials expand when heated, expansion joints are installed. This is a loop of pipe that is soldered into the pipeline on long straight sections. After completion of installation work, it is necessary to carry out a test under operating pressure.
How to solder a heating pipeline
We will describe below how to properly solder heating from propylene pipes. When polypropylene is heated to +260 degrees, it melts, which makes it possible to connect individual elements. This is ensured by the phenomenon of polyfusion - the interpenetration of atoms. We get the junction of two parts that are not separated by a border.
The soldering iron is selected depending on the type of soldering - butt, coupling or fitting. It has nozzles onto which sections of pipes to be connected or a pipe and fitting are put on. After heating, they are tightly connected and held for 4-6 seconds. The heating and cooling time of the connected polypropylene elements depends on their diameter. The data is given in the table, which can be found in the specialized literature.
Attaching the pipeline to the wall
The pipeline is secured to the wall using clips and clamps. Clips ensure that the pipe remains stationary along its axis.
They are attached to the wall with a clamp, placing the pipes no closer than 20 mm from it. Fasteners are placed at a distance of no more than one and a half meters from each other. In places where pipes turn or branch, additional fasteners are installed.
Radiator mounting
Radiators are hung on metal brackets included in the delivery kit and secured to the wall with dowels. Their thickness depends on the weight of the battery. Cast iron elements are additionally supported by legs.
Heating schemes made of polypropylene for a private house
- single-pipe or double-pipe;
- two-pipe with horizontal wiring;
- two-pipe with vertical wiring;
- collector
The single-pipe scheme provides for the passage of liquid in one direction. It is used when connecting radiators in series. The two-pipe model has a return line.
Two-pipe circuit with horizontal wiring
In this scheme, polypropylene pipes are located along the wall just above the floor level, which makes them inconspicuous and does not disturb the aesthetics of the room. This is a conventional two-pipe system with bottom wiring. Most often, heating radiators are installed around the perimeter of the room.
Vertical wiring diagram
The vertical layout is used for heating manor houses with 2 floors or more. The heated liquid is transported between floors via risers. The layout can be upper or lower in relation to the radiator. The upper model is more often used with natural circulation. On each floor you can make a horizontal heat distribution scheme. In this case, one riser is installed, through which the coolant will be transferred to each floor.
Using the distribution manifold
In a heating model with forced circulation, a collector is often installed. In it, a comb of pipes extends from the main riser; their number is equal to the number of heat consumers. Each polypropylene pipe has a separate valve that turns off a specific line. This system allows you to distribute heat evenly and, if necessary, reduce the temperature in a private home.
The disadvantage is the high cost of installation, as the length of the pipeline and the number of fittings increases. However, it is convenient to operate; it is possible to separately turn off the damaged area. Complex collectors are equipped with automatic devices that regulate the temperature of the coolant and turn off the system in an emergency.
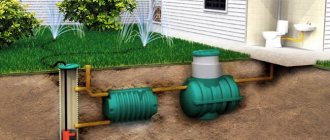
One of the methods of heating a home is a water heated floor. Polypropylene pipes are widely used for its installation. The water floor heating system is connected to the main heating network.
Organizing the heating of a manor house is a complex process. To do it yourself, you need to study methods and models of pipe laying, select suitable materials and fittings. It would be a good idea to familiarize yourself with heating projects for residential buildings that are similar in design and size to your home.
Views: 1,370
Heating system diagrams
Select the optimal pipe layout for self-installation of polypropylene heating. In the future, you will receive recommendations for connecting individual elements and place them in accordance with the chosen plan.
Single-pipe scheme
Single-pipe scheme
The simplest method of arranging a heating system. In accordance with this wiring method, each battery installed further from the heating unit will heat up to a lower temperature compared to the previously installed battery.
This method makes it possible to reduce the consumption of materials for the arrangement of the heating system. However, the heating efficiency will be low, because The temperature distribution with such pipe routing is uneven.
In view of this, you should try to refrain from a single-pipe pipe routing scheme.
Collector circuit
Collector circuit
To equip a heating system according to this scheme, you will have to spend more materials, however, the basic operational properties of such heating will be much higher.
Heat distribution throughout the rooms will be fairly uniform and high quality.
Two-pipe system
Two-pipe system
The most optimal method of arranging a heating system. The pipes are laid into the floor or into the walls of the house around the perimeter. Two-pipe heating is best suited for heating a home. Therefore, experts recommend giving preference to this particular pipe routing option.
Pipe welding problems
PPR pipes are connected to each other by welding (or by soldering). On the one hand, this is a fairly simple and convenient way of connecting, but at the same time it requires a serious and responsible approach. Many installers are dishonest about this procedure, welding everything at random. As a result, you can get this picture:
Such situations also happen to experienced installers. And the saddest thing is that it is impossible to know whether the joint turned out normal or not until you cut the pipe in half.
We had a case when we invited a third-party team to install a boiler room from PPR pipes. The guys turned the welding iron to the maximum temperature, although each pipe has its own temperature limits. They were warned about this repeatedly. But they still did it their way. In appearance, all the connections were made perfectly, but in the end, after starting up the boiler room, some of it began to leak. I had to redo it
Disadvantages of this wiring
- inability to regulate the heating temperature in different parts of the wiring. It is generally difficult to regulate, since reducing the temperature at the beginning of the wiring will lead to a minimum temperature at the end; if the temperature difference between the upper point of the wiring and the bottom of the riser is large, then below it may be necessary to install heating radiators with a larger number of sections and area than at the beginning riser. For normal operation, strong pumps are required, boiler heating costs increase, operational wear and tear increases, and there is a need for frequent replenishment of water.
How to make heating yourself without a polypropylene pump
Polypropylene pipes have gained popularity due to their affordable price, quality of material and ease of installation. Even a beginner can cope with the assembly; all you need to do is buy or rent a soldering iron - a special heater designed to connect elements together.
The amorphous nature of the polymer to an aggressive environment under the influence of high temperatures is the key to the longevity of the system. The material provides minimal resistance to the directional movement of the coolant, which makes the circuit of polypropylene pipes most suitable for organizing gravitational circulation of liquid.
Sequence of work:
- Mark the installation locations of batteries, connection points for connections and highway routes. The diagram is drawn on the walls, starting from the farthest section, gradually approaching the combustion room where the boiler will be installed. The mains should have a slope of 2 to 8 mm.
- After applying the markings, it is determined at what level the boiler should stand. The inlet pipe should not be higher than the return line. If this condition is not met, the markings will need to be adjusted or a pit will be constructed to bury the boiler unit.
- They punch holes in the partitions and cut grooves for the hidden gasket.
- Carry out a control check that the markings are applied correctly and begin installation. First, radiators are installed, then the connections are assembled and the lines are laid.
The assembled circuit is slowly filled with water through the make-up tap at the lowest point. The air from the pipes will go into the expansion tank. To fill the batteries, use a manual air vent.
Choosing a heating source
Before you begin installing a polypropylene pipeline, you should decide on the heating source. This will affect the overall design of the heating system and the selection of additional elements.
Gas
It is considered a very economical and environmentally friendly type of fuel. However, it is appropriate to talk about efficiency only if the house is already gasified or is at least located near the main gas pipeline. Otherwise, connecting to a remote network will cost the owner a tidy sum.
The best option for installing a heating system using gas fuel is a modern wall-mounted gas boiler, equipped with a set of necessary devices and protective mechanisms that ensure maximum automation of system control processes.
Another advantage of this solution is the ability to abandon the chimney that is so common in private households. Modern gas boilers are equipped with a closed combustion chamber, the supply of oxygen and the removal of exhaust air from which is carried out through a thin tube.
Electricity
Another environmentally friendly way to heat a room, although more expensive than gas. To ensure the operation of the heating system, you will need a special boiler equipped with safety equipment, a pump for circulating coolant (depending on the chosen scheme) and an expansion tank.
Solid fuel systems
They are characterized by a higher coolant temperature at the boiler outlet, which imposes increased requirements on the organization of the safety system.
How to install heating from polypropylene pipes?
Let's look at several practical examples of soldering a pipeline from a polypropylene pipe.
Soldering is done with a special soldering iron:
Each soldering iron has a temperature regulator (1). The temperature for soldering polypropylene is set to 270 degrees. The pipe is heated with a soldering iron for no more than 5 seconds.
The following must be taken into account. If the work takes place outside in cold weather, or in a cold room, the soldering time increases, because the soldering iron cools down quickly.
In this case, you need to either increase the heating temperature of the soldering iron or increase the heating time. The heating time also increases when soldering pipes of larger diameter, as illustrated by the following table:
Actually soldering. The soldering iron has two nozzles: one for heating the inner diameter, the other for the outer diameter. At the same time, both parts that are supposed to be connected are heated:
We press evenly on both parts, as if towards each other - in the direction of the red arrows in the photo:
As it heats up, the coupling reaches the side, and a flange also appears on the pipe. After heating, remove the parts from the nozzles and dock them with each other:
After connecting the heated parts, they need to be fixed for a while
After joining, hold the parts for up to 30 seconds - so that they cool down and the connection hardens. The flange on the pipe must be uniform around the entire circumference of the connection.
This is how all polypropylene is soldered, regardless of the pipe diameter and purpose, be it a heating or water supply system. The only difference, as mentioned above, is the soldering time: the larger the diameter of the tube, the longer it takes to heat and fix after connection.
A soldering iron attachment was developed to make the already simple life of the installer even easier.
The nozzle allows you to accurately determine the time when the parts to be soldered are already sufficiently heated. This nozzle has a special hole:
- through which molten polypropylene comes out. Once it appears in the hole:
- This is a signal: we remove and join the parts. There is no need to time the clock or count the seconds yourself.
There is also a ceramic nozzle that will prevent this type of melted pipe:
The advantage of such a connection (without the use of metal) is that, due to the absence of metal connections, hardness salts do not build up in such areas. And also after soldering, a monolithic connection is obtained.
When working with polypropylene, you need to take into account all the steps in advance - in order to avoid getting into some inconvenient moments. Such “moments” can occur when, for example, you need to solder in some limited space, etc.
Therefore, before soldering, it is better to draw a pipeline diagram on a piece of paper (starting from the boiler) and write down the sequence of steps.
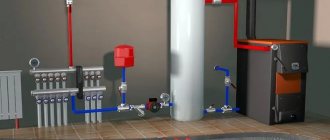
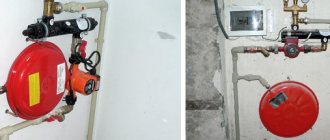
Expansion tank
At the peak of the accelerating manifold, the pipeline is diverted into the expansion tank. Its purpose is to regulate pressure in the heating system in order to avoid an increase to emergency pressure.
Today, expansion tanks of a closed design are more often used, eliminating contact of the coolant with air.
Structurally, the expansion tank is a container divided into two parts by a flexible membrane:
- One is filled with air under excess pressure.
- The other has a coolant inlet/outlet.
A closed expansion tank can be installed in any convenient location in the heating circuit, which is an advantage over open tanks mounted exclusively at the highest point of the system.
For your information! Free contact of the coolant with air in the open expansion tank promotes active oxygen saturation. This threatens early failure of steel pipes and heating devices due to the acceleration of corrosion processes. In this case, it is preferable to install a single-pipe heating system with polypropylene pipes - the material is resistant to deformation.
Do-it-yourself heating installation from polypropylene pipes
Polypropylene pipes are connected using threaded or non-threaded fittings. Threaded fittings come in both detachable and non-detachable types.
When installing heating from polypropylene pipes, you must be guided by the following technical conditions:
- polypropylene pipes must be laid away from open sources of fire;
- if there is a need to install a tank or water meter, it is better to use threaded and detachable fittings. One-piece fittings are used only in conjunction with flexible hoses;
- The use of dirty and deformed fittings, as well as independent thread cutting, is not allowed;
- in the case of joining straight sections or connecting polypropylene pipes of different diameters, you need to use couplings;
- in order not to bend the polypropylene pipe at the turning points, during installation you need to use a special square;
- tees are used at branching points.
Having familiarized yourself with the mandatory conditions for the work, you can begin the installation process.
Heating wiring
As we said earlier, for ease of operation, saving time and money, as well as to achieve maximum efficiency of the assembled system, the project must indicate the location of the following elements:
- corners;
- couplings;
- heating equipment;
- fasteners.
The pipeline approaches the batteries from the bottom or side, and is made according to a single- or double-pipe scheme.
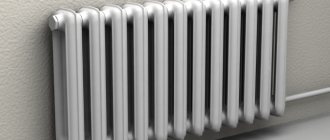
Radiator installation
Before connecting the polypropylene pipe to the battery, the battery must first be assembled, equipped with the necessary adjustment elements, and secured to the wall.
The heating radiator is installed as follows:
- We mark the places where the batteries will be installed. According to SNiP, there should be a gap of at least 2 cm between the heating radiator and the wall, and the distance from the radiator to the floor should be 10-15 cm.
- We install brackets for hanging the heating radiator. To do this, you will need a level so that the radiator hangs level, and dowel nails to attach the brackets to the wall.
- Next, the heating radiator is installed on the brackets.
According to this scheme, all batteries are installed in the room.
Connecting batteries
The procedure for connecting a polypropylene heating pipe to a radiator will be as follows:
- We start by attaching the adapter coupling to the radiator. It must be remembered that to connect polypropylene pipes to an aluminum heating radiator, special couplings are used, which differ from those used to connect polypropylene pipes to cast iron radiators.
- We connect a ball valve, radiator valve or control valve to the installed coupling.
- We connect polypropylene pipes to this tap.
- According to the steps described above, the battery output is connected to the heating pipe.
These are the main stages of connecting PP pipes to heating radiators.
Read material on the topic: How to change a heating radiator without errors
Disadvantages and methods for eliminating them
- The main disadvantage of polypropylene pipes is their high expansion coefficient. At a coolant temperature of 100°C, 10 meters of pipe lengthens to 15 cm. This leads to deformation of the structure. In order to prevent destruction, flexible supports are installed and compensation loops are made. Later, foil-reinforced pipes began to be used, which significantly reduced the expansion coefficient. Nowadays, the most practical pipes are reinforced with glass fiber: under the same conditions they extend by only 1 cm.
- Polypropylene products, especially connecting elements, are inferior to metal pipes in strength. It is not even correct to compare them: when subjected to strong impacts with hard objects, polypropylene is deformed and may collapse.
Features of fittings for polypropylene pipes
PP-R fittings for polypropylene pipes of hot water supply and heating systems
The use of metal-plastic pipes and the same connections to them allows you to create maximum aesthetics, which would be impossible when working with conventional metal materials. Metal-plastic has many advantages: ease and speed of assembly, affordability, quality, durability.
Fittings for polypropylene pipes are connecting parts that allow you to shut off the system, dismantle it, or assemble the desired structure in the shortest possible time.
Types of fittings:
- The coupling is the simplest part, representing a small cylinder. Its purpose is to join two pipes of the same diameter.
- An adapter is practically the same as a coupling, but pipes of different diameters are connected here.
- Corners are the parts needed to form 90 or 45 degree angles. It is not always advisable to heat and bend the pipe itself using heating, despite the fact that polypropylene is a fairly plastic material. This causes it to become thinner, especially on the outside of the bend. On the contrary, folds appear inside. Of course, this has the most detrimental effect on the strength of the structure.
- Crosses and tees are parts that are used to make several branches from the main line. There are a variety of angle options here. If such fittings have threads, they can be used on shut-off valves.
- Bypass curved fittings - are used when a complex structure is created and bypass one or more pipes.
- Shut-off valves are the same valves and taps, with or without threads.
- Threaded or welded plugs to complete the line.
- “American” is a coupling with a union nut, used in cases where the structure will need to be periodically disassembled.
- Compensators - to smooth out the effect of expansion of pipes due to high temperatures.
- Collectors - connect the pipeline to the source when installing heating and underfloor heating.
The selection of fittings depends on the diameter of the pipes being connected. It is desirable that the pipes and connections are from the same manufacturer. Fitting sizes may vary. In everyday life, the most widely used elements are those with a diameter of 16, 20.25 and 40 mm (according to the diameter of the pipes). The largest diameter for domestic needs is 50 mm. For industry, there are special large-section pipes and corresponding connections to them. Other technologies and fittings are already being used here.
PPR fittings
There is a classification of fittings according to the material from which they are made:
- Homopolymer (HPP) - not used in the installation of heating systems.
- Random copolymer (RPR) – has increased performance characteristics due to the maximum homogeneity of the substance from which the compounds are made.
- Block copolymer (PPV).
The second and third types of material are most resistant to high temperatures, which is why they are used in the installation of heating systems.
There is also a classification of polypropylene pipes and connections according to methods of operation:
- In cold water supply pipelines.
- Underfloor heating systems for low temperatures (up to 60 degrees).
- In hot water supply pipelines (more than 70 degrees).
- Radiators (up to 90 degrees).
What is taken into account when calculating
Main criteria that are important to consider:
- volume of coolant sufficient to fill the system;
- heating circuit length;
- rated coolant flow rate;
- required productivity, kW;
- circulation pressure;
- resistance of pipes and fittings in the heating circuit.
For each parameter there is a range of acceptable values. The calculation should give the size of the heating system pipe that satisfies all the requirements and provides optimal parameters.
Calculations refer to the internal diameter. After receiving the desired size, a suitable denomination is selected, which is commercially available, and then the material is selected. The wall thickness, outer diameter and appearance depend on this.
What are the features of using 40 mm polypropylene pipe for heating
When designing and installing a heating system, the question always arises - what diameter of pipes to use during operation. The diameter (and therefore the throughput of the pipes) is important, since it is necessary to ensure the coolant speed is within the range of 0.4–0.6 m/s, which is recommended by experts. At the same time, the required amount of energy must be supplied to the coolants (radiators).
At a speed of less than 0.2 m/s, air pockets stagnate. Speeds greater than 0.7 m/s are not rational to use in terms of energy saving, since the resistance to fluid movement becomes significant (it is directly proportional to the square of the speed). Also, if this speed is exceeded, there is a possibility of noise occurring in pipelines of small diameters.
Polypropylene pipe 40 mm is increasingly used in heating systems, even with disadvantages such as the difficulty of ensuring the quality of joints and significant expansion under the influence of heat. Such pipes are inexpensive and easy to install, and these are often decisive factors.
Polypropylene pipes are divided into several types, depending on technical characteristics and operating conditions. For heating, grades PN25 (PN30) are used, designed for an operating pressure of 2.5 atm at a liquid temperature of no more than +120 °C.
Polypropylene pipe 40 mm, reinforced with aluminum foil or fiberglass, used for heating. The reinforcement does not allow the material to expand greatly when heated.
Some experts choose pipes with internal fiberglass reinforcement. They are most often used in private heating systems.
Pipes are manufactured in standard diameters, from which you need to choose the most suitable one. There are standard solutions with which you can select the diameter of the pipe for heating your home. They allow you to select the optimal diameter in 99% of cases without performing a hydraulic calculation.
Standard diameters of polypropylene pipes include 16, 20, 25, 32, 40 mm.
Standard outer diameters of polypropylene pipes are 16, 20, 25, 32, 40 mm. These values correspond to the internal diameter of PN25 pipes - 10.6, 13.2, 16.6, 21.2, 26.6 mm.
More detailed data on the outer and inner diameters and wall thickness of polypropylene pipes can be found in the table.
| Outer diameter, mm | PN10 | PN20 | PN30 | |||
| Inner diameter | Wall thickness | Inner diameter | Wall thickness | Inner diameter | Wall thickness | |
| 16 | 10,6 | 2,7 | ||||
| 20 | 16,2 | 1,9 | 13,2 | 3,4 | 13,2 | 3,4 |
| 25 | 20,4 | 2,3 | 16,6 | 4,2 | 16,6 | 4,2 |
| 32 | 26 | 3 | 21,2 | 5,4 | 21,2 | 3 |
| 40 | 32,6 | 3,7 | 26,6 | 6,7 | 26,6 | 3,7 |
| 50 | 40,8 | 4,6 | 33,2 | 8,4 | 33,2 | 4,6 |
| 63 | 51,4 | 5,8 | 42 | 10,5 | 42 | 5,8 |
| 75 | 61,2 | 6,9 | 50 | 12,5 | 50 | 6,9 |
| 90 | 73,6 | 8,2 | 6 | 15 | ||
| 110 | 90 | 10 | 73,2 | 18,4 |
Read material on the topic: How to choose fittings for polypropylene pipes
We need to ensure the supply of the necessary thermal power. It will be directly dependent on the amount of coolant supplied, but the speed of the liquid should not exceed 0.3–0.7 m/s.
Based on this, there is the following connection correspondence (for polypropylene pipes, the outer diameter is indicated):
- 16 mm – when installing one or two radiators;
- 20 mm – when installing one radiator or a small group of radiators (radiators of “regular” power from 1 to 2 kW, maximum connected power no higher than 7 kW, number of radiators no more than 5 pcs.);
- 25 mm – when installing several radiators (usually no more than 8 pieces, power not higher than 11 kW) of one wing (arm of a dead-end wiring diagram);
- 32 mm – when connecting one floor or an entire house, depending on the thermal power (usually no more than 12 radiators, respectively, thermal power no higher than 19 kW);
- 40 mm - for the main line of one house, if available (20 radiators - no higher than 30 kW).
Let us analyze the choice of pipe diameter in more detail, based on pre-calculated tabular correspondences of energy, speed and diameter.
Let's turn to the table of speed correspondence to the amount of thermal power.
The table shows the values of thermal power (W), and below them is the amount of coolant (kg/min) with a supply temperature of +80 °C, a return temperature of +60 °C and a room temperature of +20 °C.
The table shows that at a speed of 0.4 m/s the following amount of heat is supplied through polypropylene pipes of the specified outer diameter:
- 4.1 kW – internal diameter about 13.2 mm (outer diameter 20 mm);
- 6.3 kW – 16.6 mm (25 mm);
- 11.5 kW – 21.2 mm (32 mm);
- 17 kW – 26.6 mm (40 mm);
At a speed of 0.7 m/s, the supplied power increases by 70%, which can be easily seen in the table.
Materials and tools
Polypropylene pipes PN 10 are intended for cold water supply, PN 20 - for hot water with temperatures up to 80o.
PN 25 pipes, reinforced with aluminum foil and withstanding temperatures of 95 degrees, have been developed especially for heating in a private house with polypropylene.
Polypropylene pipes PN 25 have the following characteristics:
- Melting point - 150 degrees
- Maximum operating pressure - 25 atm
- Density - 0.9 g/cu. cm
- Thermal expansion coefficient - 0.15 mm/mmC
- Thermal conductivity - 0.24 W/mS
- Outer diameter - 21.2 - 77.9 mm
- Inner diameter - 13.2 - 50 mm
- Wall thickness - 4 - 13.3 mm
The advantages of polypropylene pipes for heating are:
- Resistance to corrosion and scale deposits on internal walls
- Pipes do not burst when water freezes
- Low cost
- Light weight
- Plastic
- Resistance to temperature changes
- High level of sound insulation
- Long service life - up to 50 years
Disadvantages include low melting point and exposure to ultraviolet rays.
To install polypropylene heating, you will need the following special tools:
- Soldering iron with a set of nozzles for connecting pipes
- Plastic pipe shears or roller pipe cutter
- Deburring and chamfering cutter
- Shaver for removing foil
Every home must have heating. However, summer houses are an exception. For example, frame garden houses, which are designed for relaxation during the hot season. Therefore, it is not worth installing a heating boiler, because... The summer temperature itself will warm up such a house.
If you plan to relax only in the summer, then you can build such a garden house with your own hands. Read about how to build such a wonderful building here.
Security measures
When working with a heating device, it is necessary to observe personal protective measures:
- The soldering iron must be installed on a horizontal surface in a place free from materials.
- The technician must wear protective gloves (for working with hot tools) and comfortable overalls.
- Avoid bending over melting plastic as this process releases harmful fumes.
- The room should be relatively clean. The working surface is free from dust and debris.
- The connection between the soldering iron plug and the network must be tight and the cord must be loose.
We recommend that you read: Rules for installing stainless steel chimneys
The welding tool is preheated for 20 minutes if it does not have a corresponding indicator.
Open type
The operating principle is the same as that of the closed version. But in this case, excess coolant is forced into an open tank, which is mounted under the ceiling of the room or in the attic.
An open tank is a tank with a leaky lid, which is equipped with an emergency overflow - a pipe led outside the attic to the street or connected to the sewer.
The disadvantages of an open system include the constant supply of oxygen to the coolant, which accelerates the corrosion of the metal from which the circuit elements are made. Airing of the pipeline also occurs - to avoid this, the radiators are mounted at a slight slope and automatic air vents - Mayevsky taps - are installed in the upper part.
In addition, liquid from an open type tank evaporates and it is necessary to regularly add water so that the open system can function normally. Add water to the tank manually from a bucket, or connect a water pipe with a valve.
The advantages of open-type tanks are their affordable cost and the ability to make a tank of the required dimensions with your own hands.
Type of bottling
The natural circulation of water in the heating system depends on the principle of supplying coolant from the boiler to the heating devices. There are different contours with bottom and top filling.
Bottom filling makes it possible to avoid the installation of high vertical pipes - communications are laid at floor level. This option is suitable only for single-pipe circuits and is considered ineffective without installing a circulation pump.
Top filling is the best option, since the distribution pipe of a two-pipe system is located under the ceiling and provides an active supply of heated coolant to each radiator, from which cooled water flows into the return pipe located along the floor. For a single-pipe system, top-type filling is also preferable.
Two-pipe circuit
Design features of a gravity two-pipe circuit:
- Separate pipes are installed for supply and return;
- the supply pipe is connected to each heating device through a separate inlet outlet;
- The return pipe is connected to each heating device separately.
A two-pipe gravity heating system for a private house differs from a single-pipe one in that all radiators are supplied with coolant that has not had time to cool down, due to which:
- heat in the house is distributed evenly;
- there is no need to increase the number of sections in the radiator in order to improve heating;
- it is easier to regulate the temperature in the system;
- installation of the pipeline requires pipes of a smaller diameter than for a single-pipe circuit;
- there are no strict requirements for maintaining the slope when installing system elements - some deviations from the calculated values are not critical.
A two-pipe heating system with upper and lower wiring is easy to install and efficient; it can be used to heat a two-story house.