The older generation remembers very well how difficult it was to get a new bathtub. I had to call my friends, come somewhere, pay money, then think about how to organize delivery and lift to the floor. The baths were all standard shapes, colors and sizes.
Now, in an era of diversity, I want to create something unique and special. Why not make your own bath at home? So that it fits harmoniously into the design of the rest of the rooms in the house or apartment. How complicated is the process, what options are there? It's worth taking a closer look.
Options
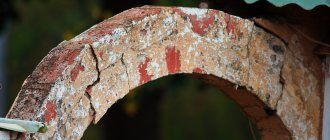
There are many of them and a person is limited only by his imagination and financial capabilities. You can arrange a classic rectangular bath or a romantic round one. Or maybe a huge medieval font, lined with brick.
Examples:
- Polyethylene bath - a budget option. To do this, take a container of the required size, made of wood or plastic, and cover the inside with polyethylene. This method is rather disposable; it is more convenient to use for a summer residence. It is not difficult to improve the “design” - dig a hole and cover it with material that does not allow water to pass through. The lazy pool is ready.
- Brick bath – Having chosen a pallet, cover it with material. Knowing the necessary parameters for constructing a bath will help you calculate the height and shape of the walls. First you need to think about the location of the drain. Make a small hole in the corner of the pan, place a corrugated pipe there, the edge of which is connected to your sewer system. Decorate the outside of the bath with tiles or other decor. It is important to use a moisture-resistant mortar for masonry.
- Concrete bath - create a metal formwork module. You will need it for a DIY concrete bath. The frame is filled with a ready-made concrete solution. Once it dries, you need to line it from the inside with moisture-proof material. The bathtub will resemble a mini-pool, especially if you decorate it with tiles.
Recommended reading: What materials are toilet bowls made of?
The dimensions of the font should be determined in advance, as is the drainage and water supply system.
Design and advantages
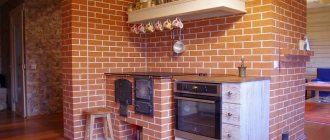
A brick bathtub is an excellent option for a washing container that you can build yourself if the standard models do not suit the homeowner in size, shape or appearance. It is made of sand-lime brick and moisture-resistant concrete, and then lined with finishing material.
Brick bath
Most often, a brick font is placed between two opposite walls of the bathroom to save free space. A finished bathtub, made to individual sizes with your own hands, becomes part of the room, a kind of swimming pool. This technology has the following advantages:
- Individual approach. A brick bathtub can be made of any size, so it fits perfectly into the interior of the bathroom, allowing you to make the most of the available space.
- Affordable price. If you make a font with your own hands, then the cost of the finished product consists only of the costs of materials: brick, concrete, waterproofing, cladding. This option for making a bathtub is cheaper than ordering a model of non-standard sizes from the manufacturer.
- Low thermal conductivity. The brick font, due to the low thermal conductivity of this material, retains heat for a long time during hygiene procedures.
- Interesting design. Unlike washing containers made from standard materials, brick bathtubs look more solid and aesthetically pleasing; they fit organically into antique, rustic and minimalist interiors.
Note! If you decide to make a brick bathtub with your own hands, choose rectangular models that do not have rounded sections, as they require less masonry skill.
Waterproofing
Needed to protect the bottom and walls of the font from moisture. To do this, the surface of the walls and bottom of the bathtub is treated with a moisture-resistant cement-sand mixture.
Mark in advance the location and install the supply pipes. In order for the liquid to flow out through the drain hole itself, you need to install it at a slight slope.
Waterproofing a brick support or concrete wall is carried out using the following materials:
- Covering with roofing felt or membrane waterproofing are the simplest methods of protecting the bottom of a container from possible leaks. The material is first cut into strips, then laid tightly overlapping, overlapping the sides.
- Coating - a mastic based on bitumen or synthetic rubber is used. The bottom of the bathtub is treated with it and a thick, monolithic layer is applied. Disadvantage: it takes a long time to dry.
- Painting - you need to apply 4-5 layers of moisture-resistant bitumen and/or polymer emulsion. Any will do. Disadvantage - it doesn't last long.
Down with partitions
The optimal solution for a small bathroom is to combine it with a toilet. Sometimes, it turns out to further expand the area due to the corridor and kitchen - such an option is only welcome.
The absence of an internal partition allows you to easily install a washing machine, an additional piece of furniture or a plumbing fixture.
Considering that now instead of two doors to the bathroom you will need one, it can easily be replaced with a sliding structure - it saves space and looks aesthetically pleasing.
Global restructuring will require a lot of work and financial investment, but the result is worth it. The possibilities for arranging the interior of a small bathroom will expand significantly.
Practical recommendations
Experienced people advise applying a layer of some backfill material with thermal insulation properties on top of the waterproofing. It will maintain the temperature of the collected water inside the bath. Then fill the screed.
When does a brick bath pay for itself:
- if a spacious room has been allocated for it in the house, then instead of a regular bath, you can create a mini-pool;
- I want to create an unusual bathroom;
- the plan is to combine the toilet and bathroom.
To build a bathtub with your own hands, you will need a step-by-step guide, especially if the material is brick.
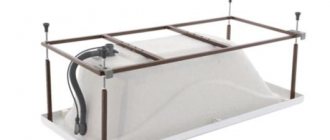
Masters consider the creation of a layout and frame to be the most difficult stages. First, you need to create a detailed large sketch (layout) from cardboard, and in natural sizes.
The lining of the inner bowl of the bathroom is made of thin, even steel sheets. They can be given any desired size and shape. The finished frame is mounted inside, in place of the bathroom. A metal container weighs a fair amount, so you should choose a reliable material for creating bathtub legs.
We recommend reading: Vandal-proof toilet
After installation, the font is treated with a waterproofing compound.
An important step is checking the integrity of the structure. Why is the bottom filled to the top with water? The bath stays filled for 2-3 days. Then, if, after inspecting the floor underneath, no wet spots are found, you can begin decorating.
The installation process is basically standard - selection of material, measuring the location, assembly, waterproofing, decoration. The only difference is the complexity of the work, the cost and its duration.
We act according to plan
Before you start renovating your bathroom, let’s answer a few basic questions:
- Is it important to maintain a separate bathroom or can both rooms be combined? In the second case, the area of the room will increase significantly due to the demolished partition.
- What plumbing fixtures can a family not live without? It is clear that the set will be minimal to free up useful space. It is more correct to limit yourself to a standard bathroom, or even better, a shower stall (we will talk about this below), a toilet and a washbasin.
- Will redevelopment require relocation of utility lines?
- Is it possible to install the washing machine outdoors, for example in the kitchen or hallway. The design of a small bathroom will only benefit from this.
- Is a full-fledged bath necessary in this case or can it be replaced with a compact hydrobox, which can give no less pleasure from water procedures.
Decoration
The design is ready, but will it fit into the surrounding interior? To do this, you need, even at the stage of choosing a material, to imagine what the bathroom will look like later, so that each element looks harmoniously as part of the whole.
The facing material must meet 4 requirements:
- moisture resistance;
- impact resistance;
- durability;
- aesthetic appearance.
As a rule, the entire inside of the bowl and sides are covered with facing material.
Finish options:
- Mosaic laying - an excellent option. It is small, moisture resistant and durable. There are many colors. You can safely line baths of any shape. However, it is better to invite a master for finishing; this is a labor-intensive task.
- Ceramic tile – if the bathtub has a simple shape - square or rectangular, then finishing with tiles will be the ideal solution.
- Liquid acrylic - the bathtub is simply filled from the inside with liquid acrylic. It will give the necessary smoothness, shine and rich color. Drying time is 3-5 days.
Some masters recommend a combined option. For example, part of the bathtub should be covered with mosaic, and part – filled with acrylic. Moreover, only it brings a brick or concrete bathtub as close as possible to a regular one, giving it a smooth and smooth shape. Swimming will become much more comfortable.
Brick bath
A structure made of brick or foam concrete blocks can replace a standard bathing bowl. The masonry technology is based in such a way that you can create a bowl of any shape and size. The use of a shrink mold is not required.
Most often, a homemade brick container is placed in the corner between two walls. The design allows you to make a comfortable font that takes up little space.
The individual masonry process consists of 4 stages:
- supply of plumbing communications;
- masonry of the structure itself;
- waterproofing;
- external cladding.
Advantages of materials
The advantages of brick baths are as follows:
- high strength and wear resistance;
- soundproofing properties;
- low level of moisture absorption;
- naturalness and environmental friendliness;
- material density;
- comparative ease.
Which brick is suitable
Bathtubs are made of ceramic, sand-lime brick or foam concrete blocks. If you follow all technical standards, you can make a strong and reliable font from any brick. The design can last for many decades. Construction industry experts recommend giving preference to standard ceramics. It is a little more expensive than its opponents, but its consumer properties cover the difference in price.
Preparatory work
Before starting construction work, it is necessary to prepare all tools and materials.
The list includes:
- level;
- putty knife;
- square;
- jointing;
- trowel;
- mopping;
- brick;
- cement;
- plaster;
- waterproofing mixture;
- tile;
- grouting of joints for swimming pools.
You also need to dismantle the old bathtub and floor down to the floor slabs in advance. Communications are double-checked and installed before construction work begins, since it will be almost impossible to correct this in the future.
Step-by-step construction instructions
In order for the design to comply with technical standards and regulations, you must follow the step-by-step instructions:
- Install a drain for shower cabins. This will increase the convenience of subsequent plumbing maintenance.
- Lay out the bottom and walls of the container using standard masonry mortar. When building walls, they use the “half-brick” technique, or use blocks with a minimum thickness.
- Apply plaster, which will help smooth out all the unevenness, and round the corners if necessary.
- The next layer is waterproofing. For these purposes, polymer and combined ready-made compositions are chosen. They are laid in a thin layer, but at the same time have a high degree of water resistance. Also, the walls and bottom can be plastered with cement mortar, which includes liquid glass.
It is not recommended to apply roll or bitumen waterproofing, as it prevents the durable installation of the facing material.
Final finishing and cladding
The final stage of construction is the external and internal finishing of the structure. Whole tiles, mosaics made of ceramics or porcelain stoneware are used as cladding. The material is attached with waterproof glue. After the installation has dried, begin grouting the joints with epoxy.
Judging by the photos of the finished products, the mosaic cladding looks much more impressive. In addition, due to its small size, the material can be easily placed under any inclination or bend of the container.
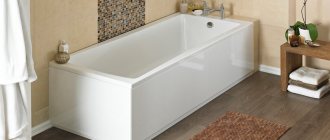
Screen options
The screen is a protective wall that helps cover the legs and bottom of the bathtub. Sewer pipes, supports and other communication systems are “hidden” behind it. You can also make the screen yourself. Before choosing a material, you need to measure the space and estimate the shape of the screen.
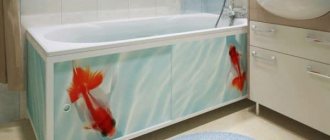
It is better to determine in advance whether the screen will be monolithic (stationary) or sliding. The second option is more convenient if you plan to create a place to store various things under the bathroom.
You can choose any material, the main thing is that the finished screen fits harmoniously into the overall design of the room and is:
- moisture resistant;
- resistant to possible temperature changes;
- washable;
- easily replaced.
Recommended reading: Guide to choosing a shower cabin
Most often, sliding plastic screens are installed, designed to match the color of the walls or floor.
A wooden screen looks gorgeous, but the wood will need to be protected by treating it with a special moisture-resistant compound. It looks beautiful if there are other wooden parts in the room. For example, cabinets, shelves or racks.
Drywall also looks beautiful, but here you need to install profile bases, then cladding the finished structure. The advantages of the material are the ability to create any shaped element.
The most convenient screen option is a removable sliding screen made of lightweight, washable material. This one is easy to clean and replace if it breaks or loses color.
Selecting the source material
On the one hand, the bathtub must be durable, and, on the other hand, it is important that its appearance gives aesthetic pleasure to its owners. It should provide exceptionally pleasant emotions. It is this combination of qualities that the following types of wood can guarantee:
- wenge;
- teak;
- mahogany;
- cedar;
- oak;
- beech;
- larch.
The type of wood the bathtub is made from is extremely important. Not only its service life, but also your precious health depends on this.
The wood of these species takes the desired shape well, is not subject to rotting, and withstands high humidity. It is very important that the bathroom does not develop fungi or mold, which are detrimental to human health.
The bowl should be smooth, neatly maintained and absolutely clean. In this case, swimming will give you pleasure and add vigor and good mood.
It’s not in vain that we try to surround ourselves with not just comfortable, but also beautiful objects. By receiving aesthetic pleasure, we prolong our life
Some manufacturers use innovative technologies that allow them to combine materials, creating surprisingly effective combinations. For example, a bowl combined of glass and wood looks like a large aquarium with a lounger inside.
This model of the font allows you not to worry about the wood drying out. As a last resort, you can simply replace the sunbed.
Additional points
Is it possible to install a shower in the bathroom? Of course, it’s enough to install a special common mixer and hang a curtain. The latter will come in handy if the bathroom is shared. In addition, the curtain protects the floor from liquids.
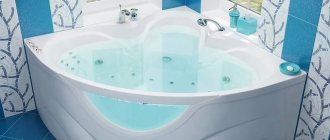
I would like to create a large, beautiful plunge pool, where you can then spend hours relaxing in the hot foamy water. The task is quite doable even in a city apartment. The main thing is to imagine in advance what the room will look like and measure the location of the future bathtub. And select materials.
Is wood afraid of water?
We know that the presence of water is the most important condition for the existence of life on earth. A tree, during its growth and development, also needs regular watering and absorbs liquid in significant volumes.
According to scientists, approximately 200 million trees grow even at the bottom of artificial reservoirs. And this is about one percent of the world's wood resource.
Environmentalists believe that transporting wood by water is harmful to nature, but it is still used
But even after the tree is cut down, its contact with water can continue. Whips and logs are floated down rivers, transported to the place of further use. They are even processed using the flooding method.
For example, oak, after several years spent in a flooded state, acquires special strength. Even before the processing stage, the cost of such material is very high.
It turns out that wood is quite compatible with water. But what she doesn’t like is frequent changes in temperature and humidity. We all know that an oak barrel filled with water swells. If you leave it for a long time without liquid, it can dry out and become unusable.
Hello from the past: a bathroom in a Khrushchev building
Owners of bathrooms in houses of the so-called “Khrushchev” buildings are faced with several problems at once:
- record small area;
- inconvenient location of communications;
- poor-quality building structures - uneven walls, distorted coatings, and the like.
There is only one way out - to combine a separate bathroom, move communications and carefully align the walls, while hiding at least part of the water pipes in them.
The design of a small bathroom in a Khrushchev building is built on the nuances of colors, shapes and textures. There is no place for contrasts that will visually fragment an already intimate room.
It is better to use ceramic tiles to decorate the walls and floors, and make the ceiling suspended to hide all its unevenness.
A corner shower cabin will save as much space as possible - it is the most compact of all models. There is also a way out for adherents of traditional bathing methods. A corner bath designed for one person in a small bathroom will not take up much space and will allow adults to bask in the fragrant foam or children to happily splash around.
The amount of furniture should be minimal; it is better to organize additional storage spaces outside the bathroom. Doors should be either sliding or opening outwards. In the second case, you can place an organizer for small hygiene items and towels on the door leaf.
More solutions for “Khrushchev” buildings can be found
Space layout
The dimensions of the bathroom are the main factor that determines the layout. The cubicle will fit perfectly into a narrow bathroom, but it will also look great in a large bathroom. The design with or without a low tray looks airy, and the glass doors seem to dissolve the shower room in space.
The photo shows a bathroom in gray tones, equipped with a cubicle with a glass hinged door.
The layout of a small room allows you to place the cubicle in the corner to save as much space as possible: this frees up space for the washing machine, sink and laundry basket.