Beam siding, at first glance, is 100% similar to a rounded wooden beam that has undergone a processing or painting process. In appearance, it cannot be distinguished from timber made of natural wood, so you can only understand that this is siding panels if you knock on it.
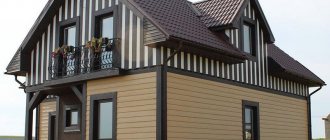
This finishing material gives buildings an absolutely magnificent and simply luxurious look! That is why it is extremely popular.
Photos of high-quality decorative siding finishes
Metal block house
A log block house is a type of external cladding, traditionally a wooden panel.
The cross-section of a block house is a segment of a circle, the side edges are equipped with a tongue and groove for connection. When assembled, the result is a canvas that looks like a log house made from a turned log. Natural wood is not the best material for exterior finishing. Despite all the stabilization measures taken by manufacturers, a natural block house is susceptible to many harmful processes:
- Warping.
- Sensitivity to moisture.
- Fire hazard.
- Rotting, appearance of insects.
- The need for periodic staining.
These disadvantages have prompted manufacturers to find alternatives to natural wood. A block house made of galvanized steel has been developed for this purpose.
It is completely devoid of the disadvantages of wooden panels:
- Resistant to water.
- Not subject to rotting.
- The appearance does not change over time.
- Does not require maintenance.
- Installation is simple and easy to do yourself.
However, there are disadvantages:
- Quite a high coefficient of thermal expansion.
- Low sound insulation ability.
- Mechanical stress causes irremovable dents.
Actually, all qualities - both advantages and disadvantages - are common to all types of metal siding. If some precautions are taken when using the material, then no problems will arise.
The decorative capabilities of the material are much wider than those of natural wood. There is a wide range of panels in different color shades. Strength and resistance to all types of impact make a metal block house the most preferred material that imitates a log.
A complete set of components or, as they are also called, additional elements, allows you to design all elements of the facade without any tricks - window and door openings, external and internal corners, longitudinal joining of panels and many other functions are successfully performed by additional elements produced in absolute accordance with the basic panels by color, size, etc.
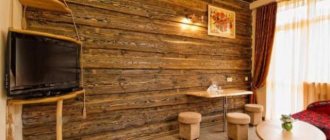
Photos of houses covered with imitation block houses:
Eurobrus
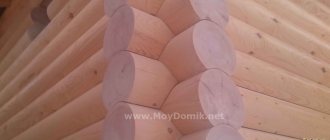
The material is a single-row or double-row panel, which is very similar to natural timber, as can be seen in the photo. Such panels are produced with locking fastening. The covering of eurobeams can be of two types:
- EcoLine – a material with the texture and color of natural wood;
- Standard - in this case, you can independently choose the color you like according to the RAL table.
The advantages of Euro timber include:
- its excellent compatibility with other types of metal siding;
- even unprocessed such material can retain its condition for up to 20 years;
- due to heat resistance, installation of Euro timber is possible all year round, as it can withstand temperatures from -50C to +60C;
- resistant to ultraviolet radiation and precipitation, as evidenced by reviews;
- low weight does not heavily load the foundation;
- With this façade finishing, it will not heat up much, but at the same time it will be perfectly insulated.
Types of metal block house
The wood-look metal block house has several varieties.
First of all, there are panels with different numbers of waves - single or double wave.
Single-wavelength ones have a smaller width, but the wave itself is wider than that of two-wavelength samples.
This allows you to choose a material that will look more expressive and correct on the facade - the larger the wall area, the wider the wave of panels should be, and vice versa.
This ratio allows you to better design the surface and achieve a greater effect.
In addition, there is a wide choice of panel colors. You can select dark or light samples that have the color of natural wood with all surface elements - knots, cracks, etc. are indicated.
The main material for a metal block house is galvanized steel 0.5 mm thick. However, samples of material made from aluminum or copper sheets are available. They are much more expensive and not as widespread.
Acrylic log siding
You can also find this type of plastic siding. It differs from vinyl in material. It is insignificant, but instead of classic polyvinyl chloride, a new generation polymer with a scary and convincing name is used in its production: Acrylnitril-Styrol-Acrylester. Therefore, acrylic siding is more expensive than regular vinyl siding. Asking the question about the advisability of increasing the price of cheap plastic, we found the answer. It turns out that companies use this material to ensure that the profile does not lose color under the influence of ultraviolet radiation. The topmost layer of this siding is covered with an innovative film and painted using the high-tech CoolColor method. Actually, this is the whole difference with acrylic analogues.
Specifications
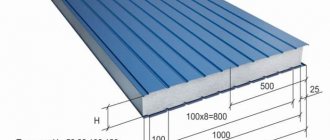
Metal panels have the following dimensions and characteristics:
- Length - up to 4 m (some panels can be up to 8 m upon request).
- Width - 22.6 - 36 mm (without lock), 26-39 cm (with lock).
- The thickness of the material is 0.5-0.8 mm.
- Profile height - 3-4 cm.
- Weight - 2.4-3.6 kg/m2.
- The panels are equipped with anti-hurricane locks, providing increased resistance to wind gusts.
- Frost resistance - from -60° to +75°.
- The durability of the coating is up to 15 years.
- The service life declared by the manufacturer (average) is at least 20 years.
Setting the starting bar (starting strip)
The starting strip is installed strictly horizontally at the bottom line of installation of the panels. You need to select the lowest point, draw a horizontal line along the perimeter of the house 40 mm above this point (necessarily horizontal, which is checked by level).
Then, the top edge of the starting bar is attached to the line. The self-tapping screws are located exactly in the center of the oblong holes; they should not be tightened tightly; the material must be allowed to move due to thermal expansion .
For the same reason, the next plank is not attached end-to-end, but at a distance of 6-10 mm from the previous one, so that when expanding, the panels mounted on it do not begin to bulge.
Setting the starting bar
Main manufacturing companies
Among the most famous manufacturers are the following companies:
- Grand Line.
- Woodstock.
- Nord house.
- Metal profile, etc.
The number of manufacturers is much larger, but there is no need to list them, since when choosing a material you should be guided not by the name of the manufacturer, but by the performance qualities and technical characteristics of the cladding.
Installing the sheathing
Siding is best attached to pre-installed sheathing. We work in the following order.
The first stage - choosing the material
Scheme for calculating the amount of siding for cladding a house
The frame can be assembled from wooden beams or metal profiles. Metal products are stronger and more durable. In addition, metal lathing is much easier to attach to an uneven base.
Installation of profiles is carried out in half-meter increments. Hangers are used for wall mounting. This technique will allow you to level out differences in the surface and secure the frame elements at a level.
Vertical lathing
Wooden sheathing is cheaper
When choosing this option, pay attention to the condition of the wood. It is prohibited to:
- the material has peeled off;
- was deformed;
- had bluish spots and traces of rot, etc.
Elements of wooden sheathing must be impregnated with fire retardant and antiseptic. If the house is built of wooden elements, the walls should also be treated with the listed preparations.
Wooden sheathing
Stage two - preparing the base
The sheathing is easiest to attach to a flat base. First of all, we remove any parts that may interfere. These are all kinds of tiles, bars, platbands, gutters, etc.
The third stage - installing guides
Siding is best mounted horizontally. In this case, we fix the bars or sheathing profiles vertically.
To attach the guides to wooden walls, we use nails or self-tapping screws. If the house is built of concrete blocks or bricks, we fasten it with dowels, having previously drilled holes for them in the wall of the house.
We align each rail by level.
Insulation Scheme for fastening siding with insulation
You can, of course, try to lay insulating layers after attaching the siding sheathing, but this is not very convenient.
Siding location
Preparing the surface for installation
The condition of the wall surface should be as close to ideal as possible. This is a very important point, since installing sheathing hides the walls and prevents access to them. If there are any flaws, areas of destruction or other problem areas, then all the processes occurring on them will become noticeable only when they reach critical sizes.
Therefore, the surface quality must be brought to the proper state, for which it is necessary:
- Remove all foreign objects and devices from the walls - air conditioners, lights, brackets, gutters, trim, etc.
- Carefully inspect the surface of all walls and draw up a defect report.
- Remove old paint layer.
- Any crumbling or peeling areas are removed.
- Detected defects must be repaired. The cracks should be expanded to determine their depth and configuration. Fill potholes and dents with putty.
- The best solution would be to completely plaster the surface. Especially if there are deep potholes, cracks or peeling.
- To strengthen the wall material and increase adhesion to the insulation adhesive, the walls should be impregnated with two layers of primer (primer).
PLEASE NOTE! The assertion of some experts that leveling the surface is not necessary is unfounded. The lathing is not so capable of correcting the situation, and the density of the insulating material, which directly affects its performance, completely depends on the condition of the plane.
Arrangement of obtuse and acute angles
Sharp or obtuse angles can occur in the presence of decorating architectural elements, for example bay windows . To create an obtuse angle, you should lean the corner profile against it and, pressing it, slightly move the profile flanges until the desired configuration is obtained.
Then the installation is carried out according to standard methods.
An acute corner is formed by squeezing the corner profile from the sides to achieve the desired shape . Then install the profile in its proper place.
CAREFULLY!
In order not to destroy the protective polymer coating, operations to bend the profile are carried out carefully, without too sharp bends. Destruction of the coating will cause rapid corrosion and render the part unusable.
Setting obtuse angles
Installation of an acute angle
Rules for constructing a ventilated façade
Facade installation technology
Do I need to insulate the walls under the siding?
The design of external cladding based on metal finishing panels must necessarily include several basic elements that will allow you to obtain not only the highest quality, but also durable facade coating.
Finishing element Necessity of use Recommended material
| Vapor barrier | Allows you to protect the insulation layer from the damaging effects of moisture. | Vapor barrier film “Izospan” or “Utafoll”. |
| Lathing Scheme for installing the frame on the walls of the house | Creates the space necessary for placing the insulation and is used as a base for securing the slats. | Metal profiles. It is allowed to use wooden beams with a cross-section of 100x40 mm or 50x40 mm and with a moisture content of no more than 14%. |
| Thermal insulation | Roll or tile material that provides heat conservation. | Glass wool insulation, mineral wool, polystyrene foam boards, polyester foam. |
| Wind barrier | Serves as additional protection for the insulation layer from high humidity. | Super diffusion two-layer polypropylene membrane film. |
| Counter-lattice | It is installed in order to obtain higher quality cladding, but, according to some experts, it is not a mandatory element for finishing. | Metal profiles. It is allowed to use wooden beams with a cross-section of 20x40 mm and with a humidity of no more than 14%. |
Only after creating a kind of multi-layer “pie” on the surface of the facade can you begin the final external cladding of the block house.
Varieties
The production of L-beam metal siding includes two main types - premium and economy.
Economy L-beam is made of steel, with polyester on top, which provides decorative and protective functions.
For the production of premium siding, Korean steel is used, which has high strength indicators. A high-quality application of the top layer cannot be distinguished externally from natural wood by color and texture.
Siding installation
Like any other siding, this type of cladding is installed on guides. To install the profile, use brackets that are fixed to the wall with anchor bolts. The distance between the guides is from forty centimeters to a meter. Installation of siding panels, according to reviews from builders, can be done in any direction, both horizontal and vertical.
For insulation purposes, slabs of mineral wool, expanded polystyrene and other materials are mounted on the wall. A waterproofing membrane is placed on top of the insulation layer, which will not allow moisture to accumulate.
Wood siding is installed using standard self-tapping screws. The special system has a special geometry, so installation must be done from top to bottom. The first panel is fixed into the guide bar until it stops. It is recommended to start laying from a corner. A finishing strip is attached to the bottom of the structure, which is aligned with the guides and secured with self-tapping screws. If there are no holes for fasteners, you should make them yourself in advance.
Otherwise, the installation of L-beam siding is carried out using the same method as installation of any other type. Self-tapping screws must be screwed into the center of the perforation, at a distance of no more than forty centimeters.
This siding is ideal for walls made of stone, brick, wood and other building materials. Possessing excellent characteristics, it will transform any building into a beautiful, noble structure, shown in the photo. And after watching the video, you will be able to install the siding l beam yourself, without involving a team of specialists.
Selection and installation of lathing
The lathing serves several purposes:
- Creation of a supporting system for block house panels.
- Formation of a ventilation gap.
- Support for insulation material.
From a design point of view, the sheathing is a system of strips located transversely to the panels, the surface of which forms a flat plane. It is customary to use wooden blocks as a material for it, but recently the use of metal guides for gypsum boards has been considered more practical.
They are free from the typical problems of wooden parts, have a perfectly flat surface, the same thickness and do not change properties over time. Prices for wooden and metal parts are almost the same, which is an additional argument in favor of metal strips.
There are two ways to install the sheathing. The first is a two-layer one, when a system of horizontal strips is first installed, between which insulation boards are tightly installed. The slats are carefully aligned on the plane, since then a layer of vertical slats is installed on them, which is the support system for the panels of the block house and, at the same time, provides a ventilation gap. This technology is good in cases where a thick layer of insulation is needed.
The second method is single-layer lathing. A system of brackets (direct hangers) is installed on the wall surface. The insulation is installed in a dense layer, the brackets are passed through it through the cut sections. On top of the insulation, on the protruding ends of the brackets, vertical sheathing strips are attached with careful alignment along the plane.
This technology allows you to significantly save on the purchase of planks and speeds up the process of creating lathing. In addition, dense installation of insulation reduces the possibility of the formation of cold bridges, which are dangerous for wall materials due to the possibility of wetting and destruction.
IMPORTANT! The brackets are installed through plastic or paronite gaskets, which prevent the formation of cold bridges.
Application of metal siding
Finishing a house with metal siding under timber
Metal siding consists of shaped strips with a lock and a perforated groove on the sides. It is mounted on the sheathing in a floating manner. The ease of assembly and reliability of the design allows you to finish the facades of buildings of any type. Relief imitation of rounded timber and other solid wood materials create the image of houses built in the traditional way for Russia - huts made of cylindrical and planed logs.
Facades are finished with metal siding:
- small one-story buildings;
- multi-storey residential buildings;
- shopping centers;
- public buildings;
- enterprises.
The sheets are attached to wooden and metal sheathing to create insulation based on the principle of a ventilated facade. You can install metal siding simply to protect and decorate the outside of your home. At the same time, the air temperature on the inside of the siding increases by 2–10 degrees in cold weather, and decreases in hot weather.
Finishing the facade with metal siding has advantages.
- Walls protected by metal siding remain dry during rain and do not freeze in frost.
- They are not destroyed by wind and solar radiation.
- The service life of the base and walls is significantly increased.
- The cost of repairing external walls is reduced.
- The ventilated gap allows you to ventilate the walls and remove excess moisture from the room to the outside. This prevents the formation of mold and mildew.
- It is easier to maintain an optimal microclimate in the house.
- Heating costs are reduced.
- The facade has the attractive appearance of a house made of wood or natural stone.
- The walls are always clean and do not require special care.
Installation of metal siding and creation of a solid covering is created using a large number of additions. Starting and connecting profiles, corners, flashings all match the finishing stripes in color. All elements are made from the same metal as the panels. The coverage of all parts is the same. Cutting metal siding is done with metalworking scissors or a fine-tooth hacksaw.
Installation of insulation, vapor barrier and waterproofing
The insulation is selected according to its technical qualities.
The main one is vapor permeability - the ability to pass through water vapor passing through wall materials from inside the premises. If impermeable insulation is used, the vapor is trapped inside the walls, which causes moisture, mold, rot, corrosion of metal elements and, ultimately, destruction of the walls.
Impermeable types of insulation, in particular, include polystyrene foam, EPS, penoplex, etc. Permeable types of insulation allow steam to pass through well, but can become wet, which significantly impairs their properties.
This type of material includes mineral wool; the best option is basalt (stone) wool. It allows steam to pass freely and has low thermal conductivity.
It should not be assumed that impermeable types of insulation cannot be used. They have excellent qualities, are resistant to moisture and do not lose their qualities over time. In addition, such materials do not need a ventilation gap - it does not make any sense. The only condition is the creation of a high-quality internal ventilation system that removes vapors from the premises and prevents the walls from getting wet.
The insulation is installed using special glue and, at the same time, using dowels with wide plastic washers on the cap. Some experts try to make do with only fungi, without using glue. This option makes the contact of the insulation with the wall less dense, which reduces its efficiency.
The adhesive is applied to the wall surface using a notched trowel and “combed” to obtain an even, calibrated layer. The insulation is laid on the surface and attached with fungi (about 5 fungi are needed for one slab of material). Gaps or cracks between the plates are not allowed; if they appear accidentally, the cracks should be filled with polyurethane foam.
PLEASE ATTENTION! A vapor-hydroprotective membrane is installed on top of the insulating material. This is the optimal type of waterproofing that does not allow moisture to enter the insulation from the outside, but facilitates its removal from the inside. The material is sold in rolls and installed in overlapping strips of about 15-20 cm. The joints are sealed with special adhesive tape.
Step-by-step installation instructions
The finishing set includes:
- Start and finish bar;
- H-profile;
- Planks for internal and external corners;
- Soffits;
- Types of platbands;
- Moldings;
- Near-window profiles;
- Slopes.
Preparatory work
Before installing siding on a building, you must first install the sheathing. It will serve as a support for the panels. You can also use insulation. Often these operations occur together. Therefore, the planks must meet the parameters of the material for thermal insulation. Then a waterproof membrane is attached to the walls. It removes steam outside and prevents moisture condensation.
After this, the counter-lattice is mounted vertically. It provides the necessary ventilation gap. It also serves as a support for siding panels. The thickness of the counter-lattice must be at least 40 mm. Wood is used for this purpose. But builders recommend using drywall.
Setting the starting line
It is mounted horizontally at the very base of the building. To do this, select the lowest point and draw a line along the perimeter 40 mm above it. Its evenness must be checked using a level. The next panel is installed at a distance of 6-10 mm from the previous one, so that when expanding, the planks do not stick out against each other.
Covering building corners
To cover an obtuse corner, you need to lean the profile against the building. Then press it in, while slightly moving the shelf of the siding profile apart. To cover an acute angle with a profile, you need to squeeze it from the sides until the desired shape appears.
Installation of vertical corner strips and H-shaped connector
Corner profiles can be complex or simple. They differ from each other in that the complex ones have recesses for the ends. They are mounted vertically using a plumb line. Fastenings for self-tapping screws are made at a distance of 0.2 ÷ 0.3 mm. Installation of complex profiles occurs immediately after the initial strip has been laid. Simple ones are installed after installing the panels. The installation process is simpler and experts recommend using this type of profile when cladding a house yourself.
To create an aesthetic appearance of the building, an H-profile is used. It has special recesses for the ends of adjacent planks. It is installed after installing the initial strip. The evenness of the structure is controlled using a plumb line.
Window and door decoration
For such work, slopes, platbands, and J-profiles are used. To install all these elements, the lathing is first made. For this purpose, galvanized steel or wood is used.
Installation of finishing strip
This strip covers the top edge of the cladding. This strip helps prevent rainwater from getting inside. To do this, the last panel is slipped under the finishing strip. Metal lumber siding is a durable material for building cladding. Step-by-step instructions for installing the panels are described above.
You can do the cladding yourself, but if you do not have construction skills, it is best to turn to specialists. They will quickly, efficiently, and accurately carry out all types of work, and the façade of the building will bring aesthetic pleasure to the owners and strangers. But at the same time, your home will be reliably protected from any extreme weather conditions.
Metal siding with Printech coating
Wood-look metal siding is made from Printech polymer-coated sheets. Metal siding not only repeats the shape of a blockhouse - the multi-color coating imitates a wooden texture.
Steel with such a coating is produced by South Korean. The coating is multilayer, has a thickness of 35 microns. Comprises:
- base layer 15-20 microns thick,
- decorative layer with a pattern obtained by photo offset printing,
- protective transparent PVDF layer based on polyvinyl fluoride and acrylic with a thickness of 10 microns.
This coating is designed for 20 years of service. Its resistance to atmospheric and mechanical influences has been tested in numerous tests.
Pros and cons of metal siding
Advantages
- The main advantages of metal are strength and wear resistance.
Externally, these are metal panels (sheets) curved in the shape of a log or board. However, each of them is multi-layered: - its basis is a metal sheet made of galvanized cold-rolled steel, treated with an anti-corrosion agent, or aluminum; — next comes a layer of primer that reliably connects the paintwork to the base; - then - the base polymer, applied on both sides, in order to provide the metal with additional protection against corrosion. This polymer is responsible for imparting color and texture and can be applied in several layers; — everything is covered with varnish or a protective coating that does not allow the paint to wear off and fade under the influence of the external environment; — a film is applied on top, providing additional protection during transportation. After lining it is removed. As a result, the material will not swell or dry out, as is often the case with wood; it is not afraid of fungus and mold, corrosion and temperature changes ranging from -50 oC to +80 oC. All this provides the opportunity to serve from 30 -50 years or more. In addition, the materials are environmentally friendly and do not emit harmful impurities when heated. - Fire safety, the reason for which again lies in the materials, because they cannot be classified as flammable or combustible. The maximum that threatens siding is loss of shape under the influence of temperatures above +100°C.
- Cheap - compared to natural wood. Not to mention the fact that it is often easier not to build a new house from logs or beams, but to clad an existing one.
- Simplicity of installation, which can be carried out in any season, maintenance, which does not require expensive products and special skills, and repair, in which it is enough to replace the damaged part.
The undoubted advantage of wood-look metal siding is its aesthetics, especially since it does not fade in the sun. Of course, such a list of advantages does not allow it to completely replace wood: it also has serious disadvantages.
Metal siding for logs
Flaws
High thermal conductivity
In hot weather, the lining produced by it heats up to such an extent that if you touch it carelessly, you can get burned, and the temperature inside the room increases significantly. And to protect yourself from the cold, the walls must be insulated. Quite a lot of weight
This implies the need to strengthen the foundation and load-bearing walls. Instability to mechanical damage. The resulting scratches and dents cannot be repaired and require replacement of the entire element.
Metal siding for logs with Printech coating
To some extent, the disadvantages include the price. The cladding option under consideration is not the cheapest.
Panel installation technology
Depending on the type and size of the finishing panels, as well as their direction, the installation of additional elements may have some differences. With the most popular horizontal installation of metal siding, the starting element is level-mounted along the lower edge of the facing material and fastened in increments of 30 cm. The main stages of work on installing a block house are standard.
Installing the starting bar
Step 1. Using a plumb line, we mark and install the outer and inner corners, securing them in increments of 30 cm on both sides, after which we similarly install connecting H-shaped strips in the areas where the panels are connected, as well as a U-shaped strip for framing the openings.
External (internal) corner connection
Covering non-rectangular corners
Installation of H-profiles
Step 2. We frame the windows and doors with an external slope strip. Door and window edging involves sequential installation and fastening of the top and side elements in increments of 25-30 cm.
Video - Step-by-step installation of factory window connections
Step 3. Install the finishing panels.
Panel cutting
Horizontal installation involves carrying out work from the bottom up. It is necessary to hook the base of the panel to the starting strip and fasten the upper edge with self-tapping screws in increments of 25-30 cm. The fasteners must be placed in the center of the mounting hole, starting from the middle of the panel. To prevent the metal block house from deforming during operation, the fastening of the panels should not be rigid. A small temperature gap of 5-8 mm must be left. Each subsequent panel must be inserted into the joining and corner strips and then secured.
Joining siding panels
Metal siding, installation
Panel installation
Additional elements
Each series of metal siding is completed with a set of special elements for decorating corners, door and window openings, as well as finishing and starting strips. offers additional elements, the front sides of which, in color, shade and texture, completely coincide with the main series of metal siding.
Depending on the selected series of metal siding, various fasteners may be required during installation. For example, the Woodstock series allows installation using simple self-tapping screws.
To create a load-bearing frame, you will need fastening brackets, and to fix sheets of metal siding and decorative elements, fastening clamps and screws. Depending on the selected series of siding and the length of the sheets, a different amount of fasteners will be required.
If the space under the siding is planned to be filled with insulation, then it is necessary to calculate its quantity, as well as fasteners for the heat insulator. Consultants or measurers will help you accurately calculate the required amount of a particular fastener.
The warranty on a metal profile can be up to 20 years, but the installation technology must be followed. If installation is incorrect, no warranty is provided; corrosion or destruction of the siding as a result of mechanical stress during transportation, installation, or operation is also not covered under warranty.
Benefits of use
Facade panels made by cold rolling have a significant number of advantages, which has made this finishing material very popular among consumers and in demand in the domestic construction market:
- the finish can easily withstand high temperatures;
- the material is durable, so the average service life of the cladding, depending on operating conditions and initial quality, can vary from a quarter of a century to fifty years;
- metal siding has excellent resistance to corrosion;
- the panels are completely non-flammable, therefore they belong to the category of fireproof materials;
- ease of installation allows you to carry out the cladding yourself;
- a metal block house is affordable and is a material in the middle price category;
- during operation there are completely no costs for processing and painting;
- the finish has high moisture resistance;
- you can choose the most convenient size of material for installation, since the length of the panel varies from 0.5 to 6.0 m, and the width is 20-30 cm.
Two-story house with verandas, covered with metal siding with imitation of a block house
When choosing a material, it is necessary to take into account some of the disadvantages of metal siding, including the need to purchase additional elements for installation work, as well as significant heating of the finish when exposed to direct sunlight.
Example of façade finishing
The cladding is durable and aesthetically pleasing
Comparison of metal and vinyl siding
What to choose siding or imitation timber
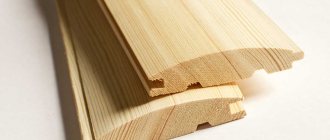
Imitation of timber is a planed board that resembles eurolining. This material is used when the main wooden covering is difficult to restore, or for insulating the facade.
If you are planning to clad a wooden house and the concept of naturalness is close to you, it is better to choose imitation timber. If a stone house is to be clad, and there is a desire to visually turn it into a wooden one, you should use timber siding.
The texture of the finishing coating is practically indistinguishable from natural wood
Siding will last much longer than imitation timber, plus imitation timber requires more careful maintenance.
A competent choice of material and subsequent installation will allow you to renovate the façade of your house relatively inexpensively. If you doubt the advisability of finishing it yourself, contact professionals - after all, even small errors in installation can lead to additional problems in the future, such as deformation of the material or poor-quality ventilation.
Preparatory work
Before installing the main elements of a ventilated façade, it is necessary to properly prepare the surface, as well as perform visual zoning for ease of work.
Step 1. Carefully remove vegetation, drainage fasteners, antennas and other structures from the surface that could interfere with installation. We remove dust and the largest contaminants, as well as peeling plaster layers.
The old coating must be thoroughly cleaned
Preparing the facade for finishing
Step 2. Using a building level, we check the surface of the wall and corner areas, after which we mark the areas to be leveled with lathing.
Step 3. We level the base or blind area, after which we carefully mark the surface of the walls for the sheathing bars.
Alignment of walls
Installation of finishing strips
The finishing strip completes the paneling, covering the top edge of the panel. To install, the last panel is cut to the required width and the edge is tucked under the curl of the finishing strip.
The presence of such an element protects the canvas from rainwater entering from above . Installation of the finishing strip is carried out simultaneously with the installation of the top panel.
IMPORTANT!
All self-tapping screws are loosely tightened so that the parts can move with temperature changes in size. To avoid corrosion, self-tapping screws must have a protective coating (galvanized) , with a head diameter of at least 1 cm.
Installation of finishing strips
How to attach panels
The panels are attached to the sheathing using self-tapping screws or nails through oblong mounting holes in the locking part. An important point is the need for loose fastening - for free movement of the material when heating or cooling, a gap of 1-2 mm is left between the head of the nail or screw and the panel.
If this is not done, the panels will begin to bend when heated, which can cause destruction of the protective coating or corrosion of the material.
For the same reason, the dimensions of all elements must take into account thermal expansion. For example, the length of the panels is made 6 mm shorter so that the corner or H-profiles do not expand when heated.
Installation of vertical strips - corners and H-shaped connector
Corner strips have two types of design - complex and ordinary. Complex corner profiles have special recesses into which the ends of the panels are inserted.
They are installed strictly vertically along a plumb line, fastenings with self-tapping screws are made in increments of 0.2-0.3 m. Installation of complex corner profiles is carried out after installing the starting strip.
Simple corners are installed after installing the panels. It is much easier to work with them, since they simply cover the joint of the planes. Such corners are fastened with self-tapping screws or rivets. Experts recommend that everyone who independently installs siding on their home use this type of corner.
The joint of the panels along the length can be made with a simple overlap, but the connection with an H-profile, which has recesses on opposite sides for installing the ends of the panels into them, looks more aesthetically pleasing. The H-profile allows you to design the connection more accurately, on one vertical line, which improves the appearance of the house.
It is also installed immediately after installing the starting strip; the vertical is checked with a plumb line.
Installation of vertical strips - corners and H-shaped connector
Accessories and tools
Well-established manufacturers of metal block houses supply the following components with finishing panels:
- internal corner;
- outer corner;
- docking strip;
- starting profile bar;
- J-shaped profiles;
- platband with slope;
- finishing or finishing strip.
System of block house components
Siding components
To install the trim yourself and get not only attractive, but also durable cladding, you will need the following tools:
- construction meter or tape measure;
- water or laser level;
- drill and screwdriver;
- construction plumb line;
- metal scissors;
- pliers and hammer;
- galvanized self-tapping screws and disc dowels with a spacer rod system;
- construction stapler and staples;
- construction tape.
For the convenience of working at different heights, you will need to use a stepladder and ladder, as well as scaffolding.
Equipment
Metal siding requires additional elements to design corners, slopes of window or door openings and other necessary details.
Without them, the cladding will look sloppy, all connections will look makeshift and unattractive . Such elements are called additions; they are produced together with the main panels, finished with the same compositions, which makes them absolutely corresponding design details.
The siding package includes:
- Start and finish bar;
- H-profile for connection along the length;
- External and internal corner strips;
- Soffits;
- Platbands, J-platbands;
- Moldings;
- Window slopes, near-window profiles.
ATTENTION!
Each manufacturer strives to present the finishing set as fully as possible, so in some cases other types of additions may be present.
Equipment
Calculation of finishing material
Calculation of siding panels
You can calculate the amount of material required for cladding the facade either using special computer programs or independently by performing simple mathematical operations. In this case, the total area of all door and window openings must be subtracted from the total surface area of the walls.
At the next stage, the area of one finishing panel is calculated by multiplying its length by its width, after which the working area indicators must be divided by the panel area indicators. Approximately 10% should be added to the result obtained for finishing rectangular walls, and 15% if the surface has a trapezoidal shape , and also has a large number of protrusions or recesses.
Thus, with a house height of 3 meters and a wall length of 6 meters, as well as the presence of two windows measuring 1x2 m, the useful area of one wall will be 18 - 4 meters = 14 meters. If the working area of a double-row panel is 1.4 meters, then to cover the wall you will need 10 panels + 10% = 11 panels.
An example of the simplest calculation option.
Calculation of façade area
If the height of the building is 3.8 m, and the working dimensions of the panel are 19 cm, then 20 pieces will be needed for finishing, excluding the width. With a house width of 7.62 m and a panel length of 3.81 m, the cladding will be carried out in two rows, so the total number of panels will be 40 pieces for a wall without window and door openings.
If independent calculations seem too complicated, and it is not possible to use a computer program, then it makes sense to order calculations from special design organizations.
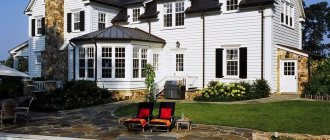
Beautiful examples
- Metal siding under timber is a self-sufficient material, the use of which allows you to obtain noble buildings made in the traditional Russian style (photo 1).
- However, metal-based siding under timber is successfully combined with other finishing materials (photo 2). The combination of wooden and stone surfaces is a win-win. The latter can be used, for example, for finishing the basement of a building or protruding elements.
- When using panels, the remaining elements of the building can be made in the same color scheme as the metal siding (photo 3), or have a contrasting shade.
- For small buildings, it is better to choose siding in light or golden shades of wood. And so that the building does not look flat and monotonous, you can use contrasting elements, for example, window and door frames, roofing (photo 4).
- For more massive buildings, you can use warmer colors of siding, which will emphasize the nobility and luxury of the house (photo 5).
- If you need to recreate the authentic atmosphere of a country house, then siding that imitates rounded timber is suitable (photo 6).
For details of installation with metal siding, see the following video.
Colors and profiles of metal block house
The steel facade can be made in two versions: wood and colored.
Metal siding to look like a log in the color of natural wood is made from rolled South Korean steel coated with Printech. This multi-layer coating is 35 microns thick and is designed to last for many years. The drawing is applied using photo offset printing.
Woodstock
Metal siding for logs in the Woodstock profile is produced by Metallprofil. It imitates a double blockhouse, its dimensions are:
- total width 356 mm,
- visible width 330 mm,
- the width of each “log” is 165 mm,
- profile height 28 mm;
- metal thickness 0.45–0.5 mm.
Ecosteel colors
Golden oak Bog oak Pine
Maple Cedar Golden Oak
Cedar
Advantages and disadvantages of log siding
Variety of colors of metal siding
Metal siding logs are very popular in industrial, commercial and private construction.
The demand for materials is ensured by its positive properties:
- low coefficient of thermal expansion;
- strength of joining of fragments;
- natural color and texture;
- resistance to mechanical stress;
- long service life;
- wide operating temperature range;
- Fire safety;
- resistance to chemically active elements and abrasion;
- immunity to mold, mildew and insects;
- environmental cleanliness;
- simplicity and efficiency of installation;
- affordable price;
- Applicability for cold and warm finishing.
Flaws:
- damage and replacement of one panel entails dismantling the entire surface;
- the polymer coating is easy to damage, and this causes corrosion of the iron;
- high thermal conductivity, the need for thermal insulation.
The number of advantages is much greater than the negative sides, which is what makes this material a leader in the field of exterior finishing.