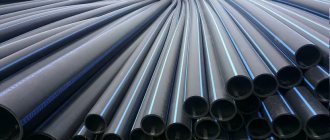
Homemade products made from plastic pipes are easy to make and do not require significant financial investments. Let's look at how to create useful and aesthetically pleasing products using simple materials. We will also offer the best ideas from plastic pipes - little things and decor for the home, furniture, structures for a summer house and garden, for a playroom.
Examples of crafts Source fishki.net
Features of pipe connection
Plastic pipes are available for water supply, sewerage and heating systems. Such products are characterized by low weight, high strength, resistance to various chemicals and durability. This is a universal material that resembles a construction set. Combining sections of different configurations allows you to create any product. The main thing is to choose the right method for connecting individual elements.
Products from polypropylene pipes are produced using a soldering (welding) machine. The use of compression fittings is also allowed to connect the segments. But you need to take into account that the resulting structures will not be dismountable.
Welding machine Source inigs.ru
Homemade PVC pipes are made using the following connections:
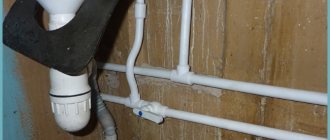
- In the bell. Bell pipes are equipped with sealing rings located in their end part. This design ensures tightness. Creating a joint with a seal takes a minimum of time - just treat the ends with lubricant and insert one part into the other. The disadvantage of such a connection is low rigidity. The advantage is the possibility of parsing. Therefore, such a connection is suitable for the construction of temporary structures.
Connection using sockets Source o-trubah.com
- Glue. The ends of the pipes are chamfered or treated with sandpaper. Make a mark corresponding to the depth of the fitting. The surface of the element and the chamfer are degreased and glue is applied. The pipe is inserted into the fitting and rotated 90 degrees. To ensure a reliable connection, the elements can be pressed for half a minute. The exposed glue is removed and the structure is allowed to dry well for several hours.
Adhesive connection Source strojdvor.ru
- Flanged. It involves connecting parts of a product made of plastic pipes using additional parts. Before performing manipulations, the ends of the elements are cleaned. Flanges and a rubber gasket are attached to the cuts. The connection is fixed with bolts, which are tightened evenly. The knot turns out to be reliable and durable. If necessary, it can be disassembled.
Flange connection Source ogodom.ru
Rules for working with material
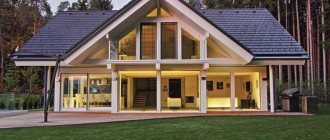
After you have purchased pipes and are ready to build a greenhouse, it is important to study the features of working with this material. There are a number of universal recommendations that are relevant for working with any type of plastic pipes.
It is better to start work on installing the frame in warm weather at a temperature not lower than +17 degrees and not higher than +23 degrees. This temperature is the most comfortable for plastic; it will bend well and, in general, exhibit all its best properties, so that it is as easy as possible for you to bend it into the desired shape.
You shouldn’t chase cheap prices and buy pipes and fittings from different manufacturers and in different stores. Make sure to buy these elements in one place so that there are no problems with their installation. The strength and reliability of your future greenhouse depends on the quality of the connections.
If you plan to create a monolithic structure that you will not disassemble for the winter, then it is better to connect the pipes by welding. Some materials stick together only thanks to a reliable alloy. This unit can be rented on the construction market, but if there are absolutely no options for finding it, then you can use a gas burner as a heating device, the main thing is not to overdo it.
It is also recommended to cut the pipes with a special tool to avoid burrs. But you can use a sharply sharpened construction knife, and simply sand down the rough edges.
Trifles and home decor
Products made from pipes are an excellent solution for decorating your home and creating inexpensive but useful things.
Organizer
The easiest way to use leftover pipes. Short lengths will do. They can have different diameters and colors - it all depends on the author’s idea.
To create a mobile organizer, pieces of arbitrary length are used and glued together. The option looks impressive when a taller element is placed in the middle, and a smaller one in a circle. Also, the segments can be placed randomly. It is recommended to seal the bottom of the organizer with thick cardboard. This product is suitable for storing office supplies, nails, screws, and tools.
The organizer can also be stationary. To make it, pipes are cut at an angle of 45° or in another way. The elements are attached to the wall or board with self-tapping screws.
Organizer options Source bouw.ru
Frame
To obtain similar products from PVC pipes, sections in the form of rings of the same or different diameters are used. It is recommended to first draw a mock-up of the product. It is convenient to glue individual elements into one whole directly on it. The finished product should be painted, which will make it a spectacular accent of any interior.
Frame example Source podelki.guru
Decorative partition
Similar to the frame, you can create a decorative partition. Pipe sections are connected randomly or according to a pre-created pattern. Decorative partitions can be used to separate functional areas in the interior or outdoors as a screen.
The process of creating a partition Source sdelaysam-svoimirukami.ru
Flower pot or vase
It's easy to create beautiful pots for replanting indoor flowers. The main thing is to choose pieces of optimal diameter and height. The pots can be placed on a piece of plywood and additionally use a special plastic stand. Options made from tees or other additional elements for plumbing also look original.
Flower pots Source kakpostroit.su
Small diameter pipes look good as vases. Long pieces are ideal for placing dried flowers or artificial flowers. To make the vase look more stylish, it is recommended to decorate it. You can use the decoupage technique, various stickers, glitter, rhinestones, and beads. A composition with several vases of different lengths looks good. They are placed on a plywood stand.
Composition with vases Source lifehacker.ru
See also: Catalog of companies that specialize in interior redevelopment
Lamps
It is easy to create original and stylish lamps from plastic pipes. They can resemble the appearance of a person, an animal, or be performed in an abstract style. There are many options - floor, table, wall lamps, ceiling chandeliers. There are no restrictions and everything depends on the imagination of the creator.
But it should be borne in mind that the manufacture of such a product can cause difficulties due to the presence of many connections. It is also necessary to attach the cartridge and connect the power supply.
Example of a table lamp Source novamett.ru
If you don’t want to make a lot of connections, you can create a lamp from one piece. You should use a large diameter pipe and make many holes in it. A socket with a light bulb or a regular garland is inserted inside. This lamp can be used as a night light. In order for the product to fit well into the interior, it is recommended to cover it with paint and add decorative elements (stickers, stones).
Floor lamp made of pipes Source 1000000diy.ru
Vintage wall for a photo shoot (master class)
Wanting to leave a piece of the celebration as a souvenir, the newlyweds create accessories and decoration elements with their own hands. Background walls are no exception. A screen for a photo zone in a rustic style is created very simply.
Materials and tools
- wooden boards (size depends on the desired size of the screen),
- frames of different sizes,
- beautiful hooks or furniture handles,
- water-based wood impregnation,
- white acrylic paint,
- wood glue,
- wood screws,
- drill or screwdriver,
- brush,
- sandpaper or sponge.
Time: 2-3 hours
Step-by-step instruction
- For the frame, lay boards of suitable size evenly and close to each other on a horizontal surface. Place 3 stiffening ribs perpendicular to them at the top, middle and bottom.
- Nail the two outer boards of the “fence” to the stiffening ribs to create a frame-type structure. Do not drive the nails all the way in.
- Turn the resulting frame over and apply wood glue to the stiffeners. Then glue each board one by one, including the last one, after removing the nails. Don’t know how to make a screen for a wedding with your own hands and not spend a lot of time and effort? – Find an element of an old fence or use a pallet - this will save both time and money. Also read about the design of a wedding arch - it will make the celebration even more fabulous.
- At a distance of 20 cm from the edge of the middle stiffener, attach the stops of your decorative wall with self-tapping screws and a drill. At the bottom, connect them together with a perch of the same size for stability. The frame is ready!
- If the wood is untreated, sand it with fine sandpaper and remove dust. Then apply the impregnation with a brush, or rub it in with a woolen rag (this will make the wood texture look nicer).
- After the impregnation has absorbed and dried, apply white paint with an artificial bristle brush.
- After waiting for it to dry (2-4 hours), take an emery sponge and lightly remove the top layer of white paint, revealing the impregnation. This will create the effect of aged wood.
- Prepare the frames, paint them, attach the ropes on which they will hang. Make markings for attaching them to the frame.
- Attach hooks or other furniture fittings to the markings. Hang up the frames. Complete the composition by hanging antique lamps, clocks or flower pots.
- The vintage wedding screen is ready, and no one else will have one like it, because you made it with your own hands.
Use Cases
In addition to the fact that such a wall is an excellent backdrop for a wedding photo shoot, use it as a seating plan for guests. Attach as many frames as there will be tables. Place a sign with the table number in the center of each, and stickers or pin flags with names around them.
Take care of the design of the wedding photo zone, and in memory of this day you will have many stunning photographs with your family and friends.
- 29 photos
Furniture
Furniture made from polypropylene pipes looks aesthetically pleasing, and its creation requires minimal financial investment.
Shelf for shoes or towels
Using pipes of impressive diameter, you can create a shelf that is suitable for storing shoes, bathroom towels, wine bottles or various small items. It is optimal to use lengths of 35 cm. The connection of individual elements can occur using glue or self-tapping screws. The resulting structures made of polypropylene pipes are attached directly to the wall. You can also first glue them to the plywood, and then fix them in the right place.
Ideas for shelves Source mtdata.ru
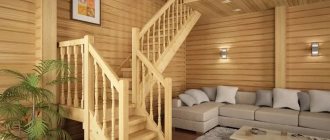
Stands
Making a book stand is not difficult, but before starting the work it is advisable to make a drawing of the future product. This will help prepare the pieces of the desired size. The shelves are made in the likeness of a heated towel rail or in the form of a zigzag.
Book shelf Source roomester.ru
Creating a stand for placing flowers will require more time and effort. It is necessary to provide reliable legs so that the structure does not bend from pots of soil. You can use pieces of plywood or chipboard as a tabletop.
Flower stand Source vrutmilife.com
Table
Making a table from polypropylene pipes is not so difficult if you first draw a drawing. In order for the plastic frame to withstand a significant load, it is necessary to provide stable legs and a sufficient number of cross links. The table top is made of glass, plastic, wood and other materials.
Coffee table with glass top Source domosedy.com
Practical table for the garden Source ytimg.com
When creating a table from pipes, you can also use atypical design schemes. The option looks original when the base of the product is formed from many segments of different diameters. However, the pipes do not necessarily have to be the same height.
Original coffee table Source ya-superpuper.com
Types of screens
There are several types of modern screens, and they will be used depending on the type of structure used, its purpose and the available material. The overall style of the room is also taken into account.
By functional purpose they are distinguished:
| Types of screens | Description |
| Transparent | They are a strong frame around the perimeter of which fabric or any other material is stretched. It is even possible to use gauze that is pre-starched. Openwork wooden or metal models are used somewhat less frequently. |
| Deaf | Such models have many valves, but their characteristic features include opacity. In this case, a board, durable and dense material, cardboard can be used. |
| Flexible | In this case, you will need thin and long sections that will be connected to each other. The result will be a monolithic wall. If the material is flexible, then the screen can be installed in the form of a spiral, roll or wave. |
| Screens in the form of a book | The sashes can be either the same or different widths. If desired, the doors are folded into a compact book and moved to another place. They are distinguished by their mobility, so they can be used as a place for changing clothes or in photo shoots. |
| Single screen designs | They have one, but fairly wide sash, which will be presented in the form of a durable frame, which will be covered with paper, fabric or any other material at hand. It is recommended to install wheels for more convenient movement. |
| Sliding structures with doors | Such partitions have been used since time immemorial, and until recently they were the only way to delimit the available space. A rigid frame was made over which dense fabric was stretched. Several frames were made, but no more than ten. If necessary, such structures can be easily assembled and moved. A little later, the metal was replaced by a lighter one - aluminum. |
Structures for summer cottages and personal plots
You can make many interesting things from plastic pipes for your dacha or for the area of a country house.
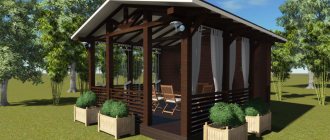
Alcove
To create a gazebo, two long pieces are used. They are given an arched shape and fixed in the ground. The frame configuration is chosen in such a way that garden furniture fits. A dense fabric is stretched over the finished structure, which will protect from rain, wind and sun.
The simplest gazebo for a summer residence Source yandex.net
Arched design
A garden arch made of polypropylene pipes looks impressive in any area. When creating it, one difficulty arises - some segments need to be bent. This can be done using a torch, but you need to work very carefully so as not to damage the product or get burned. The required section of the structure is heated until the material becomes pliable. The tube is given the required shape, which is fixed in a matter of seconds.
Two arched vaults are connected by crossbars. As a result, the structure will be filled with greenery as much as possible. Also an arch made of PVC pipes
must be securely fixed to the ground in order to withstand gusts of wind.
An example of a garden arch Source tovary4you.ru
Play complex for cats
A play complex for cats is assembled from tubes and plastic bars. After making the structure, each part is covered with thick fabric or rigid cord, which will later be used as a scratching post. The complexity of the design depends on the patience of the owners and the activity of the pet. You can build a simple house with a horizontal ladder, a lounger and hanging toys. Some don’t stop there and assemble real cat palaces with “hammocks”, a complex system of transitions, “booths” and wheels for running, like hamsters in cages.
Video description
To make an arch made of plastic pipes as quickly as possible and with minimal effort, check out the following video:
Greenhouse
Such a structure can have any size and configuration. Moreover, it is suitable for growing any plants. Greenhouse construction technology:
- The area for placing the greenhouse is being marked.
- Pieces of reinforcement are installed along the long sides of the structure in increments of 40-70 cm. They should rise 50-80 cm above the ground surface.
- A tube is placed on the rod, which is given the appearance of an arc. It is fixed on the opposite side to the same piece of metal.
- Cross members are installed that act as stiffeners.
- The frame of the future door is formed from the same tubes.
- The greenhouse is covered on top with a transparent film or polycarbonate.
What it is
A screen can be called a structure containing various hidden elements. With its help, you can organize skits, performances, use it for a puppet theater, conduct a master class in a kindergarten, and much more.
Handles rails for furniture: sizes, installation options, photos in the interior
In addition to its entertainment function, a screen or decorative fence is actively used for the development, education and upbringing of children. Believe me, any teacher in the kindergarten will only be glad if something similar appears at her disposal. These are truly multifunctional products that, with imagination and experience, can be used for a huge and varied range of applications. Using medical-themed covers, you can organize a lesson on taking care of your health. By stretching thematic canvases, it is easy to stage different performances or stage a whole performance.
Officially, such screens are called nothing less than a developing subject-spatial environment. There is even a state educational standard that it must meet.
Don’t worry, if you have ordinary polypropylene, verified dimensions and the right tools, it will be difficult to violate these standards.
But it is still important to remember that we are talking about a product for children, not adults. Leaving the kids alone near the screen, the teacher or parents should have no reason or reason to worry about their safety
All this is spelled out in the requirements and standards. In relation to the screen they are:
- Safety. We are talking about the stability of the structure and its strength;
- Transformability. The ability of the screen to change its appearance through simple movements;
- Availability. This is not about price, but about the ability of each child to carry out certain actions;
- Variability. That is, the ability to change covers and contents;
- Content and richness. Here, I think, everything is clear;
- Multifunctionality. In fact, a combination of all the previous points.
Such a decorative partition has excellent developmental functions, it allows you to concentrate and hold the attention of children, develop their intelligence, thinking, show ingenuity, learn something new, develop creatively, etc. A screen also becomes an excellent way to zone a room when conducting quizzes, skits, various kinds of events, so that children are not distracted by other things
A screen also becomes an excellent way to zone a room during quizzes, skits, and various events so that children are not distracted by other matters.
Fakes for the playground
Plastic tubes are an ideal material for creating playground items.
Gates
Creating such a craft takes little time and requires a minimum of finance. For gates, you can use sections of old pipes, which are connected according to a previously developed drawing. The mesh is attached to the finished structure and the product is ready for use. These goals are lightweight, so they are easy to carry around the football field.
A pair of gates Source livemaster.ru
House
To make a house from plastic pipes for children, you will need a minimum of effort. A simple frame is formed in the shape of a cube with triangular elements on top for the roof slopes. The finished structure is sheathed with fabric to create walls and a roof. You also need to remember to leave holes for windows and doors.
The simplest version of a children's house Source livemaster.ru
How to make a decorative garden fence with your own hands?
A decorative fence is a real decoration for any garden. Today there is a large selection of wooden, metal, and plastic structures. They can be purchased at the store or made yourself. You will learn how to do this correctly, and what other interesting ideas for a site there are, while reading this article.
- Functions of decorative fences
- Types of decorative fences and step-by-step instructions for them
- Plastic
- Wood
- Fence
- Wicker fence made of twigs
- Solid (rolled) fence made of crossbars
- Metal
- Concrete
- Unusual fences
- Fence made of plastic bottles
- Wooden fence “Pencils”
- German fence made of stones
- Tire fence
- Hedge
- Fences for flower beds (garden borders)
Video description
The following master class describes in detail all the stages of work that will help you create a very beautiful house made of polypropylene pipes for a child:
Manege
Creating a budget playpen from pipes is quite simple, since it has a simple design. First, the lower contour of the product is formed, periodically installing tees for mounting racks. The vertical sections are placed in increments of 10-15 cm. The fence is fixed at the top with the same rectangle with tees.
Scheme for creating a playpen Source retete-usoare.info
Ready-made playpen made of PVC pipes Source retete-usoare.info
Introduction
In this article we offer you a small master class - Do-it-yourself screen.
The design of the partition is not complicated and you will only spend a couple of evenings on it. The multifunctional screen is made of cedar boards and thin-layer plywood. This portable folding tri-fold screen easily creates a new living space in your room.
A screen for a room is made with your own hands by weaving strips of thin-layer plywood, which will be installed in simple cedar frames.
Fastened together with copper hinges, the screen sections can be installed in almost any room. It can be made to highlight a romantic dining area in a large living room. Or place a screen near a sunny window to create your own tranquil retreat without adding permanent walls. This decorative partition can be used in many ways, giving you plenty of room to be creative.
Briefly about the main thing
Homemade products made from polypropylene pipes are inexpensive to make and require a minimum of skill and effort. Creative and useful products can be created using waste scraps left over from plumbing or sewer repairs.
Pipes make stylish decorative items, furniture, items for the garden, or items for the playground. They not only look beautiful, but also fulfill their intended purpose. All items made from pipes are durable, resistant to moisture and can be used both indoors and outdoors.
Preparation, installation
After purchasing pipes and a plastic fence, you need to install them correctly. The sequence of preparation for installation is as follows:
- First of all, you need to plan the location and size of the future fence. It is recommended to complete this step before purchasing.
- Next, you need to stretch the rope around the perimeter. It should be taut.
- Mark where the pillars will be located. At this stage, you need to take into account the location of the gate, wicket and other features of the structure.
- Next, you need to carefully calculate everything again and measure it several more times. A mistake can be costly.
- You need to make holes in the designated places. The depth should be equal to a third of the length of the pipe.
The installation itself proceeds as follows:
- Plastic pipes must be immersed in prepared holes.
- Next, check that there is not even the slightest tilt. This is a very important point.
- Now you need to fill it with gravel. For plastic, it is recommended to use fine gravel.
- Next, the solution is prepared and poured into the holes. At this stage, you need to check again whether the structure is level. If everything is good, then you need to move on to the next point.
- The solution is compacted so that it fills all the air spaces.
- Now you need to wait until the concrete has completely hardened, preferably a little more.