Beton-House.com
Website about concrete: construction, characteristics, design. We combine the experience of professionals and private craftsmen in one place
Concrete screed: not only practical, but also beautiful
At a certain stage of construction, or when carrying out major repairs, the owners are faced with a dilemma: to install a self-leveling concrete floor or to prefer other methods of leveling the floors.
A self-leveling concrete floor is certainly an economical and effective solution to the problem of leveling the base. But when finishing the floors, it is important not only to level the base, but also to carry out the work with minimal financial costs. Let's consider all the methods of leveling the floor using solutions, evaluate their effectiveness and tell you about the advantages.
- Types of mixtures
Leveling the floor
If you decide to install self-leveling concrete floors, then, first of all, you should understand that this procedure will take a lot of time. There is an absolute plus: the process does not require special construction skills, and all work can be done independently.
Preparation
As with any screed, the procedure begins with inspecting and cleaning the old floor. Not only will the topcoat have to be removed, everything will be removed, including the previous fill. If the old concrete covering is of poor quality, it should be dismantled to the level of the slabs.
Such careful dismantling is done not only for the high-quality installation of a new self-leveling floor, but also for the reason that self-leveling floors over old concrete will eat up the height of the ceilings in the room: the minimum thickness of a concrete floor is 7 cm.
Attention! Even in a situation with a new apartment, purchased in a state of complete renovation, evaluate the quality of the fill: if the screed is soft and loose (the builders did not maintain the proportions in the mortar), it is best to dismantle such a fill.
The base must be repaired and cleaned before pouring.
Pouring concrete screed
After the base has been prepared and cleared of dirt and dust, a self-leveling concrete floor is installed.
The sequence of work is as follows:
- Base primer. Deep penetration solutions should be used. Before priming, it is necessary to repair any existing cracks or depressions. After the solution is absorbed into the surface, usually after 2-3 hours, further work can be done.
- Waterproofing. Depending on what your base will be, the film can be laid in different ways. The main requirement for rolled material is overlapping laying with the seams secured with construction tape.
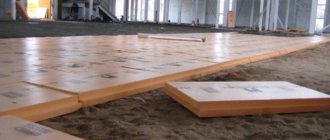
- Thermal insulation. Even if in the future a horizontal heating system is installed in this area, it is necessary to lay insulation material. This will eliminate significant energy losses, which is a very significant factor at current energy prices. Before you start laying, position the slabs without fixing them to determine the best cutting. Laying the material begins from the far corner, fix the insulation, glue the joining seams and the perimeter near the walls.
- Installation of beacons. Focusing on the zero mark, fix the aluminum guides to the cement mortar. When installing, use a building level to avoid deviations from the horizon. Beacons should be located at a distance not exceeding the size of the rule. The first line is fixed 0.3-0.5 m from the wall. After making sure that the guides are horizontal, we leave the solution underneath them to harden.
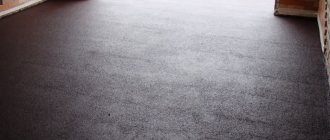
Installed aluminum beacons on cement mortar
- Pouring concrete. The solution is mixed in small portions so that it does not have time to set while you are working with the previous volume. The solution is applied from the far corner and pulled out using the rule along the beacons. Do not lean on the beacons, otherwise there is a danger of shifting the level.
- Roller work. The poured screed must be passed over with a needle roller.
- The screed is covered with plastic film and left to gain strength.
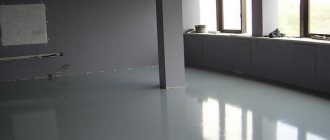
Ready poured concrete
- The process of pouring the concrete screed will take at least 4 weeks.
- If you try to save time by placing beacons on plaster mortar, you will only add more work to yourself.
- The guides will set faster, but after pouring the gypsum will have to be removed from the screed, which will significantly add hassle and will take a lot of time.
In addition to the main rough screed, other pours can be made using concrete mortar.
What and in what case to choose
The comparison of operational characteristics allows us to make several recommendations.
- A screed made from self-leveling mixtures is effective in leveling differences in height at the base of the floor up to 2 mm. In other cases, other technologies are needed.
- For tiles and porcelain stoneware, a “wet” screed is optimal. Semi-dry and dry are used depending on the situation, but self-leveling flooring is completely excluded - a mirror surface is not the best material with which the glue has good adhesion.
- Dry screed is not suitable for linoleum, carpet and PVC tiles. It is also undesirable to use this technology on an open balcony, in a bathroom, shower and, with some reservation, in the kitchen.
- The self-leveling floor solves the problem of wear of the balcony slab - it creates small loads when pouring.
- A dry screed will help raise the floor by 10-50 cm. Other methods will either ruin or collapse the ceiling.
- The ideal solution for thin and flexible floor coverings (carpet, linoleum, PVC tiles) is a self-leveling floor with a mirror surface.
- In a panel house, self-leveling flooring can be poured onto a ready-made screed.
- If the angle of inclination of the floor base is large, a combined method must be used.
Various filling methods
Generally, the pouring method depends on what substrate the mortar is being applied to and what type of finish the pour will be used for.
Conventionally, it is customary to distinguish three methods of pouring the solution:
- Self-leveling floor on concrete. A situation where the fill is a finishing coating. The thickness of such a layer is no more than 1.5 cm. For better adhesion, the concrete base is sanded and primed before pouring. This method makes it possible to do without further finishing work, but requires perfect evenness. After drying, it is usually varnished or painted.
- Two-layer cake: the solution is poured onto a base with fundamentally different physical qualities - for example, wood. To ensure that the properties of both materials do not harm each other, a separating layer (polyethylene) is laid between them. The thickness of this fill is no more than 2 cm.
- Floating screed. In this case, the base may be similar to the fill - but a leveling layer is placed under a finishing material of a different property, for example: laminate or parquet. In this situation, a separating material (film) is also laid over the walls and glued along the entire perimeter with damper tape. The thickness of the layer is no more than 2.5 cm. After laying the decorative material, the remaining film and tape are cut off, and the gap is closed with a plinth.
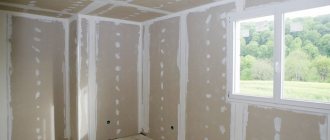
Wooden floor prepared for pouring floating screed
Regardless of the method used to construct self-leveling concrete floors, the technology for pouring them is the same:
- Work is carried out from the opposite corner towards the exit.
- You can't rely on lighthouses.
- The rule is to drive in a zigzag pattern.
- Do not leave a large volume of unleveled mortar on the floor.
- When mixing, it is necessary to strictly observe the proportions.
- Having finished pouring, it should be covered with polyethylene and access to the room should be closed.
Self-leveling floor on concrete screed
Types of cement screed and their characteristics
The choice of installation technology depends on the physical properties of the materials used.
| Type of screed | Compound | pros | Minuses |
| "Wet" | Components:
| The base is able to withstand vibration. It turns out to be very hard and durable, so it can withstand dynamic and static loads. The floor can be raised from 30 to 100 mm. |
|
| "Semi-dry" | The ingredients are the same as “wet”, but 3 times less water is taken. This is enough to hydrate the solution, but it is difficult to mix without a concrete mixer. |
| The height is “eaten up” up to 4 cm. Under a “warm floor” - 5 cm. The project is more expensive due to the high requirements for sand (only sifted and quarry sand). |
| "Dry" | Instead of sand, expanded clay, perlite or vermiculite are used. The first layer is covered with a sheet of plywood, chipboard, gypsum fiber board or OSB. The final coating is applied to the sheet material. | The technology is extremely simple - no small mechanization is involved. The load on supporting structures is reduced. High noise insulation. |
|
In terms of strength, the “wet” screed wins. It is most often installed in hangars for storing heavy special equipment, factory floors, industrial zones and open parking lots. The use of a complex of additional reinforcing materials makes the floor practically invulnerable.
Pouring materials
The possibility of leveling the floor is not limited to concrete mortar. You can purchase dry construction mixtures or mix cement mortar. In addition, there is a wide range of self-leveling mixtures. Therefore, it is important not only to understand the pouring technology, but also to choose the right material.
Let's compare the capabilities of different compositions:
| Type of solution | pros | Minuses |
| Concrete |
|
|
| Cement-sand mixture |
|
|
| Dry construction mixture |
|
|
| Self-leveling floor |
|
|
Packages with ready-made dry mixtures always contain detailed instructions for application. CPS (cement-sand mixture) can be prepared independently by mixing M500 cement and sifted fine river sand in a 1:3 ratio.
The proportions of the concrete solution depend on what kind of screed is poured. The most interesting in this series are self-leveling floors. A little more about them.
Briefly about the main thing
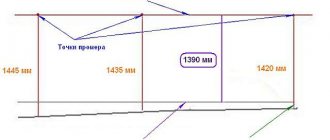
Before leveling the concrete floor, specialists determine the zero level using a bubble, laser tool or level. Then they choose the method of carrying out the work. The concrete base can be leveled using a “wet” cement-sand or semi-dry screed, as well as by applying a self-leveling mixture or fixing gypsum fiber sheets.
The materials used in all methods differ in the technology of laying on an uneven base. Professionals know this well. Therefore, their help is often used by homeowners who want to have perfectly smooth floors in their premises.
Self-leveling floors
When considering mixtures for self-leveling floors, it is worth immediately clarifying that they are divided into levelers and finishers. At the same time, the specifics of use are such that when using a branded leveler as a base, it is necessary to fill the finishing layer of the same brand. But the finishing layer itself can be applied to any base.
What is the fundamental difference between the mixtures:
- Levelers are essentially a replacement for rough screed. The mixtures are applied along beacons, using a technology similar to applying concrete mortar. Rule alignment required.
- The finishing mixture, as the name suggests, can be a decorative finish. The application layer is no more than 30 mm. They have very good fluidity and do not require additional leveling.
Any construction brand that produces a leveler necessarily offers a finishing filler for it. The photo shows several possible options.
To level the floor, modern manufacturers of building materials offer mixtures of various compositions and filling methods. You can do the work using self-leveling floors yourself, but you should take into account the type of composition and pouring conditions in advance.Types of mixtures
All existing types of mixtures for self-leveling floors differ according to the following criteria:
| Layer height | Highly filled and thin layer |
| Participating Mixer | Aqueous and solvent |
| Electrical conductivity | Antistatic and electrically conductive |
| Texture | Smooth and rough |
In addition to these indicators, it is very important to know what binder the mixture is based on.
The following mixtures are available on the construction market:
- Polyurethane. The basis is transparent polyaspartates. Finished floors are highly elastic and resistant to color fading. Give owners the opportunity to create 3D images on the surface. At the same time, they have very low resistance to mechanical stress.
- Epoxy. They are made from epoxy resin and quartz sand using a hardener. They have very high resistance to chemical and physical influences. The highest price tag of all possible options and a long hardening period.
- Cement-acrylic. They tolerate physical activity well, have an anti-slip effect, and are suitable for outdoor use. A significant disadvantage is the large labor costs of installation.
- Methyl methacrylate. They dry very quickly and are suitable for rooms with high vertical static load (production workshops). Toxic when poured, safety precautions must be observed.
Modern technologies of self-leveling floors give enormous scope for imagination
More about pouring conditions
For any type of mixture used, there is only one requirement for a concrete base for self-leveling floors: the surface must be of high quality and without flaws. Depending on the type of mixture, the drying period for the floor varies. As a rule, the surface can be used after 3–4 weeks.
During this time, certain conditions must be observed:
- It is necessary to maintain a constant temperature inside the room. Ideal conditions are temperatures within +15 - +25 degrees.
- When applying, the moisture content of the concrete base should not exceed 4%.
- To maintain these parameters, drafts should be avoided in the room.
The surface of the self-leveling floor after drying
Floor pouring instructions
If you decide to fill the floor yourself, be sure to read the instructions on the package.
Each mixture has its nuances, but in general the order of work is as follows:
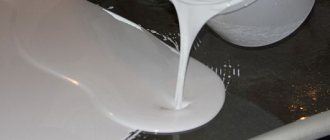
- Mix the solution, strictly observing the proportions specified by the manufacturer. The optimal composition is similar in consistency to thick sour cream.
- Pour the mixture onto the subfloor and spread using a wide spatula. The minimum pouring thickness is 5 mm. You can make the layer thicker - this will increase strength, but will entail a significant increase in financial costs.
- Go over the surface with a needle roller to remove air from the composition.
When walking with a roller to work on large areas, wear special shoes
Important! If you are using a mixture with an aqueous solution, then increasing the amount of water will give better spreadability, but will lead to cracking when drying.
If the floor has been leveled under decorative sheet or roll material, then the work is complete. But if you plan to finish filling, then after complete drying the entire cycle of work should be repeated, but with the finishing solution.
After complete drying, at first the finishing layer should be protected from sunlight and water.
Attention! Self-leveling floors can be used for any decorative finish: laminate, parquet, tiles, linoleum. There is only one thing that doesn’t make sense: installing a self-leveling floor under concrete.
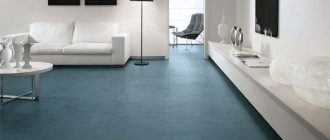
Decorative self-leveling floor in the interior
The video in this article will introduce you to the technology of working with self-leveling floors.
Main differences
The main difference between construction methods is the material required for their implementation.
The self-leveling coating is a hardened polymer or mineral composition. Initially it is a dry mixture. But it is brought to the required viscosity and fluidity and then distributed over the prepared base. A screed is nothing more than a composition of cement and sand. It is also diluted with water in the required amount until thickened.
The basic characteristic of self-leveling coating is the ability to self-level. With minimal labor and material costs, a perfectly flat, smooth surface is obtained. Hardening occurs in just a few hours. Screeding requires a fair amount of effort and time. Suffice it to say that it takes up to 25 days for the sand-cement mixture to dry completely.
Differences can also be seen in the thickness of the formation. The screed easily “copes” with significant differences in heights. A self-leveling floor cannot be installed if the difference in levels exceeds 30 mm.
Finally, ties are almost four times cheaper. Polymer is almost ideal, but it is an expensive option.
Carrying out work with large differences in the concrete base
Cement screed is the cheapest way to level floors and is required when there are large differences. And in order to further simplify the process, guide structures - beacons - are used. They are fixed to the floor at a distance of 500–800 mm, aligned in one plane using a level.
The next stage is to prepare a solution of the appropriate consistency, add plasticizers to it and place the resulting material on the concrete.
After the screed has set, the guides must be removed by filling the remaining grooves with solution. After 4 weeks, the surface of the screed is rubbed and strengthened by treating it with a primer. A faster way to level a large area is the semi-dry screed technology.
How to avoid mistakes when laying concrete
In order to save money or because of unprofessionalism, serious mistakes are sometimes made when pouring a concrete floor:
- lime cannot be added to the composition (it is used to increase plasticity and simplify the leveling process), it reduces strength;
- for the same reason, it is not recommended to use cement-lime mortars used to plaster walls;
- the liquid composition is easier to level, but it also loses strength;
- When concrete hardens, you cannot refuse to wet the surface (it will crack).
If you are not confident in your abilities, then entrust the work to professionals. The LLC PolyTek System company in Moscow provides services for pouring concrete floors. The work is performed by experienced craftsmen who guarantee impeccable results. After our work, you can be sure that your floor is in perfect order. Thank you very much for visiting our site, don’t rush to leave, read the menu, maybe you’ll find something else interesting for you.
Secrets of using finishing mixtures
Thin-layer final fill mixtures can be applied over virtually any substrate. You just need to select products in accordance with the manufacturer's instructions regarding compatibility. The priority is still cement and polymer bases.
Leveling proudly appears among the functions of finishing compositions, but since they are mainly filled with a layer of up to 5 mm, it is advisable to exclude gross flaws in the “relief”. Even if the bumps and depressions can be smoothed out with a leveling mass, there is a strong argument in favor of first eliminating the defects.
Self-leveling floors of different thicknesses will harden unevenly, and strength indicators will vary significantly.
If previously the colorful range of finishing self-leveling compounds was dominated by dull gray and cream tones, now home craftsmen figuring out how to make a self-leveling floor can actively fantasize about their future decor.
The result can be a monochromatic color coating with the color specified by the manufacturer, or a 3D version with a unique pattern, covered with an epoxy transparent layer on top.
What is it for
Many people prefer to do the repairs themselves so as not to overpay the repair team for the work. This is not surprising, because now you can find many useful step-by-step instructions for leveling the floor. But even if all the recommendations are followed, a novice master can make serious mistakes, for example, skip several steps of the work process or incorrectly mix the building composition. The end result when making such mistakes is sad - the floor surface turns out to be uneven, which is why it is impossible to install laminate or ceramic tiles.
Uneven floors threaten poor-quality installation
Note! To avoid serious mistakes, you must carefully follow the instructions for leveling the floor. High-quality work will save not only money, but also time, and the finished coating will decorate your apartment or house for a long period.
Methods for determining floor unevenness
It's no secret that additional leveling may also be required for wooden floors, especially if there are gaps or gaps between the boards. Even if the subfloor is strong enough to hold together, leveling may still be necessary. The procedure is also necessary when installing the floor on an old layer of screed, the surface of which becomes rough over time. Leveling the floor will help eliminate any unevenness.
Why do you need to level the floor?
Option #1 - mastics
As a rule, mastics are most often used for laying linoleum. They are characterized by high strength and moisture resistance, which allows them to act as waterproofing.
To glue fabric-based linoleum, dispersion adhesives or synthetic bitumen mastics are used. They are applied to the floor in a layer of about 0.5 mm. Linoleum on a heat-insulating base is glued using dispersion adhesives.
The thickness of the adhesive layer on the surface is 0.7 mm. For baseless linoleum, mastics made from resins and rubber of synthetic origin are used. They are applied in a layer of no more than 0.4 mm.
There are many recipes for making linoleum glue at home. But it should be noted that store-bought adhesive is more reliable, since if you prepare it yourself there is a risk of making mistakes or doing something wrong.
Option #2 - special glue
A good glue for linoleum is quite elastic, which does not allow it to peel off under load. According to the method of gluing linoleum, compositions are divided into two types: for fixation and continuous gluing.
There are five types of adhesives for continuous bonding: one-component, two-component, water-dispersed, polyurethane and solvent-based adhesive. Water-dispersed compositions are environmentally friendly and popular. At the same time, they are quite elastic and fix linoleum with high quality.
As a more economical option, use adhesive for fixation - a special composition that has moderate adhesive ability and constant stickiness. This glue is easy to apply and the consumption is not high. It is best to buy glue together with linoleum, which will allow the seller to give full advice and offer the best option.
Having chosen the adhesive composition, you can proceed directly to the procedure for laying linoleum.
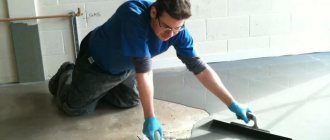
The adhesive composition is evenly applied to the floor surface with a notched trowel, sequentially spreading the linoleum and pressing it to the floor surface with a roller or brush.
Drying times vary; to find out exactly, you need to read the label and instructions on it.
Preparing the leveling mass
In an ordinary bucket, fill two-thirds of the volume with water. Then pour the dry mixture from the bag and mix thoroughly with a construction mixer until a uniform solution is obtained.
To get the solution to the required thickness, you need to experiment. In order to fill the screed level with a thick layer, you will need a thick solution.
When obtaining a layer more than two centimeters thick, it is best to equip the screed using beacons. But due to the fact that we do not take into account the ideal zero, we do not need to install beacons. If you need a solution less than five millimeters thick, you need to make a mixture with a consistency reminiscent of sour cream.