It would seem that the idea of building a bathhouse with your own hands is difficult; there are many ready-made projects, sketches, standard solutions and recommendations. Just use the suggested options correctly, choose the best one and implement it exactly in practice. In fact, building a bathhouse with your own hands is a rather complex, almost creative process, requiring a thoughtful approach and taking into account all the nuances associated with arranging a steam room, stove, foundation and insulation.
The timber version of the bathhouse will last at least ten years before renovation
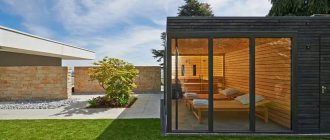
Frame
Frame-panel structures became popular among consumers several years ago. They are quite easy to assemble and do not require a large amount of natural wood or special equipment.
An inexpensive frame bathhouse is placed on a lightweight foundation, most often a columnar one is chosen. This significantly reduces construction costs since it does not require as much concrete to pour the foundation.
The walls of the bathhouse are most often mounted from ready-made frames, which are immediately manufactured in the workshop. If desired, to further reduce costs, you can assemble the frame yourself, but this will slow down construction. To create good thermal insulation and for a long service life of the building, it should be sheathed with suitable boards. To save money, coniferous species are suitable.
Attention! For frame baths, timber and logs are often used. But these materials are very expensive, although they are of excellent quality and long service life. Unplaned timber will allow you to save as much as possible on material. It is not as beautiful, but very affordable.
Since frame baths have thin walls, they require mandatory insulation. Among inexpensive insulation materials, mineral wool is most often chosen. It is laid in the walls in the form of slabs. They are not only affordable, but are also reliable and have a long service life, provided they are installed well.
Attention! When building frame-panel baths, you cannot skimp on protecting the frame and vapor barrier. If you have very little money, then give your preference to polymer film and aluminum foil. They are quite hopeful and belong to the economy segment.
External wall cladding, thermal insulation
The white linden lining with a characteristic aroma looks beautiful in the bathhouse.
External finishing is combined with the installation of an insulator. Profiled sheets and siding are attached to a frame made of wooden slats or galvanized profiles, and insulation is fixed between the elements. They install a waterproofing film and a membrane to prevent wind from blowing.
If you install insulation that is capable of absorbing water, a counter-lattice is installed. The design will provide an air gap between the layers to dry the insulator from condensation drops. Mineral wool and cellulose insulation are saturated with moisture, and extruded polystyrene foam and polyurethane foam are protected from water and steam.
From cinder blocks
Such baths began to be built not so long ago. They are very affordable, easy to build and last longer than wooden ones. Such structures require good insulation and mandatory vapor barrier. It is especially important to approach this issue if your latitude experiences constant temperature changes and cold winters.
Cinder block does not require additional protection against mold or mildew, which allows you to save on treating walls with an antiseptic. Also, cinder blocks do not burn, which eliminates the need to use fire retardants. There are several types of cinder blocks.
Expert opinion
Lovkachev Boris Petrovich
Bath master who knows everything about steaming
Attention! Cinder blocks can have different compositions; you should definitely familiarize yourself with them before purchasing. The best composition is shell rock, sand, expanded clay, sawdust and crushed stone, which are fixed with cement.
For supporting structures, it is advisable to choose monolithic blocks. They are strong and will enhance the load-bearing properties of the walls. For external walls, it is recommended to choose blocks with voids occupying 30% of the block volume. Internal partitions are erected from small blocks weighing 10-13 kg with a minimum thickness. This is necessary to save space indoors.
In addition, the internal walls rarely act as load-bearing walls, which eliminates the need for their significant strengthening. The same materials can be used as insulation and vapor barrier as for a frame bath.
To build baths from cinder blocks, you also do not need an expensive foundation, which allows you to save up to 50% of the budget. Usually a columnar or strip base is chosen.
The main thing is that it is perfectly aligned horizontally to avoid movement and deformation of the walls. If you violate the foundation laying technology, large cracks will appear on the cinder blocks.
Attention! Cinder block baths are not suitable for everyone. They are characterized by increased sound permeability. To eliminate this drawback, additional sound insulation will be required. It is worth calculating what is more profitable in this case: to build a bathhouse of a different type or to build a structure made of cinder blocks.
Standard solutions
In order to make it easier for you to prepare for the construction of a frame bath, we have collected for you the best projects and drawings that will help you cope with the task. These materials will be great for DIY construction if you are faced with the task of building both a rather modest 3x4 frame bathhouse and a more spacious 3x6 one. Let's consider other popular options: 5x5, 6x6, 6x8. Dividing by building area will help you better navigate this variety of promising solutions.
5x5
6x6
6x8
3x6
3x4
Foam block
This material also began to be in demand for the construction of baths not so long ago, but has already earned its respect among consumers. Foam block structures are lightweight and do not require the construction of a serious foundation.
Despite the fact that foam blocks retain heat well, you should definitely take care of good thermal insulation. It is especially important to think about it in case of severe winters. Foam block baths are not afraid of fire, which allows you to save on fire retardants, while the material does not crumble even at very high temperatures.
The strengths of foam block baths are their rapid erection, naturalness of the material and ease of cladding. The environmental friendliness of the materials eliminates the release of toxins and harmful substances when heated. And the low cost makes it possible to compete with other materials, gradually displacing even wood.
Attention! When using wooden slats or any wood elements as cladding for foam blocks, they should still be carefully processed for fire safety and protection from rotting.
Planning principles
There are general rules for planning areas where the bathhouse is located:
- determine the boundary of the site;
- decide whether the bathhouse will be a separate building or will be part of a house, garage or other building;
- locate all outbuildings behind the residential building.
One of the basic rules when planning is to get to know your neighbors and tell them where the bathhouse and other facilities will be located. This is important, since it will not be possible to place a well or pumping station next to your neighbor’s toilet. Another rule is to carry out land surveying.
To do this, you need to call a surveyor and determine the boundaries of the site : the engineer with the information enters all the information into the cadastral map, where the boundaries of the territory will be visible. Thanks to the presence of a cadastral plan, there will be no future disputes with neighbors.
It is also important to decide whether the bathhouse will be a free-standing structure. This solution is relevant if the plot has dimensions of more than 6 acres. Otherwise, it is better to attach the bathhouse to other structures. For example, owners often decide to build a bathhouse on the ground floor of a residential building with an entrance from the terrace. Sometimes the entrance to the sauna is from the garage, which also saves space.
When placing a bathhouse together with other buildings, do not forget about the presence of all the necessary premises for the operation of the sauna: steam room, shower, vestibule, bathroom and relaxation area.
Rules and regulations
There are some deviations from the general rules that should also be taken into account when planning. They relate to the shape and size of the site for the construction of a bathhouse.
According to the forms of memory
The placement of the steam room and other objects also depends on the shape of the site:
- If it is rectangular, then there will be no problems with placement. Here you can realize all the owner’s ideas, there is no need to invent something or be cunning with the location.
- If the shape is L-shaped, then there is a kind of niche that will be hidden from prying eyes. In such a niche you can set up a bathhouse and properly connect all communications to it, which will not interfere with the site.
- If the shape of the site is triangular, you can dilute it with round winding paths, and place the bathhouse among the green spaces behind the residential building.
- If the site has an elongated shape, there will be several difficulties. It is important to divide the territory into zones to make it convenient to move around.
Flower plantings, trees and shrubs can be used as details that will separate the zones. Bright plants can be planted near the short side of the plot. In this case, it is better to place the residential building on the short side of the fence, and build a bathhouse, garage and other buildings along the long side.
By territory size
If a large area requires the free placement of all buildings, then small areas of 5-6 acres require compact planning . For example, if the plot is small, then you can place a residential building along the long side of the fence, attaching a garage to it.
From the back entrance, where there is a terrace, lay a path to the bathhouse, and make the bathhouse itself at the back of the yard. It rarely happens when a sauna is planned in the most visible place - this is inconvenient, since people do not use the sauna every day.
Right next to the bathhouse you can place a children's playground, and on the other side you can make a small beautiful garden with flowers. If there is space left, you can make a small area for a garden for growing vegetables.
From aerated concrete
In its characteristics, this material is similar to foam blocks. Aerated concrete blocks are made from a mixture of cement, sand, aluminum mixture and special gas-forming substances. During a chemical reaction, the mixture hardens, and pouring into special molds allows the block to be given the correct shape.
Aerated concrete baths are prefabricated, lightweight, and do not require the construction of a solid foundation. In terms of ease of processing, the material is comparable to wood; it is easy to cut and assemble.
In terms of thermal insulation properties, aerated concrete blocks are not inferior to timber, which allows you to build a very warm and strong bathhouse. The special composition of the material allows you to avoid the appearance of mold and mildew, but you should understand that this requires proper ventilation.
The blocks do not burn, and when exposed to high temperatures they do not emit any harmful substances or toxins.
The only drawback of aerated concrete is its high ability to absorb water. This is due to the porous structure of the material. To prevent a reduction in the service life of the bathhouse and destruction of the concrete structure, good waterproofing is required. Particular attention should be paid to this work in the steam room and washing room. The floor in such baths should always be left wet and not insulated with anything.
Attention! Aerated concrete does not shrink significantly; it does not exceed 1-2%. This moment allows you to immediately begin decorating the steam room and dressing room.
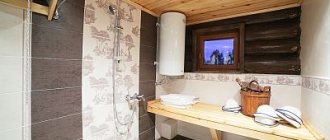
Decorating the room
Wood looks good outside and inside without finishing. For interior painting, use compositions that are recommended for hot and humid rooms. Varnish should absolutely not be used, as it releases harmful components.
For decoration, a combination of wood species with different colors and grain patterns is used. There is light wood, for example, ash, alder. Dark species include pine, fir, and cedar. Porcelain stoneware and ceramic tiles are used for the floor. The materials used are environmentally friendly.
The rest room is furnished with furniture, a sofa, a table, and sometimes the space is combined with a kitchen, barbecue area, terrace and access to nature.
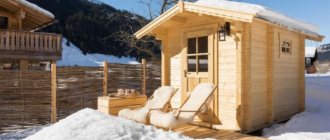
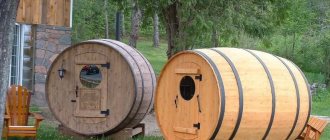
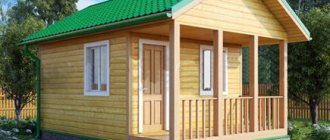
Inexpensive mini-baths
Such designs are usually chosen for small areas or with a very limited budget. Mini-baths can be of several types, but they all include a dressing room and a steam room. A washroom or shower room is found only in the largest structures of this type, and in this case it is always combined with a steam room.
Mini-baths are usually built from boards, logs or timber. They can be built on a wooden frame or mounted on wheels for mobility of the structure. The most popular models of inexpensive mini-baths are barrels. They are convenient, attractive in appearance, and can be installed on a foundation, without it, or on rolling stock.
It is recommended to build mini-baths only in cases of limited space. In terms of cost, due to the peculiarities of size and design, such baths will be equal in cost to frame-tile type structures or those built from cinder blocks.
Pouring the foundation
Pouring a strip foundation
The depth and dimensions of the foundation are selected in accordance with the calculation, taking into account the mark of seasonal freezing and the height of the rise in soil moisture during floods or the rainy season.
Phased construction of the foundation:
- mark the dimensions of the trench;
- carry out excavation work, clean and level the bottom;
- geotextiles are laid underneath so that the long sides are placed on the pillow;
- add sand and crushed stone to 5 and 10 cm, respectively;
- put formwork from boards or panels;
- they lay roofing felt and put it on the walls.
Concrete is poured in one go. The mass is bayoneted with shovels, fittings or vibrated with electrical appliances to expel the air.
Save your budget
If you have a small budget, you can save on several points. Such savings will not affect the quality of construction, ensuring the construction of a reliable structure.
You should not buy a stove with a remote firebox. Such a purchase will not only be cheaper, but will also allow you to heat up the steam room much faster, and this will save firewood.
If the soil allows, give preference to a removable foundation. It is very inexpensive, allows you to quickly carry out the necessary repairs if necessary, and is easily dismantled and replaced with another.
If you plan to have a window in the bathhouse, be sure to insulate it in the winter; regular film with bubbles, which is used for packaging, is suitable for these purposes. It is used to trim the frame from the outside.
There is no need to install a shower stall or install a shower in the washroom. Just put basins or tubs for water. It is not so convenient, but very economical.
To reduce the cost of the roof, you should not make it very high. This will not only reduce the cost of cladding, but will also make the chimney not so high.
Attention! In a budget bathhouse, you will also need to abandon full sewerage and water supply. For cold water, you can put barrels or equip a hose. Water in such baths is usually simply poured onto the floor, from where it is immediately absorbed into the ground.
Example of design with photo
To clearly understand how best to place a bathhouse on a site, you can give a visual example.
This diagram shows that the bathhouse is located next to the garage, and the entrance to it is through the garage. On a square plot, all requirements for the distance between residential buildings are perfectly met. All outbuildings are located away from the sauna.
What you can't save on
Even if the budget is very limited, it is strictly forbidden to save on the following points:
- Use of construction products without a quality certificate . Such building materials are several times cheaper, but there is no guarantee that they will not emit harmful fumes during use, especially when exposed to high temperatures. In addition, such materials can quickly fall apart and become completely unsuitable for further use.
- Saving on electrical wiring and related elements . You should not buy the cheapest sockets, hang uninsulated lamps and unsuitable wires. Such things will not only quickly fail, but they also increase the risk of fire and accidental electric shock several times.
- Use of unsuitable materials . If you want to save money, you should not replace recommended products with those that cost an order of magnitude cheaper, but at the same time, due to their performance characteristics, cannot be used in a bathhouse. This applies to insulation, flooring, and some types of wood. Unsuitable materials for specific conditions will not fully perform their task and will quickly deform or rot.
- Sauna stove and water heater . You should not buy handicraft products. They are not always safe; they may not be tightly sealed enough, which can cause a fire or burn.
Attention! Also, do not skimp on fuel for your sauna stove. Do not throw flammable materials into it that are not intended for use in enclosed spaces with high humidity and temperature. They can saturate the air with harmful substances, which will cause poisoning and even death.
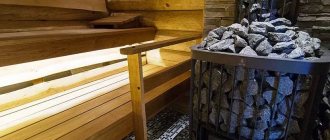
Internal equipment
Internal equipment of the steam room
The equipment inside the bath includes water supply, sewerage, electrical wiring, ventilation, heating system, bath furniture. Before construction, all communications are planned in advance so that the required number of people can be accommodated in the steam room, and the machines can withstand the total power of the units.
Heating is designed so that the steam room maintains the standard temperature. Sewage should not create additional moisture in the walls due to leaks. Ventilation will renew the air the required number of times over a certain period of time.
Water supply and drainage
If the bathhouse is used only in the summer, a system for draining the water from its pipes and siphons is provided so that in cold weather they do not burst from the expansion of the freezing liquid. Plumbing is installed in the shower (washing room), steam room, and a washbasin is placed in the locker room or rest room. A water tank (about 200 liters) is installed in the attic to ensure good pressure, or a pump is provided.
Sewage is carried out under the floor, with the cheapest option being a cesspool. Drainage wells are installed for inspection and cleaning of the sewer route. Septic tanks have several containers for cleaning and disinfecting wastewater. Their use allows the liquid from the last compartment to be used for watering the garden.
Electrical wiring installation
The bathhouse contains equipment that uses significant power. These are pressure pumps, water heaters, electric heaters. Power is needed for the operation of ventilation, lamps, kettles, and electric samovars.
High humidity requires that the wires be laid in special boxes. In another option, it is allowed to lay asbestos under the cables on the wall so that 10 cm edges protrude on both sides. Power is supplied to each unit with a separate wire, and an automatic switch is installed.
It is better to collect all control devices and switches on a common distribution panel, which is located in the dressing room.
Organization of ventilation
Ventilation in the bathhouse is natural.
Ventilation reduces humidity when the bathhouse is not in operation, since water vapor negatively affects furniture, furnishings and finishing materials of walls, floors, and ceilings.
There are two types of ventilation system:
- natural;
- forced.
Air naturally moves through channels built into walls or installed in the form of pipes. This cleaning works effectively in winter, but in the heat of summer there is weak draft. Fans are installed in ventilation vents to force air out of the room. In this case, fresh air is required, for which a supply channel is also formed.
Tips and tricks
Regardless of whether you are building an expensive or cheap bathhouse, you can use a number of effective tips:
- Choose the right bathhouse design, taking into account how many people are going to use it. The best option is 10-15 sq.m. Such dimensions allow you to equip all the necessary rooms and not spend a lot of fuel on heating.
- All boards and wooden bases must be treated against pests, mold and fungi. If this is not done, the bathhouse will last only a few seasons and will quickly require repairs.
- The ceiling is not made very high. Measure how much height you need to sit freely on the shelf and add 15-20 cm from above so as not to touch the ceiling with your head while floating.
- Doors should be installed with a high threshold. This speeds up the heating of the room and prevents the heat from quickly leaving the steam room. Be sure to seal the door to minimize heat loss.
- If possible, try to make the outer wall at least 30-35 cm thick. This will keep the heat in the steam room for a long time, which is especially important in winter, when the bathhouse cools down much faster.
- Windows are more than just decoration. They are recommended to be used as an additional fire exit. They should be placed on the western side, where there is the most sun in the afternoon, when the bathhouse is mainly heated.
Attention! Be sure to protect the bathhouse from drafts. To do this, you will need not only to properly insulate the seams, but also to correctly mark the doors. To prevent drafts inside, they should not be placed perpendicular to each other.
Choosing a site for construction
The location of the building is chosen taking into account its design; if the building is erected on a foundation, its placement in the dacha is determined by SNiP standards. If it is a mobile or ergonomic structure, or a converted shed without a foundation, it can be placed literally anywhere.
General requirements:
- it is prohibited to place a bathhouse closer than 5 m from the red line;
- if the building is wooden, it should be 10–15 m away from the residential building;
- It is better to remove the bathhouse from the reservoir or block - 15 m;
- It is recommended to build on a hill.
To save on insulation, choose a place protected from the wind.
Questions and answers
In the case of using boards to build a bathhouse, is it possible to use unedged material or will the quality of the structure suffer from this?
No. You can safely use unedged boards if you have no complaints about their appearance. The main thing is that the wood itself is strong and dry.
Why do you need a vapor barrier if insulation is already used to lose heat?
Insulation and vapor barrier perform different tasks. Vapor barrier prevents the destruction of wood due to constant ingress of water and exposure to high temperature.
Does the wood need to be treated again after some time has passed since it was put into use?
Necessarily. To prevent the wood from drying out, use antiseptics and fire retardants from time to time. To be on the safe side, all wood can be varnished again once a year.
What is better: an individual project or a standard building?
An individual project is much more expensive, so if you are building a budget bathhouse, you should focus on standard small-sized projects.
Where is the best place to install the door?
It makes no difference what kind of bathhouse you are building. Always install the door on the south side if you plan to use the steam room in winter. This way the snowdrifts will melt quickly and will not block the entrance.
A budget sauna is a reality that everyone can implement on their own site. Careful familiarization with the characteristics of materials for construction, as well as knowledge of where costs can be reduced, allows you to build a durable structure for relatively little money.
Where to start designing?
Any project development begins with determining its shape and size. Country plots are not always sold square or rectangular.
If this is the case, then the owner is lucky, but often he has to purchase irregularly shaped land for real estate. Then the question arises: where is it better to place the bathhouse on the plan? One of the basic rules is the optimal marking of the territory, taking into account all the buildings on it.
The development of a sauna project always begins with an assessment of the conditions in which the sauna itself and other facilities will be built. The characteristics of the land must be indicated here.
A few basic nuances with which to start designing a site with a bathhouse:
- relief;
- soil quality;
- availability of groundwater;
- climate;
- sizes and shape.
The terrain can be flat or hilly, have ravines or hills. All this should be taken into account when drawing up the project, because it is not recommended to place the bathhouse on uneven surfaces. To do this, you will first need to level the area.
The quality of the soil needs to be determined for further landscape design around the sauna - if the fertile layer is less than 10 cm, then soil will have to be brought in. This point will become important if you want to create beautiful areas around the bathhouse for relaxation.
If groundwater flows too high, then it is necessary to equip a drainage system. This is especially true if the bathhouse is planned from a log house or wooden beams: flooding of a structure made from such material should not be allowed. Climatic conditions are also important - they determine the construction material.
The shape and size directly affect not only the landscape design around the sauna, but also the placement of objects around the area. If the site has the shape of the letter “g”, then you will have to think about how best to place the bathhouse, and in what part of the territory to plan a residential building, garage and other objects.
Scheme
A layout diagram is created in order to clearly understand where and how various objects will be located throughout the territory. What to do :
- to start, take a sheet of white plain paper;
- if the area is irregular in shape, then the sheet can be cut to fit it;
- You can cut out objects from paper of other colors: bathhouse, house, garage, gazebo;
- Next, you should arrange the objects at your discretion by moving them.
This method allows you to carefully consider all planning decisions: when the owner moves objects, he thinks through various layout options, thereby choosing the best one.
Do not forget that all objects on the plan must be cut to scale and correspond to the dimensions of the site. After the owner comes to a final decision, objects can be drawn on the diagram. To do this, you need to draw the territory with a pencil on a sheet of paper and transfer all its buildings to scale onto the sheet.
You must specify the location:
- residential premises;
- the bathhouse itself;
- utility and auxiliary buildings;
- draw a fence;
- draw the location of communications.
If desired, you can place green spaces on the diagram. When the scheme is ready, it can be worked out in a computer version using site design programs.
Sewage system
When constructing the foundation, installation holes should be provided at the required level for laying sewer pipes. A drainage well up to one and a half meters deep is installed not far from the bathhouse. Then they fill it with large crushed stone to one third of the depth of the well, cover it with a wooden lid and install a ventilation mushroom.
The receiving manifold is made of plastic pipes with a diameter of 100 mm with a natural slope of five degrees. Wastewater receivers are installed from the washing department, sanitary unit, and only then proceed to the installation of floors.
Design work
The construction of the bathhouse must be carried out in compliance with the requirements of Building Codes and Regulations 02/30/97. The building assumes the presence of: a covered canopy, a relaxation room, a washing room, a steam room, and a bathroom.
The design stage includes the development of working drawings for the general construction part, special interior finishing work, water and electricity supply, sewerage system, natural and forced ventilation system.
Approximate material calculation
To carry out the calculation, you need to take into account what diameter the log will have. A larger one is better for a bath, but it is more expensive. The optimal diameter is 280 mm. The cost of 1 m3 of such logs with cups is on average about 8 thousand rubles.
Now you need to determine the height of the pediment. To do this, it is recommended to focus on natural conditions. In case of a large amount of precipitation, the gable should be high and the roof steep so that the snow does not linger on it, and in strong winds, vice versa, so as not to create excessive windage. The average height of the pediment is 1.5 m.
Photo gallery: drawings of a log house and necessary parameters
Top view and log cross-section parameters. A drawing of a log house will help in filling out the initial data.
To calculate the amount of material, you must fill in all the initial data. A special calculator can help with the calculation. All values can be entered into a special table.