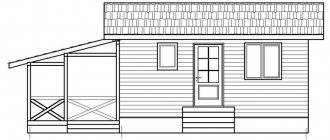
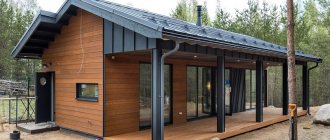
Forum member Livadi and her husband lived in a rented apartment for a long time and could only dream of owning their own home. But everything comes to an end. Thanks to the advice of their friend, they purchased a small plot of land, where they decided to build a house on their own. We independently developed the design and drawing of the house. The building was planned to be used for temporary housing, and in the future - as a bathhouse or guest house. The construction plan was developed in detail and the interior was designed. As a result, we managed to build a small 6x4 house with a budget of $6,000 in a little more than a month.
Content
- Construction of the foundation of the house
- Basement of a house
- Installation of frame walls
- Frame wall cladding
- Window installation
- Roof, rafter system
- The final stage: interior decoration of the house
- Basic materials and tools used in the construction process
- Auxiliary structures for house construction
- Bottom line
Two-story house 4 by 4
The 4 x 4 garden house can be extended. To increase the usable area, a second floor is being built. There are two options:
- attic;
- full floor.
On the top floor you can equip a recreation room or storage room. In the case of construction of the second floor, the foundation and load-bearing walls are strengthened.
A lightweight option is the attic room. Particular attention must be paid to the insulation and soundproofing of the roof. Some of the elements of the upper floor during the construction of the attic can be completed independently.
A large structure will not work when building a 4 by 4 dacha. To have spacious living quarters in which you can live all year round, you need to build a full-fledged cottage.
Construction of the foundation of the house
The entire construction process was planned to be completed on our own, but the construction of the foundation was still entrusted to a construction company. It had to be built quickly. They decided to make the frame on screw piles, since they have a number of advantages:
- Such a foundation is made on any type of soil, in this case the area is unkempt, unplowed, with turf growing;
- Construction takes little time - the foundation was laid in one day;
- Construction on screw piles will cost much less than a traditional foundation;
- Piles can be screwed close to utilities;
- Such a foundation will last more than 80 years, and if it is filled with concrete, much longer.
The company's employees delivered the material and installed screw piles. The price for the foundation with work was $1100.
Note: Even if you are absolutely confident in the quality of the materials that were used to build the foundation, you should not leave it unloaded for the winter. There is a possibility that the piles will be displaced from the ground and the foundation may bend.
Comparison: Regular drawing and our drawings
For convenience and speed of work, we did not, as everyone else does, make a separate picking list for the entire house, since working on it is extremely inconvenient. Imagine how to assemble a house if, in order to assemble a partition that is only a meter or two long, you have to look for its completeness in a book of almost a hundred! sheets. So that you do not have such problems, we have indicated all the necessary materials and their exact dimensions directly on the page where the object that you will be collecting now is drawn, you will not have to spend a lot of time finding and calculating what you need necessary, everything is indicated in the diagram - simple and convenient. In any case, there is also an additional estimate for the project.
Basement of a house
Do-it-yourself frame construction, as is known, is usually carried out using the “platform” technology. However, it was decided not to follow this advice, since there was a possibility that the insulation would get wet if it rained. That's what we decided to do.
After the foundation was prepared, it was time to install the frame and joists of the house. We carefully laid out boards for strapping measuring 150x50 cm and treated the wood with an antiseptic (in this case, Senezh red ognebio). The harness was assembled according to the drawing. We attached it using a nailer with rough, glue-coated nails 0.9 cm long. We did everything according to the level, the diagonals met perfectly. As a result, the result was a harness with a height of 15 cm. The entire process of creating the harness took about two days.
A load-bearing beam was placed strictly in the center of the frame (along the building). Its function is to support the sexual lags. After this, an antiseptic should be applied to the entire beam.
Boards were nailed on top of the strapping at a distance of 60 cm from each other. A beam of 150x50x600 cm was filled, acting as a subfloor. Two layers of polystyrene foam were laid in the formed cells - the first layer was 5 cm wide, the second was 10 cm wide, which was foamed around the edges and covered with 50x300 cm boards.
Advice: You should make the holes in the harness slightly larger, otherwise you will have to flare it.
Foundation assembly plans and drawings
A set of working diagrams and components for the project contains: a complete drawing with the dimensions of the installation locations of anchors, vents for working reinforcement and clamps, the volume of concrete and the amount of reinforcement. Technology and method for economical assembly of formwork for subsequent use for frame posts and frames. With a pile foundation, the project also includes a description and a pile field with all dimensions for installing piles (d108mm) and channel piping to ensure the reliability of the piles. If desired, it is possible to tie the piles with timber or boards on edge along the heads.
Installation of frame walls
Tip: Wood for building walls should be chosen with no more than 15% humidity.
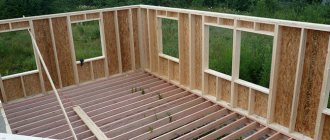
They assembled and raised the walls quite quickly. We decided to assemble the frame walls in a horizontal position on the prepared floor, since there is a possibility of encountering the problem of inaccurate calculations in the drawings.
The future walls of the house were assembled right on the floor. It is necessary to take into account that the slab must overlap the upper and lower frames by at least 5 cm, so the stand height should be selected from 2.6 meters.
When the installation of the walls is completed, it is recommended to check their level using a cord; this can be done as follows: pull the cord from one corner to the other. If there are still deviations, the walls must be pressed in from the side from which it is necessary to align. After final leveling of the walls, the jibs should be nailed.
Note: In order not to waste valuable time on leveling walls and filing posts of different lengths, you should carefully measure everything several times.
Glulam beams were used for the floors. They can withstand higher loads, which makes it possible to increase the pitch between the lags. Spacers were inserted between the floor joists.
Classic version
The construction of a 4 by 5 country house according to the classic version provides for only one floor. It accommodates a room with a living area of 16 m2. This room is suitable for one or two people who love to spend time in the garden. They need a house for daytime rest and overnight stay.
A one-story house does not require large expenses. You can build it yourself from timber or frame panels. It is enough to have some construction experience. New technologies significantly reduce the construction time of a building. The walls of the house are built from profiled timber, the cracks between which are carefully caulked on both sides.
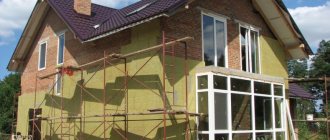
To protect wooden walls from dampness and rotting after winter, it is necessary to carry out external insulation with polystyrene slabs. They do not absorb moisture and are not damaged by rodents.
Frame wall cladding
External cladding was used with 9 mm OSB sheets, this is sufficient to provide the necessary rigidity. The bottom sheets were installed from the ground, and sometimes homemade sawhorses were used, and scaffolding was used to install the top sheets. The sheets were fastened using screw nails 50-60 mm long at a distance of 1.5 cm.
Tip: In order not to constantly count the required gap between the OSB sheets, you need to install two nails into the frame posts and place the sheet on top. Thus, a gap of the required size, 3 mm, is obtained.
After covering, we painted the edges to prevent them from swelling due to rain.
Tip: OSB sheets are an excellent wind barrier, but you should still be careful about minimal waterproofing to prevent the material from swelling.
The facade was wrapped with windproof film, and doors purchased in advance were installed.
House on 6 acres
After you have purchased a small plot of six acres, it is extremely important to develop a design for the house and its location.
In this case, it is necessary to plan everything in a complex, since different types of landscape design require certain conditions for the choice of material for building construction. If living in a house is not expected during the cold season, it makes sense to consider options for building a small house. This will significantly save the area of the site for planting or create a unique landscape design.
Before construction, it is important to study all the main requirements for the construction of objects on a land plot:
- Buildings should be located no closer than five meters from the border of the site and three meters from the neighbors’ territory.
- The distance between your house and neighboring buildings should not exceed six meters.
- Site fencing should be erected to a height of no more than one and a half meters.
- Toilet and cesspools can be located at a distance of no closer than fifteen meters from residential buildings or water sources (wells, boreholes).
Window installation
Windows, like doors, were installed after wrapping the façade of the house with film. No cutouts were made in advance for window and door openings. The following technology was used: the film must be carefully cut and the ends bent inside the opening, secured with a stapler. Next, insert the window block level and foam the seams. After the polyurethane foam has dried, carefully remove the excess. This eliminates the possibility of moisture getting between the opening and the window frame.
Roof, rafter system
Installation of the rafter system
The next stage of building a frame house with your own hands is the roof. The roof model was carefully worked out, and it was taken as the basis for construction. For this house, a frame with a load-bearing ridge truss was chosen. At this stage, the most important thing is to install the ridge correctly, then it will be easy to mount the rafters made according to the template. It is important to note that the width of the ridge must be no less than the length of the rafter support.
Rafters 150x50 were installed at a slope of 20 degrees. It is better to attach the rafters to the ridge beam using metal corners.
Note: One rafter sample should be made and each subsequent piece should be measured only according to this sample to avoid errors.
Roof installation
To improve the ventilation of the room, vents were made under the ridge and an upper ventilation gap measuring 50x50 mm in the roof structure (concrete lattice).
Tip: Regardless of whether you insulate the roof or not, you must install waterproofing and install two ventilation gaps 2-4 cm high.
Since the attic was not intended as a living space, insulation and heating were not particularly dealt with. A wind- and moisture-proof film was used instead of a membrane, so a mandatory gap was created. We decided to insulate the roof with 1.5 cm rockwool.
When fastening the sheathing, you should ensure that it extends beyond the outer rafter by approximately 20-50 cm. When the sheathing is secured, the excess must be cut off.
Tip: To avoid unforeseen situations, you should immediately fasten all roof parts as securely as possible. Thus, the strength and rigidity of the entire structure will be ensured, regardless of unforeseen weather conditions.
The roof of the house was covered with metal tiles, since it is ideal for a gable roof - minimal material consumption is provided.
Design and technology specifics
The 6x4 house became an invariable attribute of dachas during the Soviet period. At that time, many summer residents, having received the coveted 6 acres, built such small buildings. Some preferred the design of a one-story building with a simple layout: a recreation room, a small kitchen and a bathroom. Others, in order to increase the usable area, added an attic floor to a small house. The 4x6 layout of the house made it possible to equip the ground floor with a spacious living room-kitchen, a vestibule-corridor, and a terrace, limited to four squares.
The second attic floor consisted of a large bedroom of almost 15 square meters, which, if necessary, was further divided by a partition into two rooms.
But most owners dreamed of building a two-story small chalet-style house with a laconic layout. This building is distinguished by a gable roof with a minimal slope, wide projections that protect the cottage from weather troubles and serve as a canopy for spacious balconies and terraces. Natural stone or wood is chosen as the main building materials.
The layout drawing of a shepherd's cottage (that's how the chalet is translated) is ordinary. The second floor was given over to personal apartments, the first included a living room, kitchen and toilet. Sometimes the plan included adding a garage. A recreation area was always organized in front of the cottage: a children's playground with a sandbox, swings was installed, a barbecue was installed, and stone paths were laid.
Much time has passed since then, but the habit of building compact country houses with a simple layout remains. The design of 4x6 houses is intended for the construction of country cottages for seasonal residence, guest houses or tourist shelters. Additionally, the 4x6 layout can be converted into a bathhouse.
A 4 by 5 country house according to the project allows you to get not only country housing, but also to set up vegetable beds, install a small greenhouse or greenhouse, and build a bathhouse.
You may be interested in: One-story country houses: nuances of choice
The specificity of the technology for constructing 4x6 houses lies in the layout:
- All rooms in the day area must be combined into one room;
- It is advisable to provide the child with a private bedroom;
- For a utility room, it is worth allocating a few square meters on the ground floor;
- Bathrooms must be organized at each level.
Layout of a one-story half-timbered building
The construction of a compact 4x6 house in the half-timbered style is suitable for a small area. This building resembles a German one-story neat cottage. A house is being built from 4 x 6 timber.
The layout contains:
- A small hallway;
- Bathroom;
- Kitchen;
- Rest room.
A 4x6 house is designed to accommodate a family of 2-3 people. On the ground floor you can add a spacious porch or an open terrace. The project allows you to expand the area for summer recreation by installing sun loungers.
Project of a two-story chalet house
A compact two-story house 4 by 6 occupies only 24 square meters. meters. The project provides the opportunity to create flower beds, garden beds, place a garage on the site, and plant a small garden. The area of a 6 by 4 house on two floors is doubled compared to a one-story building of similar dimensions. The layout is quite suitable for the life of an average family. It can be used in a guest house of a country estate.
The 6x4 layout, the design of which provides for the location of common rooms on the first level, and the use of the second floor premises as private bedrooms, is very successful. The daytime part does not intersect with the night zone. Having gone down in the morning for breakfast, you can go up to the second floor after dinner.
Features of the 6x4 structure with an attic
Another solution to increasing the space of the house while maintaining the layout of the site unchanged is a house made of 4x6 timber with an attic. Wood is the most accessible material for most regions of Russia, so its use is justified. The total area of the house is expanded due to the attic space.
This architectural technique for changing the layout was proposed by the French engineer Francois Monsard in the 17th century. In those days, there were no modern materials for roof insulation, so attics were used for storing unnecessary things or for servants to live. Now the roofing pie can be insulated with mineral or basalt wool, polystyrene foam or polystyrene foam.
Separately, it is worth dwelling on the roof structure. According to the project, it can be a hip, gable or sloping 4x6 roof with an attic. However, in this matter the type of roof does not play a special role. The main thing is that the height of the ridge should provide a room with a ceiling of 2.5-2.8 meters.
You may be interested in: Various country house projects: photos of finished plans
The final stage: interior decoration of the house
For maximum vapor barrier of the house and hermetic entry of communications, a film was used, which is designed to prevent moisture from entering the house, and steam should easily escape from the house. It is also assumed that the film will protect the house from blowing, especially where the frames and racks are connected. The standard film is 1.5 m wide, easily stapled and very tear-resistant. However, they attached it with tape.
Tip: It is better to seal joints and holes in the film vapor barrier with bitumen-rubber roofing sealant, since the tape is not attached firmly.
They laid floors, insulated the walls and ceiling.
We made a partition for the vestibule, brought electricity into the house, made internal sheathing and laid drywall. We laid OSB-3 9mm linoleum on the floor to support the insulation from below.
Frame construction theory
Composition of the main elements of a frame house
The construction of houses always begins with preparatory actions:
- analysis of the site - soil structure and soil behavior characteristics;
- designing a building - foundation, calculating the structures themselves that make up the elements of the future house;
- generation of necessary documentation – drawings, technological maps;
- approval of papers before the start of construction with permitting authorities.
The main feature of frame house construction is the use of wall and ceiling elements for the base - timber and metal profiles. As filling there are various insulation materials (mineral wool, polystyrene foam), which are closed from the inside and outside with various panels - wood, metal, plastic or a combination. The structure is gradually mounted on the foundation and sheathed in parallel - on the inside and on the outside. This allows buildings to be erected by small teams of workers - from two people, and also not to use construction equipment - everything is done manually.
Example of a two-story house 6x6
As a result, the owner can receive a unique building with the properties he needs, which depends on the purpose of the building, the local climate and financial capabilities.
Pros and cons of frame houses
In most countries of the world, frame construction is becoming more and more popular every year. There are several reasons for this:
- the total cost per square meter is the lowest among all other construction methods. Only cardboard houses or tents are cheaper;
- versatility: the ability to adapt the building to hot and cold climates, as well as to build simple outbuildings;
- ease of maintenance - frequent renovation of facades is not required, and repairs are as easy as construction;
- high speed of construction - even a small team of 2-4 people can create a standard house in 3-6 months;
- low heat capacity of walls and horizontal partitions - simplifies the heating process, the cost of which will be minimal;
- good sound insulation – provided that proper insulation materials are used;
- frame houses are the safest - this applies to both ecology and earthquake resistance. The buildings are able to withstand tremors up to 8-9 points.
Separately, it should be clarified that, if necessary, you can build a house that can be quickly disassembled, transported to a new location and reassembled again. Such mobility is ensured only by frame and frame-modular construction schemes.
Important! Often, it is possible to prepare foundations of medium or shallow depth for the construction of a house - the weight of the structure is small, therefore, if the soil allows, the use of simple and light types of foundations is allowed. But for this you need to carefully study the area. Some types of soil require the creation of a permanent foundation, otherwise the house will deform or completely collapse over time.
But there are also negative points:
To reduce the noise of the entire structure, you will have to install heavy types of insulation in the walls - this is not very important for a summer house, but a house that is intended for permanent residence will require this.
A reliable frame house can be erected only after scrupulous calculations. Without the appropriate education, it is very difficult to draw up correct drawings, so it is recommended to turn to professionals. This will require allocating part of the budget to order design documentation, but it will guarantee that the house will not fall apart in a year or two.
Basic materials and tools used in the construction process
- Screw piles;
- Rockwool 1.5 cm for roof insulation;
- Boards 150x50 m;
- Antiseptic for treating all wooden coatings Senezh red ognebio;
- Rough nails 90 mm;
- Screw nails 50-60 mm;
- Sheathing paint;
- Metal tiles;
- Film for the facade and vapor barrier of the house;
- Windows and doors;
- Drywall;
- Workers from a construction company were hired to install the façade;
- OSB 18.3 mm (subfloor) and 9 mm (wall and roof cladding);
- Foam plastic for subfloor;
Auxiliary structures for house construction
When building a frame house, it is necessary to have various temporary structures. To secure the films and cover the frame with OSB sheets, homemade scaffolding, a trestle, and a wooden ladder were used. Scaffolding, trestles and making a ladder with your own hands is not at all difficult.
Projects and layout of a 4x6 house
Wooden house 4x6 with an attic floor and a balcony Source dom-steny.ru The shaped roof of the house will increase the space of the upper room Source dom-steny.ru
Layout of a 6x4 country house with an attic and veranda Source dom-steny.ru
Houses of the same type can be slightly transformed Source dan-stroi.ru
A terrace with columns and a non-standard roof make a small house presentable Source dom-steny.ru
Room layout: studio hall on the first floor and bedroom on the second Source vizada.ru
A country house can be like this: one floor and 2-3 small rooms Source domnomore.com
Bottom line
In just a month and a half, we managed to build a foundation, make a full-fledged frame of the house, and insulate the walls and floor. At the same time, all work (except for the facade) was carried out on our own, without the involvement of hired workers. Using similar technology, it is easy to build other buildings, for example, a do-it-yourself outbuilding. About $6,000 was spent on building a 6x4 frame house with your own hands, excluding the exterior cladding of the house.
Based on materials from Forumhouse
Elements of a frame house drawing
What does a detailed drawing of a frame house consist of? From many different drawings, each of which has its own purpose.
Let's consider all the main elements of a frame house drawing using the example of a two-story residential building measuring 7.2 by 7.2 m.
Three-dimensional model of a house
Without the appropriate education and skills, it is difficult to draw conclusions about the final appearance of your future home based on engineering drawings. Therefore, the first drawing is a three-dimensional drawing of the future house. This allows the customer to choose from a variety of standard projects the most suitable in appearance. Even at home, people are “greeted by their clothes.”
If you order a project from a specialist, you may be offered a project for the same house with different cladding and roofing options.
House layout
After choosing the appearance of the house, you need to decide on the layout. This is one of the most important design elements to ensure comfortable living.
Here we see a detailed plan of the location of all the main walls and partitions, and doorways are marked. Complete with other drawings and specifications, building a house turns into working with a construction kit that you make yourself. If you purchase a house kit from the manufacturer, the drawings also indicate the markings of each beam.