- Technical support
- Articles
- Installation technology for water heated floors
#warm floor #built-in heating #design #installation #adjustment
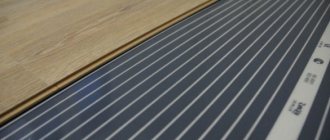
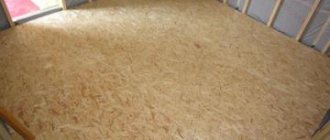
The most common way to implement underfloor heating systems is monolithic concrete floors, made by the so-called “wet” method. The floor structure is a “layer cake” made of various materials (Fig. 1).
Fig. 1 Laying underfloor heating loops with a single coil
Installation of a heated floor system begins with preparing the surface for installation of a heated floor. The surface must be level, unevenness in area should not exceed ±5 mm. Irregularities and protrusions of no more than 10 mm are allowed. If necessary, the surface is leveled with an additional screed. Failure to comply with this requirement may lead to air-filling of the pipes. If there is high humidity in the room below, it is advisable to install waterproofing (polyethylene film).
After leveling the surface, it is necessary to lay a damper tape at least 5 mm wide along the side walls to compensate for the thermal expansion of the heated floor monolith. It must be laid along all walls framing the room, racks, door frames, bends, etc. The tape should protrude above the planned height of the floor structure by at least 20 mm.
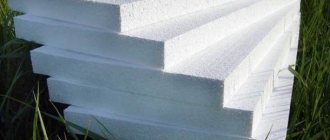
After which a layer of thermal insulation is laid to prevent heat leakage into the lower rooms. It is recommended to use foam materials (polystyrene, polyethylene, etc.) with a density of at least 25 kg/m3 as thermal insulation. If it is impossible to lay thick layers of thermal insulation, then in this case foil thermal insulation materials with a thickness of 5 or 10 mm are used. It is important that foil thermal insulation materials have a protective film on the aluminum. Otherwise, the alkaline environment of the concrete screed destroys the foil layer within 3–5 weeks.
What is the beauty of heated floors?
Due to the fact that the underfloor heating pipes are laid out over the entire area of the room, the most uniform heating of each area is achieved. Wherever you are in your home, you will be equally comfortable.
With water floors, in most cases you get rid of heating radiators, which previously took up extra space in your home. For all these features, water-heated floors are loved in private homes. Let's take a step-by-step look at laying a water-heated floor with your own hands.
Floor installation methods
There are several ways to create a warm water floor.
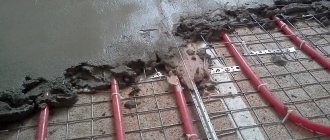
- The most popular and reliable of them is concrete screed. Unlike electric types, 16 mm pipes cannot be hidden in tile adhesive, and it will not work. Therefore, the screed is poured at least 3 cm above the pipes.
- The second method is to lay pipes in cut-out polystyrene foam grooves. The grooves are made by hand, pipes are laid inside, then the screed is poured.
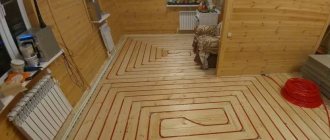
- The next option is often used in houses with wooden floors, although it requires a lot of labor - laying it in wooden grooves. To do this, boards are placed on the floor, which create a gutter of the desired shape for installation.
Cost of installing heated floors
Many people are interested in the cost of installing heated floors. Let's share some numbers. If we take into account everything described above, then without pouring the screed and without taking into account the boiler room, the cost of components will cost approximately 1000-1200 rubles per square meter. You add the cost of the installer’s work in your region and get the final cost per square meter. If the areas are large, then in some cases this amount includes collectors for heated floors.
Taking into account the boiler room, turnkey installation of heated floors will cost approximately 2,500 rubles per square meter. This cost takes into account a boiler room with one boiler, an indirect heating boiler and related equipment. The figures are relevant for houses from 150 square meters. With a smaller area, the amount may be slightly higher due to the high cost of boiler equipment.
Pipe layout
It is carried out with a certain step and in the required configuration. It is recommended that the supply pipeline should be laid closer to the outer walls.
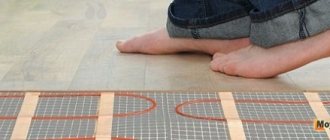
When laying a “single coil” (Fig. 2), the temperature distribution of the floor surface is not uniform.
Fig.2 Laying underfloor heating loops with a single coil
When laying spirally (Fig. 3), pipes with opposite flow directions alternate, with the hottest section of the pipe adjacent to the coldest. This leads to an even temperature distribution over the floor surface.
Fig.3 Laying heated floor loops in a spiral.
The pipe is laid according to the markings applied to the heat insulator, with anchor brackets every 0.3 - 0.5 m, or between special protrusions of the heat insulator. The laying step is calculated and ranges from 10 to 30 cm, but should not exceed 30 cm, otherwise uneven heating of the floor surface will occur with the appearance of warm and cold stripes. Areas near the exterior walls of a building are called boundary zones. Here it is recommended to reduce the pipe laying pitch in order to compensate for heat loss through the walls. The length of one circuit (loop) of a heated floor should not exceed 100–120 m, the pressure loss per loop (including fittings) should not exceed 20 kPa; the minimum speed of water movement is 0.2 m/s (to avoid the formation of air pockets in the system).
After laying out the loops, immediately before pouring the screed, the system is pressure tested at a pressure of 1.5 of the working pressure, but not less than 0.3 MPa.
When pouring a cement-sand screed, the pipe should be under a water pressure of 0.3 MPa at room temperature. The minimum pouring height above the pipe surface must be at least 3 cm (the maximum recommended height, according to European standards, is 7 cm). The cement-sand mixture must be at least grade 400 with a plasticizer. After pouring, it is recommended to “vibrate” the screed. When the length of a monolithic slab is more than 8 m or the area is more than 40 m2, it is necessary to provide seams between the slabs with a minimum thickness of 5 mm to compensate for the thermal expansion of the monolith. When pipes pass through seams, they must have a protective sheath of at least 1 m in length.
The system is started only after the concrete has completely dried (approximately 4 days per 1 cm of screed thickness). The water temperature when starting the system should be room temperature. After starting the system, increase the supply water temperature daily by 5°C to operating temperature.
Calculate the length of the contour
When making calculations to determine the number of pipes for laying a structure - a water-heated floor, the following points should be taken into account:
- the total area of all premises;
- number of collectors;
- room layout;
- the size of window openings and doors through which heat can escape;
- wall thickness;
- placement of furniture;
- air humidity;
- purpose of the rooms;
- presence of other heating systems.
Based on the average, 1 m2 will require 5 linear meters of pipe, with a laying step of 20 cm.
To most accurately calculate the size of the pipeline, the following formula is suitable:
L = S/N x 1.1
Where:
- S is the area of the room;
- N—laying step;
- 1.1 - reserve for making turns.
To the data obtained, you should add the number of meters from the floor to the manifold cabinet and back.
For clarity, let's look at the calculation process using an example:
- room area - 15 meters;
- the maximum distance to the manifold cabinet from the floor is 4 meters;
- distance between pipes - 0.15 mm;
15: 0.15 x 1.1 + (4 x 2) = 118 meters
Another way to calculate the amount of pipeline is to reflect the laying diagram on graph paper. At the same time, it is necessary to observe the scale and take into account the size of the room.
After reflecting the entire system on paper, you need to measure the length of all the coils in the drawing using a ruler, and multiply this result by the appropriate scale.
Is it possible to join pipes to each other?
If a water floor made of copper pipes is laid in a screed, then the pipes will have to be joined to each other. This will make the structure more reliable and durable. When installing polypropylene products, the connection is made by soldering, and in cases with a polyethylene circuit, the connection is made by welding a heat-resistant coupling.
The situation is more difficult when connecting PE-X and PE-RT pipes with fittings. Installation of press fittings is acceptable, but not recommended, as leakage may occur. But to connect the pipeline to the collector unit you cannot do without press fittings.
Important! Connecting circuits using push and compression fittings is prohibited. This also applies to push-in connectors for HDPE.
It is better to take a flexible pipeline for a warm floor, in one solid piece. This is more reliable and practical, since if there is a leak, repairing the lower floor will cost more.
Warm floors are a modern heating system that, with the correct choice of material and accurate calculations of the distance for laying loops, can create an ideal microclimate in the house.
How to calculate the number of pipes
The approximate pipe flow rate can be calculated by knowing the area of the heated room.
Data can be obtained by subtracting from the total area of the room the area of zones that do not need to be heated (the floor under large pieces of furniture) and the area of indentations from walls and partitions. The indentation, as a rule, is taken to be 20 cm, and for a standard room with an area of 20 sq.m., the area of such a zone will be about 3.5 sq.m.
The pipe consumption per 1 sq.m of area with a pitch of 100 mm will be approximately 10 m, with a pitch of 150 mm - 6.5 m.
Attention! In cases where the heat loss of the room is higher than the heat transfer, reducing the laying step may not give the expected result. Here, first of all, it is worth thinking about additional ways to insulate the room.
Water circuit installation diagrams
Schematically, laying pipes for arranging a liquid circuit can be done in one of the following ways:
- coil;
- double coil;
- snail.
Coil . The method of laying such a contour is the simplest and is performed in loops. This option will be optimal for a room divided into zones with different purposes, for which it will be convenient to use different temperature conditions.
The first loop is installed around the perimeter of the room, then a single snake is inserted inside. Thus, a maximally heated coolant will circulate in one half of the room, while a cooled one will circulate in the other, and accordingly the temperature will be different.
The coil turns can be spaced evenly, but the bends of the water circuits in this case will have strong creases.
The serpentine pipe placement method is ideal for rooms with little heat loss. They are used not only for apartments and private houses, but also for industrial facilities where there is a need to heat all year round
Double coil . In this case, the supply and return circuits are located next to each other throughout the room.
Angle coil . It is used exclusively for corner rooms where there are two external walls.
The advantages of the serpentine shape include simple planning and installation. Disadvantages: temperature changes in one room, pipe bends are quite sharp, so you cannot use a small pitch - this can cause a pipe break.
When laying the contour in the edge zones of the room (floor areas where external walls, windows, doors are located), the pitch should be smaller in comparison with other turns - 100-150 mm
Snail . Using this arrangement, supply and return pipes are installed throughout the room. They are placed parallel to each other and installed starting from the perimeter of the walls and moving to the center of the room.
The supply line in the middle of the room ends in a loop. Next, parallel to it, a return line is installed, which is laid from the center of the room and along its perimeter, moving towards the collector.
The presence of an external wall in the room may require double laying of pipes along it.
Due to the alternation of two lines when laying using the snail method, temperature fluctuations in the supply and return lines can be up to 10 °C
The advantages of this method include: uniform heating of the room; due to smooth bends, the system has little hydraulic resistance, and savings in consumables can reach 15% compared to the serpentine method. However, there are also disadvantages - complex design and installation.
Collector connection diagram
The choice of a ready-made mechanical or automatic collector model depends on the characteristics of the heating system.
The first type of control module is recommended to be installed for heated floors without a radiator, the second can be used in all other cases.
Valtec collector groups are the most popular. The manufacturer provides a 7-year warranty on its products. The installation diagram for the liquid circuit manifold is already included in the package of the finished mixing unit
According to the diagram, the assembly of the distribution comb for heated floors is carried out as follows:
- Installation of the frame. The following can be selected as the installation area for the collector: a prepared niche in the wall or a collector cabinet. It is also possible to mount directly to the wall. However, the location must be strictly horizontal.
- Connection to the boiler. The supply pipeline is located at the bottom, the return pipeline is located at the top. Ball valves must be installed in front of the frame. They will be followed by a pump group.
- Installation of a bypass valve with a temperature limiter. After this, the collector is installed.
- Hydraulic test of the system. Check by connecting to a pump, which helps build up pressure in the heating system.
In a mixing unit, one of the required elements is a two- or three-way valve. This device mixes water flows of different temperatures and redistributes the trajectory of their movement.
Shut-off valves and fittings are installed on both pipelines, return and supply, connected to the manifold installation, designed to balance the volume of the coolant, as well as to block any of the circuits
If servo drives are used to control the manifold thermostats, then the mixing unit equipment is expanded with a bypass and bypass valve.
Types of heated floors
Various types of heated floors have been developed. The most common are water and electric. Water ones are connected to the main heating circuit, which operates in the room. That is, there is no need to install a source of thermal energy separately. If we talk about savings during operation, then this is the best option.
The water system also has disadvantages:
- They can only be installed in private households. You can’t do this in an apartment; the law doesn’t allow it. When connected to a central system, the heating level of the coolant is automatically reduced, since the power of heating boilers is designed for a certain volume, which was laid down during the construction of an apartment building. That is, it will become colder in your neighbors’ apartments. It is not possible to obtain permission to connect. Violation of the law entails heavy fines and dismantling of the system.
- Since high pressure is created in the pipes, there is a risk of leaks. And this entails expensive repairs, not only of the water circuit itself, but also of the entire floor covering. If the water circuit on the second floor breaks down, the ceiling below will also suffer. That is, the risk of repair costs exceeds the savings in operating costs.
With the electric heating method, heating cables are installed under the finished floor, in a concrete screed. Its thickness is from 3 to 5 cm.
Among the disadvantages of cable floors are long-term installation, expensive operation, that is, increased energy consumption. Installing a thermostatic unit partially solves this problem.
The undoubted advantages are high heat transfer (efficiency is close to 100 percent), the ability to install both in an apartment and in a house.
Drafting
At the initial stage, a project is drawn up on graph paper. A detailed installation diagram should be shown here. The dimensions entered must fully correspond to the scale scale.
The project contains not only the parameters of the room where heating is planned to be installed, but also the location of all immovable objects under which the pipeline is not installed is recorded.
Drawing up a project for laying heated floors
The order of placement of pipes is selected from the most common ones (snake, spiral). Comparing these methods, each of them has strengths and weaknesses. The “snake” technique is simpler and faster, but does not ensure uniform heating of the plane.
Spiral laying is more difficult to perform, but it provides uniform heating and eliminates kinks in the coolant.
Now all that remains is to measure the length of the pipes (in total) and convert them to actual dimensions according to scale.
Pros of plinth
The technology, which is fundamentally different from traditional heating systems, looks like an ordinary decorative element from the outside. She received nationwide love thanks to her filling:
- A warm do-it-yourself plinth is equal in thickness to its traditional counterpart, but the height is slightly larger - 12-15 cm. This is done for the convenience of installing the heating system inside the element.
- The finishing is mounted at the junction of the floor and walls along the entire perimeter of the living space, organically fitting into any interior.
- The principle of operation is simple - electricity or coolant heats the tubes, and they, in turn, give off heat to the outer aluminum casing.
The benefits don't end there:
- Installing a warm baseboard allows you to get rid of inconvenient radiators - the dream of many owners. Nothing will stop you from turning any idea of an interior designer into reality. You don’t have to hide ugly batteries in closets, behind screens or curtains.
- This system allows you to increase the service life of your furniture, because, for example, a cabinet standing next to a conventional converter quickly dries out due to hot air.
- A warm baseboard with your own hands can be either a full-fledged heating method or an auxiliary one. This element can not be placed along the entire perimeter of the room, but only where additional heating is needed. This reduces energy costs without reducing the efficiency of the device.
- The innovative heating system can be installed not only in a new apartment, and not only during renovation. Its installation is possible even months after the completion of construction and repair work.
- You can use a warm baseboard with your own hands in any room. They are suitable for living rooms, bedrooms and offices; they perfectly warm glazed verandas, terraces, winter gardens, balconies and loggias, can be installed in the bathroom and toilet, and are safe even for a child’s room.
Another great advantage of a warm baseboard with your own hands is that it does not create a “thermal cushion” under the ceiling. The entire space of any room is heated evenly:
- Standard heating systems work in such a way that hot air inevitably rises. In this case, drafts on the floor are possible. If the room is small, then this is not so noticeable. But, for example, in country houses this difference is quite large.
- The skirting system works in such a way that heat is transferred not only into the space, but also into the walls. This advantage will be useful for owners of private houses whose walls often freeze, and for residents of corner apartments in high-rise buildings.
But many people prefer this system rather than a warm floor, because to install a warm baseboard you do not need to prepare a concrete screed; the modular design of the system is very mobile. At any time you can pick it up and move it to another room.
Basic methods of pipe installation
There are only two methods of laying pipes for arranging a heated floor - flooring and concrete. In the first method, ready-made materials are used for the base: polystyrene insulation and modular or slatted panels. There are no wet jobs that require a long drying time, so installation is quick.
When using the second option, the heating network is walled up with a screed. Depending on the thickness of the concrete, the time it takes for it to dry completely is calculated. It will take 28 days to harden and only after that is it possible to install the selected floor covering. This is the most labor-intensive and financially expensive method.
#1: Laying on profile thermal insulation boards
Arranging a warm floor system using this method is the simplest. Polystyrene insulation mats are used as the basis here.
The standard parameters of such slabs are 30*100*3 cm. They have grooves and low posts on which the finishing material is laid.
Polystyrene mats are not hygroscopic, so they do not lose their original characteristics when exposed to moisture. Even though this material is a polymer, it does not contain any components harmful to health.
In this case, pouring a concrete screed is not necessary. If tiles or linoleum are used for flooring, gypsum fiber sheets will initially be laid on the base. The thickness of such plates should be at least 2 cm.
#2: Device using modular and rack panels
In most cases, such panels are used in houses built from wood. Fastening of pipes for arranging a heated floor is carried out on a rough foundation.
The modular system is equipped with chipboard panels 2.2 cm thick, on which the heating lines are laid. These modules are equipped with channels to accommodate aluminum fixing plates. With this installation method, the insulation layer will be located in the wooden floor.
All strips are placed with a distance of 2 cm. Based on the applied pitch between the pipes, strips of the appropriate length (15–30 cm) and width (13–28 cm) are used.
To reduce heat loss, pipe latches are installed on the plates. If linoleum was chosen for the final floor covering, one layer of gypsum fiber boards is laid on the pipes; if laminate or parquet boards are used, they are dispensed with.
The installation of a modular floor is carried out using ready-made elements, which are chipboards. They are equipped with grooves for fixing coolant pipes
The slatted flooring system is almost identical to the modular one, however, it does not use panels, but strips, the minimum width of which is 2.8 cm.
Laying is done directly on the logs in increments of 40-60 cm, and the distance between the slats is at least 2 cm. For thermal insulation, extruded polystyrene foam or fibrous mineral wool is chosen.
Laying of heat-conducting lines is carried out by placing pipes in intermediate holes between chipboard sheets on aluminum plates equipped with grooves
Both methods are more suitable for wooden floors. In other cases, a more complex option with a concrete screed is chosen.
#3: Installation of pipeline with screed
Despite the labor-intensive process, installation of a heating network with a concrete screed is the most popular.
The process consists of the following steps:
- First of all, the base is prepared. Irregularities in the subfloor are eliminated using a hammer drill.
- The first layer is waterproofing material. It is spread in strips so that the edges overlap each other by 20–30 cm. The film should also extend to the base of the walls by 15 cm. The joints are glued with construction tape.
- Thermal insulation is laid over it.
- A damper tape is glued between the future fill and the walls. This action is required to compensate for the expansion of the screed when the floors are heated.
- Laying reinforcing mesh. It helps to increase the strength of the screed.
- Pipes are attached to the fittings according to the chosen pattern using plastic ties.
- A control check of the heated floor system is carried out by filling it with liquid and pressing it.
- Next, the guide beacons are installed.
- The final stage is pouring the cement screed.
For rooms with a large area, the sector division method should be used, with cells no more than 30 m2. For each of them it is necessary to arrange an individual circuit.
If the lower floor is heated, then polystyrene foam with a thickness of 20–50 mm is used as insulation. When there is an unheated basement floor or basement below, the thickness of the thermal insulation should be 50-100 mm. Pouring heated floors with a concrete-sand mixture can be done with or without a reinforcing mesh.
If polystyrene foam boards with connectors for the contours act as insulation, the use of a mesh is not necessary.
When standard thermal insulation material is used, a thin polymer or metal mesh is used to fix the heat-conducting line.
On our website there is a series of articles devoted to the design, installation and connection of water heated floors.
We advise you to read:
- How to make a water heated floor with your own hands: a step-by-step guide from design to assembly
- Connection diagram for water heated floor: design options and device manual
Choosing the optimal installation method
In large rooms (halls, living rooms), the ideal option for laying the pipeline is a “snail”; it is capable of uniformly heating an area of any size. Snake laying is possible, but the floor in one area will be hotter than in another.
For small rooms, a “snake” is quite suitable, because on a small surface the temperature difference will be erased and will not be noticeable. This method is also great for rooms with complex layouts. In addition, the location of the “snake” contour along the outer walls will cut off the cold coming from the street.
This option is ideal for rooms with different zones. In each zone, you can lay the circuit according to the most suitable pattern to create an optimal microclimate.
The “corner snake” does not warm up the room well, it is recommended to use it with a combined method; it will ideally heat corners.
Installation on a wooden floor
Wood does not conduct heat as efficiently as concrete, but installation on it is also feasible. For this purpose, distribution plates made of aluminum are used. The pipes are laid in wooden grooves made by attaching pre-prepared boards.
For installation of linoleum, carpet and other materials that require a flat surface, a leveling layer of chipboard, plywood or gypsum fiber board is laid over the pipes. If parquet or laminate is used as the finishing coating, the design of the heated floor can be slightly simplified, without the use of a leveling layer.
When choosing plywood and chipboard, make sure that they have sanitary, hygienic and thermomechanical characteristics that allow them to be used together with heated floors.
What data is needed for the calculation?
The traditional contour calculation is performed for pipes with a diameter of 16 mm, but the scheme for any pipe size remains the same: they are calculated according to the length of the loop along which the coolant will move.
Initial data collected:
- Desired temperature above the floor:
- Contour laying diagram;
- Distance between pipeline elements;
- Maximum length of pipe used;
- The number of contours used with different lengths;
- Possibility of connecting loops to one pump and manifold, the number of such connections.
Distance between pipes in the circuit
Along the perimeter of the room, the circuit with heating elements is laid in increments of 0.1 m. In the rest of the space, the increment is usually considered to be from 0.15 to 0.25 m. If you exceed the maximum value, then when the owner walks on the floor covering, a strong temperature difference will be felt, which is extremely unpleasant.
Allowable contour length
The indicator depends on the parameters of pressure in the loop and hydraulic resistance - they are determined by the amount of coolant passing through a certain pipe diameter per unit of time.
When a heated floor is installed, the water circulation in one of the loops is disrupted, and even a circulation pump cannot be restored. The coolant becomes locked in the circuit, cools down, and reduces the pressure to 0.2 bar.
Experts recommend the following dimensions in the outline:
- A metal-plastic loop with a diameter of 16 mm can be up to 100 meters. The optimal value is considered to be 80 m;
- Polyethylene pipes with a diameter of 18 mm can form loops up to 120 m (preferably 80...100 m);
- A metal-plastic pipe with a diameter of 20 mm allows loops of 125 meters. The shorter the length in this case, the more reliable and stable the operation of the system is predicted.
How to calculate contours with different lengths?
Sometimes a heated floor is made with several contours. Ideally, they should be equal in length, then there will be no need to balance the system. In practice, such a scheme is practically impossible to implement even by experienced specialists.
To calculate the pipeline in different rooms, the difference in the length of each circuit is taken into account up to 40%. It is recommended to vary the diameters of the pipes and change the pitch of their laying, which will compensate for the lengths of the loops.
Possibility of connection to one pump and manifold
The number of loops connected to the collector and pump can be determined by the power of the equipment, pipes (diameters and material of manufacture), the number of circuits, the footage of the room, as well as the material from which all enclosing structures are made.
It is difficult to cope with such calculations on your own, so at this stage it is worth engaging professionals who have enough experience and knowledge in calculating underfloor heating projects.
How to count a loop?
After collecting the initial data and determining the optimal option for heated floors, we begin to calculate the maximum length of the water heated floor circuit:
Such calculations make it possible to create floor heating systems with sufficient power to regulate and maintain the temperature in the living room set by the owner. When calculating the length of pipes in several circuits for a large house, assuming their connection to one collector, it is worth contacting designers with experience in performing such work.
What temperature should be in the rooms of a private house?
Calculating the length of the pipeline in heated floors is important for the heating rate and sufficient heat release. A stable temperature must be maintained inside the room, for which the coolant is heated to 60 degrees Celsius. If this value is exceeded, communication materials may be damaged.
Thermal comfort values for residential premises of a private house should be approximately the following:
- The rooms should be maintained between 27 degrees and 29 degrees;
- Corridor or hallway (all passage areas) - 35 degrees Celsius;
- Bathrooms and places with high humidity - up to 33 degrees Celsius.
Date: September 25, 2022
Heat loss and location
With additional insulation of the floor and walls, the laying step may be wider.
The heating circuit is a complex system, so the pitch between the loops may not be constant. If heated floors are used in rooms with strict air temperature requirements (bathrooms, industrial facilities), the step can be constant. The following values are respected:
- Large industrial premises, swimming pools, water parks - 20 cm between loops with a pipe diameter of 20 mm.
- Bathroom – laying step 15 cm.
In other cases, the values are approximate and unequal along the length of the entire pipeline. It is necessary to maintain a minimum distance between turns along the walls, since this is where the greatest heat losses are observed. As you move away from the walls, the step increases. If the heat loss of hot pipes is less than 50 W/sq.m., the step will be 30 cm. If the heat loss exceeds 80 W/sq.m. the minimum step must be observed.
Traditionally, pipes are laid in such a way that there is a distance of 100-300 mm between them. More accurate values are obtained after a general calculation.
The approximate distance in the bathroom is 10-15 cm. In the living room, the interval increases to 25 cm. For corridors, kitchens, utility rooms, storage rooms, the optimal value is 40-35 cm. Values may vary in different parts of the room.
Commissioning
Full maturation of the cement screed occurs after a month, which is when balancing needs to be done using collector flow meters.
Using balancing valves, the coolant flow is regulated; it should become the same in all circuits. If you have no experience with self-balancing, it is better to invite a specialist.
After manipulating with cold water, if the system is working correctly, you can conduct tests with heated coolant. At this point, the installation of the heated floor is considered complete.
Select the preferred styling form
Many different forms of laying heated floors have been developed. The most common and frequently used ones are: a snake (various: regular, double or angular) and a snail.
Some specialists combine 2 patterns in one outline. The edges are laid with a snake, and the center is laid with a snail.
In order not to damage the pipes after installation, it is necessary to stop other construction work in this room until the screed is poured.