A garage is an important and necessary building for storing a car. This room can also be used as a workshop or storage room for household products and unnecessary items. Based on this, the flooring here must meet all standards and fully fulfill its purpose. An important factor is the surface coating, especially for concrete, because it is known that this material tends to “dust” and deteriorates over time. How to cover a concrete floor to strengthen the base and extend its service life?
Saving on the rough field
Often the cost of a solution must be considered in its entirety. You need to compare several lines in the estimate at once, and not just one. This way you can cover the floor with an inexpensive laminate. But the cost of m2 must include a subfloor (a strong and level base) and a substrate.
With wooden floors, there are other cost items: in addition to the boards, there is also oil or varnish, sealant or cork backing to protect against squeaks, and fasteners.
But the absence of a subfloor, the pie of which can cost a pretty penny, warms the soul.
Manufacturing technology
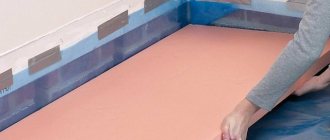
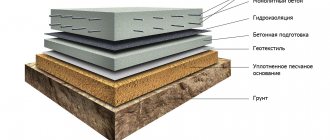
Before you start pouring the floor, it is important to carefully prepare the base, consisting of several layers. The main recommendations are to use fine-grained filler in the concrete mixture and lay it along the beacons in one go
Laying the underlying layer
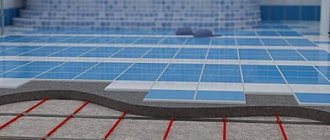
This layer consists of a compacted sand cushion with a height and a crushed stone bedding (fraction 30-50 mm) with a height of 7 to 10 cm each. The purpose of this layer is to protect the lower part of the slab from exposure to moisture from the soil and to act as a leveling base.
The soil characteristics that must be taken into account before proceeding with floor installation include the following:
It is important to remove the plant layer of soil when preparing the base. Otherwise, due to shrinkage, the concrete structure will simply collapse. Sand is used when groundwater levels are low to the surface, as it is capable of absorbing moisture. When using crushed stone on wet soil, capillary rise of moisture is excluded.
Sand and gravel backfill
Special installation with water supply for sand compaction
To reduce the cost of work and get a high-quality result at the preparation and design stage, it is necessary to take into account some nuances:
- After laying the finishing material, the level of the finished floor should coincide with the level of the threshold of the entrance opening.
- It is necessary to prevent the floor screed from resting on fragments of the base or foundation that protrude from the internal walls.
- During the process of compacting the sand layer, it is irrigated rather than spilled through with water.
Installation of footing and waterproofing
The purpose of the waterproofing material is to prevent the insulation and screed from getting wet under the influence of moisture.
Recommendations for waterproofing are as follows:
- When directing bitumen roll materials, two layers are created. The overlap is at least 15 cm when positioned perpendicularly.
- When using film, the direction of gluing the sheets does not matter. The main thing is to overlap and carefully seal the joints.
- The EPDM membrane is laid in one layer.
Finishing screed
The installation of a concrete footing with a height of 5 to 10 cm allows you to create a flat and rigid base for the waterproofing layer (gluing film, fusing bitumen). Otherwise, when using rolled bitumen materials or PVC film, their installation becomes significantly more complicated due to the divergence of joints on loose ground.
Bitumen waterproofing
Laying insulation
Strips of insulation or a tape of the same name are used as a damper layer. The tape is glued directly to the inside of the foundation or plinth around the perimeter of the room.
Being, in fact, a ceiling, the ground floor is not rigidly fixed to the walls of the room. Therefore, it has the following qualities in the field of insulation:
- The contact points between the floor and the plinth, due to the presence of a lower insulated layer, are completely protected from heat loss.
- Using a damper layer installed around the perimeter of the room between the screed and the wall, the room can be protected from vibration and noise.
- Sealing and leveling work, which is required when laying slabs, will not be required in this case.
- The advantage is the lack of free space (underfloor) under the floor structure.
Floor insulation with penoplex
Reinforcement
A floating screed involves introducing utility pipes into the room before pouring the solution - heating, cold and hot water supply, sewerage.
Reinforcement
Concrete pouring options
Plaster beacons or metal profiles, which are used when pouring mortar, can increase the productivity of the work performed and obtain a high-quality coating.
The peculiarity of the work is that you cannot walk on the reinforcing mesh while pouring the floor, so there are two ways to carry out the work.
When pouring the mortar from the far corners of the room towards the door, the reinforcing mesh inside the concrete is given the required level of rigidity, so the free areas of the reinforcement do not move. This method is called "tracks".
Movement around the pouring area can be carried out using ladders - suitable stands made of brick or timber installed in the mesh cells, on which the boards rest.
After 3 days the floor can be finished.
How to pull together boards
The easiest way is to cut a piece with a groove from the same board.
And use a hammer to adjust the boards to each other. But this method is not for perfectionists. If you have the opportunity and desire, then you can make one of the magical devices.
Device for pulling together boards
In this video, the author demonstrates the operation of this thing: https://www.youtube.com/watch?v=PMEzEffA2-U
Unfortunately, the author did not give the dimensions.
Second device
Andrey Shaiter is famous for his extremely useful videos. And then he turned up the heat. I assembled a device from plywood, tested it and already made a tool from a 25x25mm square aluminum pipe. All sizes are in the video.
A self-builder doesn’t need such thoroughness; it can be made from plywood. It won't be difficult to assemble a couple of these pieces.
In fairness, it is worth mentioning the device from Kreg. This dream of a perfectionist costs 6000 rubles. Ideal angles, drilling and tightening with stops will eliminate pinching and cracking. Suitable for cladding walls, terraces and of course floors.
Comparison of characteristics
If the thermal resistance of the structure does not meet the objectives, then during the design, thicker insulation is installed, and this leads to increased costs. At the same time, insulation with the lowest thermal conductivity is not always the most rational choice, because it may turn out to be more expensive and it will be more profitable to take a thicker layer of inexpensive material.
Moisture absorption – the ability to absorb moisture. When saturated with moisture, the insulation loses its thermal insulation properties - thermal conductivity increases. In a heated floor design, the heat insulator is separated from the ground by a layer of waterproofing, but in the case of floors, the possibility of leaks from above cannot be ruled out. In this regard, polyurethane foam insulation and foam glass perform best.
The flammability class is usually given great importance when choosing insulation, but it is often forgotten that what matters most is not the flammability of the material itself, but the flammability of the entire structure. In ground floors, the insulation is sandwiched between the soil and the concrete screed, that is, surrounded by non-combustible materials. For this reason, the likelihood of contact of insulation with fire is very low.
Density - this parameter affects the compressive strength and weight of the material. To prevent the screed from crushing the insulation, it must have the necessary rigidity; each material has its own permissible density. For example, PPS with a density of 35 kg/m3 can already be used for insulating floors on the ground; for mineral wool, the density should be at least 160 - 175 kg/m3.
Weight - this characteristic is related to density; the denser the material, the heavier it is. Logistics costs for delivery and unloading depend on weight. If PPP can be delivered by a passenger car and unloaded by hand, then specialized trucks will be required to deliver aerated concrete.
Price – Ultimately the choice is made based on cost. You should not look at the price per cubic meter of insulation, because this cost does not take into account the difference in the thermal conductivity of the material. For comparison, we will take the insulation with the lowest thermal conductivity as one. Different insulation materials will receive the following coefficient: PIR - 1, EPPS - 1.27, EPS - 1.27, Foam glass - 1.4, Mineral wool - 1.4, Aerated concrete - 1.58, Perlite concrete - 1.7. This way we can calculate the actual cost.
For example, at a price per cubic meter, aerated concrete is cheaper than extruded polystyrene foam, but taking into account the difference in thermal conductivity, the layer of aerated concrete will need to be made larger, and in addition, we must additionally take into account the cost of unloading and delivery, which will be more expensive for aerated concrete.
| Thermal conductivity (W/m*K) | Water absorption (%) | Flammability class | Density (kg/m3) | Price per cube (rub) | Actual price (RUB) | |
| PPP - 35 | 0,036 | 0,5 | G3 | 35 | 4100 | 5207 |
| EPPS - 40 | 0,029 | 0,13 | G4 | 40 | 6235 | 7918 |
| Minvata | 0,04 | 1,5 | NG | 160 — 175 | 7033 | 9846 |
| Perlite concrete | 0,07 – 0,13 | 10 | NG | 600 — 800 | 5120 | 8704 |
| Aerated concrete | 0,05 – 0,08 | 5 | NG | 150 – 300 | 5600 | 8848 |
| Foam glass | 0,04 – 0,08 | 0,2 – 0,5 | NG | 100 | 10254 | 16470 |
| FEAST | 0,021 | 1 | G1 – G2 | 30 — 40 | 16470 | 14355 |
How to cover a wooden floor to avoid problems
In my opinion, varnish is not an option. If it peels off, as in the photo above, then you need to remove it from the entire surface and reapply it. This process is called scraping.
Trick: I recently began to remove a small chamfer from the floor board with a double-dome. After all, it is on the edges that chips occur. This way your floor will retain its original appearance longer.
The second reason is that the varnish makes the surface “plastic”. Yes, she looks like a tree. But to the touch and in essence it is acrylic. Then it’s better to buy laminate. He is more resistant to damage.
The only alternative to varnish may be oil. I like Russian. This is not an advertisement.
By the way, the guys from Doubledom also do not use varnish, but coat it in 2 layers with German Biofa borma or Osmo oil. Here is a comment from their leader:
Good oil costs about +200 rubles per m2. In the basic configuration of the house, the Tex water composition performed well.
Here are the floors in one of the Double Houses. This is not an oil or a varnish. This is Tex's water composition. The most budget option. Half a year old. But a Labrador weighing about 40 kg caused damage to him with its claws. Therefore, dog lovers need to take this experience into account.
We select the type of pipes and install them
Before designing a heated floor, you should decide on the material of the pipe products. Products made of metal-plastic, polyethylene, galvanized or copper are allowed. The most popular models are metal-plastic and polymer.
The quality of the structure depends on the strength of the material and the integrity of the contour. It is not allowed to lay pipes on a surface that has slopes and unevenness of more than 5 mm.
Installation, proportions and loop pitch
Installation of heated floors on the ground must be carried out according to a previously prepared installation plan. If the room is not rectangular, then you need to make a diagram of individual rectangles, with its own turn of the loop.
In each area, taking into account the purpose of the zone and the desired level of heating, the circuit can be located like a snake or snail.
When carrying out work, you must follow some rules:
- To prevent overheating of the structure, it is necessary to correctly place the pipes over the surface of the area. They are located more densely around the perimeter, and a thinner outline is made in the center. You need to retreat approximately 15 cm from the walls.
- The step between the heating elements, regardless of the installation method, should be 0.3 meters.
- At the junction of slabs and floors, pipe products should be separated with a metal sleeve.
- The size of the circuit should not exceed 100 meters, as the level of heat transfer will decrease.
The contour can be laid in one of two ways:
- bifilar (spiral) - characterized by uniform heating, the process is not complicated, since the bending angle is 90 degrees;
- meander (in the form of a zigzag) - the coolant cools down while passing through the main line, thereby heating the floor becomes uneven.
The system is fastened to the concrete base through the bottom layer of insulation using dowels. Each pipeline branch, regardless of the selected circuit layout option, must go to the distribution cabinet.
The ends of the pipeline are connected to the correction unit using crimping or soldering. Each outlet must be equipped with shut-off valves, and ball valves must be installed in the supply sections. In addition, it is worth making thermal insulation of pipes leading into the room located nearby.
Before pouring the final screed, it is necessary to carry out crimp testing. There must be no air in the pipes that will be connected to the corrector. To do this, air is removed from them through drain valves.
It is important that the air vents are closed at this moment
Testing of metal products is carried out using cold water, and testing of plastic products by doubling the pressure in the pipeline.
Pouring cement-sand screed
The mixture for pouring the screed is prepared from 1 part cement, 3 parts sand. You need 200 grams of liquid per 1 kg of mixture. To increase the strength of the structure, 1 gram of polymer fiber is added.
Pouring a heated floor is similar to installing a base. A reinforced screed with a thickness of 8 cm is recommended. An important point is that heated floors can only be used after a month, this time is necessary for the screed to harden. In addition, only after this you need to begin installing the finishing coating.
If groundwater is located close to the heated floor layer, care must be taken to drain it - install drainage 30 cm below the floor level.
The bottom is filled with river sand or soil with crushed stone. It is poured in layers of 10 cm and moistened with water. Usually 3 layers are enough, on which you need to put geological textiles.
Next, you need to equip the foundation with bitumen mastic or other waterproofing material, and lay polystyrene slabs as thermal insulation. In the future, the installation scheme for water heated floors does not differ from standard installation.
According to the analysis of experts, the main mistake when performing work on installing a heated floor on the ground with your own hands is a violation of the technology - the absence of compensation gaps in the slab, poor compaction of the powder, incorrectly laid waterproofing.
A warm water floor in a private house on the ground is a complex structure, and its installation must be taken very seriously. However, by choosing this option, you will initially lay down the conditions for a comfortable atmosphere in the house.
Video instructions
Water heated floors on the ground - part 1
Watch this video on YouTube
Floors on the ground. Errors. #Floors #Screed #Concrete
Watch this video on YouTube
No. 4 WARM WATER FLOORS ON THE GROUND WITH YOUR OWN HANDS
Watch this video on YouTube
Benefits of the oil
They won’t describe the advantages here—you can find them online. Very briefly:
- the damaged area can be washed, sanded and re-oiled without redoing the entire floor
- the wood remains to the touch and looks like wood
- “Zhivitsa” is 100% natural. You can work without gloves and respiratory protection. Unless you are prone to allergies to anything and everything. The base is linseed oil. There are no strong odors during work. The oil is washed off in the usual way with soap.
I was looking for something to cover the worn parquet floor, but in the end I gave up on stereotypes
Of course, it is best to repair the parquet immediately and properly. But this is not always possible. Of course, it is best to repair the parquet immediately and properly. But this is not always possible
What to lay on top without killing the parquet
I reasoned something like this... I’m ready to go for a temporary, cosmetic, but quick and least expensive solution. I put off the big and expensive work of restoring my favorite parquet until later, when I have time, money and energy for it. And therefore, finishing him off is not at all part of my plans. Means?
✅ Maybe laminate? I mean, floating, on a substrate. No, he's outside my height tolerances. The minimum thickness is 6 mm, but it is laid on a substrate 2-3 mm thick. And my wonderful doors have a gap above the floor of about 6 mm. Should I cut good panel doors from below? Well, I do not.
✅ I categorically do not consider linoleum over parquet in rooms. Linoleum over parquet is beyond my strength, it’s mentally difficult. Although its thickness is only 2 mm, and the price is from 300 rubles per linear meter.
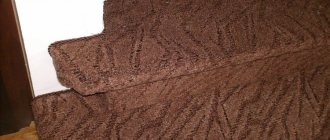
Agree, the low-pile Balta ITC Deauville carpet looks very decent. But here it is laid on a base prepared according to all the rules, and not on top of parquet. Agree, the low-pile carpet Balta ITC Deauville looks very decent. But here it is laid on a base prepared according to all the rules, and not on top of parquet
✅ So what remains? Only carpet? And thin. To be honest, I don't really like carpet material. But you can install it yourself. You will need double-sided tape, scissors, and accuracy and determination.
The low-pile carpet has a thickness of 5 mm (+/-). The width of 4 m allows you to do without seams. The price per linear meter of a decent beige coating without a pattern or with a nice modern geometric pattern is about 600 - 700 rubles/sq.m. Fine.
Looking at carpet samples on Yandex Market, I became more and more interested in the idea of carpeting. So, all that remains is the carpet. Or still...
How to properly coat a spruce or pine board with oil
The floorboard is usually made of softwood. This means that it contains a lot of resin. The resin will prevent oil from penetrating into the pores. On his Instagram, the manufacturer gave a way to properly coat spruce and pine with oil.
Question: I heard that oil is of little use on spruce and pine . There, they say, the resin is in the pores and the oil does not penetrate. Are they lying? ) Tell me how to do it correctly. Are there any nuances or differences from hardwood? Manufacturer's response: Resinous rocks can be treated with gum turpentine before impregnation with oil and all resin pockets can be cleaned. After this, soak in oil. There will be no sense if you do NOT process it, especially such porous wood species)
True, they gave this feature in the context of wooden furniture. But the mechanics and process are the same.
Something else worth paying attention to is the polymerization time of the oil. The surface can be used after 1-2 days. But the final formation of the oil layer will occur after 21 days. Until then, it must be handled with care.
Beauty under your feet: How to update your flooring without major repairs
A beautiful floor covering based on an existing one is a very real task
Evgeniya Nazarova 19/March/2015 Regular Houzz contributor, interior journalist Save Comment 2 Likes 17
Floors are perhaps the most vulnerable surface in an apartment: you don’t even need to try very hard to ruin the coating. A guest moves a chair carelessly - you will get a scratch on the parquet. If you dropped a knife from your own height, the crack on the tile is ready.
When there are a lot of cracks and chips, the carelessness of the finishing begins to irritate, and many people think about repairs for the first time. But this is not always enough strength - and money. We have to look for alternative options to cover up these annoying little things. Yes, so that it doesn’t look pathetic.
Holly Marder Save photo Disguise under paint A plank floor is very convenient in this sense: it may not look as expensive and solid as parquet, but the boards can be updated with clear varnish or paint at any time. Sandra Dages Interior Designer Save photo
Whatever the consultants in the salon say about the dependence of the paint composition on the type of wood and the level of humidity in the room, be guided above all by common sense.
If you are not going to sand off the top coat of paint, use the same base compound to avoid a “conflict of interest.”
If you previously went over the floor with a sander and there is no trace left of the former paint, use a new composition that will allow you to breathe freely. Thus, water-soluble paints and varnishes can be applied even without a respirator and evacuation from home for a week.
Chris Snook Save photo Please note that it is not necessary to change the color of the entire floor covering - just paint over the problem areas. Delphine Guyart Design Save photo Are there paintings or other bright accessories in the interior? Rely on their color when choosing a new shade for the floor. Take a look at the photo: the shade of the decorative stains on the plank floor of the hallway is precisely chosen to match the color of the end wall and the anthracite ceiling. And the bright spots on the floor of the nursery echo the chair and are reminiscent of Lego. INT2architecture Save photo Combining ideas A bright blue spot on a white plank floor itself acts as an original accent. But so that the floor does not leave anyone indifferent, the designers of this interior also combined two carpets on the white part of the flooring. ZazuDesigns Save photo
Change not the floor, but your attitude towards the problem If your wooden floor looks like it has seen better days, it's time to turn the disadvantages into advantages, and at the same time slightly update the interior.
The living room owner in the photo, noticing that the paint was starting to wear off, took sandpaper and scraped off the paint in several places. Then retro accessories and shabby furniture appeared in the interior - now the living room looks as if it was intended in the design project.
i.fromkin interiors Save photo
On top of an old floor What to do with a coating that can no longer be spot repaired? Of course, it can be changed, and this can be done quite inexpensively.
For example, lay carpet directly on the old floor. The method of installation depends on whether you perceive carpet as a temporary solution before a major renovation or, on the contrary, hope for its durability.
In the first case, it is better to glue the carpet with tape - after a couple of years it will be easy to remove. To increase the service life of the covering, it is placed on a gripper strip and on a backing - the latter helps to achieve the effect of a real thick carpet.
Urrutia Design Save photo
Carpets also tend to wear out, and this often becomes a problem. Replacing carpet is a labor-intensive task; choosing a new carpet is not the most budget-friendly initiative.
While you are deciding which ways to get rid of the problem will suit you, place a new small rug or even a soft skin on top of the old carpet - this decorative technique will help hide problem areas on the carpet. Subsequently, you may become so accustomed to the mix of carpeting that you won’t want to change anything at all.
Save photo
Tip: When updating the decoration in interiors where bright furniture plays the main role, choose neutral shades - they will not distract attention. Here the floor was first covered with a milky carpet, and then supplemented with white short-pile leather. Rug on carpet is an obvious trend.
Antonius Schimmelbusch Interior Design GmbH Save photo Lazy solution to the problem Remember what Ouspensky said: “What is the use of this picture on the wall? — This painting on the wall is very useful. It blocks the hole in the wallpaper.” Great advice, take note! The pile of books waiting on the floor to purchase a new shelving will take on a new meaning - it is now a completely functional structure covering a defect in the flooring. If you don’t like the option with books, rearrange it and cover the hole with furniture. Irina Tatarnikova Decor Save photo Benjamin Hill Photography Save photo Or even several carpets In large rooms, the flooring wears out unevenly, mainly in the entrance area and under furniture. There is a solution: instead of one giant one, you can lay several small rugs. This technique will not only solve everyday problems, but also enliven the interior. Save photo
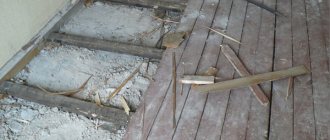
Risk zone: bathroom Cracked tiles in the bathroom? This is not a reason for a major overhaul. The easiest way to solve the problem is if you still have the same tile: the damaged element can simply be replaced. To do this, you will have to break the tiles with a hammer and chisel, remove the fragments, and clean the freed square from the glue. Doesn't work? Break the tiles with a drill. Your goal is to carefully remove the damaged element and place a new one in its place.
The less dried old glue you leave, the easier the replacement process will be - you won’t have to “trample” the fragment in height.
Monica Ewing Save photo
Don't want to do renovations? The bathroom floor is not tile, but, say, damaged self-leveling flooring or linoleum? Finally, are you just not ready to deal with the messy construction work?
The same targeted technique will help - lay down a rug.
Mark English Architects, AIA Save photo
Don't have any old tiles left in reserve? Or was it not tile, but, say, mosaic, and the option “I’ll do the renovation in a fashionable patchwork style” doesn’t suit you very well? Solve the problem in pieces. Replace cracked flooring with a completely new and unexpected covering (ceramic, stone, metal elements, for example).
Tip: Use special thresholds and linear expansion joints to eliminate seams between poorly compatible surfaces.
How to coat with oil and what consumption?
From one site we managed to get as many as 4 combinations of applying Zhivitsa oil to a wooden floor.
In any case, it would be a good idea to contact the manufacturer. And discuss the scheme and nuances of the coating. They actively respond to email and Instagram. And they definitely have the latest information.
The first combination is oils from the “Standard” line
- 1st layer - Primer oil. Antiseptic (consumption 10-15 m2 per 1 liter of oil);
- 2nd layer – Solid oil with wax (consumption 15-20 m2 per 1 liter of oil);
- 3rd layer – Solid oil with wax (consumption 22-25 m2 per 1 liter of oil*);
- 4th layer – Carnauba wax (consumption 15-20 m2 per 1 piece).
The second combination is professional oils from the “Pro” line:
- 1st layer - Bio Soil (consumption 10-15 m2 per 1 liter of oil);
- 2nd layer – Parquet (consumption 15-20 m2 per 1 liter of oil);
- 3rd layer – Parquet (consumption 20-25 m2 per 1 liter of oil*).
The third combination is oils from the “Standard” “Pro” line:
- 1st layer - Primer oil. Antiseptic (consumption 10-15 m2 per 1 liter of oil);
- 2nd layer – Parquet (consumption 15-20 m2 per 1 liter of oil);
- 3rd layer – Parquet (consumption 20-25 m2 per 1 liter of oil*).
The fourth combination is also “Standard” and “Pro” oils
- 1st layer - Bio Soil (consumption 10-15 m2 per 1 liter of oil)
- 2nd layer – Solid oil with wax (consumption 15-20 m2 per 1 liter of oil)
- 3rd layer – Parquet (consumption 20-25 m2 per 1 liter of oil*)
* Oil consumption for hard wood will be less.
Cork
Cork flooring - naturalness and warmth
Such flooring materials allow you to create a truly original covering. The products are made from cork tree bark, so they are completely natural and environmentally friendly.
Among the advantages it should be noted:
- Comfort when walking barefoot.
- High level of sound insulation.
- The coating is non-slip and non-marking.
- The cork is well protected from moisture.
- The material is easy to care for.
- Wide range of colors and textures.
Disadvantages include low mechanical strength and short service life. In addition, cork requires subsequent finishing with varnish, so such floors cannot be called budget.
Reliability
When considering reliability, it makes more sense to consider critical vulnerabilities. In general, the reliability of the coating is ranked as follows:
Ceramic tiles and porcelain tiles
Most of all, these floor coverings are afraid of directed strong impacts from hard objects. They are most vulnerable in cases where there are voids under the tiles. Glazed ceramics are more vulnerable to impact and abrasion.
If the coating is selected for the street or unheated premises, it is necessary to take into account frost resistance and the level of water absorption. If for these purposes you select a tile intended for use in other conditions, and it quickly deteriorates, then such ceramics cannot be called unreliable. The buyer just made a wrong choice.
In general, tiles and porcelain stoneware have proven themselves to be the most reliable floor coverings. They are not afraid of water, household chemicals, most mechanical loads and tolerate operation well in different conditions. Their scope of application ranges from residential premises to industrial facilities.
Concrete screed
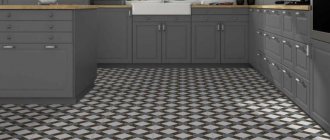
Before choosing the type of flooring, let's talk about how to make a floor in a summer house as such. The simplest and most reliable option is a concrete screed. It is inexpensive, durable and strong, and can also to some extent prevent the appearance of rodents in the house, which is very important for a summer residence.
You can leave the screed in its original form in non-residential premises - for example, in the hallway and garage. In other rooms, its appearance and the fact that the floor will remain cold at any time of the year will interfere. Of course, you can combine the technology with a heated floor system, but for a summer house this is not the cheapest option.
It is also worth remembering that concrete screed is very difficult to lay evenly. Therefore, most likely you will have to put sheets of plywood under the flooring. This will also help insulate the floor.
First floor in a private house
Floor pie on the first floor
Consider the following example of a design for the first floor in a wooden house. It does not use logs, and the sheathing is installed directly on the floor beams. This allows you to save ceiling height, makes the scheme simpler and cheaper.
The floor pie of the first floor in a wooden house is shown in the photo.
This scheme is suitable for the first floor above a warm basement, and for floors between the 1st and 2nd floors.
- At the very bottom there are cranial blocks made of 100*25 mm boards. They are screwed to the beams from the bottom. They are needed to construct a subfloor for laying insulation.
- Then there are load-bearing beams 200*50 mm.
- The subfloor made of 100*25 mm boards is laid on cranial blocks.
- A windproof film (vapor barrier membrane) is laid on the subfloor.
- Then insulation is placed between the joists. In a specific example, 2 layers of Rockwool Light Butts mineral wool are used, laid staggered, with a total layer thickness of 20 cm.
- The top of the insulation is covered with a vapor barrier.
- Then the sheathing of the joists is done. In this case, FSF plywood with a thickness of 21 mm is used. It is laid with offset joints.
- Additionally, it is recommended to add counter battens to this scheme to create a gap under the plywood.
Price
The price of all types of floor coverings is influenced by many factors - the materials and technologies used for their manufacture, format, aesthetic and performance characteristics, release date and popularity of the collection. Therefore, their cost varies over a fairly wide range:
Prices in all cases are indicated per 1 m². However, coatings of the same type with the same performance characteristics may have different prices - you also need to pay attention to this point when choosing.
No. 4 - Cork covering
This is an expensive and not the most practical floor covering option. But the material is environmentally friendly, it is pleasant to walk on it even with bare feet, it is elastic and, in general, even by itself creates coziness and comfort in the room.
Cork is a material that not only makes the floors warmer to some extent, it also insulates sound, and the neighbors below will not hear all noise from the apartment, except the loudest. This type of coating is considered elite and is quite expensive.
Forms of production of cork flooring
Installation of cork flooring can be done in any room, except those where the level of humidity is high, since the material will simply begin to absorb moisture and deteriorate. Also, installation must be done on a flat and solid base. You can't put a cork on bare concrete either - you must use a backing. Overall installation is very simple.
Cork is especially popular in children's rooms
Cork is available in the form of slabs or rolls. It must be installed using special glue. Some options have a layer of immediately applied adhesive component in production, which allows you to fix the material on the floor. The upper part of the material is coated with a special compound that protects the cork from moisture.
- heat and sound insulation properties
- environmental friendliness
- easy installation
- high strength
- elite material
- it's nice to walk on it barefoot
- suitable for any room except the bathroom
- does not bend and can withstand heavy loads
- not afraid of rising or falling temperatures
- it costs expensive
- cannot be placed in the bathroom
Natural = environmentally friendly?
Let's just define the concepts right away. “Environmentally friendly” is not at all the same thing as “naturalness,” although often natural houses with natural finishing materials are among the most environmentally friendly. The concept of sustainability has become a gold mine for entrepreneurs today. After years of negative information about the dangers lurking in our homes in the form of new furniture, flooring or windows, most people would give anything to replace the silent killers with eco-friendly walls, furniture and flooring. Moreover, clay floors in a cottage, walls made of firewood in a country house and pebbles underfoot in the shower no longer cause laughter.
So, what is eco-friendly flooring? In official terms, this is the property of all structural elements not to emit harmful substances, especially during operation. This provision is even spelled out in the MDS 31-12.2007. But keep in mind that sometimes even the most natural coating has to be laid only with glue - and this is no longer environmentally friendly. That’s why we’ll now look into everything in detail - both the coatings and the methods for laying them.
Practicality
Here you cannot focus solely on resistance to stains and ease of maintenance. We also take into account:
The totality of coating characteristics can be distributed as follows:
PVC tiles
Quartz-vinyl flooring is identical in practicality to laminate. However, it surpasses it in moisture resistance, and is inferior in terms of heat and sound insulation. You also need to take into account the maximum temperature restrictions when installing heated floors. Typically, for quartz-vinyl coating it varies between 28–30 °C.
When assessing the practicality of PVC tiles, it is important to consider the method of their installation. If the coating must be glued to the base during installation, it cannot be reused. After prolonged contact with large amounts of water, PVC tiles may come off the floor. It is unable to provide unhindered access to communications.