It is clear that it is not always possible to fulfill both of these conditions in private houses, villages, and holiday villages (perhaps this is why water intake fittings with a rod valve were used in Soviet toilets). In addition, the reliability of operation of membrane fittings is also influenced by the quality of workmanship and the quality of materials used to manufacture the fittings. Therefore, fittings with a diaphragm valve have to be repaired every few years, but more often they simply need to be replaced, like a used razor; you cannot cut a new membrane from an old tire for such fittings. We'll have to figure out what kind of fittings this is and how it works.
For owners of Jika toilets, as well as toilets equipped with Slovenian-made inlet fittings, I can offer the following diagrams for installing inlet fittings with a diaphragm valve:
Well, for everyone else, I present the following, in my opinion, a more visual model of the operation of inlet fittings with a diaphragm valve. But first it’s better to look at the membrane and see what it is. After watching the video, it will be a little easier to understand what we are talking about:
Types of float valves
Float valves for toilets are divided according to the type of locking mechanism into the following types:
In a piston device, a floating float, when rising, presses on a piston moving towards the flow of water until it rests against the saddle. Piston locking mechanisms are already outdated; they do not have any unique design features.
The disadvantages of such devices include noise during filling and the constant sound of falling drops due to the loss of tight pressure to the inlet over time.
The membrane locking mechanism is activated by the action of the pusher on the rubber or silicone membrane. Among the advantages of membrane devices are fast water collection, less noise, and constant flow intensity. Disadvantage: good constant water pressure is required.
Equipment installation
It is not difficult to buy shut-off valves at any plumbing store, but it would be better to install the branded components included in the kit. Thus, there is a greater likelihood of matching all components.
To install the cistern yourself, you need the following tools:
- wrenches: adjustable and open-end;
- bendable hose;
- screwdriver;
- plumbing system;
- gaskets of the required size;
- fuma made of rubber.
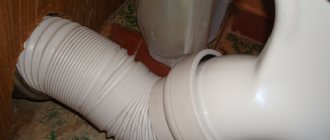
The instructions for installing such equipment include several stages. Initially, you should install the lower part of the drain assembly in the tank, the main thing is to make a tight fit to the outlet hole. Install a rubber gasket between the bottom of the container and the base. Then install the tank on the toilet. A thick rubberized ring should be placed between them. This will prevent surfaces from touching. Using bolts, you should screw the flush and flush structure to the toilet.
If this is a drain tank device with a button with a bottom water supply, then before installing the structure, the elements that will supply the liquid should be correctly installed. In this system, rubber gaskets should be firmly secured. They will help avoid leakage. In a structure placed on top, these elements will not be needed, since they are above the water level. After fixing the tank, you can install such units. The same method is used for these types of installations. A tube is threaded into the hole in the tank and secured on both sides with nuts.
The next step will be to attach a bendable hose to the riser fitting and attach a water tap, allowing, if necessary, to carry out repairs and shut off the flow of water. Typically, hoses have nut-spacer elements in their design, which ensure fastening strength. However, craftsmen most often build in a fuma for greater reliability. After connecting the tank to the water supply system, the float should be adjusted. The liquid level should be 15 cm below the edge of the tank.
At the last stage of installation, you will need to install the mechanism. The top fittings should be placed in the hole of the cover and secured with decorative elements covering the hole.
What types can there be?
Before deciding how to choose fittings for a toilet, let’s try to understand what should be understood by the word “fittings”. This word should be understood as all the constituent elements that are aimed at ensuring the operation of plumbing, which includes, among other things, the toilet.
According to the functions performed, the following types can be distinguished:
- fittings that block the flow of water after the tank is filled;
- fittings that provide drainage of liquid.
Each type constitutes separate mechanisms, which, nevertheless, are closely related to each other. The latter circumstance leads to the fact that if one of them breaks down, the second one stops working too.
List of required tools
In order to eliminate the leak, you need to acquire some tools and consumables. During the repair process, it is necessary to replace unsuitable seals, hoses, and gaskets.
When the toilet cistern is leaking, you may need:
- sealant for plumbing work (silicone);
- sandpaper;
- limescale remover;
- Screwdriver Set;
- knife;
- pliers;
- a set of keys;
- fum tape (sealing tape for water).
Types of drain mechanisms
Today you can find two types of drainage devices on sale:
- Single-mode;
- Dual-mode.
In the first case, draining is carried out by emptying the entire tank; the second has two buttons in its design - they are responsible for pouring out a certain amount of water. This volume can be adjusted; in addition, the use of such systems is completely justified, since water is seriously saved here.
Although the type of drain mechanism may be different, it operates on the same principle. A little differently, the impulse of movement occurs to the valve, which either opens or closes the hole through which the water leaves.
The principle of its operation depends on how this valve is designed. Sometimes this valve is placed at the end of tubular drains that act as an overflow. In other cases, a similar structure opens and closes thanks to special chains made of metal or plastic. The last type of design is far from the most successful, since such a system often fails.
Depending on who the manufacturer of this device is, the design can have quite significant differences. However, all these systems can be divided into two key components:
- Water drainage system;
- Water collection system.
Due to the water collection system, the tank is filled. It can be either side or bottom. If the design has a bottom feed, then they are very convenient for several reasons. First of all, the main positive side is the almost silent operation, but the design of this system is very complex.
It includes the following elements:
- Vertical rod float;
- Traction;
- Buoy.
The water supply shutoff unit begins to operate due to the traction, which is connected to the buoy into one common structure, which at the same time represents a water level limiter.
If water is supplied from the side, then this design will be more reliable, but when filling the tank it will make quite a lot of noise. Here the operating principle of the entire system will be much simpler. The tank contains a special membrane, thanks to which water flows into and stops the tank, as well as a small float connected to the supply tap using a lever.
When the tank is filled, the float rises and the lever begins to move, gradually cutting off the water supply when the required volume of water is collected.
Drain water from the tank from above or from the side. The side design is used mainly for hanging tanks, which are almost never used today. Most modern products use a drainage system with an upper water drainage principle.
As a rule, the trigger structure is a bulb made of rubber or rubberized plastic. This equipment is not too expensive, but at the same time very reliable.
In order for water to pass from the flush cistern directly into the toilet, a rod or a special button is placed on the lid, which will move the lever. As mentioned earlier, modern systems for draining water in tanks can have one or two operating modes.
The second type has two buttons, which release either half of the tank or the full one. This option is most suitable for people for whom saving water is not just empty words.
Setting up individual elements
You can independently adjust the operation of the float mechanism to fill the tank more or less to save money.
Adjustment methods differ for different models:
- Old-style mechanisms can be adjusted without shutting down; you don’t even need to drain the water. The lid is removed, the wire that holds the float is found, and it is bent in a way that is convenient for proper filling. They check the work.
- In new installations, the holder is made of plastic, so instead of bending, a special threaded clip is used to adjust the degree of lifting of the float. Or there is a screw on the lever that needs to be rotated to change the position of the air flask.
To reduce the volume of water, the float is lowered and vice versa.
Adjustment and repair
When using the toilet, problems periodically arise - sometimes it flows, sometimes, on the contrary, water does not fill into it. Sometimes, tired of the inconvenience, people buy new toilets. But in vain. Most faults are resolved in 10-20 minutes. Moreover, everything is so simple that anyone can do it. You don't have to call a plumber. You can do everything yourself.
Adjusting the water level
We will talk about devices with bottom water supply. After installation, the toilet cistern must be adjusted. By default, they come from the factory set to the maximum amount of water in the container. This amount is often excessive. With the help of simple adjustments we can reduce the volume of water in the tank. For this:
- Turn off the water supply and drain the water.
- Unscrew the button.
- Remove the cover.
- There is a plastic screw on the float mechanism. By unscrewing/twisting it we change the amount of water. If you need to reduce the amount of water, tighten the screw, lowering the float down. The next time you fill (you can turn on the water), the water level should drop.
- Reinstall the cover and button.
The same procedure is necessary if water is constantly leaking from the tank. One of the reasons is that the float is raised too high. Because of this, water flows through the overflow system.
With a side water supply and a float mechanism, adjustment is even simpler - we change the position of the float by bending its lever. On the one hand it is simpler, but on the other hand it is more difficult. You have to bend it many times to achieve the required level.
By bending the float lever we change the water level in the drain tank
Toilet tank is leaking
If the water in the toilet constantly leaks and its level is normal, we move on. There are several reasons for this leak. And if so, then the methods of elimination will be different.
- The rubber seal under the drain valve in the tank has silted up, dirt has gotten under it, and a groove (or several) has appeared on its surface. The method of treatment is to clean the existing gasket or replace it with a new one. To resuscitate the old one, you need to: turn off the water, drain it,
- remove the drain mechanism by unscrewing the plastic nut from below;
- pull out the drain valve, remove and examine the gasket, clean it of settled particles, if necessary (there are grooves), sand it with very fine sandpaper until smooth;
- install it in place, connect everything and check operation.
The trigger mechanism itself was demolished. To check whether this is the case, you can lightly press the mechanism with the cover removed. If the leak stops, that means this is the problem. If it still leaks, you should try cleaning the gasket (described above) or replacing it. If the flow stops when pressed, you can replace the fittings or make the glass heavier.
Where to put the weighting agent
To do this, remove the release mechanism and place something heavy in its lower part. This could be several pieces of metal, a sock filled with pennies, sand, etc. We install the device in place and check the operation.
https://youtube.com/watch?v=OE_lWt7Xqp8
Water does not fill
Another problem that you can fix yourself is that water does not fill into the drain tank. Most likely the problem is a blockage - the filter or tubes are clogged. It's a long story, better watch the video.
https://youtube.com/watch?v=U_6q_MFVt5U
Repair of toilet fittings
It is not uncommon for a cistern to break down. In this case, it is not necessary to call a plumber; after studying the principle of operation of the fittings, you can fix the malfunctions yourself.
Basic faults
The most common possible defects are:
- high water consumption;
- leak;
- weak drain;
- production of gaskets.
Insufficient drainage may occur as a result of obstruction of the drainage channel.
A leak can be explained by the addition of water through an overflow or wear of the float. In case of overflow, the fittings are set to moderate water consumption. To do this, bend the lever or adjust the fastening screw. In the second case, the float is made heavier by adding metal hangers or replacing it with a new one.
Troubleshooting an inlet valve
In this unit, a violation of the quality of locking is most often observed. This happens due to the activation of an elastic cuff or rubber stopper. For repairs, the exhaust valve must be removed. Before this, turn off the tap and drain the water from the tank. Next, unscrew the drain button, remove the cover, unscrew the union nut, through which the valve is attached to the bushing.
The valve has a small rocker arm on the reverse side; it is connected to a float lever or rod. This is where the problem with any type of valve lies. To troubleshoot the problem, take the following steps:
- The drive lever is disengaged from this rocker arm.
- The rocker itself is removed. Typically, it is secured to the valve body with a pair of pins.
- Check the condition of the plug pressed into a plastic cup located on the opposite side of the rocker. It is taken out and turned to the water supply spout with the flat side. If this has already been done, the cork is cut, resulting in two even ends. The halves are folded and pressed back into the glass.
Diaphragm-type valves lose their tightness when the rubber disc is deformed, which may also be caused by insufficient float pressure on the valve. In this case, adjust the glass, placing it lower. There is another option - a foam cube is connected to the float from below. When these actions do not give the desired result, the membrane is changed.
Troubleshooting a button
Jamming, unsatisfactory movement, or complete disobedience to the influence may occur in this node. In older models, the button worked by acting on the rack. The latter transmitted movement to a gear on which a long lever was attached. At the end of the lever there is a chain, through which the membrane is lifted. The problem was resolved by tightening the chain more tightly. The teeth on the rack could also work together. To eliminate the malfunction, it was turned with its back side.
Modern drain valves are equipped with a lever mechanism, which is more reliable. The only possible thing is that it is not centered correctly. To avoid this, the threads on the drain valve body are positioned exactly along the central axis of the hole. If this condition is violated, the upper thrust plate of the microlift is shifted in the desired direction.
The cause of such a problem is failure of water to enter the tank, debris in the valve section in the narrowest place. In this case, the tank should be emptied, and the valve, together with the float and lever, should be unscrewed. Then, using a needle, clear the narrow passage through which the liquid enters the tank.
The remaining debris is washed by first opening the valve of the inlet pipe. If water flows freely, the valve is closed and all elements are installed in place.
If you need to replace any part of the fittings, it is better to take the unusable element to the store. In this case, you can purchase a part completely identical to the broken one.
How are shut-off and drain valves adjusted?
If the tank and fittings set were purchased separately, the drain and shut-off valves require adjustment: the user determines the volume of water entering the container and the installation height of the drain valve.
Adjusting the Float Stop Valve
The products are available in two versions:
- with metal lever for float. To increase the volume of incoming water, it is bent so that the float is higher. To reduce the amount of liquid, do the opposite: bend the lever so that the float is lower;
- with plastic float lever. This lever does not bend. The position of the float is adjusted with a special screw.
Usually inside the tank there is a mark for the optimal water level - you should follow it.
Sometimes it is not possible to adjust the filling level of the tank by moving the float; possible reasons:
- The shut-off valve is clogged. In this case, less water is supplied than the required volume. Having shut off the water supply to the apartment or on the branch to the tank, the valve is dismantled, disassembled and washed;
- The shut-off valve diaphragm is worn. Water flows continuously and flows through the overflow pipe into the toilet. Valve replacement required.
Adjusting the drain mechanism
It is necessary to install the bulb valve at the required height.
The procedure depends on the design and is described in the manual. When setting up a drain mechanism with a button, the button assembly is set so that it is located at a distance of 3-7 mm in relation to the lid. This ensures reliable fastening of the cover.
Then the flush button is screwed into the hole in the lid. To center the thread, first make a couple of turns counterclockwise and only then screw the element clockwise. No tools are required - just tighten by hand. The installation is completed by checking the drain mechanism.
When making adjustments, it is important to prevent the moving parts of the water filling valve and the drain mechanism from coming into contact. It is also necessary to ensure that none of the elements touch the wall of the tank
How to repair a leaking toilet drain if it's broken
In most cases, it is quite possible to repair a leaking tank yourself.
to seek the help of plumbing experts. First, the plumber turns off the water.
Then you need to empty the container from the liquid in it that is flowing.
Depending on the type of malfunction that occurs, certain actions are taken.
Replacing the gasket for the mechanism
To carry out repairs, you will have to remove the container from its place by unscrewing the fastening screws (in compact models). Next, you need to remove the drain mechanism, remove the old shut-off membrane (rubber gasket), and install a new part of the same diameter in its place. Additionally, you can lubricate the junction of the gasket with the tank with a special sealant.
Softening the pear to repair the device
From being in hard, cold water for a long time, the rubber bulb, which acts as a shut-off valve, often loses its elasticity, which is why it begins to cope with its functions worse. Using a simple “old-fashioned” method helps to eliminate this problem. It is necessary to remove the part from the device and immerse it for a while in a container with hot, but not boiling water.
Photo 1. Drain valve with a rubber bulb; it can lose elasticity from hard water, so it needs to be softened.
This technique allows you to restore the desired softness to the material and improve its properties. If this method does not help, you can replace the pear with a new one.
Reference! It is recommended to choose the softest model from those presented; it will last longer.
How to install new fittings
Included with the new fittings are instructions for use. First of all, let's get acquainted with the instructions.
- 1. We install a valve that regulates filling using gaskets and adapters. There are plumbing models in which the inlet and filler mechanisms are installed simultaneously.
- 2. The fittings can be inserted into the tank before installing the toilet; we place the gasket on the upper surface of the drainage system and place the device in the tank, fastening it with nuts.
- 3. Rubber gaskets are used for internal fasteners, and plastic gaskets for external fasteners. The internal gaskets can be lubricated with silicone sealant for sealing. We replace old gaskets after disassembling the device.
- 4.If possible, the gasket connecting the tank and toilet bowl is also lubricated with sealant.
- 5. The fittings must be located at a distance of at least half a centimeter from the walls of the drain container.
- 6. Having completed the installation, the tank is attached to the toilet bowl.
- 7. Close the tank with a lid by screwing on the drain button.
- 8.Connect the water and perform a test drain.
Conclusion
Now we have looked at the design of the drain valve, which is used in the toilet cistern, and the circumstances under which the equipment may fail. With this knowledge, you will be able to cope with these problems on your own. The video in this article will allow you to find additional information on the above topic.
| Exhaust | In addition, they are called stock ones. This is due to the fact that in order to activate the device, it is necessary to lift the rod up using the handle, after which the drain hole will open. New models of toilets produced recently do not have such a system. |
Setting up plumbing toilet cisterns
The completion of the assembly of plumbing does not mean the end of all work on its installation. Often the toilet cistern fittings need to be adjusted, after which the filling, overflow and flushing functions must be performed flawlessly. Also, sometimes it is necessary to adjust mechanisms during their long-term operation or replacement.
Adjusting the cistern with a button
What should you pay attention to when setting up modern “push-button” plumbing?
Figure No. 2
- The height of the flush valve is set (Figure 2). Its design must correspond to the dimensions of the storage container under the lid, taking into account the button (1). Disconnect the rod (2) from the latch of the overflow tube. Release the rack clamps (3) on both sides. Move the racks (5) in the required vertical direction, guided by the scale marked on them. Secure the clamps and rod in the new position.
- The height of fixation of the overflow tube is adjustable. There are two requirements for this parameter: the surface of the water in the toilet tank should be 15-20 mm below the overflow edge, but at the same time, the fully pressed button should not touch the top of the tube. To do this: Set the size of the gap between the edge of the overflow and the top (4) of the rack (5), (Figure 2). To perform this operation, you will have to release the rod (2) and the pressure ring or clamp on the tube. Lower or raise it to the required height. Fix overflow and draft.
- The functionality of the filling fittings is configured in accordance with the requirements of the previous paragraph regarding the filling volume. In order for the inlet valve to ensure the optimal water level in the cistern, the position of its float must be set. If you need to set an early cut-off of the supply, then the float is lowered lower or fixed higher if the volume of liquid is insufficient. Changing its position is carried out by rearranging the rod similar to the rod on the drain valve.
Adjusting the two-level drain
In modern push-button toilet sets, it is not uncommon to have a two-level water discharge. Such models require small and full drain settings.
Adjustment of two-button drain mechanism.
We regulate the discharge of the entire volume of liquid by using a damper, increasing this parameter, moving it down and, decreasing, moving it up. The partial discharge of water is set by a small flush float, which, after opening the lock, we move down or up, respectively increasing or decreasing the flow rate.
You can learn more about adjusting the two-button release mechanism from the video:
Adjustment of old models
In conclusion, it is worth mentioning the adjustment of “classic” systems with lateral water supply. The design of an old-style toilet cistern involves only adjusting the inlet valve.
Its work depends on the position of the float, which is lowered or raised. For this purpose, if the rocker arm is brass (steel), then it is simply bent into the desired position, and if it is plastic, then the geometry of the lever changes after loosening and then tightening the mounting screw.
Adjustment of the overflow and exhaust valve is not provided in such models, and problems arising with them, as a rule, lead to repair work or complete replacement of the mechanisms.
How to choose a valve
The main characteristics that you need to pay attention to when looking for fittings:
- suitable tank height;
- parameters of the connection hole for the inlet valve, drain hole and hole in
- reservoir cover for the start button.
If the diameter for the start button is not suitable, in some cases the problem is resolved by lining the adapter ring.
Plumbing fixtures with an inlet valve for a toilet with a bottom supply, due to the inconspicuousness of the supply hose of the plumbing system, look more aesthetically pleasing.
Other advantages of such models include reduced operating noise. In a device for a toilet cistern with a side water supply, the mounting hole is located above the filling level of the cistern, so there is less chance of leakage.
The choice of drainage method is determined by the requirements. Touch and single-mode pressure devices are usually installed in public places with high traffic, where the main importance is given to regular flushing and good flushing of the toilet bowl, rather than saving water consumption. For apartments, models with two modes or a “stop” function are more suitable.
The pull-out flush mechanism is especially popular with older people, who find it easier to pull out the handle than to press the release button. Lever release is popular in retro style models. Electronic and sensor flush devices are suitable for installation in a bathroom used by people with special needs. Pneumatics are good for implementing design solutions.
Before purchasing, it is worth comparing the water intake speed of different models, finding out the size of the total and trouble-free operating life, measured in release-press cycles.
Among the buttons, handles and pull handles there are options in different colors; it is possible to order samples with your own logo and design. Metal models are available in two types - metallized and with a more abrasion-resistant galvanic coating.
At the moment it’s hard to imagine how people had the opportunity to live in a house without a toilet. But now the bathroom must also have the most modern equipment, otherwise ease of use and comfort will not be achieved. In any bathroom, the toilet is given a central place. The drain mechanism also differs little between different models, so special attention should be paid to the drain device - the valve of the drain tank, which we will now consider in more detail.
Drain mechanism device
The tank fittings include two components:
- water supply valve;
- flush mechanism for flushing water into the toilet.
The fittings can be separate or combined.
Separate fittings
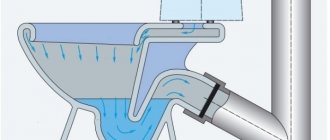
This is the most common option. Both components are not connected to each other. At the entrance to the tank, a valve with a membrane is installed, connected to a lever with a float at the end. When the water rises to the desired level, the float will be at the same level and the membrane will block the flow area of the valve. The drainage mechanism is a vertical rod with a bulb valve at the bottom.
By lifting the rod by the handle (outdated version), the user removes the bulb from the saddle and opens the drain hole. In modern models, this requires pressing the button at the top. The most practical version of the drain mechanism has a double button: one part empties the tank only half, the second completely.
The bulb valve is made of buoyant material, therefore, after being removed from the seat, it is held in the body of water and does not block the drain hole. After the tank is emptied, it falls back onto the saddle and, when the tank is filled, remains in this position, since the water presses on it only from above.
Advantages of the solution:
- low cost;
- ease of adjustment;
- cheap repairs: if damaged, only the failed component is replaced.
Combined reinforcement
This is a more expensive option, used in luxury plumbing fixtures.
Both components are combined into one system. The advantage is significant reliability. Disadvantages: high cost both in purchase and in repair - if it breaks down, you have to replace the entire complex. The design of the fittings depends on the method of supplying water to the tank - from the side or from below.
But the adjustment of both options is carried out almost identically.
Why is water running through the inlet tank, it leaks and does not hold it
The valve will leak if the rubber gasket material to which the locking mechanism is attached has dried out.
If the mechanism does not hold water, the reason may lie in damage to the membrane. If a rubber bulb plays the role of a regulator, it may have lost its elasticity.
Is water constantly flowing in the tank? This is also possible if the float is broken, which should stop supplying water as the container fills.
Attention! The water supply may not stop due to the displacement of the lever that controls the correct position of the drain mechanism inside the container.
Types of drainage system
In addition to the internal configuration, the shut-off valves of the flush tank differ significantly in the material of manufacture, which affects the quality and service life of the toilet itself.
Material options for the production of toilet fittings:
- Plastic: Due to the low cost and availability of the material, polymers have rapidly conquered the market in absolutely every industry. However, plastic is a fickle material; the quality and durability of the components, as well as the direct operation of the drainage system, depend on its composition. Previously, the quality of shut-off valves could be judged by the cost of the product itself, however, today there are too many new young manufacturers on the market offering high-quality products at low prices. And established well-known brands allow defects, which leads consumers to doubts. Therefore, today it is very difficult to distinguish reliable toilet fittings from fake ones. Unfortunately, this difference is revealed only during the operation of the toilet.
- Metal: a material that provides high strength and significant service life of shut-off valves. To produce drain systems, modern manufacturers use brass and bronze compounds, because they are truly resistant to mechanical damage and the effects of water. The fittings of the cistern, made of similar metals, do not corrode for several years, maintaining all functional qualities. Metal shut-off valves are typical only for expensive models produced in the appropriate style.
As practice shows, toilets with plastic fittings are in greatest demand, which is understandable. Affordable cost and the ability to repair at any time determine our choice.
The cistern fittings are the basis for the operation of the entire toilet. Water is supplied in two ways: side or bottom. Side water supply is characteristic of our domestic plumbing and is characterized by rather high noise. The lower water supply is much quieter than the upper mechanism.
Before you begin repairing a toilet, you need to familiarize yourself with its design.
Both with side and bottom water supply, the valve closes under the influence of a control rod connected to the float. A float is a kind of plastic container or a small foam element.
Regardless of the type of water supply, the float is carefully balanced during installation of the fittings. Such work is necessary for the efficient and reliable operation of the cistern, which directly depends on a certain water level in the system.
Results
Most of the problems associated with repairing or replacing components of a drain tank can be solved even by inexperienced home craftsmen. If leaks appear in the toilet bowl, it is necessary to diagnose the type of breakdown and stock up on the materials and tools necessary for the work. In cases where the old drain valve has failed or dried out, it may need to be replaced. This process is simple , so doing the repair yourself will help you save a lot on plumber services.
Source
A few words about the design of the tank fittings
Before I tell you why a toilet tank may leak, I will introduce you to the design of the fittings so that you understand the principle of its operation.
Of course, there are currently a great many options for mechanisms.
However, the principle of operation of the tank always remains the same, since any fittings include three main elements:
shut-off mechanism - is a tap that automatically shuts off the water as it enters the tank. The float is responsible for the water level at which the shut-off valve is activated;
Tank fitting options
- discharge system - is a valve that closes the drain hole. The valve is controlled by a button or lever;
- overflow system - prevents flooding of the apartment in case of failure of the locking mechanism. If the water in the tank rises above a certain level, the overflow system ensures that it is drained into the toilet.
Features of the tank
The mechanism for draining water from the tank is of two types. In the first, all the water is drained when you press a button or when you lift the handle up. The first option provides two buttons for rational use of water. When you press one of them, the water is partially drained, and using the second you can remove all the water from the tank.
If the flush works normally, then water flows into the toilet bowl quickly and without delay with a characteristic sound. If problems arise, the flow of water either does not stop and the walls of the toilet are constantly wet, or the water overflows from the tank.
This kind of breakdown can cause flooding of the toilet room, or provoke the formation of limescale on the walls of the toilet and, undoubtedly, lead to high water consumption due to its constant supply. Another sign of a malfunction may be the appearance of condensation on the cold water pipe that leads to the toilet.
Sometimes, to eliminate a leak, it is enough to clean the tank and parts from plaque and rust. They appear due to poor quality water and failure to follow simple plumbing hygiene rules.
To avoid further problems and eliminate the leak, it is important to find out the cause of the leak and determine in which part of the tank the breakdown occurred and check all the parts. To do this, you need to turn off the water in the riser, then clean the tank and study the design
Flush design device
If previously the tank body was made of cast iron, today ceramics, earthenware or special plastic are used. All the main elements of the tank are connected to each other.
There are only three key mechanisms: inlet, adjustable float, flush and overflow systems:
- The inlet or fill valve stops the flow of water into the tank after it is filled. The required water level is “measured” by the float.
- Locking or drain mechanism. This is the flapper/valve that opens during flushing.
Modern models have buttons for this. They can be single or double to adjust the amount of water flushed. Old Soviet toilets use a chain, lever or rope that is attached to a lever with a bulb. These elements are connected by traction. And the pear is at the bottom of the tank.
The standard tank design is quite simple. In some models, the flushing mechanism consists of a siphon. Its membrane is the weak link and often fails, as do the spokes connecting the flush and the float
The toilet float regulates the operation of the locking mechanism and controls the level of water drawn in, the design of which depends on the type of water supply to the tank (bottom or side).
There are several types of floats, but each one has air inside:
- The first, hollow, is made of rubber. It is located at the bottom of the reservoir and functions as a rocker arm.
- The second, plastic, glass-like float. Located at the top of the tank. When the tank is filled with water, it rises up and works almost silently. The latter type is used only in older models; the first type is installed in modern toilets.
The overflow system protects the entire toilet room from flooding if the filling mechanism does not work for some reason. When more than normal water gets into the tank, it is the flush tank fittings that drain it into the toilet. If you find a leak, then do not panic, but remove the toilet lid and figure out what the problem is.
Preparation for repair
Before work, turn off the shut-off valve on the cold water pipe. Such a tap should be in a private house and apartment. If it is missing, in a high-rise building they shut off the valve on the pipe in the basement, depriving residents of apartments on the upper and lower floors of water through the riser.
Prepare tools for work :
- pliers, a universal screwdriver with different attachments;
- a set of open-end wrenches or an adjustable gas wrench;
- side cutters, rubber spatula;
- a gun for squeezing sealant out of a tube.
A pipe remover is used, which allows you to clean the inside of the connections and pipes. You can use a countersink instead.
The materials you will need are rubber or polymer gaskets; the need for them will be determined after inspection. Spare parts are purchased for those that have become unusable and cannot be repaired. You will need silicone sealant.
Types of fittings for flush cisterns
The principle of operation of a regular tank is not complicated: it has a hole through which water flows and a place where water is discharged into the toilet. The first is closed with a special valve, the second with a flap. When you press a lever or button, the flap rises and the water, in whole or in part, flows into the toilet, and then into the sewer.
After this, the valve returns to its place and closes the drain point. Immediately after this, the drain valve mechanism is activated, which opens a hole for water to enter. The tank is filled to a certain level, after which the inlet is closed. The water supply and shut-off are regulated using a special valve.
The fittings for the flush tank are a simple mechanical device that allows water to be drawn into a sanitary container and drained by pressing a lever or button.
There are separate and combined designs of fittings that collect the volume of water required for flushing and drain it after activating the flushing device.
Separate and combined options
The separate option has been used for many decades. It is considered cheaper and easier to repair and configure. With this design, the fill valve and damper are installed separately, they are not connected to each other.
The shut-off valve for the tank is designed in such a way that it is easy to install, remove or change its height
To control the flow and shutdown of water, a float sensor is used, in which sometimes even a piece of ordinary foam is used. In addition to a mechanical damper, an air valve can be used for the drain hole.
A rope or chain can be used as a lever to lift the damper or open the valve. This is a typical option for retro-style models, when the tank is placed quite high.
In compact toilet models, control is most often carried out using a button that needs to be pressed. For those with special needs, a foot pedal may be installed, but this is a rare option.
In recent years, models with double buttons have been very popular, which allow you to empty the tank not only completely, but also halfway, in order to save some water.
The separate version of the fittings is convenient because you can repair and configure individual parts of the system separately.
Combined type fittings are used in high-class plumbing; here the drain and water supply are connected into a common system. This option is considered more reliable, convenient and expensive. If this mechanism breaks down, repairs will require completely dismantling the system. Setup can also be a bit tricky.
The fittings for a toilet cistern with side and bottom water supply differ in design, but the principles of setup and repair are very similar.
Materials for making devices
Most often, toilet fittings are made of polymer materials. Typically, the more expensive such a system is, the more reliable it is, but this method does not provide clear guarantees. There are also counterfeits of well-known brands, as well as quite reliable and inexpensive domestically produced products. The average buyer can only try to find a good seller and hope for luck.
Fittings made of bronze and brass alloys are considered much more reliable, and such devices are much more difficult to counterfeit. But the cost of these mechanisms will be significantly higher than that of plastic products.
Metal filling is usually used in luxury plumbing fixtures. With proper configuration and installation, such a mechanism functions smoothly for many years.
In bottom-fed toilets, the inlet and shut-off valves are very close. When setting up the fittings, you need to make sure that the moving parts do not touch
Water supply point
An important point is where water enters the toilet. It can be done from the side or from below. When water is poured from the side hole, it produces a certain amount of noise, which is not always pleasant to others.
If water comes from below, it happens almost silently. The lower water supply to the tank is more typical for new models produced abroad.
But traditional domestically produced tanks usually have a side water supply. The advantage of this option is its relatively low price. Installation also differs. Bottom water supply elements can be installed in the tank before it is installed. But the side supply is installed only after the tank is installed on the toilet bowl.
For replacement, the fittings are selected taking into account the option of supplying water to the plumbing tank; it can be side or bottom
Operating principle of toilet valves
In this post, I will tell you the principle of operation of the drain fittings for a toilet cistern and the principle of operation of the filler fittings with side and bottom supply.
I’ll break it all down into small pieces so that you can understand the principle of operation. And when we know the principle of operation, we will be able to clean or repair this device, if necessary.
I will show the principle of operation of drain and fill valves using several examples.
The fittings of this manufacturer are installed on toilets, “Santeri”, “Santek”, “Rosa”, “Dela”, “Keramin” and others. This flush or fill fitting will fit toilets from other manufacturers. The most important thing is that the diameter of the filler hole is 1/2 inch thread,
and the diameter of the drain hole was around 61-65 mm.
Water enters the toilet tank through the fill valve. I'll start with the fill valve. And I’ll start with the oldest fill valve, which was installed on old Soviet toilet tanks.
He is the oldest and is gradually fading into oblivion.
I will show the operating principle of this valve so that people who already use it can disassemble it and repair it, clean it first. So that they are not afraid to take it apart. Well, if it’s time to change, I recommend changing to this one.
More compact and cheaper. But that doesn't mean he's worse.
What does it consist of?
Polymer float
metal rocker,
rocker holder,
holder axle, retaining nut,
gasket, body nut,
the threaded part of the body, the body itself, the membrane, the pusher on which the rocker holder presses
and filler tube.
The operating principle is simple. Water is gathering. The float floats up. This whole mechanism presses on the pusher.
The pusher presses on the membrane, and the membrane, in turn, blocks the passage of water. You might wonder why such a long thread is needed? It's actually simple. The filter is hidden in this thread.
If water stops filling into the tank, here is what you can do in the case of this valve. First you need to make sure that water is already reaching the valve. Turn off the water. Remove the liner and check if the mesh filter is clogged. If it is not there, then you will have to remove the valve.
How to remove the valve, see the previous post.
Unscrew the housing nut.
Separate the valve.
There is a nozzle on the threaded part.
Clean it, for example, with a wire in the opposite direction of the water flow. Remove the membrane and wash it. Rinse all parts in water and reassemble everything in reverse order. If there is no serious damage, then the valve will continue to operate.
Please note that the valve cannot be assembled incorrectly.
At a certain place the valve has a joint between the parts. Align these grooves and tighten the connecting nut.
But this tube is needed so that water does not create too much noise when filling the tank.
In my case, the tank is made much larger than it actually is. It was made specifically to fully demonstrate the operation of the fittings and methods of height adjustment.
The second type is a filler valve with side water supply.
As I said earlier, you can safely change this one to this one. It will also fit very well in an old Soviet toilet if anyone still has one.
What does it consist of? Float, pusher, nut, oblique washer. Needed in case the wall of the tank is slightly tilted inward.
This washer can be used to align the supply valve to a vertical position. Now you can see that it can be tilted one way or the other in any direction.
Elastic sealing cone-shaped gasket with an angle of 120°C,
two successive levers, a rod along which the float moves and the same rod is a flow extender,
the filter, the body itself, which consists of a threaded part with a nozzle and the main part of the body in which the rod and elastic membrane lie.
There is a sealing gasket between the two parts of the housing.
The operating principle is similar. The mechanism presses on the rod, the rod presses on the membrane, the membrane shuts off the water.
The principle of cleaning this valve is similar to the first. The only difference is that in order to disassemble the valve into two parts, you do not need to unscrew the nut. Because she's not here.
You need to grab the two parts of the body and disassemble it. Unscrew it a little, turn it about 30° and it will come apart.
The next valve is with bottom water supply.
Components: float, rod, rocker arm, float holder or float guide.
Guide extension. The holder extension is needed in case my tank is too deep and I want to increase the water level. In this case, I move the float as high as possible. To prevent it from falling off, I install an extension cord. Valve body in two parts, threaded part with nozzle, second part with pusher and diaphragm, nut, filter, cone gasket, swash plate. The principle of operation is similar to the first one with the only difference that it is not horizontal, but vertical.
The fourth type of fittings is with bottom water supply.
Float, pusher, float guide, which is part of the valve body, guide extension if you have a deep reservoir, rocker arm, rocker arm axis, nut holding both parts of the body, pusher, elastic seal, membrane, return element that redirects water down for silent filling tank, the second part of the body with a metal thread inside which a check valve is installed. A check valve, in principle, is not needed, because when the valve is closed, water still does not flow out of it, but for some toilet manufacturers the issue is fundamental. That's why it produces such valves.
The fifth type of valve is similar to the one I just talked about, with the only difference that there is no check valve inside it and it has a polymer thread rather than a metal one.
In terms of reliability, plastic threads are not inferior to metal threads in this case. But for some manufacturers it is the metal thread that is important.
Perhaps it’s worth checking how long the valve with metal threads and with plastic threads holds. Not so much how long it holds, but to see what will burst faster, the valve will rupture, or the flexible line will come off the thread. I think we'll do it in the end. To clean this valve, you need to unscrew the nut and clean it with something like a wire in the opposite direction.
This is if there was no filter or if the filter was cleaned, but the water still does not fill. It is not necessary to remove the valve from the tank for this operation. Well, I think it’s time to check the valve for rupture now.
The first thing that came to hand was a valve with a metal thread.
I did not put it in a transparent tank, because... I was waiting for the valve to break and I was afraid of damaging the transparent tank. Installed a standard tank.
I poured water into it and waited for the valve to take off. But no, the flexible line did not break and the valve did not bang. The valve does not allow water to pass through in the closed position up to 20 bar.
Although the operating pressure is 2 times lower. After 20 bar, the valve began to let water through with a shock. Even after the breakdown, he holds his 12 bar. The second valve with polymer threads showed a similar result. I took them both apart to look at the damage. At autopsy, no damage was found.
Put it back together. I checked. Both valves are in working order. Then I tied the float in the closed position with wire and repeated the test. The result is the same on one and the second valve. After failure, the valve allows water to pass at a pressure exceeding 12 bar. And it lasts until 12. As a result of the fact that no damage was found inside during disassembly, I can assume that the pressure simply displaces the gasket. After reassembly, the valve is ready for operation again.
It turns out that excess pressure with this valve is not as scary as it seemed to me at first glance. And you don’t have to worry about the valve popping out of the tank during operation.
I was asked a question: what pressure can the valve close? The official operating pressure of these fill valves is 10 bar. But the water filling starts from 0.5 bar or from 0.1 bar for such valves.
Externally, the fill valves seem unremarkable, but they have some engineering solutions that allow these valves to operate as quietly as possible and close quickly when water is filled into the tank.
The quality of valve operation depends little on the degree of water contamination. They can be installed in a tank with different wall curvatures. Due to the cone-shaped gasket with an angle of 120°C with an inclined washer.
Despite the fact that they have tried to make the valves as efficient as possible, they remain affordable. To make sure, you can go to a search engine and look for IncoEr valves and make sure that they are not expensive.
Now I will talk about the principle of operation of the drain valve.
All drain valves have the same basic structure. The functionality of the valves varies depending on what additional elements are installed on these valves.
The advantage of this design is that if you want to put another valve, for example, the valve where the handle was, you want to put a button or you want to put a double flush button. Or you wanted to install fittings with double automatic drainage. In all these cases, you do not need to remove the reservoir and change the socket or seat.
Simply unscrew and install a new valve. I wrote how to do this in a previous post.
The valve base includes: seat, nut, gasket,
retractable overflow tube, extremely elastic gasket, washer retaining pad, guide, valve body bottom, automatic drain float,
red case cover or blue elite version. Engineers tried to make the most simple and reliable design for long-lasting operation of the valve. One of the engineering solutions is the edge of the valve seat.
It has a sharp shape. The valve seal is made of elastic material that is resistant to aggressive media that may be contained in tap water.
One way or another, the water is not perfectly clean and over time the valve and the tank itself become covered with a brown coating.
So this connection, the seat and the valve, are designed in such a way that under water pressure when the tank is filled, the valve sags, and the gasket is pressed deeper, thus cleaning itself and the edge of the seat.
As a result, the most important sealing spot - the elastic seal and the sharp edge of the valve seat - always remain clean.
However, if your drain valve starts leaking water, it doesn't necessarily have to be a valve, disassemble the valve and look at the condition of the rubber seal and the seat/seat where the gasket meets the plastic part. If necessary, clean in such a way as not to damage the socket or tear the elastic gasket.
According to the manufacturer, since the creation of this valve design, there has not been a single complaint from users about the leakage of the drain fittings.
Quite often people ask me the question: why does the water from the tank not drain well into the toilet? It seems that everything that can be adjusted has already been adjusted and the button is pressed all the way, and the filling of the tank is set to maximum, but when you flush the water, the water goes so-so? So, now I will tell you how this problem was solved by engineers.
The intensity of the water drainage flow in this fitting does not depend on whether the drain is small or full.
In both cases, when draining, the valve opens the drain hole completely. Water enters the hole from all sides. During descent, a vacuum is created in the tank, which prevents the free flow of water from the tank. Some manufacturers make holes in the rear of the tank to allow air to freely enter the tank, but not everyone is ready for this.
In my case, there is not a single hole in the walls of the tank. The manufacturer offers a button with a special breather, which ensures sufficient air penetration into the tank. As a result of these two engineering solutions, an intensive drainage of close to two liters per second is ensured. Then, like other manufacturers, the drain rate can be 1.2 or 1.5 liters per second. Actually, this is the answer why in some toilets the water does not drain well, while in others it drains well. Everything very much depends on the design of the reinforcement.
I showed the base of the valve, and now I will show what is attached to them in order to get all the different things that I will talk about now. I'll start with the simplest release mechanism by lifting the handle up.
This mechanism is especially popular among older people. Due to the fact that pulling out the handle is easier than pressing a button with your finger. This valve consists of a base plus: an overflow extension tube, a clamp for this tube,
holding base and nut for cover.
Adjustable threaded rod, handle, drive rod holder, rod nut,
valve lift drive rod.
Installation is very easy. I installed the valve body, tightened the nuts holding the handle, and connected the valve and the stem with a rod. The rod was passed through the hole. All is ready. Adjustment.
There are no problems in adjusting the fittings to the height of the tank. I loosen the nut that holds the overflow tube extension in place.
I lift it up to adjust the height so that I can fill it with more water than is currently installed. Please note that when you install the overflow tube, do not install it too high. The overflow tube must be installed lower than the edges of the tank. Not edges, but additional holes.
For example, there may be holes for air supply on the right or left and back. What I wrote about earlier. We adjusted it, lifted the overflow tube, and tightened the nut. After that, the rod that the valve itself pulls can be easily disconnected, moved to the side, raised to the desired height and snapped back. And the nut must be tightened so that it is close to the valve itself. Thanks to this nut, you can stop the flow during draining. The function is called stop flow. When you pull the handle, the handle remains in the raised position until all the water has drained from the tank. In order to stop the flow, let’s say you decided that you didn’t need to drain all the water, the fact that it was already glass was enough for you. In this case, you need to hit the handle and thus the valve will turn off the water back.
The next valve is a push-button valve. Consists of a base. Added to it:
slightly different overflow tube without thread, overflow extension tube,
spline nut,
two valve struts, two valve adjusting riser clamps, valve adjusting struts with numbers,
craving,
rocker,
pusher with thread and return spring, white button, which is suitable for hidden installation in a tank with a 40 mm hole and for tanks with a 24 mm hole for the rod. This button can be installed on a lid with valve diameters of 24 mm or 40 mm.
To adjust the drain fittings to the height of the tank, simply lift both red clamps up and raise or lower the adjusting posts so that the numbers match.
Move the lock to the down position. Close the lid. Tighten the button and you can use it. Please note that before raising or lowering the guides, you must release the rod. Because the rod will not allow you to adjust the height of the fittings to the desired position. To adjust the height of water rise with the filler valve, everything is very simple. I disconnect the float and move it higher or lower to increase or decrease the volume of water being filled.
Lately, designer tanks are increasingly appearing in which the outer part is slightly inclined towards the inside of the tank. In this case, reinforcement with a thick head may not be suitable for such tanks. In the case of this fitting, the head does not take up much space and thanks to these guides you can adjust the button to fit any tank.
If in this position it turns out that the amplitude is not enough, then you can take it and rotate it 90°. Then it moves more to one side. Please note that here you can fix the valve itself in 3 positions. The third valve from the set is similar to the previous one with the only difference that this valve already has a shiny button. Just like in the previous one, when you press the button, the full volume of the tank is emptied. Before moving on to the next valves, I will show you the principle of operation of this valve. So, what causes the water to drain? Look, when I press the button, the water should drain as long as I hold it, because as soon as I release it, the water pressure presses on it and, by all logic, it should close. The valve should have pressed down and closed the hole.
But this doesn't happen. The question is why? And all because at the base of the valve there is a special float, which allows the user not to constantly hold the button until the tank is completely empty.
Look, the water is gone. When she left, her space filled with air. When the water is filled back, air remains in this small float, which is located behind the red part of the body, as a result of which the float is always at the top while the water is in the tank. And on the body of the overflow tube there are hooks for this float.
As soon as I press the button, the tube rises, hooks onto the float and the float holds the valve in the upper position until the water comes out completely and the float drops, releasing the valve behind it. This is such a simple design.
If I don’t need to drain the entire volume of the tank, but only need to drain part of the tank, in this case I will have to purchase another fitting, which is equipped with a different button. Double flush button. Look, when you press the small button, both are clamped, but not deeply.
In my case, the water drains while I hold the button. If I press the larger one, the button is pushed deeper and the water is completely drained. I can release the button as if it were a single button with the tank emptying completely. How it works? Remember, there is a float at the base, which is always at the top, and there are hooks on the overflow tube. When you press the small button, the valve rises, but does not reach the hooks and does not lock in the raised position. And if I press the big button, the valve rises higher, just the minimum distance that is necessary to catch the hook of the float. With fittings with a double flush button you can save your water.
The next type of valve is also a double flush valve, but here there are two automatic flushes in which the small flush is also adjustable. This means that by pressing the large button I can press it once and the water will drain completely from the tank until the valve closes. Same thing with the little one. I can press the little one once. Let it go and the water will flow until it reaches the level that I adjusted.
The components of such a valve are similar to the previous one. Adjustable drain body, rod rocker,
adjusting rod, float. It works similarly to the previous float. Let's say I adjusted it to half the tank. Reaches a shallow float. The float rises up and sits in this position until I press the trigger.
As soon as I pressed the trigger, the float rocker hooks onto the second release on the overflow tube and stays there until the water drops below the first float. After the water drops below this float, the rocker will release the valve and the valve will fall into place and shut off the water if the small release was activated.
Adjusting this valve is very simple. You need to remove the button and the reservoir cap. Using this little red handle, twist the rod that raises the float higher or lower.
But if you have “diaye” fittings, then you need to twist the yellow rod. Please note that, unlike other drain valves, the volume of the small drain in the fittings is not adjusted stepwise, but smoothly. All. The small drain has been adjusted; all that remains is to close the lid, tighten the button and you can use it.
The IncoEr campaign offers several types of buttons. The first simplest one is the white button. Universal for tanks with a hole of 24 or 40 mm.
The second has the same white border, but the button itself is shiny with a single flush.
And two double flush buttons that differ from each other. These are a metallized button and a galvanized button. Outwardly, at first glance, they are no different. Unless they are considered in more detail. The first is a metallized coating.
In short, metallized particles are attracted to the button and settle on it in the plasma environment of an anomalously glowing discharge in magnetic fields.
In fact, everything is much more complicated than I said. Next, the button is varnished. The advantage of this button is the price. But the disadvantage of such a coating is that if aggressive chemicals are used when cleaning and wiping the room, or fittings with such a button are installed in public places, then such a coating will wear out over time. But the second option is galvanic coating. This is a completely different type of coating. In short, metal sticks to the product under the influence of electric current. First comes copper plating. Then a nickel plating bath and finally chrome plating.
This coating no longer peels off either at home or in public places. The disadvantage of such coverage is the price. The price of this button is several times higher than the metallized one. Therefore, all Russian manufacturers of toilets in the economy segment are equipped with metallized buttons. These buttons differ in appearance. The metallized interior is not painted. Galvanic coating on all sides of the button. Even when I pick up the galvanic and metallized ones, one of them feels heavier and more pleasant to the touch. She's even a little cold. Almost metallic, and the other one is actually light.
It is clear that it is plastic. This one is completely plastic. If you don’t pick it up and try it by weight, you won’t be able to immediately tell whether it’s metal or plastic. This will be immediately clear. There is copper plating and more metal than on this button. This button is better. It is more durable, but at a price.
We have a separate type of fittings for the more expensive segment. This is a DUAL fitting.
Installed on products.
The fittings have a different body color. Galvanized buttons. colorful guide,
original packaging, a plastic wrench for tightening the nuts and a more expensive gasket between the tank and the toilet with a memory function. In order to activate this function, before installing this gasket, bring your open palms to it and say: “Remember, you toilet gasket remembers its shape. You are round, have an even edge along the outer and inner edges at the top and bottom. You can hold water and maintain its shape at any time after installation and be ready for a new installation.” Although, even if you don’t say the mantra, it will still remember its form. After reading this post, you know the working principle of the drain and fill valve. You will be able to disassemble and repair these valves.
I really hope you found this post helpful.
Operating principle of shut-off valves
During operation of shut-off valves, the following parts are involved:
- Float
- Lever design
- Valve
- Union
At the inlet there is a fitting through which water can enter from the system. When filling the cistern, the water level rises, causing the float to act on the lever system. She, in turn, presses the valve to the fitting and blocks access, blocking the liquid.
When filling, three types of location of the filling fitting are used:
- Top position
- With side water supply
- Bottom position
Each of them has its own subtleties in the operation of the system as a whole.
Toilet fittings with top connection
This type is used quite rarely. Due to the peculiarity of this design, filling the tank with water was accompanied by a high noise level. Subsequently, manufacturers abandoned production with such filling.
Toilet fittings with side connection
For lateral connection, the shut-off valve has two versions:
- Rod
- Membrane
The operating principle remains unchanged. The main difference is that the membrane is not able to block the access of water gradually, so when filled, access is blocked instantly.
The rod valve has the ability to close smoothly. At the moment when the float rises, the lever system gradually acts on the rod, thereby smoothly closing the access to water.
Fittings for toilet bowl with bottom connection
This method has a number of advantages over other supply connections:
- Silent filling
- Convenient location
- Possibility to hide water supply systems
- Large selection of varieties
- Availability of components
Due to the fact that the connection is made at the bottom, the toilet allows you to hide all water supply systems. It is for this reason that overhead tank designs are no longer used in apartments and residential buildings.
Such systems, in turn, have also been modernized over time. In order to reduce water consumption, two-button fittings began to be used, which include 2 drain modes. The first mode allows you to slightly open the drain valve of the fittings and release water gradually.
The second mode is designed to drain a large amount of water in a short time. The model range with a bottom connection is equipped with a two-button fitting at the manufacturer’s factory, but if desired, it can always be replaced.
How does the drain mechanism work?
The flush is based on the principle of pushing out the float module. When we press the button, the water drain valve rises and it quickly flows through the drain pipe. As soon as water begins to flow from the drain tank, the float lowers and opens the water supply. As the water level rises, the float rises and closes the flow.
Maybe the article “Installing a toilet with your own hands: step-by-step connection instructions” will be useful to you. Go>>
Main problems with drain fittings
From time to time, small malfunctions arise in the operation of the toilet flushing system, which, if desired, can be easily fixed with your own hands.
- Systematic flow of water into the toilet bowl;
- Water constantly flows into the flush tank.
A systematic stream of water that flows into the toilet indicates damage to the bulb in the system. The pear stops sealing the drain hole in the initial stage. To solve this problem, you can attach some kind of weight, thus weighing the pear down and returning it to its normal position. If the drain system fittings are equipped with a membrane, then in this case only replacement of this spare part is necessary.
Installation of drain fittings
If water constantly enters the tank, it means the float is deformed. If the float is skewed, it is quite easy to correct it. There is a more severe version of such a breakdown - depressurization of the float; to check it, you need to remove it and lower it into a container of water; if it sinks, it means it is unsuitable for further use and needs to be replaced.
Signs of leakage
If the tank is leaking, you can observe the following:
- you can hear falling drops of water or a flowing stream;
- you can see rusty stains, lime deposits on the walls of the tank;
- a small wet trace is visible in the toilet bowl, which remains after flushing;
- the appearance of condensation on the outside or on the hoses;
- The water does not go away quickly after pressing the button.
If the water does not drain quickly or the level is incorrect, then the water pressure is not sufficient to pass the waste through the water seal. And some of it remains in the toilet bowl.
As soon as you detect one of the listed symptoms, you need to determine the cause and eliminate the problem.
Instructions - how to fix a stuck toilet button
To eliminate the cause of the malfunction you must:
- Remove the reservoir cap. In most cases, it does not have additional fasteners and is held directly by the plastic housing of the flush button, which must be unscrewed (counterclockwise). To unscrew the toilet cistern flush button, you do not need a special key - this is done by hand.
- Carry out an inspection. Having gained access to the “filling” of the tank, you should carefully inspect the drain mechanism drive for damage and distortions. Often the problem with a button sticking occurs due to accidental displacement of the pressing rod. Excessive force when pressing the button can also provoke a shift in the adjustment mechanism.
- Adjust the drain mechanism. If the cistern button has failed, the height of the drainage device (flush valve) may need to be adjusted. Many modern models of push-button toilets use a two-level flush system - in this case, it is necessary to adjust the low and full flush. To do this, you need to move the lock on the rod several positions up or down (this is determined logically depending on the specific model of the valve).
- Often the cause of drain failure is rust and other mechanical suspensions, which are deposited over time on the working parts of the fittings, complicating its normal functioning. In this case, the problem is eliminated by simply cleaning the working units from these deposits.
Removable toilet flush buttons If the malfunction is caused by mechanical damage (breakage) of parts of the drain fittings, the simplest and most correct solution would be to completely replace the fittings (it is unlikely to be possible to glue plastic parts together).
The main thing is to choose the right method of supplying water (bottom supply or side supply). If any questions arise during the replacement process, then just refer to the instructions that are included in each kit. You should not buy cheap Chinese drain mechanisms; a high-quality set costs from 600 rubles.
The answer to a frequently asked question: why are there two buttons on the toilet cistern?
The toilet flush cistern is one of the most active consumers of water in the house. When you press the button each time, all the water accumulated in the tank goes down the drain.
In order to save money, manufacturers of plumbing equipment have developed two-button drain fittings, which are designed to minimize water consumption. This system involves two drainage options: small and large.
When you press one (small) button, part of the water from the tank is drained (the volume of water supply is adjustable), when you press the second button, all the water is released.
Classification
Intake mechanisms can be divided into groups according to three criteria:
- material composition,
- location,
- type of construction.
By material
- Brass or bronze. Products made from these alloys are practical, durable, reliable and completely resistant to corrosion. But such metal valves are quite expensive.
- Plastic. Plastic products are very popular because, along with their long service life, they are quite inexpensive.
By location
- With bottom eyeliner. Valves with this connection are located at the bottom of the tank. With this method, water intake occurs completely silently. Also, the lower location allows you to hide the inlet hose and free up the space in the toilet room from unnecessary fittings.
- With side eyeliner. Valves with this connection are located, respectively, on the right or left side of the tank. This design is the simplest, which has a positive effect on its service life.
You need to select inlet units depending on the design of the toilet cistern. Also, when choosing, you must adhere to the following rules:
- The product package must include the valve itself, the float, O-rings and a fixing nut.
- O-rings must be elastic, correct in shape and free from defects.
- The plastic element must not have visible scratches or nicks.
- The movement of the float should occur smoothly, without sudden jumps.
By type of design
Once upon a time, valves were ball valves; the device looked like a ball, which was used in all tanks. The modern device is called an inlet device, since it has no resemblance to the design of ball mechanisms, but is used together with a float. There are several types of float devices for the toilet tank:
- Croydon valves consist of a shell, a float with a lever and a piston with a seat. In this mechanism, the movement of the lever is perpendicular to the action of the piston. This system is used in old tanks and has a fairly low price.
- The piston ones are equipped with a forked pin with a lever axis. Here, the water is adjusted by horizontally lifting the lever, which moves the piston, at the end of which there is a special seal that comes into contact with the seat and blocks the flow of liquid. This is a fairly common model and is included in the middle price category.
- Diaphragm valves have a rubber or silicone membrane instead of a gasket, which moves when the piston moves. This is the latest device, which is used only in the latest models of toilets. The advantages of this valve include fast water intake, instant shut-off of liquid intake and, depending on the quality of the fittings, silent filling of the tank. Among the disadvantages, one should take into account the presence of a constant water pressure in the system (0.05-0.1 MPa) and the purity of the liquid, since if the membrane is damaged, it is impossible to replace it on your own. In this case, you will have to purchase the entire intake mechanism.
Assembly of cisterns
The further comfortable operation of the plumbing will largely depend on how to assemble the tank and then adjust it. Naturally, each type of equipment has its own installation secrets, which are quite accessible to the home craftsman.
The sequence of assembling a tank with a top button (Figure 1) is as follows:
- We fix the outlet valve (5) in the large central drain hole of the storage tank. You can install the entire mechanism or only its lower part. At this stage, as at all subsequent ones, it is necessary to control the tightness of the gaskets, securely fixing them with threaded elements to obtain tight connections.
- If you are assembling a model that includes fittings for a toilet cistern with a bottom connection, you should also secure the inlet valve (2) with a float (3) in the corresponding hole in the plumbing product.
- Insert an elastic gasket (6) between the toilet bowl and the flush container. It must be carefully centered, and then tighten both halves of the plumbing into one with screws (7).
- In a model with side water supply, we fix the inlet valve.
The toilet is leaking: what to do?
First of all, don't panic. If we exclude mechanical damage to the toilet (various chips and cracks), then there will be two reasons for water pouring onto the floor:
- Poor-quality fastening of the toilet with bolts;
- Wear of the rubber seal, which is located between the flush cistern and the toilet bowl.
To eliminate this problem, first try simply tightening the mounting bolts a little more. However, be careful: if you use too much force, you risk damaging the tank and breaking it. Tighten them gradually, periodically checking whether there is a leak or not.
If, after tightening the fasteners, water continues to leak onto the floor, you will have to remove the tank and change the O-ring located on the drain channel. Don’t be lazy, and if you’ve already removed the tank, immediately change the washers that secure the mounting bolts and rubber gaskets, and it’s best to treat all joints with silicone - this will provide an additional guarantee against leakage.
For tanks with bottom wiring, the problem of water leakage may be associated with a worn seal where water is poured. In this case, you will also have to change the seal that has become unusable and secure everything with silicone sealant.