What is a tile leveling system (SVP)
SVP is a modern technology developed specifically for leveling tiles. Initially, SVP appeared abroad, and after a while they began to use it here. The system is used for laying not only tiles, but also porcelain stoneware, the thickness of which is 3-20 mm, on the floor and walls.
The SVP includes a clamp and a wedge. Reusable wedges can be used repeatedly, but the clamps remain inside the joint during tile laying. Similar foreign hovercrafts have separate tongs and generally have a more complicated design.
Making a hovercraft with your own hands
The simplest homemade design will be a hovercraft made of aluminum wire with a diameter of approximately 1.5 mm. It's done like this:
- We select a block of dense, hard material measuring 1.5x1 cm.
- Pressing tightly, we bend the wire around its sides, starting from the bottom. We close the perimeter at the top by making a small twist.
- We remove the workpiece from the template and use wire cutters or pliers on the sides from the bottom edge to bite the wire. This is necessary so that you can remove the stops without unnecessary effort after the glue has dried. To ensure that the “bites” are of the same depth, you can place a limiter under the jaws of the nippers.
- We make a base from a metal plate that will lie on the lower edge of the frame and fit under the tile. It is worth remembering that in order to avoid unpleasant situations, the thickness of the bases of all sets should be approximately the same.
- From scraps of wood we make spacer wedges, which should be securely fixed in the stop.
When laying tiles, homemade systems are installed in exactly the same way as factory ones.
Do not forget that the most high-tech device or tool requires experience, skills, dexterity and the desire to achieve high results. Your expectations, abilities, opportunities and information that can be found on our website will always be the key to your right choice. All that remains is to wish you good luck!
Features of use
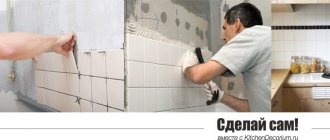
If the installation of the facing coating is carried out unprofessionally, it will ruin the interior and lead to a host of other unpleasant consequences - for example:
- Fungal formations and dirt will begin to appear in the seams between the tiles.
- There is a possibility of accidental injury.
- Under the influence of mechanical loads, the material will begin to collapse.
Most often, this leveling system is used if the tiles are larger than 40 cm. Sometimes it is used for small facing materials.
The following types of leveling structures are distinguished: with a wedge-shaped or screw tensioner, with a special tool for fixation - a jagged strip.
Designs with a wedge-shaped tensioner include two plastic elements - a wedge with a tooth and a key-clamp with a base in the shape of a polygon or oval. The clamp is a plastic element in the shape of the letter “T”. Its top part can be quickly broken off. This element can be used once, and the wedge can be used repeatedly. The design may contain tapes, meters, clips, caps and other auxiliary elements. It is necessary to purchase a rubber hammer to use it to beat off the locking mechanism.
To tighten the structure with a screw tensioner, a steel pin and a screwdriver are used.
Leveling systems with a locking tool are used for installing tiles whose thickness ranges from 3 to 30 mm. You also need to additionally purchase a special tool.
Is the game worth the candle?
The new system helps make tiling work even better. It is preferred by both experienced craftsmen and beginners.
It is very difficult for an inexperienced master to immediately achieve an attractive appearance and follow the installation technology, so DLS is designed to simplify all manipulations as much as possible.
Advantages and disadvantages of the system
The advantages of the system are as follows:
- SVP ensures the stability of the cladding after the glue shrinks. Reliable fixation of the tiles prevents the installation from moving to the side.
- The system also ensures even tile gaps. But sometimes specialists use plastic crosses to adjust them.
- The cost of laying tiles increases, especially in cases where the installation is carried out by hand, without the appropriate knowledge, skills and abilities.
- SVP can be used repeatedly (except for consumable clamps).
However, such a system also has disadvantages - for example:
- The tiles cannot be washed on the day of installation, which primarily applies to the fastener area. After the glue has hardened, you can remove the wedges. Cleaning cured glue can take a lot of time.
- When installing the SVP, it is impossible to make seams less than 3 mm due to the thickness of the flow gates or rings.
- “One-time” items will need to be constantly purchased.
Basic Concepts
Previously, plastic crosses were used to lay tiles, which were inserted between adjacent elements. The disadvantage of this system is that the crosses only affect the seam distance, but they do not allow the products to be aligned in the horizontal plane.
Today this problem is solved with the help of special wedges that are included in tile leveling systems. Technically, these elements themselves cannot influence the material, so they are used together with special clamps. The wedges resemble a kind of pitchfork, which consists of two guides.
There are small notches on the surface of these products that allow you to securely and efficiently fix the clamp and ceramic tiles.
Depending on the material used for manufacturing, these elements can be divided into 2 types:
- Plastic. Wedges of this type are made from various types of polymers. This makes them strong and durable. High-quality products are perfect for reusable use.
- Metal. They are not found as often, as they command higher prices. They are used by professionals who constantly lay tiles. Metal can withstand loads much better and can last as long as possible.
Comparison of domestic and foreign analogues
SVP systems vary depending on the manufacturer. Leveling systems produced on the Russian market consist of a wedge and a clamp. The wedges are reusable, but the consumables-clamps are disposable, since part of them remains inside the seam after completion of the installation work.
Analogues from foreign manufacturers additionally include mechanisms for twisting, tightening or latches for fastening - Litolevel from Litokol, Rubi.
SVP models have different components that are supplied complete.
SVP (gate and ring)
System advantages:
- Strength, high reliability of wedges compared to caps. Wedges are useful when styling.
- Excellent fixation, no damage to the ties.
- No need to soak screeds, small bearing areas. After a few hours of break, it is not difficult to continue working - just make a small recess under the cap or install them immediately.
But there is also a drawback. To remove the ties, you need to kick them or use a mallet. However, if struck at an angle to the seam or in places where the glue is clogged, the screed will break in the wrong place.
Rubi
Advantages:
- High quality plastic, professionally designed design.
- Reliable design of the support platform. Thanks to the flexibility of the petals, strong fixation of tiles with a thickness of 3-20 mm is ensured.
- Nylon ties soaked in water for half an hour become more tensile. Once dry, they are quickly removed using pliers. They need to be soaked according to the manufacturer's instructions.
- The design of the tie loosening is also convenient; it breaks in the required place.
- The 0.8 mm screed ensures the thinness of the seams and the ability to adjust them using crosses.
Flaws:
- Less reliable fastening of the clamps; if glue gets in contact with them, they do not hold.
- Minimum clamping force. When you try to increase it, the risk of breaking the ties increases.
- After the break, the work becomes more difficult. If the ties are inserted immediately, they will dry out within a few hours, which increases the risk of them breaking. Since the area is large, it is difficult to insert them into the glue that has had time to dry. You will need to use a screwdriver or spatula.
- Although the caps can be reused, they can only be used a maximum of 7 times in a row.
In addition, such a system is expensive.
Popular brands
Among the most popular tile leveling systems is Castorama's Diall. The leveling kit is equipped with an easy-to-break clamp and is 1.35mm thick at the grout point. The wedge is equipped with teeth, so it can be used to grade the pressure.
Also worth mentioning is the RUBI Delta leveling system. It is very versatile as the wedges fit 3-12mm thick tiles, it is only designed for 1mm wide grout.
This type of system is also offered by the well-known company Knauf. Here the wedges are inserted using convenient mounting pliers, which allows you to better regulate the pressure level. Knauf offers various sizes and widths of system elements.
The Perfect Level system also receives very good reviews. It also comes with special tongs and the icing wedges are reusable. Moreover, it is also very versatile, suitable for various thicknesses. The minimum seam width is 1.5 mm.
The Diall kit from Castorama is the best value, but it doesn't come with extra pliers, which makes the job faster and more efficient.
Comparison of domestic and foreign analogues
| System name | Product Information |
| Raimondi Leveling System Starter Kit |
|
| Tile leveler QEP LASH |
|
| Perfect Level Master Tile Leveling System |
|
| Yaekoo Tiles Leveler Spacers Lippage Tile Leveling System |
|
| Craftsboys Tile Leveling System |
|
Instructions for use
First of all, you need to make sure that the room temperature is approximately +10°C. This is the ideal temperature for hovercraft.
Next you need:
- Prepare the glue by diluting it according to the manufacturer's instructions.
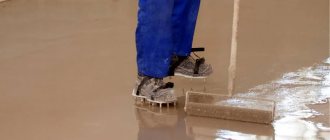
- Apply the mixture to the floor or wall with a notched trowel.
- Lay the first tile on the floor.
- Make sure it is laid correctly using a building level.
- Install 2 clamps on all sides of the part, maintaining a 1-5 cm space from the edges.
- Place the second tile end to end.
- Insert a wedge between the outer part of the clamp and the tile so that it firmly adheres to both tiles to align them.
- Remove excess glue (once it dries, it will be difficult to remove).
- Cover the remaining surface.
After the glue has dried, the wedges must be removed. To do this, you need to hit them with a rubber hammer along the tile seams.
What are the “disadvantages” of using leveling systems?
- 1. Sensitive additional costs when finishing small- and medium-format tiles in large volumes. For the customer, the costs of the SVP are evidence of the low qualifications of the contractor. 2. It is not effective for correcting uneven bases by laying tiles, and when tiling with a “propeller” it is even harmful. 3. When tightening a recessed sheet with a clamp, cavities may form under the coating. 4. After laying the tiles, it will not be possible to completely clean the seams from the glue, and scraping the hardened mortar after removing the clips is more difficult and time-consuming.
By and large, professional tilers do not need to use SVP. The time saved on leveling the sheets will then be spent on cleaning the seams from glue; ceramics with geometric defects must be laid without clamps, and with smooth tiles and a prepared base, the use of DLS will only slow down the work of the pros.
Consumption
There are 3 factors that affect material consumption:
- SVP quality. If it is low, then the tools will easily break during installation, and you will have to spend money on repairs.
- Professionalism of the master. If an inexperienced worker works with the SVP, there is a risk of making mistakes and omissions that will completely ruin the result.
- Sizes of tiles. If they are large, you will need to use auxiliary mechanisms for fixation.
To calculate the number of units, you must use the formula C=K/S, where:
- C – consumption;
- K – number of fixing elements for two tile coverings with a common border;
- S – area of one tile, in m2.
How much does it cost
I use a tile laying system, the overall installation costs will increase slightly. Everyone will also have to buy glue, grout, tiles, level, etc. To all of the above, you just need to add the cost of the required volume of system elements.
The average cost of products on the market, for a bag of 50 pieces (wedges, clips), is 240 rubles. When calculating the required number of products, it is worth operating with the size of the tiles. For laying 1 sq.m. tiles measuring 30*30 cm, you will need 44 products. If tiling with a size of 60*60 cm is carried out, then the consumption is 1 sq. m. will be 11 pcs. Everything is calculated individually.
Price
The cost of tile leveling systems depends on the material from which it is made and also on the number of units in the package.
SVP produced have the following packaging options:
- Gate clamp 1.0 mm (USVP) - 101 pcs. at a price of 150 rub. per package
- Gate clamp 1.0 mm (USVP) - 501 pcs. at a price of 705 rub. per package
- Clamp Ring 1.4 mm (USVP) - 101 pcs. at a price of 150 rub. per package
- Clamp Ring 1.4 mm (USVP) - 501 pcs. at a price of 705 rub. per package
- Wedge Gate 1.0 mm (USVP) - 201 pcs. at a price of 525 rub. per package
- Wedge Gate 1.0 mm (USVP) - 51 pcs. at a price of 140 rubles. per package
- Wedge Ring 1.4 mm (USVP) - 201 pcs. at a price of 525 rub. per package
- Wedge Ring 1.4 mm (USVP) - 51 pcs. at a price of 140 rub. per package
Tool for laying tiles in the OBI online store
The OBI hypermarket catalog includes over 220 items of tools and consumables for laying ceramic tiles. Products are sold individually and in convenient sets at prices ranging from 15 to 2000 rubles per item.
This subcategory includes many different types of goods:
- Crosses and crayons.
- Spatulas and trowels.
- Chisels and wedges.
- Drill sponges and attachments.
- Plumb lines and cords.
- Cleaners and wedges.
Crosses for laying tile products are made of transparent polypropylene. Consumables of standard thickness and shape are available for sale.
Spatulas differ in several parameters:
- Dimensions (width).
- Material of manufacture.
- The shape of the working surface.
Rubber products are used for thorough grouting of joints. Devices with a serrated base are indispensable when applying glue to the lower surface of the facing material.
Plumb lines and rules are used to level the cladding during installation operations. Drill attachments are designed to thoroughly stir the adhesive mixture before use.
Order goods for exterior and interior finishing work in the OBI store using a mobile phone application.
Homemade option
You can make a hovercraft yourself: in this case, the design of the system will be simple, but at the same time, economical.
You will need to purchase the following tools:
- Aluminum wire for clamping with a thickness of 1.7 mm.
- Small pieces of hardboard (fibreboard) used as wedges.
- Cut mounting tape plates to provide support.
The aluminum wire is bent to achieve an elongated rectangular shape. A plate is being installed to provide support. The lower parts of the wire (they will be placed below the plane of the tile) should be “bitten” on both sides. This will allow you to break it off faster later.
After installing the device between the tiles, it is necessary to twist the upper ends of the wire into a spiral. Before this, pieces of hardboard are installed under the wire to fix the materials. Once the glue is completely dry, the clamps are removed. You also need to cut off the protruding parts of the loop with wire cutters.
Installation of tiles will be accelerated and simplified even when using a self-made mechanism, which is inferior in functionality to professional models.
How to do it yourself
Homemade hovercraft are less accurate, but this is a great way to save money. Aluminum wire and metal rectangles are used as a homemade leveling system. A clamp is made from wire, and a stop is made from a metal plate. Using wire cutters, make the required number of rectangular clips. Cut rectangular stops from strong metal, and also prepare plastic wedges.
The algorithm is as follows:
- We install a metal plate perpendicularly into the clamp wire, which will rest against the tile.
- We lay the tiles on top of the metal plate.
- Then we install the plastic wedge into the aluminum clamp. If necessary, we additionally insert fiberboard scraps to secure the structure well.
That's all. The homemade hovercraft system is ready.
Useful tips
- With the help of SVP it will not be possible to eliminate every surface unevenness. Alignment is carried out on the tile located at a higher level. Empty spaces are formed under the raised tiles. This risks causing the tiles to split and crack in the future. It is necessary to carry out the cladding, first ensuring a completely level base. It is permissible to use SVP on those surfaces where the maximum level of difference does not exceed 1 cm.
- Also, using SVP it is impossible to completely avoid cracks in the tiles. Its installation must be carried out using tile adhesive with a composition that is optimal for a particular coating. If the adhesive is not suitable for the tiles, then dynamic loads risk deforming the entire structure.
- The suitable temperature for using SVP is +10°C. You also need to take into account drafts and air humidity levels. This will ensure high quality work.
- When purchasing an alignment design, you should make sure of the quality of the mechanisms supplied in the kit. Today there are many fakes of such systems on the market.
- The quality of the tile materials should be maximum - this will ensure an even coating of the cladding.
- You should not try to save on the number of installed clamps, otherwise there is a risk of weak fixation of the structure, which will deform the coating.
Before using the SVP, you need to test your skills and abilities. To do this, it is enough to connect 9 tiles into a square on the floor using a hovercraft, without using an adhesive. This reduces the risk of damaging the tiles and SVP tools during installation.
Pros and cons of SVP
Leveling kits when facing with ceramic or porcelain tiles are a good help, allowing you to significantly increase the pace of work and achieve high surface quality while reducing labor costs. Another advantage is that the thickness of the devices allows you to align gaps without using crosses.
The most important disadvantage of SVPs was their price. The smaller the tile size, the more sets will need to be used. Plus the cost of a branded tool. If the amount of work is small, a good way out of this situation may be to make structures for leveling yourself.