Installing a lighting system in a building requires considerable financial and labor costs. At the same time, open cable routing worsens the appearance of the interior, while at the same time, to install hidden wiring, it is necessary to form grooves in the walls and drill sockets for the component elements. Particular difficulties arise if it is necessary to install additional lamps after completing renovations in a room. The best solution to this problem is to purchase a modern wireless switch. It allows you to remotely control the light, adjust its brightness, and set a delay for the operation of electric lamps.
Wireless switch - a device designed for remote control of lighting Source werkel-kupit.ru
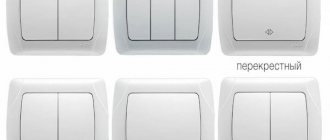
Varieties
Modern wireless light switches are classified according to the following criteria:
- Number of controllable luminaires. There are wireless devices designed for one or more groups of lighting fixtures with different numbers of bulbs.
- Possibility of adjusting the luminous flux. The brightness of the lighting is adjusted by long pressing the button of the mechanism with a built-in dimmer.
- Management method. In stores there are designs with convenient touch or push-button switches and remote controls.
Using auxiliary functions allows you to configure the delay of command execution for some time. Then, before the lights go out in the room, the user can perform a number of necessary actions.
With remote control
Simultaneously with stationary switches, remote control of individual, multiple lamps is carried out from an ordinary key fob or remote control. At the same time, 2 buttons are allocated to each channel of the latter: one turns on the electrical power and increases the brightness of the light, the second reduces the light intensity and turns off electrical appliances.
Switching the load on and off is done by briefly pressing the button, and adjusting the light flux is done by holding it down for more than one second. The factory kit usually contains parts for wall mounting.
The presence of a remote control allows you to control the lighting in the house without going to the switches, without pressing them Source elektrikexpert.ru
Touchpad
It is a screen made of crystal glass. It has an image with a visualized backlight. Typically, switching is carried out by briefly applying a finger, lighting control is carried out by holding the latter on the marked area of the panel.
Subsequently, when a person touches the surface of the device, the parameters of the capacitor in the electric field change and a control signal is produced. It triggers the switching circuit of the switch. The absence of mechanical elements in such a design increases the reserve of its functioning to one hundred thousand inclusions.
The touch panel of the wireless switch is activated after lightly touching its surface Source ixbt.online
Multi-channel radio switch
Up to eight channels can be configured, all of them connected to one lighting system. Such a device makes it possible to regulate the light in all rooms of the building. It remembers the addresses of specific remote controls and executes commands only at the individual bitrate.
This design transmits and receives information at a specific speed (measured in kbit/s), and the signal frequency (about 35 kHz) does not change at all. The basis of any remote control is a pulse generator. Its notification is modulated by a specific indication code.
The range of the wireless radio switch is up to 250 meters, the battery charge is designed for 5-7 years of active operation Source bt-energy.ru
Connection
Let's look at the procedure for connecting a wireless light control device using the Zamel RZB-04 as an example.
The product package includes the following components:
- two-channel radio signal receiver;
- two-channel four-mode switch;
- fasteners for mounting the device (dowels with self-tapping screws, double-sided tape).
The receiver is capable of operating in one of five modes:
- Inclusion. When you press a button, one or more light sources are turned on. The function is available in any of the possible key positions.
- Shutdown. The function is also activated by pressing a key.
- Monostable mode. The lighting only works when the button is pressed. As soon as the key is released, the light goes out.
- Bistable mode. The light is turned on and off alternately by successive key presses.
- Temporary mode. After pressing the key, the lighting remains on for some time. The function is useful for lighting devices operating in entrances, bedrooms, and long corridors.
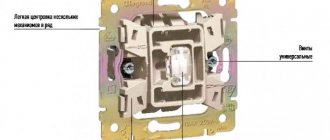
Before you start connecting the receiver, you need to understand the circuit.
Advice! If the receiver cannot be mounted in the ceiling, it is recommended to use a socket box or chandelier base for this purpose.
Connection instructions
We carry out the work in this order:
- Before starting work, turn off the electricity (using a machine) and check the network for no voltage. After this, remove the old switch.
- First, we apply voltage (connect phase and zero). We direct only the phase to the switch, but not the zero. It is necessary to obtain a phase that runs continuously and constantly supplies voltage to the receiver. To do this, turn on the transmitter or connect the conductors directly. The second option is more preferable. To create a continuous phase, we connect it to one of the conductors going to the lighting fixture. To make the connection reliable, we use Wago terminal blocks.
- We connect the phase to contact L. There is no need to pass the wire through the switch, since the device operates in constant mode.
- We connect zero to contact N. We take the wire from the junction box.
- To the OUT1 terminal we connect the phase wire going to one or more lighting devices. Here you will need a neutral wire, which we take from the junction box or receiver (pin N).
- We connect the phase wire to the OUT2 contact, going to the second group or one lighting device. We take the neutral wire in the same place as in the case of the OUT1 contact.
- We connect a pulse transmitter to the INT1 contact. This switch transmits only short signals when a key is pressed. As a result of operation, the operating mode of the first group of lighting devices changes. This feature of the pulse device allows you to control the lighting from a remote control or a stationary switch.
- We connect the impulse switch for the second group to the INT2 contact in the same way as described above.
- We connect the switch to the receiver and connect the electricity.
System programming and reprogramming
We decide on the operating mode of the system. Typically, consumers choose the standard option, which involves moving the switch to the upper position to turn it on (turning it off is done in the opposite direction).
To perform programming, perform the following steps:
- Using a screwdriver, press the PROG button of the ROP-2 device. Hold the screwdriver until the red LED lights up.
- Briefly press the top of the wireless radio switch button. As a result, the red diode will light up.
- We press the bottom of the switch and the light diode lights up again.
We reprogram the second key using the same principle as described above. The only difference is that the actions are performed with the second yet unused key.
Installation of the device
To secure the device, the supplied kit includes double-sided tape and dowels with self-tapping screws. The easiest way is to use tape, since in this case you won't need any tools. Another advantage of adhesive tape is the ability to change the location of the switch as many times as you like. The adhesive tape is divided into four sections, each of which is glued around the perimeter of the device.
When the switch is installed, install a control lamp. With its help we test the performance of the system. To check, move the key to the upper position - the light comes on. Press the down key and the lighting turns off. An indicator indicates that the switch has tripped.
Advantages and disadvantages
As practice shows, a wireless light switch is an extremely convenient design. Among its main advantages it is worth noting:
- simple installation that does not involve disturbing the finishing of the walls, chipping their surface, or laying additional wiring;
- the ability to control all lighting fixtures in the home using one control panel;
- large signal reception radius: 30-250 m, which depends on the product model, layout, load of furniture in the room;
- safety for residents: the device operates at a minimum current and in any case is not capable of harming human health.
The disadvantages of wireless devices include loss of control of the lighting system when the battery in the remote control is discharged or the Internet is disconnected (if WI-FI is used).
Wireless switches have no physical connection to switching units at all Source i.siteapi.org
Design
Based on their design and application features, dimmable light switches are divided into two groups:
- Modular design;
- Designed for installation instead of conventional switches.
Modular switches are not intended for domestic use and are mounted in power switchboards. They usually dimm entrance lighting.
The most common design of modular devices has push-button dimming. A single press of the button turns the lighting on or off, and a long press (more than 5 seconds) allows you to enter the adjustment mode and set the desired output voltage level.
Some models have additional adjustment of the maximum and minimum voltage values.
Household adjustable switches have a wide variety of designs. For the most part, they are designed for installation in standard mounting boxes for conventional switches, so there is no need to resort to special installation measures.
Application
It is advisable to purchase and then install wireless switches (instead of traditional devices), if necessary:
- Turning lights on or off at great distances. Installation of wiring is expensive, the radio switch (depending on the product) operates within a range of no more than 350 meters.
- Transferring any device. In order not to move bulky furniture and to avoid damaging the finish, the device can be installed on the wall, inside the cabinet.
- Elimination of installation defects. When moving the power line, there is no need to trench the walls; it will be enough to connect the mechanism with or without a remote control.
- Ensuring convenient use of electrical appliances. The contactless switch does not take up much space and is easy to operate.
- Control lighting throughout the house. A small functional device with a remote control provides the ability to control connected light sources from several zones.
- Saving the design idea. If the switch cannot be installed inside a niche, the wireless device will fit perfectly into any interior style.
Important! In wooden buildings, when flammable building materials are used inside the buildings, the laid cable significantly increases the likelihood of a fire. The use of distance structures will be the most economical and simple solution.
Modern wireless switches have a stylish appearance and can be installed within a few minutes Source elektrikexpert.ru
Programming
After installation, the device begins to work like a regular touch switch. To switch lighting lines over a radio channel, the device must be programmed.
Each group (key) is programmed separately, as a separate device.
So, touch the desired sensor and hold it until short beeps appear. Sound signals indicate the moment of programming we need. When held for a long time, the sounds occur in the following order: 1 short – pause – 2 short – pause – 3 short – pause – 4 short.
The pauses between series of “peaks” are very short; during this pause you need to press the desired key on the transmitter (key fob or switch) and the receiver will be programmed for this signal. After the 1st short sound, the selected signal of the transmitter is switched on and off. After 2 short pulses, a signal is set to turn on
.
After 3 beeps, a command is given to turn off
. When the switch beeps 4 times, all settings are reset and you need to rebind the transmitters.
Based on experimental data, it became known that for stable operation there is no need to assign more than 4 signals from different devices to one group.
Well, in conclusion, the promised links to Aliexpress: Switch-receiver with key fob Switch-receiver with wireless switch
Rate this publication:
- Currently 4.18
Rating: 4.2 (11 votes)
What to look for during the selection process
Before you begin selecting a wireless switch, you should determine the number of lamp groups that the device will serve. The number of channels can vary from one to eight. Low power consumption of touch and button products in gentle standby mode guarantees long-term operation of the transmitter: battery replacement is not required for two to seven years.
Additionally, it is necessary to calculate the total power of the light sources planned for connection, then accordingly select a device with optimal technical characteristics. It is definitely worth considering that models using infrared rays operate only at a viewing distance of the receiver; at the same time, radio waves can bend around all sorts of obstacles and penetrate walls inside structures. For a private home, there is no need to purchase a transmitter with a maximum power of 10 mW and a range of 0.1 km. In this case, a distance of 30 meters will be sufficient.
Popular manufacturers
Wireless electrical equipment is produced by manufacturers from various countries:
- Wookee company - radio switches with/without remote control operate with 1–6 channels and a load in each line of 0.2–0.5 kW, the radio signal receiving unit is located in the installation box, the range is up to 30 m.
- NPP "Nootekhnika" (Republic of Belarus) - switches with a touch or push-button remote control for 1-3 channels are distinguished by excellent polymer quality, the products are equipped with a radio dimmer, the range is up to 50-100 m.
- COSO company (Holland) - the receiving part of compact radio switches is placed in a regular chandelier socket and works with high power consumers ≤ 3.5 kW, the remote control range is up to 30 m.
How to connect with your own hands
Typically, the dimensions of the receiving module do not exceed the size of a box of matches. Therefore, it is easy to place it in the installation box or other easily accessible places near the installation wires. It can also be mounted at the location of the old switch (the latter must be removed).
To correctly install a wireless switch, you need to use a simple connection diagram Source strojdvor.ru
According to safety precautions, the day before connecting a wireless device, it is extremely important to turn off the electricity at the distribution panel. Connect the device to the electrical circuit in the following sequence:
- Cut the phase wire suitable for the lamp, connect the ends to Lin and Lout (in the case of a single-channel product).
- In a multi-channel model, separate the phase, then connect it to the corresponding light bulbs through the output terminals L1out, L2out, ..., Lnout.
- The common zero N is applied to the lamp lamps through the output and input zero terminals.
The contactless switch can be attached using the following methods:
- For screws into the socket of an old device or into a newly created hole.
- Glue using double-sided tape (usually included in the kit) to facing tiles, wallpaper or any parts in the interior.
The installation process of a wireless switch is practically no different from the installation of a conventional switch, the only difference is that there is no need for wiring Source electrikmaster.ru
Light control systems
Now many different systems are beginning to appear, which are gradually conquering the market of smart home components. In this chapter we will talk about the proven nooLite light control system, which was developed by a Belarusian company.
This system is a set of components that includes devices such as special consoles and power units, radio switches. Based on nooLite, anyone can assemble a lighting system with their own hands. The control principle of this system is shown in the diagram below.
The diagram shows that the lighting is controlled using remote controls that transmit a radio signal to the power units. Power units, radio switches, in turn, when they receive a command from the remote control, turn off or turn on the light of a lamp or lamp, and also adjust the brightness level. The power unit itself, the radio switch, is a small plastic box that is connected using two wires to a 220 V network and the remaining two wires to the light bulb or luminaire itself. The small size of the radio switch allows it to be mounted anywhere in an apartment or house. The fifth wire is an antenna, which receives a radio signal from the remote control.
The remote control itself is a four-button unit that can be stuck anywhere in the room. For example, such a place could be an empty space under a switch.
The remote control has a built-in lithium-ion battery that provides an operating life of more than one year without recharging. The functionality of the nooLite system does not end there. The system itself is sold in the form of kits, which, in addition to two or three remote controls, as well as two or three power units, also include the following components:
- Ethernet gateway PR1132;
- Motion sensor PM111;
- Humidity and temperature sensor PT111.
The PR1132 Ethernet gateway is a device that can be connected to a wireless router or ethernet switch. This connection allows you to turn on power units, as well as motion and temperature sensors using a smartphone and an Internet browser via a Wi-Fi network. In addition to browser-based control or control via a smartphone via a Wi-Fi network, you can develop your own applications for the PR1132 Ethernet gateway, thanks to the support of its own API. For example, thanks to the Google Speech API and the gateway API, you can organize voice control of light.
From the chapter discussed, we can conclude that the nooLite system will provide remote lighting control at the highest level, which you can assemble with your own hands today.
Switch with timer
These models operate differently than time-delay circuit breakers. In fact, they are a combination of a classic switch and a programmer (today, electronic). These smart home switches allow you to automatically turn on and off the light source at a specified time. This applies, for example, to illuminated building number signs or lamps in the general area of the building.
This type of switch can also be used to switch between day and night lighting, such as those used in shops or service points. Many devices of this type also have a built-in classic surface-mounted light switch. So, in addition to automatic control, you can also start the lighting manually.
Of course, they are rarely used in residential areas. However, they are quite useful for office or industrial premises.
Adding switches to a Yandex smart home and controlling it through Alice.
Yandex Smart Home is a universal application that works with devices from different manufacturers. Therefore, the addition occurs in two stages.
First, you register an account in the manufacturer's application and add devices there.
- Download the GRITT Smart app
- Register
- Add a device (for more details, see the instructions included with the device)
Then, in the Yandex mobile application, you download these devices and they begin to work in the smartphone, Yandex.Station and respond to Alice’s commands.
- Log in to the Yandex application on your smartphone and click on the menu icon in the lower right corner
- Select Devices - Device Management
- Click "+". From the Add menu, select Other device
- In the Popular Manufacturers section, select GRITT Smart
- Click synchronize accounts and allow Yandex to receive a list of devices
- Set up your devices. Indicate names and location
- Enter the device control menu and become familiar with the voice commands you can use to control
The setup is complete, you can tell Alice - turn on the light!!!
Buy smart speakers with Alice to control your Yandex smart home >>
Operating principles of remote devices
Modern devices that turn on/off light at a distance usually operate on the basis of emitting/detecting waves of a certain frequency (sound, infrared, ultrasonic, etc.).
Such devices usually consist of two parts:
- A receiver on microcircuits, which is installed near a lighting fixture or mechanical switch connected by power wires.
- Remote control (remote control).
Let's take a closer look at the most common types of such devices.
Infrared controlled switch
This category of devices operates on the basis of an infrared wave emitter, which is remotely controlled from a special unit connected to an open circuit. This makes it possible to turn the lamp on/off using the remote control.
A number of manufacturers (BJC, Duwi, Simon, Steinel) have found a way to avoid this problem. The models manufactured by these enterprises are equipped with controllers that convert infrared radiation into a radio signal, which allows you to increase the range and overcome obstacles encountered along the way.
In some cases, commands transformed into radio frequencies are converted back to IR at the output, which is necessary to control certain types of devices (air conditioners). Another disadvantage is the insufficient range of infrared waves (up to 20 meters), which can be overcome by using repeaters.
Devices for controlling light via radio channel
Such devices are often included in Smart Home systems, but can be used independently. In radio frequency remote switches, the command transmission process is carried out using a remote control, the signal of which is transmitted to the controller responsible for controlling the light.
A special range of radio frequencies is allocated for the passage of information (usually 315, 433, 868 MHz). The power of radio transmitters for such devices is 10 milliwatts, which is regulated by law.
Despite the small indicator, the operating radius of the devices is quite extensive: in open areas it reaches up to 100 meters, and in spaces with obstacles – up to 25 meters.
Such a range of the device (it can be enhanced by repeaters and other devices), as well as the ability to overcome obstacles, are the main reasons for the prevalence of radio switches, which are used both in everyday life and in industrial and administrative institutions.
Scheme of operation of radio frequency devices
To transmit a radio signal, the following set of equipment is required:
- battery (regular batteries);
- remote controller connected to the load and network;
- a remote control that resembles a remote control for a video or television device. There are pocket mini remote controls or key fob devices with 2-6 buttons; Such devices are used to control a small group of devices.
The remote control controller is mounted in a wall, lighting fixture (chandelier glass) or under a suspended ceiling.
Such a device is compatible with various types of lamps: incandescent, halogen, fluorescent (regular and compact), conventional and linear LED, regardless of whether they are arranged singly or in groups.
With radio control, the signal is transmitted in the form of a packet of information: it contains a command, the address of the device to which the instruction is intended, as well as a checksum. Radio waves are received by all receiving devices at once, but due to the indication of the address, only the device for which the command is intended responds.
The transmitted checksum is used to verify information: the amount sent by the transmitter must match the number counted by the receiver. If the results are different, the device does not work.
For stable, error-free operation, each command is transmitted to the transmitters repeatedly (at least three times), which somewhat slows down the efficiency of the system. Radio switches usually also have a button that allows you to turn off the remote control and control the device manually.
Control by mobile phones or via the Internet
Modern devices may provide a function for adjusting lighting using a smartphone or mobile phone. In this case, control is carried out via the Internet using special applications that are installed on a smartphone or computer. Typically, the software is part of the kit included with the device upon purchase.
Such devices have a large, almost unlimited range, but require Wi-Fi or other access to the worldwide network. Using phones and smartphones, you can turn the light on/off, adjust its intensity, and set special modes for devices (standard, custom).
Devices for turning off lights, equipped with remote controls, may also have additional functions, which include:
- possibility of adjusting the level of lighting intensity;
- a specially installed stationary button that allows you to find a lost remote control;
- equipped with a timer, light or motion sensor.
It is only important to remember that each additional option increases the cost of the device.
Installing the controller
In order for the ceiling lamp to work normally and perform its functions according to the given program, it must be connected to the control unit in the design. A chandelier, which has several sets of lamps combined into blocks, is connected using a controller. Each unit is connected to it, and then the controller is connected to a directional device that communicates with the control panel.
If the circuit of one group of light bulbs requires the use of a power supply, then the controller is connected to it directly. If a power supply is not necessary, then it is enough to simply assemble all the contacts into a single wire and direct it to the control device.
The control unit must meet the necessary parameters, so you should select it in accordance with your device. There are controllers with two, three or more channels, which allows you to make the chandelier more functional.
Often, when purchasing such a lamp, all its equipment will be located in the housing and will be hidden there when installed. But if you need to assemble the device yourself, then try to install the controller in the case to save space.
If this is not possible, it can be installed next to the switch and hidden in a recess in the wall. To be able to replace it, it is best to cover the controller with a special plastic case.
As a result, we get the following sequence of connection and operation of our entire system: when interacting with the remote control keys, it transmits a signal to the receiver, which turns on the current supply to the controller and activates the part of the control device we need, the controller, in turn, begins to distribute electricity to the necessary us light bulbs. Thus, the operation of the controller and the chandelier is carried out.
Contactless module selection options
Control can be done using a remote control, which for convenience is made in the form of a key fob.
Before purchasing a contactless limit switch, you must pay attention to the following characteristics:
- block type - the external one can be installed in place of the standard device, the internal one is mounted after removing the chandelier;
- layout - the kit includes a remote control, charging, and rarely a battery and holder;
- features of lighting lamps - the devices are compatible with LEDs, halogens and incandescent bulbs;
- operating frequency – ranges from 2.2 to 5 GHz, which determines the quality of signal reception and transmission;
- range of action – budget models operate at a distance of 10 m, luxury models – at a distance from 100 to 350 m;
- power – contactless equipment has a maximum load limit of 1000 W, but you need to select a power unit with a power 20% more than declared;
- number of clicks – the battery runs out after 10-20 touches, the sensor is designed for the number of touches up to 100 thousand;
- current rating – from 6 to 16 A;
- number of channels - modern devices receive signals from 1-8 sources.
Important characteristics are also the case material, the presence of a coding system, the permissible temperature range of use and the method of fastening.