The nuances of restoring an old door with your own hands. Ideas and methods, photos.
A person associates his home with a place of rest. Therefore, she tries to create comfort, choose an interior and a pleasant color scheme in order to fully realize this.
On the other hand, everything in our world tends to become outdated and destroyed. Our homes and their interior decoration are no exception.
By renewing anything around us, we awaken creative energies within ourselves and feel like creators.
Although most types of interior work require special deep knowledge and skills to perform them, we are quite capable of updating interior doors on our own.
Let's talk about the features and methods of reconstructing old doors in more detail.
How to make a new one from an old door with your own hands: options, photos, tips
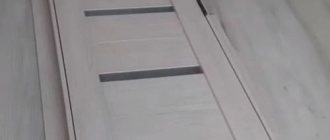
photo of an old door before and after restoration using decoupage technique
It is important to prepare it before updating the old door:
- remove the doors from their hinges and place them on a flat horizontal surface
- fold all accessories separately or prepare them for disposal if they become unusable
- if there are glass elements, carefully remove the glazing beads and then remove breakable parts
- if the door has been painted, turn on a hair dryer and gradually warm up its surface
- equip yourself with a piece of coarse sandpaper and remove the bubbles of old paint
- replace the paper with another one with a finer abrasive and go over the entire surface of the door again
- carry out final sanding with sandpaper with minimal abrasiveness
- treat the door surface with a special putty for wooden products
- After complete drying, clean the doors in 3 steps with sandpaper of different abrasiveness.
- fix the result with drying oil or stain
- then carry out those types of work that are necessary to update the appearance of the door
- if there were glass elements in it, put them first and then new beads in a fresh color/design
As examples, look at the options for updated doors in the photo.
embodied ideas for decoration and restoration of an old interior door, example 1
embodied ideas for decor and restoration of an old interior door, example 2 embodied ideas for decor and restoration of an old interior door, example 3
embodied ideas for decor and restoration of an old interior door, example 4
embodied ideas for decor and restoration of an old interior door, example 5 embodied ideas for decor and restoration of an old interior door, example 6
embodied ideas for decor and restoration of an old interior door, example 7
embodied ideas for decor and restoration of an old interior door, example 8
embodied ideas for decor and restoration of an old interior door, example 9 embodied ideas for decoration and restoration of an old interior door, example 10 embodied ideas for decor and restoration of an old interior door, example 11
embodied ideas for decor and restoration of an old interior door, example 12
embodied ideas for decor and restoration of an old interior door, example 13 embodied ideas for decoration and restoration of an old interior door, example 14
embodied ideas for decor and restoration of an old interior door, example 15 embodied ideas for decor and restoration of an old interior door, example 16 embodied ideas for decor and restoration of an old interior door, example 17
embodied ideas for decor and restoration of an old interior door, example 18 embodied ideas for decor and restoration of an old interior door, example 19 embodied ideas for decor and restoration of an old interior door, example 20 embodied ideas for decor and restoration of an old interior door, example 21
embodied ideas for decor and restoration of an old interior door, example 22
embodied ideas for decor and restoration of an old interior door, example 23 embodied ideas for decor and restoration of an old interior door, example 24 embodied ideas for decor and restoration of an old interior door, example 25 embodied ideas for decor and restoration of an old interior door, example 26
Preparatory work
Before decorating interior doors, they are prepared. The following tools are used for this:
- construction adhesive;
- tracing paper;
- press.
The door needs to be removed. Then examine the canvas for defects. If the old box has scratches, they need to be repaired with wood putty. You can decorate the canvas with photo wallpaper. If the doors are peeling in some places, then an adhesive mixture is applied, tracing paper is applied, and pressed. An adhesive mixture is also used to seal cracks and microcracks. If the defects are large, chips with a fine dispersion are added to the adhesive composition.
How and with what you can update the color of old wooden doors: ideas
a girl paints an old wooden interior door with white paint.
After you have completed work on restoring the surface of the old interior door, choose a new color for it.
Among the ways that can help you in this moment, we note:
- Painting with stain, paint or opening the wooden surface of the door with varnish. Remember, for the best result, brush along the fibers, then all the cracks will be filled with dye.
- Accents on moldings, or painting protruding door parts with contrasting or similar colors. If such elements are missing, glue them from wooden or polyurethane slats and paint them.
- Artistic painting, coloring using stencils. The method is suitable for creative owners who want to bring originality to their interior.
- Pasting wallpaper, large drawings on paper, pieces of fabric. Decoupage. In this case, follow all the requirements for fixing the material on the surface of the door - soak it with water, glue, and treat it with a stream of hot air on top.
- Stained glass painting on glass. If you are good at drawing or have some interesting stencils, buy special stained glass paints and decorate the glass elements of your old door.
- Pasting vinyl stickers. Note that this method saves you time preparing the old door. In other words, you can not even remove it from the hinges, but immediately glue the vinyl elements.
Self-adhesive film
Self-adhesive film is made of PVC. This is a durable, waterproof and wear-resistant material in different colors .
It can be either plain or with a pattern, including one imitating wood, stone, or leather. The film is also divided into glossy, matte and mirror. To stick a door with film, you need a small number of tools and mandatory preliminary preparation of the surface.
Stages of gluing a door with self-adhesive film:
- The previously prepared sanded surface is degreased.
- The sheet of film is measured according to the size of the door. When gluing, it is important to remove the protective layer of the backing gradually, smoothly moving from top to bottom.
- Use a roller or spatula to smooth the film so that there are no bubbles or creases.
- Along the perimeter of the door, the film is additionally fixed with a hot iron (be sure to iron it through a cloth) or a hairdryer.
The resulting air bubbles can be removed with a regular sewing needle, which is used to carefully pierce the film, after which the surface is further leveled with a spatula.
Before covering the doors with self-adhesive film, it is worth knowing some features. There are many advantages, but the main ones are that the material can withstand high temperatures, it is easy to maintain and durable. But preparing the surface for this method takes a lot of time. If this process is not given due attention, then all the flaws will be visible through the film, and bubbles and creases will also form. In addition, the film is not capable of masking large errors - it is, first of all, a decorative element for a smooth, but not aesthetic, surface.
How and with what can you update varnished doors?
a man removes the old varnish coating from the doors to restore them according to a new design.
To carry out restoration work, remove the old varnish from the door in one or more of the following ways:
- sandpaper
- grinding machine
- chemical solvent
The first method was discussed in the previous section. The second method will significantly speed up the process of removing the old varnish coating. And the third has one nuance - the varnish can selectively remain on the door leaf. Therefore, be sure to polish the latter.
After removing the old layer of varnish, sanding and drying the doors, decide on their new design, for example:
- apply new varnish or laminate,
- paint it the color you want,
- stick wallpaper/photo wallpaper or other self-adhesive tape with imitation, for example, natural wood,
- apply hand painting, copying a specific drawing, or using a stencil,
- decorate the door by gluing bulk cereals - rice, buckwheat. Be sure to apply a layer of varnish on top for better fixation of the material.
Skin tight
Alternative and practical finish. It is used more often for lining a wooden entrance door from the inside. The decorative role is played not only by the tight-fitting fabric itself, but also by the buttons that are used for fastening. Usually these are small carnations with beautiful caps.
In order to decorate a door with eco-leather or dermantine, you need to purchase a filler: padding polyester or thin polystyrene. It is glued to the door leaf, only then the finishing coating is attached.
Please note that the leather is folded over the edges of the door. Only then do the nails be driven in. You can choose an interesting geometric pattern. To achieve a beautiful design on top of the upholstery, secure the rivets tightly together. Here you can save money and stretch strong fishing line or thin copper wire between the studs. The surface of the door will acquire three-dimensional patterns.
How and with what can you update veneer doors?
photo of updated old veneer doors
One of the most common problems with veneer doors is swelling of the panel in certain areas. Therefore, first prepare it, carry out restoration measures before updating.
The following will help eliminate the problem of canvas swelling:
- Iron. Heat it on medium and iron the swollen surface of the door folded on a horizontal stand.
- Wet rags. Moisten a piece of cloth with water and spread it on the problematic surface of the door. After a quarter of an hour, remove and wait until dry.
- PVA glue. Fill it into a syringe and carefully insert it under the swollen surface of the door. Smooth the area with a dry cloth.
To eliminate cracks and chips on an old door made of the material in question, stock up on strips of veneer of a similar color.
- Cut strips that match the parameters of the surface being repaired.
- Cut off the excess with a scalpel after applying it to the site of the chip/crack. Please note that the fibers of the patch should be perpendicular to the door being restored.
- Treat the door leaf with a special putty and wait until it dries completely.
- Use double-sided tape to secure the veneer strips.
- Sand the joints.
When your old door has only minor scratches and chips, treat them with wax:
- liquid
- pencil
In the first case, drop a couple of drops into the crack and immediately wipe with a dry cloth to remove excess. Before doing this, be sure to clean the door from dust and dirt, and also sand the surface.
In the second, tear off a piece from the wax pencil, knead it in your palms and stick it on the problem area. Wipe off the mark with a rag. Only do this on a previously cleaned and prepared door.
The following will help you update a prepared old veneer door:
- varnish
- dye
If you masked chips and scratches on the door with wax, then remember that varnish and paint will not cover them. Or they will linger on it for a short time and then fall off.
Stained glass
Stained glass windows are mainly found in churches, which evoke admiration and peace among parishioners. You can try to recreate the look of small stained glass windows on old canvases. In this case, it is necessary to have glass inserts on the door. To make the task of creating stained glass easier, you can buy ready-made drawings and decorate the glass, or prepare everything yourself, but only after the necessary preparatory work has been carried out.
In order to make a stained glass window, you need to purchase acrylic paints and special metal strips that will help create the illusion of a frame. When applying the design, the glass must be in a horizontal position so that the paint does not flow off. After everything is ready, insert the glass into the panel and secure it with glazing beads.
How and with what can you update paneled doors?
old panel doors after updating with paint, options in decor
Panel doors in the interior look interesting. However, it is not always convenient to treat their worn surface. We won't go into details. Let's look at restoration options.
Successful solutions:
- painting in several colors highlighting protruding areas
- gluing wallpaper in segments, adhesive tapes along the contour, on panels
- decoupage of individual segments
- varnish coating
The cardinal method is to disassemble the door panels and replace them with laminated hardboard. To do this, you cover the door frame with it and select the color especially carefully when gluing its ends.
If there is glass in the door, decorate it with special paints or imitate stained glass. Stencils for decoration are also suitable.
Artificial aging
Artificial aging will add additional luxury to the doors of connoisseurs of antique styles.
This effect can be achieved in several ways, but the easiest way is to use craquelure varnish. It covers the paint with a network of tiny cracks.
A good option would be to use a quick paint job with a dry brush or sand the paint applied in several layers.
In this case, you must not forget about the decor around the door. An antique door will in no way become a worthy decoration for a room in modern styles.
How and with what can you update painted doors?
a man paints old previously painted interior doors.
Your first task is to remove the old paint from the doors and prepare them for restoration work. Their sequence:
- decide on the location of the door in space - either lay it on horizontal supports, or remove it from its hinges and leave it vertically,
- use a spatula to go over the entire surface and remove the layer of old paint,
- sand with sanding paper,
- treat with a special primer for wooden surfaces,
- let dry and sand again,
Seal off areas of the door that you do not plan to paint or open with varnish.
Video description
If you are wondering whether it is possible to restore interior doors that are over a hundred years old, watch this video:
Restoring cracked panel doors
If the panels dangle in the grooves of the main planks, the canvas will have to be disassembled and reassembled and glued.
The panels are held in place by a tongue and groove joint lubricated with glue, and are sometimes tightened with dowels or self-tapping screws, the caps of which are closed with wooden plugs. To restore the integrity of the door, you need to do the following:
- The removed canvas is placed on the edge, the plugs are removed and the screws are unscrewed;
- separate the frame elements and inserts;
How and with what can you update paper doors?
updated paper doors in the interior
Renew paper doors with lightweight materials that will not weigh them down and cause the fabric to tear. For example:
- self-adhesive film
- decoupage
- gluing individual elements, for example, paintings, three-dimensional drawings
- painting with paints
- stencils
Features of the material
To finally convince the reader of the rationality of using self-adhesive film for door decoration, the properties of the material should be examined in more detail. It has many advantages, but also has several disadvantages.
By and large, self-adhesive film is a polymer material, or rather a thin PVC film, on the back side of which there is an adhesive substance.
How and with what you can update an old door frame: ideas, photos
a man measures the level of a door frame during its restoration.
You should remember about the restoration of a door frame when you are updating an old door leaf. Of course, fiddling with the first one is less convenient, since it cannot be removed.
The door frame processing technology is similar to those discussed above about doors. Choose carefully the shades of paint and stain, as well as the color of the self-adhesive tape and wallpaper, so that this area on the wall is in harmony with the updated door leaf.
Below are a number of interesting door frames after DIY restoration.
updated door frames to match the interior and doors, example 1
self-adhesive door frame decorative elements, example 2
self-adhesive door frame decorative elements, example 3
Video description
How to disassemble the paneled fabric, watch the video:
- grooves and tenons are cleaned of old glue and putty, the remains are sucked out with a vacuum cleaner;
- if necessary, remove paint and polish each part - it’s easier to do this separately than on the whole canvas;
- insert the panels into place, lubricating all locking joints with wood glue;
- the assembled canvas is compressed with clamps and left until the glue dries;
- insert dowels into the holes.
Assembly of paneled fabric Source mdveri56.rf
How and what to decorate a door beautifully with?
a beautifully covered interior door after renovation.
Among the common ways of decorating an old door is gluing a new covering entirely or in fragments.
For this you will need:
- wallpaper
- textile
- leather and its substitutes
- photo wallpaper
- metal rivets, beads
- patchwork
- cut fragments of a picture, for example, a world map
To stick this or that material, select an effective adhesive, for example, PVA glue, special for wallpaper, tape, double-sided self-adhesive tape.
Paintings
Unusual pictures can be painted using the door as an unusual canvas. These can be light ghostly landscapes, bright still lifes, cartoon or comic book characters, funny animals or images of cities.
How to beautifully wallpaper a door?
the old door is covered with wallpaper after renovation.
The main thing is to follow the wallpapering technology.
- First, prepare the door leaf for renovation. The technique was presented in the first section of the article.
- Decide on the color and texture of the wallpaper.
- Apply special wallpaper glue to the surface of the door and attach a paper decorative element.
- Level the result with a dry cloth.
- Trim any overhanging edges with a utility knife.
- Wait until the wallpaper on the door is completely dry.
If desired, add decor:
- molding
- design features, for example, small shells and cut nets, glued on top and covered with paint
In addition to regular wallpapers, the following are popular:
- photo wallpaper depicting three-dimensional objects/paintings
- decoupage
- self-adhesive tapes
Vintage
Vintage is done using the decoupage technique. There are different methods and instructions for decorating using the vintage technique. The base is prepared as for decoupage - painted and sanded.
The panels are sealed. Old magazine and newspaper sheets, sheet music, notebooks are used - anything that can arouse interest. You can cover the panels with a thin black baguette profile. Everything is varnished.
Vintage can be decorated with pearl-like beads, lace, bows, flowers and whatever you want. The result is a luxurious, exclusive door.
How to update an outdated metal front door?
old metal entrance door after renovation
Metal doors also tend to become morally and physically obsolete. If you set out to update them, keep in mind that the approach and methods will be different for the external and internal parts of the front door.
So, the internal part will be updated by the following solutions:
- drawing a picture using a stencil
- art painting
- full door mirror
- dermantine upholstery
- self-adhesive film
- veneer
- laminate
And for the outside of the door the following are suitable:
- veneer
- MDF panels
- laminate
To secure any material to the surface of a metal door, you will need an adhesive liquid, for example, liquid nails when working with wood.
Painting
Plain paint will be the easiest way to create a beautiful or unique door. This could be repainting the entire canvas in one color or creating an original pattern, selecting a color scheme in the form of a bright accent spot, or creating a door that replicates the decoration of the walls, applying patterns or ornaments.
Note!
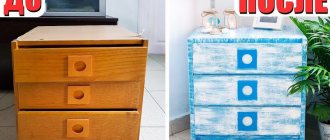
DIY furniture decor - 145 photos of exclusive and modern design ideas
DIY pot decor step by step: simple decorations and decor options for pots made from different materials
This solution can be used as decor for a metal door in the entrance area or as a canvas dividing rooms.
How to beautifully decorate an old nursery door yourself: ideas, photos
DIY updated door in a children's room
A children's room is an area of creativity, leisure and intellectual work for a child. Consult with him before you start updating the door to the nursery.
Even better, involve your child in the process.
For inspiration, we will add a number of ready-made solutions for decorating the door to the children's room.
options for decorating doors to a children's room after updating them, example 1 options for decorating doors to a children's room after updating them, example 2
decor options for doors to a children's room after updating them, example 3 decor options for doors to a children's room after updating them, example 4 decor options for doors to a children's room after updating them, example 5
decor options for doors to a children's room after updating them, example 6 decor options for doors to a children's room after updating them, example 7 decor options for doors to a children's room after updating them, example 8
options for decorating doors to a children's room after updating them, example 9 options for decorating doors to a children's room after updating them, example 10
decor options for doors to a children's room after updating them, example 11
decor options for doors to a children's room after updating them, example 12
decor options for doors to a children's room after updating them, example 13
Textile
Fabric or leather will look very unusual on the door. Ideally, they will be remnants of curtain fabric or upholstery upholstery.
For a delicate Provence or decoration of a bedroom or a child's little princess, exquisite lace is used.
How to beautifully decorate an old kitchen door yourself: ideas, photos
updating an old kitchen door with mosaics
To make the kitchen door transformed after restoration, choose a concept for its decor. It can be:
- painting
- opening with varnish
- decoupage
- gluing wallpaper and any adhesive surfaces
- art painting and stencils
- stained glass elements
- mosaic and gluing of loose, small elements
See below for implemented ideas with updated kitchen doors.
embodied ideas for restoring an old kitchen door in the interior, option 1
embodied ideas for restoring an old kitchen door in the interior, option 2 embodied ideas for restoring an old kitchen door in the interior, option 3 embodied ideas for restoring an old kitchen door in the interior, option 4
embodied ideas for restoring an old kitchen door in the interior, option 5
embodied ideas for restoring an old kitchen door in the interior, option 6 embodied ideas for restoring an old kitchen door in the interior, option 7
Care Tips
In order for a veneered door leaf to last as long as possible and look like new, it must be properly looked after. It is forbidden to clean the veneer with abrasive materials, otherwise small scratches will remain on the coating and it will quickly lose its gloss. It is not advisable to install veneered doors in such a way that direct sunlight always falls on them. This will cause the cladding to fade; veneered doors will have to be updated quite often: apply varnish or paint.
It is allowed to wipe the veneer with a damp cloth, but it must be thoroughly wrung out. Literally washing with water; using the structure at high levels of humidity is prohibited. You also need to be careful when washing the floors, because the bottom of the door frame and sash will suffer from this.
Veneered doors, if properly cared for, will last for decades. Only in this case they cannot protect themselves from minor scratches and defects. Therefore, it is necessary to have an idea of how to reconstruct a veneered door with your own hands. This can be easily accomplished using available materials and basic tools.
How to beautifully decorate an old bathroom door yourself: ideas, photos
options for updated bathroom doors in the interior
The bathroom is a special place in any home. Here we bring beauty and relax after everyday work. I want the door to have its own style.
If you're currently upgrading, consider these ideas:
- drawing a picture through a stencil
- self-adhesive film
- imitation of stained glass and paneled elements
- combination of colors when painting fragments
- mirror interior
- photo wallpaper
For more details, see the implemented ideas for decorating the bathroom door in the pictures below.
design options for bathroom doors after a do-it-yourself update, example 1 design options for bathroom doors after a do-it-yourself update, example 2 design options for bathroom doors after a do-it-yourself update, example 3 design options for bathroom doors after a do-it-yourself update, example 4 design options for bathroom doors after a DIY update, example 5 design options for bathroom doors after a DIY update, example 6
bathroom door design options after do-it-yourself renovation, example 7
design options for bathroom doors after a do-it-yourself update, example 8 design options for bathroom doors after a do-it-yourself update, example 9 design options for bathroom doors after a do-it-yourself update, example 10 design options for bathroom doors after a do-it-yourself update, example 11
design options for bathroom doors after do-it-yourself renovation, example 12
So, we looked at the features of restoring an old door in a house on our own. We got ideas from looking at photos of finished ideas. We learned how to properly prepare the door surface for renovation.
If you feel the potential but don't have the courage to take the plunge, start with dollhouse elements. Your child will appreciate creative solutions for decorating doors, and you will gain courage and realize your desires to update them in your home.
Decoupage
An original and creative way to decorate doors with your own hands. Moreover, you can use it to decorate absolutely any surface. The work works especially well on high-quality wood. And vintage style is back in fashion.
Before applying pictures, the door must be treated with a primer or acrylic paint (if you need to level it, putty will do). After this, the creative process can begin.
For decoupage, special napkins (available in craft stores), wallpaper or fabric are usually used. In addition you will need:
- scissors;
- PVA glue;
- brushes, sponges, rollers.
First, the elements are applied to the surface, the exact location is noted, and different options are tried. Glue them using PVA (replacing glue is not recommended). You need to glue the picture from the center, smoothing out the bubbles and folds.
Door decor with drawings
Decorating doors with different shades
After drying, be sure to coat the surface with varnish.
Many people use various photos for decoupage. The technique remains the same, it is enough to simply separate the bottom layer of paper from the photo so that the gluing is reliable. You will have to do the same with the wallpaper.
See alsoLarge clock in the interior: photos, views
When is restoration necessary?
A wooden structure, for all its charm, may not be liked by the owner, or significant defects may be found on its surface. In such situations, there is no need to purchase a new door, because wood can be easily restored. At the same time, it is quite possible to cope on your own.
Cases when restoration of interior wooden doors is required:
- chips, cracks, scratches are noticeable on the surface, the integrity of the coating is compromised;
- Unsightly spots stand out against the background of the finish;
- the panel area has cracks;
- the surface has darkened;
- the appearance is lost due to damaged cladding;
- if glass and mirror inserts and other decorative elements are damaged;
- and finally, in the case when you just want change.
If interior or entrance doors have a complex design with decorative carvings or other elements, then it is better to contact professional wooden door repair specialists who will carry out the work efficiently and quickly. Otherwise, you can update it yourself using our tips.
Mirror
Mirror inserts in doors are one of the most functional ways of decoration. This is a good choice for small rooms, because reflective surfaces visually add volume to the room. At the same time, such a door can replace a separate wall mirror or a mirror panel in a wardrobe.
Ready-made decorative mirrors are difficult to use to decorate a door, so reflective acrylic panels are useful in this case. Their advantages are ease of processing and variety of colors. If you still have fragments of old mirrors, you can use them too - make a mosaic out of them.
Photo: nonovinkimebeli.ru
Molding
To make the simplest and most budget door luxurious and elegant enough for classic interiors, use molding. These are ready-made elements that imitate stucco molding, bas-reliefs and other decorative inserts.
The simplest molding is made of polyurethane or foam, so it can simply be glued or mounted on liquid nails. And to make a beautiful aged door, be sure to paint it over the top and use contrasting colors or gilding for details.
Photo: evrookna-mos.ru
Mosaic
Mosaics for interior decoration are good for their uniqueness and aesthetics with ease of execution. Instead of buying a ready-made drawing, you can post a whimsical abstraction yourself. And no one else will have such doors anywhere else.
To create a mosaic, glass, ceramics, small tiles, acrylic, pebbles and shells, and any other little things are used. The main thing is to draw a sketch in advance and think over the location of all the details, because even chaotic ornaments will be neat and harmonious only if you think about them in advance.
Photo: artelle-doors.ru