Darkened comfort, which was fashionable and in demand in interior design not so long ago, has practically lost its relevance. It has been replaced by elements of luxury and comfort, filled with light and volume, which are fully provided by the original “bleached oak” color. In combination with natural wood, it is the trend of the season and a bright word in the design of the room.
What is the “bleached oak” technique? In essence, this is the same painting of wood, but using special technologies. Due to the fact that furniture elements, panels or other wooden products are varnished, a clear, pronounced texture and noble matte finish inherent in expensive types of wood are clearly visible.
From cheap pine to noble oak - my experience in brushing and artificially aging wood
It started with the fact that I had nowhere to put my countless dearly beloved cast iron frying pans.
The result of diligent Google smoking was a stand for frying pans, which I made, spending a little over 500 rubles. So, I purchased two furniture panels made of pine measuring 200*1000 mm, a metal brush and a 0.5 liter bottle of non-aqueous stain Novbytkhim “Stained Oak” .
The store warned me that the plastic cap on the bottle is not the strongest and may leak from under it. The seller put the bottle in a bag and wrapped the neck with tape. As a result, she got home without any problems))
The remaining tools - a jigsaw, a piece of sandpaper, a sponge, a nylon brush and gloves - were already available.
✴️✴️✴️ PREPARING THE BOARD FOR PAINTING ✴️✴️✴️
We measure the required length of the shield and cut off the excess .
We clean the cut with sandpaper and begin processing. We use a metal brush - we move it with even force along the wood fibers, not forgetting about the ends. As a result, the soft part of the tree is removed, and the remaining hard fibers form a beautiful relief.
I cheated a little and used a wire brush to speed up the process. For speed, it is better to choose a stiffer and wider brush (with a cup).
Each board, 77 cm long, took me 20 minutes.
Next, use sandpaper and then a hard nylon brush to remove the burrs . The main thing is not to overdo it and not to sand the resulting relief.
It’s better to use a nylon brush for a drill or angle grinder for this, but I couldn’t find it on sale here. It took me 10 minutes for both boards.
The board is ready. This stage was the most dusty and labor-intensive - this is how much garbage I collected from the floor:
✴️✴️✴️ PROCESSING BOARDS WITH NOVBYTHIM STAINED OAK ✴️✴️✴️
apply the stain in one layer, since I don’t want a very dark board. If desired, painting can be repeated to obtain the desired color. The interval between layers is 2 hours.
You can paint with a brush or swab - I had a dish sponge. I’ll say right away that the idea was so-so - pretty soon the sponge began to fall apart, so it was better to choose a brush or a gauze swab.
So, apply stain to the board
The stain absorbs well into softer wood, but not into hard fibers. As a result, the contrast and texture of the aged board appears.
The stain is non-aqueous, so it smells like paint (xylene). You can work indoors like I do, but then there will be glitches, you will have to ventilate everything well, keep in mind))
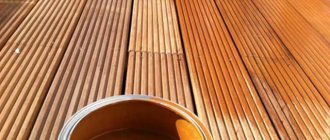
We leave the boards to dry, and after 12 hours we get this result:
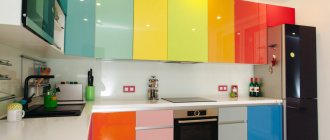
And here’s what these boards look like on the kitchen wall, already loaded:
All the work from start to finish took me 2.5 hours, not counting installation of the stand on the wall. Please do not judge strictly - this is my first experience, and my tools are far from ideal. However, I already like the result!
❤️❤️❤️ RESULT ❤️❤️❤️
Despite the smell, the stain turned out to be quite suitable. It is cheap, waterproof, does not cause wood to swell, does not require varnish protection afterward, and most importantly, it helped me achieve the desired result. Therefore I recommend it!
Application technology
Doors can be painted either manually or using a spray gun. This process can be described in the following sequential steps:
- Preparation. The door leaf is thoroughly washed beforehand. This is to remove any grease or oil stains. Do not leave large pieces of dirt on the surface. If the doors have been painted previously, then it is advisable to completely remove the old layer of paint. To speed up this process, you can heat it with a hairdryer.
- Primer. When the canvas dries, it is coated with special solutions. They help strengthen the wood structure. Experts recommend using deep penetration formulations.
- Treatment. Many experts recommend going over the top layer of doors with a wire brush. This will allow you to give the desired texture, making the surface more attractive and natural.
- Application of the solution. The first coat of paint should be thin. It is important to let it dry. To create a more attractive effect, you can use a mixture of varnish and enamel. When the composition has dried, apply the paint with a brush. It is important to move only in one direction in order to create parallel strokes. After they dry, they are treated with sandpaper, giving the desired texture. Then the whole thing is covered with a layer of protective varnish.
Painting doors to look like bleached oak requires some experience. Therefore, before carrying out such operations, you should practice a little.
Good evening! Tell me how to competently solve the situation? The loggia was covered with clapboard 2 years ago, primed and treated with colorless stain in 2 layers. Now the color is like this (I attach a photo). How to make the color of bleached oak, is it possible? Thank you very much for the answer!
Dennis Denny
After you have stripped everything back down to bare wood, take white paint and dilute it 3-4 times until it shows through when applied. For reliability, the top can be secured with colorless acrylic varnish.
- Likes: 1
- Save
Dennis Denny
But even then, you will end up with something like a milky tint. If you want it just like in the photo, you need to experiment with light gray paint.
- Like
- Save
Stages
If the master has chosen pine as a material for the floor or other elements of the room, then you need to take into account the properties of this wood when processing it with stain and varnish. The steps for proper operation are:
- Buying high-quality “correct” boards.
- Grinding.
- Primer.
- Impregnation with stain.
Many carpenters and woodworkers love pine because it is easy to work with, light weight, and low cost. In addition, this wood is available everywhere.
When finished with transparent materials, the pine surface seems to radiate warm sunlight. This effect is rarely found in other breeds.
Fewer problems arise when the task is to preserve or emphasize the natural color. But if you need to give it darker shades, then the result of impregnation with stain will often be unpredictable. This is due to the fact that, due to resin substances, pine wood has different absorbency in certain areas. The unevenness of this process makes the surface mottled or with stripes that differ in tone.
Because of this drawback, you should not refuse to process such material. You can tint pine boards evenly if you know the technology and how to do it correctly. This will require only a few simple steps and a little more time to prepare the wood.
Let's start tinting
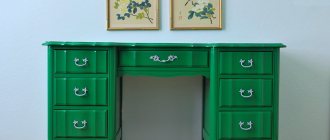
There are several ways to tint. Paint by hand, spray or dip. The most common method that can be successfully used at home is painting with a brush. So, the old wooden bedside table is ready for its color transformation. And this is what she has to do:
- Cleaning and sanding
. Before painting, it is important to level the surface and make the wood structure as smooth as possible. An ordinary sandpaper will help with this. - Applying stain
. Using a roller or brush, spread the paint evenly over the wood along the grain. And to remove excess, simply rub the stain with a dry cloth or swab. - Paint drying
. This stage is extremely important. It is better to be patient and wait until the layer dries thoroughly. Only in this case can you evaluate the final result of the work and the resulting shade. If it is not saturated enough, you can apply the stain again. - Varnish coating
. This completion of tinting prolongs the wear resistance of the colored wood product.
DIY wood tinting
– the process is quite labor-intensive. However, if you love creativity and are not afraid to try new things, then this type of work will certainly bring maximum pleasure. And bright wooden interior items will delight you every day!
Uniform tinting of pine: 4 steps for a perfect result
In retail outlets, there are often many other related species in stacks of finished pine boards, but sellers do not make much distinction between them, calling everything “pine.” Such species are very close in botanical classification, but still, they are not quite pine and they have slightly different properties. That is, they will absorb stain differently. However, this is also observed in pure pine: even the same board can have a different resin content and different absorbency in different areas. What can we say if the boards chosen are from different trees.
Unpredictability is something to consider when starting to use stain for this breed. To determine its level and boundaries, test samples are used. This is the most reliable method to check the quality and parameters of the material.
No. 2 Paint filling method
This method works best on unsanded wood with a slightly rough surface (such as a wooden fence). With its help, wood can be given a rustic look and an antique effect.
Step by step:
- Clean the wood with soapy water and a brush and leave to dry.
- If your paint is too rich, thin it with thinner.
- After this, pour some paint onto the wood surface, and then take a scraper and spread the paint over the wood.
On an unsanded, that is, not completely flat, wooden surface, the paint layer will not be the same everywhere. A little more paint will flow along the depressions and less on the bulges, that is, in some places the white color will be more saturated, and in others more transparent, which will create the effect of antiquity.
You can see the result of painting a wall using this method above.
Choosing the “right” boards
Pine has significant knotiness, but in our case this is part of its attractiveness and uniqueness. Regular, non-rotten, hard knots, which are an integral part of the structure of the board, are not a hindrance, but “dead” such elements of wood should be avoided. That is, the rotten ones, those that stagger, fall out. Also, boards with accumulations of these formations near the core or with knots around which the wood grain lines sharply change direction should be rejected.
But even boards with these disadvantages are quite suitable for use. The problem can be solved in a simple way: by securing the falling knots with epoxy glue. Do not be afraid that over time its adhesive properties will weaken and the board element will fly out or crumble. This glue is based on epoxy resin, which is extremely durable after drying.
Waxing furniture after bleaching wood
When treating a surface with wax, it must be applied evenly and then rubbed into the surface with a cloth or steel wool. At this stage, special emphasis is placed on the texture of the wood. The applied layer of wax must be allowed to dry, after which re-processing is carried out. Unabsorbed wax is immediately removed from the surface of the wood.
After the microcrystalline wax dries, the surface of the wood acquires good impermeability, and the pronounced “white oak” structure gives the furniture an ultra-modern look. Therefore, by using the “Bleached Oak” technique, you will make your interior stylish and interesting without any special expenses.
Like
- Tweet
Like and get a discount!
Proper grinding
A step-by-step proven method on how to properly sand a pine board:
- to begin with, you can take coarse-grained discs for a grinder and, changing them in descending order, finish the procedure with disc No. 180;
- then, additionally sand it manually using a block with sandpaper No. 180. It is necessary to move along the fibers: this will remove marks from the sander;
- The final stage is sanding the ends with sandpaper with grit No. 220. This will prevent them from excessively absorbing the stain.
Pine primer
Experience in processing pine wood shows that applying stain to its clean surface leads to uneven tone and staining.
The carpenters conducted an experiment with test samples to determine which primer composition would provide better color uniformity. The surface was treated with shellac for furniture, a factory primer-conditioner for wood with uneven absorption and a polyurethane composition. The latter showed the best result.
After applying and drying the composition, the surface is lightly sanded in the direction of the fibers with a sponge with abrasive No. 320 and a liquid stain is applied.
Tinting wood with stain: step-by-step instructions
To obtain a neat coating and a decorative effect, it is necessary to properly treat the surface. If the operating technology is violated, the tinting will fade too quickly. Or there will be unsightly stains on the base, which will significantly spoil the overall effect of the treatment.
Rules for applying the composition yourself:
- The old coating is removed, you can apply sanding;
- It is necessary to get rid of greasy stains; the surface is completely treated with white spirit or gasoline. The resin is removed if necessary;
- The stain is preheated, the product must be applied in a thin layer, application begins from the top of the object, layers are applied step by step to obtain the desired tone of the base.
Next, varnish is applied to the dried surface, several layers are made, each is applied after sanding the base with sandpaper.
To obtain a neat coating and a decorative effect, it is necessary to properly treat the surface.
How to create different shades
To create the required shade, mixtures of different stains (dark and light) are applied to test samples. That is, if a darker shade is required, then a darker one is added to the light impregnation, and vice versa. Next, the mixture is applied to a test sample, which must be created strictly from the same batch of wood as the main material being processed. If this is a wall or other object, then you can select several areas and experiment on them, or take a risk and take similar wood, but keep in mind that the result may differ, since trees of the same species in our case may have significant differences in terms of their saturation with resins .
Impregnations for conifers of different shades can be mixed to achieve the desired tone. Another way to achieve the desired result is to add a special concentrator paint to the stain. Lightening can be accomplished by adding a colorless liquid to a darker one.
When purchasing, you should pay attention that there are different color options for stain on sale. In addition, there are a large number of paints for this substance. You can choose several individual color-changing concentrates or a set of them. Some retail outlets offer to create the required shade based on customer samples.
Choosing the color of the lining
We found out how to paint the lining; it’s time to decide on the shade of paint. Many of the shortcomings of the room can be advantageously turned in the other direction if you “play with color” a little. Need to expand your space? Choose paint in white or light beige shades. But remember that they are susceptible to rapid contamination. A dark tone, on the contrary, will visually reduce the size of the room.
You cannot make the ceiling, walls and floor contrasting in color. It is best to leave natural wood in the bedroom, and choose paint in subdued tones to decorate the office.
Wood preparation
Before applying stain, the surface must be moistened and dried. This will prevent the fibers from deforming immediately after processing. After these two stages, the wood must be sanded. The grit size of the grinding tools should be 120 – 150. After cleaning from dust, grind with an abrasive of 150 – 180 grit and then thoroughly clean it from dust again. Desirable wood parameters: temperature > +15 C°, humidity 8 – 12%.
It is highly advisable to treat resinous pine wood with a product to remove resins.
How to apply with a brush
It is advisable to use flat brushes: the wider the working part, the better - this will reduce the risk of layers of impregnation overlapping each other, which leads to uneven shade. Apply first along the length, then along the width, and then again along the length. That is, with cross-shaped movements. After 1 – 2 min. the remains are leveled with the same brush, but clean and dry - this additionally levels out the difference caused by the uneven absorption properties of the wood. A rich, even layer of impregnation left on the surface will provide a spectacular appearance to the treated surface.
Painting while preserving the structure
How to paint the lining to change the color but maintain a pronounced wood grain? You can use the brushing technique, which in this case involves processing the lining in several stages:
- First, pigmented oil, wax or glaze is applied to the surface.
- Then the selected varnish or paint for the lining is taken in a small amount, applied along the entire length of the board and gently shaded.
- After 10 minutes, use a soft, lint-free cloth to remove most of the oil.
The result of such manipulations will be a bright and expressive wood pattern, emphasized by the pigment remaining in the grooves and recesses. This method is great when using lining in different interiors: country, Provence and many others.
Final varnish treatment
It is advisable to select a varnish from the same company for a stain from a certain manufacturer. Working with water-based varnishes has a peculiarity: this type of product should be applied with a sprayer (spray gun), and not with a brush or roller. This is due to the peculiarities of their fluidity: when applying water/alcohol varnishes manually, it is very difficult to ensure uniformity, while other types of such coatings are thick and viscous, allowing them to spread over the surface more evenly.
Scope of use
Based on the European Regulation C 2354 “Transparent coatings for wooden floors and varnishes made from them, minimum requirements and tests” of March 1, 2009, there are three categories.
| Category | Description |
| A | Intermittent use of the surface, infrequent loads of walking in shoes (rooms for receiving guests, kitchens, bedrooms). According to the wear resistance classification for laminated and linoleum coatings, it is similar to classes 23 and 31. |
| IN | Constant use of the surface, walking in shoes (lobby, corridors, school premises, universities, office rooms). Compliance with 32-33 wear resistance classes. |
| WITH | Increased exploitation (places with a large flow of people, supermarkets, hospitals, cafes). According to the wear resistance classification for laminated and linoleum coatings, it is similar to classes 33, 41-43. |
Regulatory document C 2354 does not contain information about the maximum possible level of impact from furniture wheels (tables, chairs). This is due to the fact that the ability to withstand the load of the rollers is directly dependent on the species and grade of the wood material.
There are several types of parquet depending on the type of use
When operating sports facilities and halls for physical activity, it is usually necessary to use varnish coatings that maximally protect the flooring from wear.
For example, the Petri series has an alkyd-based varnish composition with SPAR GYM technology, which is non-slip; in addition, it is able to protect the coating during intensive use, and does not interact with water during wet cleaning.
Which class of parquet is better to choose?
Important Features and Tips
Coniferous wood tends to yellow over time, so you should choose light or gray stains. It is recommended to use only varnishes that are resistant to fading.
Experts recommend first testing the impregnation on a prototype and coating the surface with varnish. That is, process the sample completely to the end: this way the result of the combination of stain and the selected varnish will be visible, which will allow you to check whether the tone created as a result of the “collaboration” of these two substances is suitable for the master.
Wood, and especially its conifers, has a certain degree of unpredictability in the light of the work we describe. There is a possibility of tonal color changes occurring over time.
Containers used during operation must be as clean as possible and consist of identical material. If impregnations are mixed, then this must be done extremely carefully in the same container. If it consists of metal, then its impurities may slightly change the tone.
To create tones in the light or gray range, you should select wood that is as close to them in color as possible. In addition, the result largely depends on the structure of the tree. For example, it is influenced by the quality of the solid rings of this material.
Color spectrum
The main task of a paint coating is to create a durable coating and give it a color effect.
Using colored varnish has several advantages:
- protection from external factors;
- decorative function;
- the service life of the material increases.
Homeowners often purchase glossy varnish for their interiors - this applies to rooms that are quite dark. The clear look is one of the few examples where the natural structure of wood is emphasized through the application of varnish.
For example, by covering a parquet board with walnut-colored paints and varnishes, you can get several different color effects. It can be beige, red, black or dark brown.
Home owners also like to use tinting compounds. They cover doors, furniture, and parquet. The wood gains an unsurpassed appearance, as well as resistance to mechanical stress. Blue stains, fungus and mold will not form on this surface.