The bathhouse is one of the obligatory attributes of life for many residents of our country. Naturally, the issues of its arrangement and, in particular, the problems of finishing remain relevant. For many years, wall tiles in bathhouses were extremely rare or absent altogether. The only option that was considered normal was to cover the bathhouses with wood.
Many people think that it is almost impossible to come up with something new in this area. This opinion is wrong. Today, with the emergence of new trends in design and the spread of new types of baths in Russia (hamam, thermal baths, Japanese baths, etc.), the situation has changed. Let's talk about whether there is a place for tiles in a bathhouse and, if so, what criteria should be used to choose this material when purchasing.
How to finish the slopes of the front door
Dmitry Kuznetsov
Author of the article: editor-in-chief of the project, repair expert.
Finishing slopes with your own hands: all the secrets of working with special materials.
There is a reason why slopes are made; this beautiful frame complements the main detail - the front door. You just need to understand how exactly the slopes of the front door are finished. To do this you should consider:
Slopes have more than just a decorative function. These door elements also become additional insulation, and very effective, since the plane covers the joints where the door frame adjoins the wall.
Equipment
Additional elements
Here are the parts included in the cladding kit:
- Narrow long panels are the main element from which the cladding is assembled.
- The corner is external, usually 3 m long.
- The corner is internal, has the same length.
- The starting plank, into the protrusion of which the lowest cladding panel is placed. Installed above the plinth and above window/door openings. Typically 3.8 m long.
- J-section plank. This part covers the ends of the panels if the cladding is open. For example, if the siding is not installed along the entire perimeter, or there is an extension adjacent to the house, which it was decided to leave unfinished. In addition, the J-plank is used as a frame for gable trim, and if desired, it can also be used as a finishing strip.
- Planks with T-shaped and H-shaped sections. They are used to design joints between siding panels - mainly when extending them along the length. The length of one part is 3 m.
- Near-window slats. They are used in cases where windows and doors are recessed into the wall. Length - 3 m.
- Platbands. They are used for finishing openings, the filling of which - a window or a door - is located in the plane of the outer surface of the wall.
- Window tides. Before purchasing, you should make sure that you have not already installed them: these parts are usually supplied complete with metal-plastic windows.
- Drain plate. An additional accessory designed for installation above a window.
- Wind board.
The best way to finish slopes - materials
For the front door, slopes are made of various materials. Sometimes it is enough to tidy up existing slopes.
The door is held tight. Then it would be advisable to level the slopes with plaster; it is especially important to strengthen the corners. Similar work should be done both in the hallway and from the entrance.
Finishing the slopes of the entrance door with plaster
To make plastered slopes look neat, you should paint them to match the color of the door.
The walls of the house are thick, then the slopes should be wide. In this case, gypsum board is used for finishing. Then the walls will become warmer, and the joints between the wall and the door frame will be securely closed. Such slopes always look neat.
If the owner likes this option, he can wallpaper the drywall or cover it with paint. The main advantage of drywall is that it saves the homeowner from the painful task of leveling plaster. After all, you will need the ability to use the rule, after which you will also need to clean the wall. And then you still have to apply a decorative coating on it.
Finishing the slopes of the entrance door with plasterboard
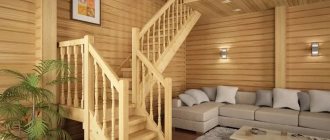
Sometimes slopes are made of natural wood. Of course, if this option fits into the door design. Materials such as wood combine perfectly with any interior design. Wood tinting can be easily changed if treated with modern preparations.
The tree lasts for a very long time, while all its original decorative qualities remain the same.
It’s even easier to cover the slopes with laminated fiberboard-based lining. This is a great alternative to wood:
Finishing the doorway with clapboard
But on the outside, finishing with clapboard is not a well-thought-out decision. After all, from the outside of an apartment, and especially a mansion, such material will not last long.
You can use ready-made PVC panels as a finishing option. Manufacturers offer these products in any color and shade, as well as suitable width. This type of finishing looks aesthetically pleasing, respectable, and most importantly, attractive. This material lasts for a long period, although it is better to install PVC panels only on the inside of the home.
Finishing the doorway with PVC panels
If you purchase ready-made slope parts, you can install them yourself. Another polymer option is suitable for finishing the inside of the door - plastic lining. It is also easy to choose such products to match the color of the walls in the hallway.
Suitable for covering slopes and chipboard panels. This material is usually used if the walls being treated are very thick. Although this material has already lost its former popularity, because more advanced finishing options are offered on the market. And they are much easier to install, look more attractive, and have better properties.
H-profile fastening
The H-profile is designed to connect siding planes in the longitudinal direction. Its installation is no different from the installation of internal or external corners, it is carried out simultaneously with them and is subject to similar requirements.
The only caveat may be the location of the H-panels, which can be installed symmetrically, distributing the length of the panels into equal sections, or, to save material, using the full size of the panels on one side and trimmed parts on the other.
Most often, the first option is used on the front sides of the house, and the second - on the reverse, invisible sides.
What technologies are used to finish the slope?
The installation of the entrance door slopes is carried out after the installation of the door itself, when all the cracks between the wall and the door jamb are sealed. At the same time, precariously held pieces of the old coating are knocked off the slopes. All crumbling areas are thoroughly cleaned.
Plastering method for finishing slopes
When the owner decided to level the slopes and plaster them, he should work in this sequence.
First stage. The surface is well cleaned and then primed. It will be better if in two layers. However, the second primer is applied only after the first layer has completely dried.
Installation of a corner for plastering slopes
Second phase. You need to find out how smooth the slope angles are. Let's say deviations from the norm are discovered. Then this circumstance will need to be taken into account when installing reinforcing corners. These parts are used to level the corners if minor deviations from the vertical are detected.
Third stage. Perforated corners are placed at the corners of the slopes. Are used:
It is best to plant the corners with finishing putty, which is applied to the corners of the slopes with a spatula. The excess solution that appears will begin to appear through the holes in the corner. They are removed with a spatula.
Fourth stage. The surface of the slope may be too uneven. Then there is no need to rush to install perforated corners on the corners. First, you need to set the direction from the door jamb by securing a narrow strip of drywall. Its width is up to 1 cm.
Fifth stage. The points at which it is necessary to first apply putty, then plaster, are determined. These landmarks are the installed reinforcement corner and the edge of the plasterboard strip.
Sixth stage. Using a trowel, putty (prepared composition) is thrown onto the wall. They start working from the floor. When a sufficient amount of putty is stuck on the wall (the area will immediately be treated about a meter high), a rule is used to level the putty.
Here the role of beacons is played by a perforated corner, which is fixed on the corner, and a strip of drywall, which is fixed along the door frame.
Seventh stage. The next area is processed in the same way: the solution is poured and leveled. Until the treatment progresses to the top of the opening.
Eighth stage. The ceiling area of the opening is processed with much greater difficulties. A wide spatula is used to apply the putty, and a short rule is used for leveling. Next, the putty is applied to the section of the wall located above the doorway. The upper part of the metal corner is also covered with putty.
Puttying walls near the opening
Ninth stage. Slopes treated with putty are not touched yet. Let them dry.
Tenth stage. The dried putty layer is covered with a primer. The prepared surface is refined using the following coating options:
Prices for popular types of putty
How to trim door jambs with plasterboard
This type of work does not cause any particular difficulties. Drywall is much easier to work with than plaster. But here, too, finishing putty is used, although you can use a special gypsum-based adhesive instead of this composition.
Source
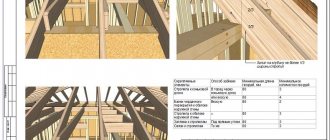
Preparing to install Docke trims
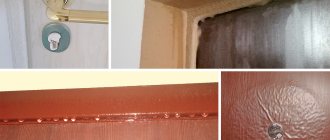
Before starting work, the openings are protected from moisture penetration: waterproofing of window and door openings can be made of aprons made of galvanized steel, aluminum foil or roofing felt (Fig. 22). Additionally, Stroymet specialists recommend the use of silicone sealant.
Rice. 22. Waterproofing of window and door openings: a - flush with the wall; b - protruding from the wall; 1 - sheathing; 2 - silicone sealant; 3 - lower apron made of roofing sheet; 4 - the same, lateral; 5 - the same, upper; 6 - aluminum tape or sealant; 7 - upper L-shaped apron made of roofing sheet; 8 - the same, side
Regardless of what apron material you use, their installation should begin from the bottom strip of the opening.
- Apply silicone sealant to the sheathing. Next, nail the bottom strip of the apron on top of it (fastening with nails along the upper edge of the strip will allow, if necessary, to bend the strip and place ordinary siding under it, thereby ensuring water drainage).
- Having installed the apron on the bottom strip of the opening, proceed to install the side strips. Fastening is done with nails at the same distance from the opening that was chosen when installing the lower apron.
- Complete the fastening of the top strip by installing the apron.
Important: All waterproofing elements must be installed on top of each other - this is the only way to ensure normal water flow. If the waterproofing is not mounted flush with the wall, but along the protrusion of the sheathing of the opening from the wall, you should use L-shaped aprons made of roofing sheet with a narrow edge extending over the entire thickness of the sheathing
The latter are fastened in compliance with the rule: the side aprons cover the bottom one, and the top one covers the side ones.
If the waterproofing is not mounted flush with the wall, but along the protrusion of the sheathing of the opening from the wall, you should use L-shaped aprons made of roofing sheet with a narrow edge extending over the entire thickness of the sheathing. The latter are fastened in compliance with the rule: the side aprons cover the lower one, and the upper one covers the side ones.
Important: Under no circumstances should the siding backing/profiles be attached directly to the window/door unit. In this case, when replacing a window or door, you will be forced to partially remove the siding.
Finishing the slopes of the front door - compare and choose the best of 6 traditional options
No matter how chic the door you install for yourself, without a decent frame it will look, to put it mildly, unpresentable. The finishing of the entrance door slopes is no less important than its installation. But often people have no idea how to decorate the slopes of the front door. Let's talk about how to refine a doorway, discuss the pros and cons of the most popular materials.
Often it is the slopes that are responsible for the presentable appearance of the doorway.
How and with what you can decorate the slopes of the front door of your home
If you are faced with the task of how to finish the slopes of the front door, you can find step-by-step instructions in this material and in the video in this article, and we will try to analyze to the smallest detail all the pros and cons, which are often forgotten to be mentioned in advertising brochures.
Option number 1. Good old plaster
Finishing doorways with cement plaster is deservedly considered the patriarch of the trend. This decoration of door slopes appeared along with the doors themselves.
A well-plastered and finished slope will last for decades; it is not afraid of temperature changes, humidity, or cold. The plaster will fill all voids and uneven areas. To ruin such a slope, you need to hit it with a hammer. If you are not going to influence your doors so radically, then you can rest assured about the rest. To refresh the surroundings, the plastered slope can be repainted, wallpapered, or covered with the now fashionable reflective film with a 3D effect: a smooth and durable surface will withstand everything.
But plaster also has a downside. Of all the finishing methods, plastering slopes is the most labor-intensive and dirty process.
Plastering the slopes of entrance doors is not an easy task.
Of course, if you install the beacons correctly, buy good plaster mixtures and quality tools, then things will go much faster. Although believe me, if you have never plastered doorways with your own hands, this kind of design is not for you. In addition, plaster is, in fact, stone, only artificial, and you should not expect any serious insulation from such a finish.
There is one more professional nuance. Even on a well-leveled slope, you can only glue wallpaper, and then after two layers of primer. For high-quality painting, plaster alone is not enough: the surface will still have to be additionally puttyed and sanded, and puttying and sanding will take no less time, effort and money than plaster.
Plastered doorways look simple but elegant.
By the way, if you plan to finish the slope with natural or artificial stone, then plaster will be the best and most reliable base; you do not need to putty it.
Option No. 2. Slopes of the entrance door made of plasterboard
The next most reliable option is finishing the doorway of the front door with sheets of plasterboard. This type of cladding is also called dry plaster.
Drywall attracts with its speed and relative ease of installation, plus, if necessary, door jambs can be closed almost completely. If we roughly break down all the work, then briefly finishing the front door opening with sheets of moisture-resistant plasterboard consists of 5 stages:
A hollow plasterboard slope has another undeniable advantage: it can be filled with insulation, thereby increasing heat and sound insulation. In this case, it is better to use foam plastic as insulation. There is an option to blow foam inside, but you need to act carefully: it can squeeze out the sheet when it expands. It is advisable not to use mineral wool or any other type of wool to insulate entrance door passages: condensation will cause it to become damp and useless.
Painted gypsum board slope.
Many people blame drywall for allegedly breaking easily, but believe me, if you install a good frame with a gap between the profiles of no more than 200 mm, and when installing it with glue, you don’t have to worry about the strength of the slope.
Option number 3. MDF
Finishing entrance door jambs with MDF boards is currently considered perhaps the most common. This is a fairly tough and at the same time beautiful material; such panels behave well under temperature changes and in conditions of high humidity.
When choosing MDF panels, there is a small nuance: to decorate the inside of the front door, you can take any sheets, but for external slopes, especially if the doors go directly to the street, you should buy only moisture-resistant ones (the back of them has a greenish tint), otherwise within a year all the beauty will bubble up.
In this case, we are only interested in laminated panels; there is no point in taking regular ones and then painting them separately. The line also includes panels covered with natural wood veneer. The price for them is about half as high as for laminated ones, but such slopes are practically indistinguishable from expensive wood.
A backlit slope made of veneered MDF is not only beautiful, but also convenient.
As for self-installation, it’s not a problem to buy and install extensions, trims, mounting angles and other things. Essentially, you are dealing with a constructor. First, a frame of wooden blocks is constructed around the perimeter of the opening, and panels are already attached to it.
A relatively expensive tool will require a miter saw or at least a jigsaw, as well as a drill and a screwdriver. A hammer, tape measure, etc. are usually in the arsenal of any home craftsman.
The only disadvantage of MDF slopes is the price of the material itself. The only thing more expensive than such cladding is natural wood of elite species; by the way, it is installed in the same way, but it is better not to undertake it yourself: the risk of spoiling it is too great.
Setting up a door frame made of MDF is not as difficult as it seems.
Option No. 4. Lining
The price of a good wooden lining is approximately equal to the cost of MDF, but in this case you get entrance door slopes made of natural wood. This design of the doorway looks quite solid, but there are nuances.
Any lining is mounted on a wooden sheathing, which means you must have enough space for such sheathing. Accordingly, it is problematic to make small slopes from lining.
Natural wood is a good material, but rather capricious. In extreme conditions of entrance doors, wood must be covered with antiseptics, fire retardants and other protective compounds.
Slopes made of wooden lining.
Previously, all linings were varnished, but now design experts do not recommend varnish. The fact is that most people associate varnished lining with balconies and garages, and the front door is still the face of the home. It is best to buy an oil-wax impregnation and apply it. The result is pleasing: fast, beautiful and inexpensive.
Option No. 5. PVC
Slopes made from finishing PVC panels can be installed within 1 day, plus the price of this material is affordable for almost everyone, but decorating a doorway with plastic has a number of negative aspects.
Plastic PVC slopes are installed easily and quickly.
You can break through a hollow thin panel by simply leaning on it. As practice has shown, even the highest quality plastic panels on good sheathing in the area of entrance doors last no more than two to three years.
Under the plastic you need a wooden or metal sheathing. Theoretically, such a panel can be glued to a plastered slope with liquid nails, but if you have a good plastered slope, then why do you need plastic?
In addition, according to fire regulations, it is extremely undesirable to install plastic in the entrance area. In the event of a fire, it will actively melt and emit choking, acrid smoke, thereby blocking the exit.
Although, on the other hand, plastic is ideal as a temporary solution to the problem. And when you have enough funds, you can quickly dismantle it and install solid entrance door slopes made of high-quality MDF on the same sheathing.
PVC panels have a fairly wide range of decor.
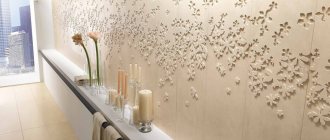
Option No. 6. Decorative polyurethane linings
If you dream of seeing your doors decorated with luxurious stucco, we recommend paying attention to decorative polyurethane overlays. Visually, such a finish cannot be distinguished from good stucco, and the performance qualities of such slopes are an order of magnitude higher. The only problem is that the price for such jewelry is quite serious, plus you can’t glue an overlay to a crooked base. In other words, you will first need to level the slope with plaster or drywall, and then glue the polyurethane beauty onto it.
If the slopes are decorated with luxurious stucco, this indicates good taste and status of the owner.
A few words about the decorative finishing of door slopes
The final decorative finish is applied only to a solid, prepared base; accordingly, we can only choose between plaster and drywall.
Rules that cannot be ignored
Siding installation rules
- You only need to purchase galvanized screws, as they do not rust from moisture.
- Screw the fasteners at right angles; any distortions reduce the strength of the structure.
- The holes for self-tapping screws have an oblong shape, ensuring the mobility of the fasteners when expanding. Do not tighten the screw completely, leave a gap of 1 mm.
- The gaps between the profiles allow the structure to expand without problems when heated.
Installing siding near window openings is a complex area of cladding; to know how to properly complete the finishing, you can watch the video tutorial.
Conclusion
In conclusion, we would like to note that it is better for DIYers to stick to materials designed for sheathing. These are MDF, wood and PVC. If you are confident in yourself, then you can take a swing at drywall. But we recommend leaving plastering of slopes to professionals.
MDF door slopes are one of the most affordable for DIY installation.
Source
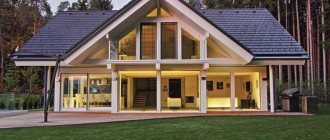
We improve the entrance door opening: finishing options
The front door is an important element of the interior of the house. The image of the entire building depends on its appearance and the quality of finishing of the opening. The most popular are metal doors. This popularity is due to the fact that it is reliable and easy to care for.
Today there are many different options for designing a doorway. One of the important points in repairs are slopes. The doorway is finished with different materials. If the work is carried out correctly and with high quality, the new coating will be beautiful, reliable and will become a worthy decoration of the hallway interior.
What are door slopes?
Many people don’t even know what slopes are, accepting cash for them. But this is a mistaken opinion. Because slopes are not a finishing material, but part of the wall around the door frame. Special attention is paid to the choice of their cladding, because they decorate the room and set a certain style for the interior. Therefore, regardless of the type of door chosen, it is necessary to pay attention to the slopes. In order to properly design the slopes, you need to choose the right finish.
Reasons for finishing
Repair work may be required for various reasons. But most often the doorway is finished after installing the iron door. Metal sheets are quite heavy and bulky. When installing them, the appearance of the adjacent walls is spoiled. There is a need to refine the doorway. More often, finishing of the front door from the inside is required. If the damage is serious, it is better to entrust the repair of the doorway to a specialist who understands this matter.
Installation of additional elements
General diagram of installation of the starting bar and external corner
First, install the starting strip - place it 4 cm above the level of the siding. Subsequent starting panels are mounted with a gap of 5 mm. These gaps are needed to avoid overlaps. An end strip is installed under the cornice.
To prevent precipitation in the form of rain and snow from entering the corner joints, a special sealant is used. This material is attached with a self-adhesive side to the sheathing, and is fixed on top with siding.
After installing the additional elements, you can begin. Installation of panels should begin from any corner of the building. The bottom row is attached with a lock to the previously installed starting bar - subsequent rows are attached to the previous ones in the same way, using lock connections. Do not forget to control the horizontality of the planks using a building level.
Finishing methods
The doorway is decorated using different materials. Plastic, tiles, plasterboard, MDF and more can be used for cladding slopes. But in order to properly trim the doorway of the front door, it is necessary to take into account the material of the door leaf, the width and degree of damage to the slopes, as well as personal preferences. You can finish the opening after installing the iron door yourself, but it is better to entrust this task to professionals.
Laminate
Even inexperienced craftsmen can use laminate. It has a chic appearance, is environmentally friendly and therefore does not harm the environment. The only drawback of laminate is its poor resistance to high humidity. Therefore, for exterior finishing it is better to use a more reliable material.
Before finishing uneven slopes, it is necessary to assemble a frame to which the panels will be attached. Smooth surfaces can be sheathed with laminate by gluing onto polyurethane foam. Decorating the front door opening in this way is popular due to its ease of installation and affordable price.
MDF panels
Entrance door openings are often finished with MDF panels. Installation is simple and quick. To install the panels you will need dowels, foam, a chisel, a jigsaw and liquid nails. MDF can have different types of external cladding. Therefore, it is necessary to decide in advance which panels will be used for finishing. They can be laminated, painted or veneered.
Laminated panels look chic and have excellent technical characteristics. Veneered panels are considered the most durable. Therefore, finishing the front door opening is most often done with this type of panel.
Before you start working with MDF panels, you must carefully take measurements. The distance between internal slopes is less than between external ones. Finishing the entrance door with MDF panels is carried out only after removing the old lining of the slopes. The big advantage of this material is that the finishing of doorways with MDF panels can be done by hand.
Decorative rock
Decorating the front doorway with decorative stone looks original and beautiful. This material gives the surface an attractive appearance. Before laying decorative elements, it is necessary to make markings. You can lay out the material on the floor in the order in which it will be laid on the slopes. This will allow you to understand how the stone will look on the wall and decide on the pattern.
The material has an uneven shape, so small defects will appear organically. It is necessary to prepare the surface in advance. The artificial stone is fixed with glue. Work starts from the bottom. Installation can be done in two ways. With the first, seams of a certain thickness are left between the decorative elements, and with the second, they are completely absent. Particular attention should be paid to the corners that are trimmed and sanded.
Decorative stone can have any shape. When choosing this finishing method, you need to consider how well this material matches the overall interior design. Doors framed with bricks look unusual and beautiful.
PVC panels
You can trim the doorway of the front door with PVC panels. The material is affordable and has many advantages. But its fragility does not allow the use of plastic for exterior decoration of entrance doors. This is precisely its main drawback. The slightest careless movement can lead to damage to the material. A large selection of panel shades opens up wide possibilities for implementing any design solutions. Thanks to this, doorways in different rooms are sheathed with plastic.
Today, the most popular are PVC panels that imitate the structure of wood and fabric. The plastic is glued to the wall with special glue, or attached to a wooden frame. The joint is closed using a special corner.
Cement screed or plaster
The simplest way to finish slopes is plaster or screed. A solution is applied to the surface of the wall, and then it is leveled and all unevenness is eliminated. But in order for the surface to be smooth, it is necessary to place beacons. Special strips are fixed vertically with alabaster. After the beacons have dried, the distance between them is filled.
It will take several days for the screed to dry. The big plus is that with the help of plaster you can eliminate any defects on the surface of the walls. After it dries, it is painted with acrylic or facade paint, and the inside is covered with wallpaper. And decorative plaster can also be used. With high-quality and correct plastering, the slopes look neat and beautiful.
Most often, this method is used to finish a wide opening. Because other finishing methods may look rough and ugly. But in order to properly plaster the surface, you must have certain skills and knowledge.
Plasterboard finishing
One of the popular types among modern doorway finishes is plasterboard cladding. The surface sheathed with this material has an attractive appearance, and if installed correctly it will last a very long time. Smooth surfaces can be covered with plasterboard using special glue. A frame made of a metal profile is first attached to the curved surface, and then it is sheathed with sheets of plasterboard.
The availability of the material and simple installation contribute to the fact that plasterboard cladding is popular for decorating the front door.
Source
Types of siding for windows
There are two types of siding for framing windows: vinyl and metal.
Of the two, vinyl is the most popular. And this is due to a number of factors:
- Less weight
- Affordable price
- Does not allow moisture to pass through
- Easy to clean
- Durable when used correctly.
- Aesthetic and neat.
Whereas metal siding can boast a long service life.
Considering that it is installed on the outside of the wall, it is deliberately covered with a layer of plastic.
However, it is easy to create various kinds of reliefs on plastic. Including repeating the shape of the wood.
Tools that may be useful for window framing
- Screwdriver and attachments for self-tapping screws.
- Metal scissors.
- Knife for cutting vinyl siding. Basically, it doesn't cut. They draw a line along the siding, and then break off the outer piece.
- Hammer.
- Tape measure, rulers and corner ruler.
- Laser or water level.
- Chalk for marking.
It is better to purchase all profiles and fasteners immediately along with the rest of the siding.
Because then you may not guess with the color. If the windows stand out a little, it's not so bad. But it’s visible.
We create a drawing and mark the following points on it:
- Width under frame
- Slope width
- Window frame parameters
- External sides of slopes
After calculations, add another 15% of the length of all materials for cuts and bends.
Installation features
1. Self-tapping screws must be made of stainless steel or galvanized.
2. Self-tapping screws must be screwed in only at right angles.
3. When screwing in the screw, the cap does not need to be embedded in the material. Since this is an external design, there should be some play. Otherwise it will come off under the influence of the wind.
4. If you plan to install a flashing, it should bury all the screws with the side.
5. Slopes from 20 cm are formed with a j-profile, tiles and external corners at the edge of the recess.
6. In Europe, windows are recessed to a depth of 20 cm. For these, a special window strip is used, the edge of which is hidden by the finishing profile.
7. If the window is flush with the wall, it is decorated using siding, platband or j-profile.
8. When designing an arch, a j-profile is also used. Often in a plastic version - for smooth bending.
Preparing slopes for windows
If there are cracks or holes, they must be plastered. If this is not done, the finishing will then disappear.
You also need to coat them with a deep penetration primer so that they do not absorb moisture from the air.
Before installing the sheathing, you need to calculate where the batten will be. It can be located vertically or horizontally.
Depending on how the panels and profiles will be located on the slope.
1. Measure the bottom of the frame
2. Set aside a distance on the platband equal to its width. From it measure a distance equal to the bottom of the frame. And also another segment equal to the width of the casing.
3. Cut off 45 degree corners on both sides and cut off the front side.
4. The side panels go through the same procedure.
5. The top bar remains intact.
9. You can alternate platbands and j-profile.