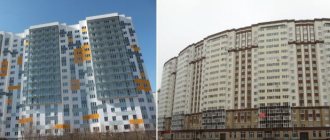
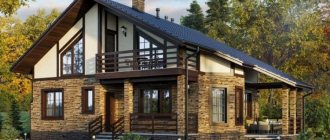
Wooden houses are popular in country clubs and villages. They are relatively inexpensive to build, and look presentable and modern. The only caveat is that the interior decoration must match the exterior design. Eco-friendly materials in natural shades will blend seamlessly with a wooden frame. Cozy kitchens in wooden houses are subject not only to a certain style, but also to safety requirements. Therefore, it is important to carefully think through all the details before starting construction. Examples of what a kitchen in a wooden house can look like, design, photos in our article today.
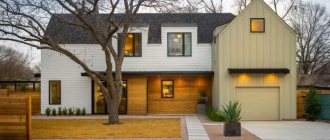
Beautiful and modern design of a wooden house Source houzz.com
Nuances of kitchen design in a wooden house
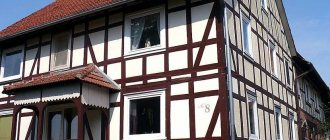
A wooden house is usually built from logs or timber. It is worth noting that the material from which the house is built plays a very important role in the design of the kitchen:
- The kitchen in a house made of timber is warm and cozy, so it is very important to initially think through the cooking area and dining room with all the nuances. It is necessary to take into account that all materials and pieces of furniture, equipment must be suitable for the log house; very often natural or artificial stone is used.
- A log house is most often built from pine, which darkens over time and this should definitely be taken into account when choosing a color scheme for the kitchen. It is also worth noting that most modern styles would be out of place in a kitchen in a log house; it is better to choose some modern elements, such as a bar counter.
How to zone a kitchen
Typically, the kitchen in a log house in a country house is combined with the living room. For a comfortable stay, designers delimit the room into two zones. You can do this in several ways:
- Turn the sofa with its back towards the set
- Install a bar counter
- Decorate the arch
- Put up some pillars
- Choose different types of wood for the living room and kitchen
- Lay out pillows on the sofa and armchairs, lay down a carpet, hang curtains in the common area
- Play with color contrast in furniture or accessories
Another unusual technique for delineating a room is lighting. These may be lamps of similar models. Or a colored LED strip along the headset. A multi-level ceiling will also visually divide the kitchen-living room in half. A combination of several methods will create an original room design.
Beams and a bar counter for zoning the kitchen-living room Source pic2.me
Finishing materials for the kitchen
Regardless of whether it is a standard kitchen or a living room kitchen in a wooden house, it requires high-quality finishing materials that meet the following requirements:
- Durability;
- Hygiene;
- Easy and simple care;
- Water resistance;
- Resistant to temperature changes.
Small kitchen design
If the owners own a small summer cottage, then arranging a kitchen-living room does not make much sense. Often, cooking is done outdoors using a barbecue. Let's look at some recommendations for kitchen decor:
- It is better to do without massive finishing, since in a small kitchen it will look too bulky. Block house elements are more suitable for spacious rooms;
- The amount of furniture should also be controlled so as not to turn the kitchen corner into a pantry. It is better to place a wide countertop with spacious cabinets, a stylish washing bowl and open shelving;
- Some elements of the furniture set should be decorated in a “handmade” style, since this is extremely appropriate in wooden buildings;
- To compensate for a cramped space, you can use transformable headset items. These include sliding tables, roll-out shelves and cabinets.
The dimensions of each element must correspond to its operating conditions. If the country house is used only for rare visits on weekends or holidays, then some of the household appliances can be abandoned altogether. A single-compartment refrigerator and a small hob will be enough. Perhaps you can leave a compact dishwasher so that the owners do not have to clean the kitchen on the weekend. Thoughtful design gives you the opportunity to restore order in the blink of an eye. And since style is the basis of a cozy interior, we will next consider the most popular options.
Flooring options
One of the most practical and durable flooring options for a kitchen in a wooden house is tiles. This material tolerates moisture well, has high wear resistance, and is easy to maintain.
It is worth noting that the tiles on the floor will be quite cold, which is not very comfortable for walking especially barefoot, but if desired, you can create a “warm floor” system.
Laminate and linoleum are also considered good flooring options; it is only recommended to choose a waterproof laminate.
Floor and ceiling finishing
The issue with flooring is quite simple to solve. Both laminate or parquet, as well as carefully planed boards, are suitable. Tiles that imitate natural stone will also look good. The ceiling is somewhat more difficult, since the wiring has to be masked. It is not worth doing an open method of laying it in the kitchen, since this room has a rather aggressive environment for communications. It is better to hide it in a corrugated pipe or behind trim on the frame. This could be the already mentioned drywall or clapboard paneling.
Styles for the kitchen in a wooden house
The design of a kitchen in a wooden house can be done in various styles, but the most suitable and most popular are:
- Provence is one of the most cozy and sophisticated kitchen styles in a wooden house. This style contains rustic simplicity, aristocratic chic and romance. For a kitchen in this style, the best choice is a pastel palette and the presence of various decorative elements.
- Scandinavian is one of the lightest styles for a kitchen in a wooden house. This style is an excellent option for a country kitchen in a small wooden house; you just have to choose practical materials and pieces of furniture that are easy to keep clean.
- Retro is one of the popular styles for decorating this kitchen. It is worth noting that it is not recommended to use decorative items in the pop art style, because they can ruin the whole harmony. Also, this style requires the use of several tones and you can create some kind of bright accent.
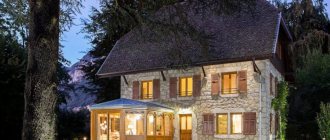
- Country is the most suitable style for a kitchen in a wooden style, because it requires a large amount of wood in the design. It is advisable that finishing materials and pieces of furniture be made of wood; it is also better to use old-style furniture.
- Eco style is quite often used to decorate kitchens, especially in wooden houses. It is worth noting that this style requires the use of only natural and environmentally friendly materials.
Interior wall decoration
The most organic option for the interior decor of a wooden house would be the same finish. This will create an image of an environmentally friendly living space. Only here you will have to take into account the features of a humid kitchen microclimate, which is destructive for untreated wood material. The most popular finishing options are the following:
- Painting;
- Plasterboard covering with decorative inserts;
- Use of wall panels;
- Using natural stone in combination with wood.
Let's look at each of them separately:
- Painting
Refers to budget methods of finishing planes. To take advantage of this simple option for protecting walls, you need to properly prepare the surface. Clean it, sand it to a shine, then treat it with a primer and special impregnation. It is better to carry out the painting procedure using a sprayer. When the surface is dry, it can be coated with several layers of paint and varnish.
Advice. To preserve the natural shade of wood, it is recommended to use transparent materials. If the surface to be treated is characterized by stains, then the choice can be made with tinting varnish.
Experienced designers can use several shades of the color palette at once to design a stylish kitchen. But even in this case, you cannot do without impregnating the wood with an antiseptic.
- Sheathing with plasterboard
When there is no possibility or desire to put the internal planes in order, then in such cases they resort to the help of drywall. The use of this material is possible without necessarily leveling the surfaces. For cladding you only need to install a durable frame or profile. In the future, plasterboard sheets can be covered with various finishes: from plaster or paint to decorative tiles. At the same time, the practical material can be used not only for walls, but also for the ceiling surface. It reliably hides communications, heat and sound insulation materials.
- Wall panels
To preserve wood in the kitchen interior, you can use the usual lining. You can also attach MDF panels to the frame. Their advantage over plasterboard is that these materials do not require finishing. They are initially self-sufficient because they have a characteristic woody texture. The combination of painted material with the texture of natural wood will also look stylish. However, some owners replace wooden products with modern PVC panels. This allows you to save on repairs and at the same time make your life easier. Because plastic panels are easy to cut even with an ordinary knife and are easy to maintain. They are also able to imitate the texture of natural wood.
- Wood and stone
The use of beams or wooden boards for wall cladding is strongly encouraged if the kitchen boasts a large area. When there is no need to conquer every area. The block house is popular, evoking nostalgia for the village. Its advantage over a log house is the prevention of the occurrence of various cracks. Modern products are pre-equipped with a tongue-and-groove system, which makes installation easy and simple.
To correctly place accents in the kitchen, you can select an area near heating appliances. To do this, it is recommended to use some type of stone. It can be either natural or artificial material. Among the stylistic decor options, mosaics and paintings are popular.
Furniture and kitchen appliances
The interior of a kitchen in a wooden house depends entirely on the chosen style, but also requires certain rules when selecting furniture and appliances. Cabinet furniture will look most harmonious and stylish in a kitchen in a wooden house.
Based on color and type, you can choose from:
- White kitchens;
- Natural or artificial wood;
- Furniture in dark muted tones;
- Black furniture with a glossy or matte finish.
These criteria should be chosen relative to the overall style of the kitchen. It is worth noting that for this kitchen it is not recommended to use furniture with plastic or chrome elements.
The table can be chosen in any shape from solid wood or with a glass top. If the kitchen is small, it is recommended to replace the dining table with a bar counter.
For seating, you can choose chairs, a wooden bench with decorative soft pillows, or a small sofa.
Equipment items should be of simple shape, functional, but with a minimum amount of decor and not be too conspicuous.
Planning and zoning rules
Layout is a competent arrangement of furniture and household appliances in a room.
There are several main areas in the kitchen:
- cooking or hearth. This zone includes the stove, oven, oven. To prevent fire, the walls next to the stove are lined with stone or tiles;
- work zone. This is where food is cut up. The work area includes a table top. It is located between the sink and the stove. The distance between them should not be less than 60cm so that water splashes do not fly into the hot frying pan. The required height of the table top is 15 cm below the bent elbow of the hostess, the standard is 75 cm. The apron is made of a material that is easy to wash from grease and dirt;
- sink. This is the most active zone. This is where the hostess stays a significant part of the time;
- storage. This includes a refrigerator. It is tall, so it is located in the corner. If it is installed in the middle of the wall, it will break the work area into 2 parts, which is not very nice.;
- dinner Zone. It is placed at some distance from the sink and stove.
To correctly place the stove, refrigerator and sink, use the triangle rule.
It is necessary for the convenience and comfort of the housewife preparing food. If you visually draw lines between them, an equilateral or isosceles triangle should form. It is important that when moving between zones, a person does not encounter obstacles on the way.
There are several types of layout:
- straight. The kitchen set is located along one wall. You can use hanging shelves and a cabinet with a sink instead of a kitchen unit;
- parallel. The set is placed on 2 opposite walls. This placement is suitable for a narrow kitchen. The width between two rows for ease of movement and opening of cabinets should be at least 120 cm and no more than 180 cm;
- L-shaped. If the kitchen is small, then the set is installed L-shaped with a built-in cabinet with a sink;
- U-shaped. It is located along 3 adjacent walls;
- island There should be more than a meter from the island to any surface.
Textiles and decor for the kitchen
In a wooden house in the kitchen it is recommended to place the following textile elements, regardless of style:
- Curtains or tulle;
- Tablecloth or runner for the dining table;
- Potholders;
- Towel;
- Apron.
It is better to select all textiles in the same color scheme and from natural materials. It is not recommended to choose too catchy colors with bright, large patterns.
If you want to use textiles with a pattern, you should pay attention to models with geometric, floral motifs, and thematic ornaments.
The following items are considered the most appropriate for decoration:
- Kitchen utensils made of wood, such as spatulas, boards, stands;
- Ornamental plants;
- Wall decor, such as a clock, a panel;
- Food products, such as garlic in a bunch or onions in a net, aromatic bags of herbs or coffee.
Protecting wood from moisture
The disadvantages of wood are its flammability and ability to absorb moisture. To prevent the occurrence of mold, mildew and wood rot, logs and beams are coated with antiseptic agents.
Antiseptics are divided into:
- impregnating. They are necessary for the primary processing of wood to protect it from moisture;
- film-forming. A protective film is formed on such antiseptics. Used at the final stage of processing.
Fire retardants are used to protect wood from fire. They prevent the wood from burning quickly.
Kitchen design tips
When decorating a kitchen in a wooden house, experts recommend:
- If you want to paint wood, it is better to choose calm, natural tones.
- It is recommended to place built-in furniture only after the wood has settled.
- Lighting and decorative items should highlight each area of the kitchen.
- In a small kitchen you should not use drywall.
- It is best to place the work area by the window.
- To prevent the wood from absorbing aromas when cooking, it is necessary to coat the wood with a special product, wax or varnish before starting repairs.
- The hood must be powerful regardless of the size of the kitchen.
Ventilation and exhaust
During the construction of a house, an important issue is the arrangement of ventilation. The access of fresh air is regulated through automatic systems or plugs.
The kitchen is equipped with a hood. Exhaust devices are:
Hanging. They are used only in small kitchens because they have low power. They have a carbon filter, which often becomes clogged and requires urgent replacement.
Built-in. Mounted inside a wall cabinet and designed for a spacious kitchen. They have great power.
Dome. They are located above the hob in the wall or ceiling. They have a cone shape.
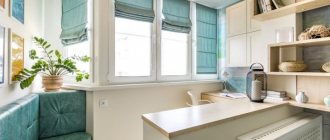
Lighting nuances
The kitchen in a log house should be bright to make cooking comfortable. However, dark wooden chopped walls (if you left them in a natural shade) hide the light, so there should be more of it than usual.
Above the work area with open narrow shelves, ceiling spots or directional lamps on tires are sufficient. If there are cabinets or wide shelves hanging above the countertop, add additional lighting below them.
An island, peninsula or bar counter needs additional lighting - a ceiling pendant will do this best. The same applies to a separate table for meals.
It is good to separate the light sources, making the light brighter in the cooking area and dim in the dining area.
The photo shows the lighting of the work area
Small kitchen design examples
We have already mentioned that in a small kitchen in a wooden house it is better to abandon the abundance of natural wood by painting or tinting the logs white. Other life hacks for making a room appear larger:
- Glossy surfaces. Stretch ceilings, facades in film, glass and mirrors.
- White bright light. The bigger, the better. Avoid curtains so that the sun's rays can freely penetrate the room.
- Furniture to match the walls. White on white, gray on gray, etc. This technique dissolves cabinets in space.
- Change in depth. If the area is very small, order cabinets 10-15 cm narrower than usual.
- A straight, but three-row kitchen, instead of a two-row corner one. Occupy the walls to the ceiling, leaving as much free space on the floor as possible.
- Minimalism. The fewer accessories in sight, the more spacious the room seems.
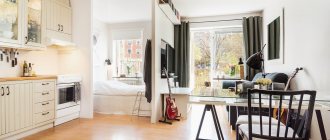
The photo shows a closed kitchen layout
If the kitchen is separate, and the location and layout allows it, remove the partition between it and the adjacent room: there will be more space, you can place the set in a niche and move the table into the adjacent living room. Or install a bar counter at the border.
Advice! When decorating the walls of a log house, avoid massive natural materials.
Instead of rough timber - thin lining, instead of large porcelain stoneware - small tiles. In general, downsizing is advisable in everything: for example, it is better to replace one huge painting with 2-3 small ones.
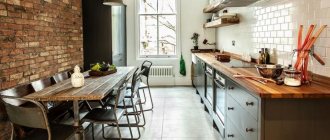
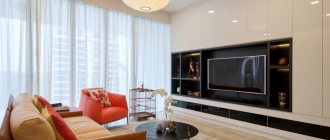
The photo shows furniture and appliances in country style
The second, simplified method of installing kitchen cabinets on log walls.
Finally, on the second day, the turn of the most interesting thing for me came - organizing a system for movable fastening of the upper cabinets. To be honest, I was simply amazed by the simplicity of the engineering solution. We did not have to involve the masters of “Rus...” to insert the bars, as was shown in the photo above; Sasha did everything himself and quite simply.
Photo - This is our master - Alexander, a man with truly golden hands and brilliant engineering skills.
Let's take a closer look at his approach. So, boards with a cross-section of 100*20 mm were taken; if necessary, they were slightly trimmed with an electric planer, or, conversely, they were extended using wooden pads. At the top, the board was rigidly attached to the log using two powerful self-tapping screws.
At the bottom of the board, a longitudinal cut was made with a circular saw, into which a self-tapping screw was screwed. The cut allowed the board to slide along the lower screw along the rest of the crowns of the house as it settled.
The cabinets themselves are hung on special horizontal metal slats, this is very convenient and allows you to move the cabinets to the left or right during installation. Accordingly, special hangers are installed in the upper cabinets, which allow you to finely adjust the position of the cabinets in height. And quick-release door hinges for facades are also very convenient and practical. Indeed, modern furniture fittings have made the lives of furniture installers and their customers much easier.
Photo – This is an unpretentious, simple, but reliable solution that Alexander used to attach upper cabinets to log walls.
Please note that the apron either lay on top of the board (but was not attached to it in any way), or simply did not reach the board, as will be seen in one of the photos below.
Photo - Let's show a close-up of the lower floating block for attaching the block to the wall. This solution will allow the frame of the house to settle painlessly. And such a cut is easy to make using a circular saw; filigree use of a chainsaw is not required here.
The next photo shows another important point. It is clear that today no kitchen can do without roof rails and a storage system organized with their help. But how to attach the roof rails? Only for a thin apron - it won’t be very strong. Through the apron into the wall - it is impossible; when the house shrinks, the apron will simply be broken off. Sasha again proposed a simple and effective solution. On the back side of the apron, a small and thin plank was placed (1-2 cm thick, where the logs allowed) and the railing support was screwed into this plank with a self-tapping screw through the apron. It worked independently of the wall and reliably.
Photo – Another subtle point is the fastening of the roof rails. The bases of the rails should only be attached to the apron and in no case through the apron into the wall logs. Of course, for reliability, a thin block was attached to the back of the apron into which the self-tapping screw went.
The photo shows how holes for sockets and a switch have already appeared. The kitchen turned out to be not entirely symmetrical, so we thought for a long time about how best to arrange the sockets. We decided to make it symmetrical relative to the side walls.
The next photo shows the left corner of the future kitchen. Owners of wooden houses made from carriages are unaware of many of the problems of houses made from round logs. That is why you will not see vertical bars on the left wall - the wall is already flat, so the cabinets were attached directly to the logs.
Photo – Left corner at work. Holes for sockets were made, supports for railings were installed. Note that no vertical bars were used on the left wall of the carriage - this was not necessary, because this wall is already level.
In principle, all the work has already been carried out, all fastening parts are hidden from prying eyes. The only fastening structure can be seen on the right side of the window, which we show you in the next photo. In the upper part you can see a vertical board, which is cut with an electric planer to bend around the log. In the lower part we see the position of the apron.
Photo - What our “attachment pie” looked like from the side. Shown is a view of the side cabinet, you can clearly see how the vertical beam was cut through. You can see how the apron extends behind the top cabinet, while the top cabinet itself can easily fall down as the walls shrink.