Since the middle of the last century, interior design has been replenished with a new direction that does not go out of fashion to this day. The loft style is still popular and is used to decorate magnificent residential and office spaces. But in order for the interior to look harmonious, it is necessary to strictly adhere to certain frameworks. And although the direction allows you to use literally any finish, there are clear rules for the design of the ceiling.
Concrete ceiling in the interior, with false beams Source homeli.ru
Distinctive features of the loft style
The loft style (from the English loft “attic”) arose naturally against the backdrop of the Great Depression of the 30s in the United States. Due to the economic crisis in the country, industrial enterprises went bankrupt one after another, and empty factory buildings were rented out. Artists loved them because of the abundance of light and space. But since there was no money for repairs, the interior was left as is - ceilings, walls and floors without finishing, communications in a visible place. Then the workshops began to settle down.
Private housing in an industrial premises - this is how one phrase can explain the essence of this style. Loft is easy to recognize by its characteristic features:
- unfinished walls made of brick or concrete (later version);
- open communications, ventilation pipes;
- high ceilings and huge windows;
- combining several functional areas into a common space, even without partitions;
- horizontal rooms;
- mixing old and new, antiques, handmade - poor residents used everything they could get their hands on in the interior.
The Great Depression passed, and the style was firmly entrenched in modern interior design. It can be reproduced both in a residential building and in an apartment.
Loft is not as simple as it might seem at first glance. When decorating an interior, beginners make mistakes that result in the loss of chic and aristocracy:
- cheap brick tiles - the cladding should look natural, picturesque, like real masonry;
- low ceiling - this problem is often encountered when decorating rooms in Soviet-style houses; in spacious production workshops the walls are always high;
- an abundance of dark shades greatly narrows the space, especially in small rooms such as a bathroom; the absence of bright colors in the interior takes away coziness and comfort, so designers recommend using several bright accents.
Compatibility
Concrete elements look just perfect in combination with metal structures, rough wood and brick walls.
In fact, modern fashion dictates an almost complete rejection of decorative finishing. That is, it is only permissible to paint the internal surfaces, preserving their original texture. Do not hide wiring and pipes. Install the first one on porcelain insulators, and treat the second ones with a transparent anti-corrosion compound.
Don’t be afraid that the apartment will resemble the set of a post-apocalyptic film; it will turn out cozy thanks to the installation of lighting and the right selection of accessories.
When starting to decorate, use pieces of furniture that correspond to different eras. Don’t be afraid to place a modern, laconic sofa next to a Chippendale-style chair. All this is united by a frankly trashy coffee table made of pallets and thick glass. Rest assured, the Bukhara carpet left over from your grandmother will sparkle again in such a living room and create a comfortable relaxation area.
Lighting and backlighting
Different types of lighting will have completely different results. Spotlights can be mounted in the crossbars or between them in the ceiling.
For complex volumetric structures, mobile lamps can be attached directly to the beams and change their position if necessary.
The chandelier should reflect the overall stylistic idea, for example, in a country style room it could be a low wrought iron chandelier, while in a Provence interior it could be neat with several textile shades.
An unusual effect is created by the LED strip; recessing it into the side parts of the beam creates a feeling of floating in the air.
In a living room
Do you think that the stretched fabric will not fit well with brick and metal elements? This is wrong.
A two-level ceiling in beige and brown tones will fit into the interior without much difficulty. The main thing to remember is to choose colors that match the furniture. Don’t get carried away with fancy chandeliers - it’s better to buy simple spotlights.
Separately, it is necessary to note the texture: if you decide to abandon bright shades, give preference to matte. It harmonizes with the deliberately rough decoration of the room, while shiny gloss may be a little out of place. However, there are some nuances here too.
If you have a large living room, you will be able to emphasize the abundance of free space, so appreciated by lovers of this style, with a glossy white ceiling. The room will seem even larger - which is, in fact, what we are trying to achieve.
For small rooms combined with a kitchen, we recommend trying to experiment with a two-level canvas in light shades. Hidden lighting around the perimeter of the internal level will add volume and make the room airy.
By the way: The stretched fabric provides great opportunities for experimenting with lighting. Try laying LED strips like in this photo. Agree, very original and unusual? In addition, it is quite consistent with the spirit of the loft.
Concrete for walls and ceilings
The use of modern technologies in creating an interior, as well as a number of tricks, will allow you not only to decorate the room with a concrete mixture, but to obtain a non-standard decorative coating. Thus, the brutality of concrete walls turns into an ultra-fashionable gloss, reflecting all the colors of the interior with skillful handling of the material. The line from pure concrete to polished walls is much thinner than it might seem at first glance. By properly treating a concrete surface with modern coatings, you can not only create an unusual design object, but create a masterpiece.
Room design with concrete ceiling
White room with concrete ceiling
Interior of a room with a concrete ceiling
Concrete ceiling in the interior of the room
Concrete ceiling
What ceiling color is suitable?
The color palette should fit the overall design concept. Most often, light, dark or black, white or cement gray shades are chosen.
Metal with concrete
The use of steel in home interiors is another modern trend. With the help of perforated sheets, a complex ceiling geometry is created, in which the main place, of course, is allocated to concrete.
A good option is to use forged parts. They are used to make partitions that zone space, shelving and bar counters. The combination of brutality with perfectly smooth parquet floors gives maximum effect.
In studio-type apartments, it is advisable to perform zoning using a steel mesh. Additionally, ceiling cornices are fixed near it, on which blind or, on the contrary, transparent silk or velvet curtains are hung. With their help, you can isolate a separate part of the apartment.
Nothing will stop a bachelor from building a toilet from glass, completely transparent panels, matted at the touch of a button.
When working on the interior of a small apartment, you should observe moderation. Here it is permissible to use only one accent element that unites the entire room and creates the required mood.
The most successful options for the kitchen
The use of decorative plasters for kitchens takes into account the location of the plastered areas. Some types of putties are only suitable for finishing walls throughout the kitchen. Others - to serve as a huge wall panel. Still others are for improving the apron in the niche of the kitchen unit. Almost all are suitable for organizing room zoning.
You can highlight the dining area and visually expand the room using a light marble or art-concrete covering. Silicate wood or smooth stone finishes will truly enrich the kitchen space. It is suitable for interiors in Baroque, Classical, Rococo, Italian, English styles.
Yellow silicate decorative plaster will make the kitchen environment sunny and joyfulSource gidpokraske.ru
For kitchens in a classic style, Italian or even laconic high-tech, coatings that imitate marble, granite chips or cold natural stone are often selected. Silk plaster will fit very well into the interior of boho-chic, Provence and any other neoclassical style.
Marble plaster on kitchen wallsSource pro100stroy.com
Types of successful decorative plasters based on textures and colors for finishing kitchen walls:
- marble – polished or matte surface;
- silk – dark, light, with mother-of-pearl;
- wood imitation;
- under brickwork;
- “travertine” texture;
- under wood;
- “bark beetle” texture;
- orange peel texture;
- “sea wave” texture;
- stucco or volumetric sgraffito.
The most reliable in strength and safest to use is mineral decorative putty. It will never fade in the sun, it is difficult to scratch it with a knife or chip it with an accidental blow. You need to wash without using hard brushes or abrasives. Small particles of bulk detergents can become lodged in the finely porous structure.
Texture – “brickwork” with imitation whitewash Source petro-man.ru
Plaster finishing under whitewashed brickwork will look great in a Provence, chalet, light country, loft, or Scandinavian style interior. Simplicity and texture will serve as an excellent backdrop for furniture and various decorative items (paintings, floor hangers, chairs, open wall shelves, large lamps hanging directly from the ceiling, lamps).
Textured plaster in the form of cinder block masonry for a chalet-style kitchen interiorSource window-kursk.rf
“Travertine” resembles porous-relief natural stone or weathered “shell rock” (building blocks made from compressed shells). Such imitations are often created in light shades. The darkest shades for such surfaces are blue-gray, light green or light brown.
Travertine will ideally create an imitation surface of natural stoneSource mykaleidoscope.ru
Textured coating “bark beetle” is considered one of the most fashionable today. And a surface plastered to look like wood is always a popular technique and fits most interior styles. This technique will be cheaper than decorating the room with a real array. The technique suits almost every interior if you treat the wall with putty with a surface similar to an orange peel. Any shades are already applicable here.
Types of decorative plaster that are not suitable for finishing kitchen walls:
- Acrylic.
- Silicate.
- Silicone.
- With crocodile skin design.
Acrylic mixtures are dangerous to apply on walls near hot stoves and heating radiators. When heated, the high molecular weight polymer will emit harmful toxic volatile impurities. When exposed to intense sunlight, it cracks. Another disadvantage is the low degree of vapor permeability.
For the kitchen, acrylic plaster is best used to decorate the wall of the dining area, where there are no nearby heat sourcesSource s.sakh.com
The silicate mixture is not harmful to human health and could well be used for finishing kitchens. But it's inconvenient to apply
Before using this decorative paste, it is important to pre-treat the wall surface with a special primer
In the interior, using silicate plaster you can achieve beautiful textured coatings Source avatars.mds.yandex.net
Textured crocodile leather finish is not suitable for every interior style
It is better to take it into account after careful consideration during the development of the project. The texture is interesting, but labor-intensive to apply
It should only be done by a professional.
Decorative plaster “under crocodile skin” close-upSource na12.ru
Factors on which the decor of the living room depends
The use of different materials is allowed. Among them:
- Decorative plaster. It will help hide noticeable unevenness of the walls. The material is expensive, but is considered durable and can be renewed annually by painting. When used correctly, it does not turn yellow or fade (if the color version is used).
- Liquid wallpaper. They contain acrylic and lie flat on the surface. This option is affordable and environmentally friendly, and does not require professional finishing skills. The disadvantage of this material is the lack of assortment. In total, there are five to seven types of mixture for application.
- Paper wallpaper. An excellent budget option that is suitable for those living rooms in which the walls are perfectly straight. The canvases are easily soiled and cannot be cleaned and are subject to mechanical stress. Gluing is not easy, as the paper often tears and wrinkles.
- Vinyl or non-woven wallpaper. This option has a wide range of colors, but the base is considered not environmentally friendly. It may take a long time for the smell from the wallpaper to dissipate and not harm a person’s lungs. Among the advantages are that it fits perfectly on the surface, dries quickly and has a lot of colors. With the help of such finishing you can even create a basis for decoration.
- Painting. Quite a good option, especially if wallpaper for painting is already pasted. It applies well with a roller and leaves no drips or streaks. These properties are guaranteed if the instructions for dilution and use of the liquid composition are followed.
- Wall panels are options of different shapes and textures. They also differ in color. They are expensive and not widely available. Suitable for all types of walls, they hide sound insulation and other intermediate materials well. The panels do not tolerate temperature changes and mechanical damage. Due to the high cost, they try to mount it on one wall to create an accent or depth of the room.
- Textile wallpaper. These are pure and natural canvases. They will create a unique atmosphere in a classic interior style. Not practical as they get dirty easily. They are expensive, but when completed, the rooms look rich, luxurious and perfect.
Space is an important factor when choosing decor. The smaller the living room space, the less visible accessories and decorations should be.
Using coffee textile wallpaper with textureSource oooalfa-pro.ru
Decorating the walls in the living room with bright textile wallpaperSource mirpola-dekora.com.ua
Lighting and additional decorative elements
This style widely uses materials such as wood, glass, and metal. It is from them that you can choose a lot of interesting accessories.
The most popular decorative option is wooden beams, slats, channels and panels that act as supporting structures. Beams placed not at right angles, but in broken lines, and metal mesh, especially those painted in contrasting colors to the ceiling, look interesting. Steel and copper fittings add more brutality. To save money, they install not original materials, but polyurethane dummies. Vintage fans with blades are appropriate in high rooms.
A concrete ceiling looks elegant, in the center of which there is a rosette with a geometric or floral pattern, especially in the dining area in the kitchen. It makes sense to put a round table under it.
Large-mesh metal meshes, including chain-link, air ducts made of shiny stainless steel, etc., will add a deliberate roughness. Bicycles can be stored in them in plain sight. This option is suitable for children and teenagers.
A harsh loft ceiling will be given lightness and warmth by lighting. Several lighting options are used:
- chandeliers in an industrial style, reminiscent of industrial devices - irregular in original shape, rough in color, or even assembled from individual lamps without a lampshade;
- suspended ceiling lamps - all kinds of spots look original here, with domed, oval, semicircular shades, devices in the form of fans;
- LED strips - for hidden lighting.
Lighting fixtures are chosen with large or elongated bulbs. Lampshades are preferable to copper or steel, chrome-plated. Bulb lamps on cords also came into fashion.
In low rooms, a contour LED strip at the top of the wall will visually raise the ceiling. You can install a chandelier above the table and illuminate the rest of the room with hidden fixtures.
Fabric elements add coziness - textiles on the sofa and windows, carpet on the floor. But without classic curtains, it is better to install blinds.
Varieties by composition
Wall finishing material fillers have different features, functional and technical properties. If this is an option for decorating surfaces with gypsum or lime, then you can safely count on their strength. Such mixtures are usually used to finish the ceiling between beams in interior styles: Provence, country, chalet, vintage, retro, loft. Or when plastering sections of walls to look antique.
Decorative plaster in eco-style living room interiorSource behance.net
Additional additives for decoration, creating an unusual coating:
- metallized threads;
- crushed shells;
- large cellulose fibers;
- pigments and colors.
Any decorative marble plaster in the living room, dining room, or hallway will not only beautifully recreate a beautiful pearlescent-shiny surface, but will also reliably protect the walls from various aggressive external factors. Neither mechanical damage, nor chemicals or detergents will damage the integrity of the coating. A number of other types of additives to plaster have the same or different properties.
Glossy marble plaster on the walls of the living roomSource odnastroyka.ru
Acrylic
Acrylic and latex decorative bases have ideal vapor permeability and durable operation. The strength is comparable to materials where gypsum is added to the composition. They are well suited for interior decoration of rooms such as kitchens or bathrooms. The texture is smooth, the walls are easy to clean from dirt.
External cladding of house facades is also done using plasters with such additives. The main advantage is that the walls “breathe” and are resistant to mechanical damage, rainy weather or weathering. Therefore, acrylic or latex varieties are suitable for finishing the exterior walls of houses in rainy or foggy regions.
Pleasant color and texture of acrylic decorative plasterSource ferrara-design.spb.ru
Mineral
A feature of mineral decorative plaster is its division into two main groups: marble and quartz. This can also include granite and composite mixtures. They are very similar to each other in terms of performance characteristics. The coating is moisture-resistant, and therefore can be used in bathrooms and kitchens where humidity is concentrated. Pros:
- perfect imitation of natural stone, marble;
- pleasant smoothness – semi-gloss pearlescent surface;
- wide range of colors;
- goes well with decor and furniture in classic, Italian, antique and English styles.
One of the main and only disadvantages of such decors is the surface structure. It is porous, so dust and small particles - pieces of threads, lint, wool, fibers - quickly stick to it. It is difficult to wash such walls, but it is possible with the help of special attachments for a washing vacuum cleaner. If the surface is finely porous and smoother, then it is less hassle to maintain.
Fine-pored decorative mineral plasterSource decorstudia.com.ua
Silicate
The main feature of silicate plastering mixtures is the form of the substance - liquid silicate glass. Once cured, it hardens firmly, creating a super-strong, wear-resistant surface.
Advantages of silicate plaster:
- excellent durability of the finished coating;
- property of repelling dirt and plaque;
- high level of moisture resistance;
- good heat resistance.
Such coatings are difficult to ignite from sparks or open fire. Therefore, they fully comply with all the requirements of building standards and fire safety regulations. Finishing is best used when decorating kitchens (kitchen splashback, entire work area), bathrooms, and even an indoor barbecue installed in the local area.
Elastic decorative silicate plaster paste. It is convenient to distribute it over the surface and form it into texturesSource stroimdom.com.ua
Silicone
The binding component is silicone, which is added to the ar-concrete plaster. The plastic substance is extracted from resinous elements. It lasts a long time as part of the applied mixture. The mass can be used for finishing both external and internal walls. Plaster with excellent moisture-resistant properties, so it is suitable for furnishing kitchens and bathrooms. Additives can be different pigments. But there are always stabilizers, fillers, and antifungal concentrate.
The homogeneous texture of silicone plaster allows you to decorate the surface of the applied layer using a textured rollerSource kraski-net.ru
DIY ceiling formwork video
Pouring concrete on the ceiling is one of the most effective ways to create a reliable and high-quality ceiling in the house. At the same time, the ceiling structure has a long service life.
And what a creative canvas a concrete ceiling is! It can be turned into a real work of art. Interested? Let's take a closer look.
Pouring the ceiling with concrete is meant as monolithing a roof or ceiling. This can also be understood as pouring already assembled floors from ready-made reinforced concrete products.
The latter is most often used when installing a roof for additional heat and sound insulation. The monolithic pouring method is more applicable in the initial stages of construction.
Let's consider the main comparative characteristics of such concrete ceilings:
- Reliability . If we consider it qualitatively, then a cast reinforced concrete ceiling is the most durable and reliable option. Although the installation of ready-made concrete products will be much faster. After all, pouring concrete requires thorough curing - at least 28 days until it reaches full strength, or even more. It all depends on the thickness of the fill and in general on the features of the project. Slowing down the construction process can lead to unnecessary financial costs.
- Difficulty of execution . Compared to labor intensity, monolithic pouring is more complicated than installing floor slabs. Although, it is precisely this type that is available for independent reproduction when reinforced concrete products are laid with the help of special equipment and professionals in this field. There is nothing worse than incorrectly installed floor slabs that will constantly “cry” when it rains and melts snow.
However, such monolithic works can also be dangerous. If the formwork is placed incorrectly, you will end up with a low-quality concrete ceiling, which can lead to destruction in the future.
Therefore, do not take on board this problem yourself. Be sure to consult with specialists, study all the necessary technical documentation, and it is advisable to attract an “experienced” master to your team who will lead the entire “parade”.
- Price. The price for completely monolithic and prefabricated works is almost the same. But if we consider work involving hired specialists in both cases, the cost of this construction stage will increase by about 20%. If you independently reproduce monolithic works, pouring will be cheaper than installing prefabricated concrete products.
With all this, there is nothing “outlandish” about the monolithic filling of the ceiling. All operations are available and can be performed independently.
For those who dare to pour the ceiling with their own hands, our small and useful instructions will direct their working impulses in the right direction and tell you how to properly perform concreting.
The preparatory stage is the time when you not only need to clear the construction site of debris, but also purchase everything you need. You also need to decide exactly in advance whether you will pour purchased concrete or make it yourself.
If you choose the second, then think through to the smallest detail how you will feed the finished mixture into the formwork: lift the equipment, use a pump, or drag it in buckets the old fashioned way.
For the pouring itself, you will need concrete of a grade no lower than M250, preferably M350. But the grade of concrete is taken according to the project or not lower than specified. But this is only in case of other changes during the construction process.
In addition to this, to set up the formwork you need the following:
- Boards for formwork sides. They can be taken used or with a low level of processing. The aesthetics of the future ceiling structure will not depend on them.
- Plywood for the formwork base. Ideally, laminated plywood is purchased. It does not warp under the weight of concrete and can be dismantled without problems. Boards may be used. But they can create an uneven relief of the future ceiling surface. Therefore, it is better not to save money and take laminated plywood. After concreting, it will still be useful on the farm.
- The timber is taken as a support for the lower part of the formwork. 4x4 boards to create the support structure.
- The reinforcement for the frame is taken from a ribbed profile with a diameter of 10 or 12 mm. But it is better to consult a specialist on this issue. The frame is knitted with wire or welded. Of course, the second option is better if you have the opportunity to use the services of a welder, or rent a welding machine.
- Fastening elements.
- Polyethylene film.
In terms of equipment and tools, be sure to keep the following on hand:
- concrete pump with pump and hoses;
- deep vibrator;
- spatula and rule;
- tape measure and level;
- Bulgarian
Keep in mind that the ceiling is poured with concrete over the entire area simultaneously. Therefore, once again think through the algorithm of your actions and the list of everything you need.
The formwork for pouring the ceiling is slightly different from that which is made for driving foundations or armored belts. The ceiling should be as level as possible, accurately installed and durable.
Before installing it, be sure to make sure that it can withstand the weight of concrete and reinforcement. Practicing master builders or architects will be of great help in this matter.
Attention! Always be guided by the project at any stage of construction, especially when pouring the ceiling with monolithic concrete.
- First, the support frame is assembled from 4x4 boards. The distance between them is approximately 15-20 cm. Such frequent supports will help the plywood bottom of the formwork to withstand the weight of concrete and reinforcement.
- Throughout all formwork work, use a level to ensure that the support beams are positioned correctly.
- Pay special attention to the fasteners. It is best if it is made according to the example shown in the photo below.
- When the main frame is ready, make a deck from laminated plywood or boards. If you choose the second option, then make sure that they fit perfectly together.
- To prevent leakage, place film under the boards. In the case of laminated plywood, there is no need to further process it.
- It is best to wrap the boards in cling film and lubricate them with machine oil.
Tip: After completing the assembly of the formwork, check its levelness again with a level. Found the slightest discrepancy? It is better to disassemble the structure and reassemble it. This way you will avoid defects and subsequent dismantling of the ceiling.
Ceilings are poured with a minimum thickness of 15 cm. In this case, the reinforcement is done in one layer. If the height of the future ceiling exceeds this value, then the structure must be reinforced with an additional top layer of reinforcement.
When doing such work, you need to adhere to important principles:
- Reliable connection of the reinforced frame with the entire building. Metal rods are laid on the brick layer of the wall (if a building is being built from a different wall material, we tie it with brick). If the floor is poured in a built building, but bricks will need to be drilled and reinforcement installed there.
- Knitting a frame is simple and accessible to everyone. The reinforced frame is made in the usual cross-shaped form with cells of 15x15 cm. The intersection points of the reinforcement are welded or tied with wire, but so that the frame elements do not “walk”, but are firmly located in place.
- There is never too much iron in concrete! Don't skimp on the fittings. The more there is, and the better it is connected to the rest of the building, the more reliable both the ceiling and walls will be. The general principle of tying reinforcement is illustrated below.
Performing such work requires certain skills and skill levels. If there are none, then it is best to hire qualified workers.
The actual pouring of concrete is the simplest part of the entire work process.
It can be divided into three main stages:
- Concreting. The concrete is simply pumped into the formwork. Concreting begins from the farthest corner.
It is best to fill the entire ceiling area at once. If it is too large, then it is better to split the whole process into several parts.
- Vibration . After laying, the concrete must be properly vibrated. With a small thickness this will not take much time. The deep vibrator should work no more than until laitance appears. And don’t forget that we have prefabricated wooden formwork on beams, which can become loose with prolonged vibration.
- Alignment. You can smooth concrete with anything. The main thing is that it is convenient. The rule will level a large area at once, but it will be difficult for those who have never worked with it. In this case, small and large spatulas come to the rescue. But in order for the surface to be perfectly smooth, during the finishing work you will still have to make a screed and learn how to putty concrete ceilings.
And now about the most unpleasant thing - about building a concrete ceiling. To prevent this structure from cracking or folding in half, you need to wait a long time before removing the formwork and continuing construction.
This may take up to several months. Only an experienced craftsman who knows all the features of your project can say more specifically.
In the summer, especially when it is hot, the concrete will need to be watered so that it does not dry out and cracks appear. In any case, it is best to cover the finished concrete ceiling with plastic film, under which, during hardening, its own greenhouse microclimate will form. When the moisture dries up, add a little water to maintain “tropical” conditions continuously.
Often, during the finishing work, many questions arise, the most popular of which is: how to level a concrete ceiling quickly, easily and inexpensively. This can be done in several ways - namely, sheathing it with plasterboard or puttingty. The first option is simpler and faster to implement.
And as always, there will be a “but” that will ruin everything. In our case, the cost and quality of gypsum boards. Really good drywall is expensive, which is unjustified if you are going to make suspended or suspended ceilings in the future.
Do-it-yourself putty is cheaper, but also requires more labor. If you have never done such work, then it is best to watch a video that will tell you in detail how to putty a concrete ceiling. You may not become a professional finisher, but you will be able to supervise the workers.
After leveling the ceiling, you can leave everything as is or move on. Today, the most popular finishing method is suspended ceilings. Due to the fact that demand is high and the level of competition is incredibly high, prices for them have dropped significantly. In this case, the concrete ceiling does not need to be specially prepared.
For those who want something “like not everyone else”, we offer a traditional and more creative option - coloring. No, you don’t need to paint a solid canvas with regular water-based paint. Today there are many different shades of pigments. And creative individuals can combine them in some unusual ensemble of drawings. We offer a small selection of options for painting concrete ceilings.
The easiest way is stencil painting. All that remains is to choose the colors and the required stencil. And the rest is a matter of technology.
As you can see, pouring concrete on the ceiling is not only reliable and durable, but also beautiful. You can create anything you want on such a canvas, the main thing is desire and imagination.
The construction of a house and a number of other buildings requires the mandatory arrangement of interfloor or attic floors. Wood is often used to accomplish this task. Wooden floors are easy to install, but if you need to ensure high-quality insulation and sound insulation of the room, give preference to concrete floors. You can make a monolithic concrete floor yourself. Read the instructions and get started.
You can make a monolithic concrete floor yourself
Contents of step-by-step instructions:
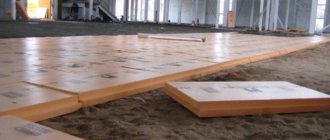
Before starting any work, it would be useful to familiarize yourself with the rules for laying monolithic slabs. The main recommendations are as follows:
- the span length can be no more than 900 cm. This is exactly the maximum permissible length of one monolithic slab;
- To lift the slabs, you must use special equipment. In accordance with this requirement, loops must be built into the slab, hooking onto which the crane can lift the product to the required height. Relevant for those situations when slabs are purchased ready-made or made independently, but on the ground;
During the installation of slabs, you must constantly monitor the evenness of their laying.
The slabs are laid with a 2-3 cm gap
If the length of one slab is not enough to cover the entire span, you can use one of two available options:
- lay the slabs end to end, leaving gaps around the edges of the room. Finally, the gaps will need to be filled with concrete blocks;
- lay the slabs not closely, but at even intervals (20-30 mm). Finally, fill the gaps with concrete, having first secured the formwork under the ceilings so that the mortar does not fall down.
The technology for arranging floors requires the mandatory use of horizontal formwork. You can rent ready-made formwork from a specialized company or assemble the necessary structure yourself.
The first option is simpler and more convenient. Ready-made factory formworks come complete with telescopic supports, which allows you to further save time on the manufacture of supports.
The second option is more budget-friendly. To assemble the formwork yourself, use an edged board with a thickness of at least 2.5-3.5 cm. You can use moisture-resistant plywood with a thickness of 2 cm or more.
The boards should be knocked together as tightly as possible. If there are noticeable gaps between the boards, the formwork must be covered with a waterproofing film.
Prepare the following equipment for assembling the formwork:
First step. Install vertical support posts. The best option is adjustable telescopic metal stands. If they are not available, wooden logs with a diameter of 80 mm or more are also suitable.
Install the racks in meter increments. The distance between the walls and the racks closest to them must be at least 200 mm.
Second step. Place crossbars on top of the support posts. This is a longitudinal beam, due to which the entire structure placed above will be supported.
Third step. Install the formwork on top of the crossbars. First, lay transverse wooden beams on the longitudinal beams, and boards or plywood on them.
Select the dimensions of the formwork so that its extreme edges rest against the walls without the formation of cracks.
Construction of monolithic floor formwork
Fourth step. The top edge of the formwork structure must be strictly at the same level as the top edge of the lined wall. To meet this requirement, adjust the height of the support legs.
Fifth step. Install vertical structural elements. Because the edges of the floor slab must meet the wall, place the vertical fence at an appropriate distance from the inner edges of the walls.
Sixth step. Check the levelness of the formwork installation using a level. Correct deviations if found.
To connect the formwork elements, use convenient fasteners, for example, dowels or nails.
For the convenience of subsequent work, the formwork can be covered with waterproofing material.
Telescopic stands are preferred over their wooden counterparts for the reason that metal is much more durable than wood. Each telescopic stand can withstand a load of up to 2000 kg without deformation and cracks, as can happen in the case of a wooden beam.
A monolithic floor slab is subject to mandatory reinforcement.
Floor slab reinforcement
First step. Prepare the fittings. Select the appropriate rod diameter in accordance with the design loads. In most cases, rods with a diameter of 1.2-1.4 cm are used.
Second step. Lay the first reinforcing mesh at the bottom of the future monolithic slab. First lay the longitudinal and then the transverse rods. The optimal cell size of such a mesh is 120-150 mm. If the overlap has a small area, you can increase the cell size to 200 mm.
Third step. Tie the joints of the rods with steel wire.
Fourth step. Place a second reinforcing mesh on top similar to the first. Tie both meshes with wire.
If the length of one rod is not enough, tie an additional rod with an overlap equal to at least 40 diameters of the reinforcement. That is, if you use rods with a diameter of 12 mm, the overlap should be at least 480 mm.
It is recommended to place the joints of the rods staggered. The ends of the reinforcing rods must lie on the supporting beams.
For the initial pouring, a standard concrete mortar is prepared. The recipe is as follows:
- 2 parts sifted clean sand;
- 1 part coarse aggregate - you can use both crushed stone and gravel;
- 1 part cement M400-M500;
- water.
Add enough water so that the consistency of the solution is close to the consistency of liquid sour cream. The thin solution will perfectly fill all internal cavities and cracks, making the slab truly monolithic.
It is most convenient to prepare the solution in a concrete mixer. Add the dry and solid ingredients first, and then gradually add water, stirring as much as possible.
If you don’t have a concrete mixer, you can prepare the solution in a large trough, but it takes too long and is quite difficult, especially if you don’t have assistants.
The process of pouring a monolithic floor can be divided into 2 stages: pouring and finishing pouring.
At this stage, the initial layer of concrete is poured. Pour the solution evenly and slowly; sudden movements are unacceptable, as this may cause the formwork to warp.
Pouring a monolithic floor
Don't make the pour too thick. The main task of this layer is to fill all existing cavities.
“Smooth” the finished fill with a shovel over the entire surface. Do this smoothly and carefully. This will remove excess air and completely fill even the smallest cavities.
Monolithic floor thickness
At this stage you need to prepare a separate solution. The recipe is the same as in the previous case. The only difference is that you need to take less water to make the concrete thicker.
First step. Pour a layer of concrete of such a thickness that there remains about 20-30 mm to the calculated thickness of the finished monolithic slab. Pour slowly and evenly.
Second step. Level the fill with a shovel as in the previous part of the instructions. Leave the concrete for a couple of days and move on to the next step.
Third step. Prepare a solution of 1 part cement and 3 parts sand. Large aggregate is not needed at this stage. Add water to obtain a medium-thick solution.
Fourth step. Fill the slab completely with the solution prepared in the previous step. During the pouring process, level the slab using the rule until a perfectly smooth surface is obtained.
This completes the pouring of the monolithic floor. All you have to do is monitor the condition of the pour for a while so that the concrete hardens and gains strength without unnecessary problems.
Monolithic floor slab
During the hardening process of concrete, a large amount of heat will be released, under the influence of which intense evaporation of moisture will begin. Lack of moisture will cause concrete to crack. Therefore, during the first few days after pouring, you will need to regularly wet the slab with water.
You can pour water in buckets (2-3 buckets per session) or through a hose with a sprayer. First, you can lay old rags (preferably burlap) on the dried concrete and pour water on them. In hot weather, cover poured concrete with polyethylene, because Drying too quickly may cause the slab to become cracked.
The formwork can be removed approximately 10 days after the last wetting. In general, the slab will gain strength in 3-5 weeks. After this period, it will be possible to proceed to further planned construction work.
Thus, you can independently arrange a monolithic floor. At the same time, you will spend much less money on arranging the necessary structures than if you buy ready-made factory-made slabs. Follow the instructions and everything will work out.
Briefly about design
The design of suspended ceilings using fabric is quite diverse. On sale you can find about two dozen colors and textures of stretched fabric fabrics, and therefore the designer’s imagination has room to be realized. The appearance of fabric canvases is attractive and looks dignified, noble, and richer than their film counterparts. Here are a few more advantages for the designer that fabric provides:
- Excellent compatibility of fabric with different interiors and styles. They look most advantageous in interiors decorated in Art Nouveau, Baroque, and Classic styles;
- Externally, the ceilings look like perfectly executed plaster and do not have the shine or excessive smoothness characteristic of film. For lovers of the classic look of a plastered ceiling, fabric canvases without a pronounced structure will be a godsend;
- five-meter width provides a seamless surface even in spacious rooms;
- There is the possibility of an original design of the canvas through the use of the technique of applying patterns to the fabric. At the same time, the canvas does not look very bright, the drawings do not “scream”, but rather resemble noble frescoes. And if desired, you can order artistic painting on the fabric, which is impossible to do on a film canvas;
- A serious problem for the film is usually the chandelier adjacent to the film. But in fabrics there is no such problem - the canvas does not turn yellow under the influence of heat, since it is heat-resistant and tolerates elevated temperatures.
Tile panels on the ceiling
A lightweight material, usually consisting of plastic or foam in a variety of shapes and sizes, allowing for quick and easy installation.
In this case, there is no need to take a master class on decorating the ceiling; just mark and cut the panels correctly and glue them evenly.
Installation of such tiles is carried out by preparing the ceiling, applying an adhesive composition to the surface of the tile and gluing it to the ceiling.
Among the disadvantages of such a material for gluing the ceiling, one can highlight the “cheap” look; it will be very difficult to choose a decent tile that will favorably highlight the interior.
The next drawback is poor resistance to water and humidity; such material is not suitable for a bathroom or balcony.
It is also difficult to maintain - the material is porous and has joints, just like floor tiles, so dust will accumulate in the seams, making cleaning inconvenient.
Advantages of concrete as a finishing material
Probably the main advantage of concrete can be considered naturalness. It can be put on a par with natural stone, brick, ceramics, because there are no synthetic components in its composition.
Other advantages include:
- Resistance to moisture and variable temperatures;
- Fire resistance;
- Availability;
- Low price;
- Durability;
- Extravagant appearance.
As for aesthetic appeal, everything is very ambiguous and largely depends on both the skill of the designer and personal perception. Let's put it this way: to consider a raw concrete ceiling beautiful, you need to be either an ascetic or an adventurer, independent of generally accepted concepts of beauty and comfort.
Installation of tiles on a concrete ceiling
Due to its low cost, quick installation and the ability to quickly repair in case of damage, this finishing method has become very popular. Options with different patterns and textures are sold. Expanded polystyrene tiles are attached with special glue.
Installation of tiles on a concrete ceiling
Before starting work you need to know the following:
- gluing begins from the center of the ceiling;
- immediately assess where large defects are located and calculate the placement of the tiles so that the entire part completely covers the defect;
- Whole tiles will have to be trimmed when the distance to the wall becomes small. Before gluing, markings should be made in advance so that for the most part whole tiles fit. Trimmed options are best placed in places where they are least noticeable (under a curtain, doorway).
Despite the fact that the tiles are glued easily and quickly, one cannot help but note the disadvantages:
- fragility;
- lack of a single canvas, which is not always aesthetically pleasing;
- rarely used in modern interiors;
- not resistant to fungi, mold;
- lags behind at high humidity.
Stages of work
Old material is removed from the ceiling.
Using dowels, a metal profile or wooden beams are attached at a distance of 40-60 cm from each other.
Cladding with clapboard using a stapler, nails, screws, self-tapping screws.
Protective varnish or painting.
Painting a wooden ceiling is necessary not only for beauty, but also to protect it from rotting, odors, indelible stains, and parasites.
To preserve the beautiful wood texture, choose water-based paints or special ones based on aniline.
Before starting work, the wooden surface is sanded using sandpaper and treated with stain or special impregnation to preserve the natural properties of the wood.
This coating is durable if all preparation requirements are met. It is easy to care for. The difficulty lies in installing lighting with such a wooden ceiling finished.
Traditional and modern methods of finishing ceilings
Just recently, the methods for finishing ceiling surfaces could not please us with their diversity. Modern technologies have introduced many new methods with which you can decorate ceilings. And, if previously only traditional whitewashing, plastering and painting were used for renovation, now the most daring design ideas can be implemented on the ceiling, which will help radically change the appearance of the space.
These include:
- installation of suspended ceilings;
- installation of suspended plasterboard structures;
- artistic painting;
- ceiling decor with textiles;
- photo wallpaper;
- stucco.
Such a wide range of finishing types will allow you to choose the appropriate design option, and the ease of implementation of some methods - making a decorative ceiling with your own hands.
In the office
Are you planning to decorate a small work room for yourself? You might like the matte two-tier design. We would recommend white, but in this case experiments are quite acceptable - for example, a blue or bright red ceiling. Before installation, make sure that it matches the rest of the interior elements.
We recommend decorating the stretched fabric in the office using lamps on an unusual frame. However, for its installation you are better off turning to professional installers. However, believe me, the result is literally stunning. We recommend giving preference to a glossy texture - this will make the room seem voluminous.
A soaring stretch ceiling is a great way to give your office a bit of eclectic style that goes well with the loft. The main thing is to choose cold tones of LED lighting - warm ones do not fit well with common ideas about urbanism.
Playing with light can, in principle, radically change the overall perception of the room. Look at the chandelier in this photo - it looks like a logical continuation of the ceiling, adding airiness to the room. However, make sure that the lamps in it do not heat up. Otherwise, there is a serious possibility that the urban impression will be complemented by very real smells.
Decor and additional elements
Despite the fact that the loft belongs to the minimalist design trends, decorative details are used - with their help they complicate the ceiling space. These can be frame structures, pipes, columns, wires and ventilation equipment.
Wooden beams are one of the popular features of loft-style rooms. Previously, such structures were used to support high ceilings in factory workshops. In modern interiors, cross beams split up space. Designers often place wooden structures on the ceiling not parallel to each other, but in broken lines - this way they can zone the room. But it’s worth decorating apartments with beams if the ceilings are not lower than 3.5 m.
A mesh made of metal wire, painted black, will decorate the stretch ceiling. It will look good on a concrete surface.
Black fittings, as well as steel or copper colors, look impressive. Such designs do not burden the space, but give it brutality. A fan with blades makes the room elegant; old appliances will emphasize the industrial style of the interior.
Related discussions
Concrete ceilings without finishing. Pros and cons.
Loft style interior
Ariana Ahmad Interior Design
Fix it with a special varnish and that’s it!
- Likes: 1
- Save
Natalya Maximenko Design
In my loft-style project, I simply sanded the ceiling and coated it with a transparent, colorless matte varnish.
All the joints, some “flaws” in the ceiling - everything remains - this is what gives the concrete its unique style. No plaster is needed if you want to highlight the beauty of concrete.
I consider it mandatory to cover with matte varnish.
- Like | 7
- Save
Julia Zapevalova
Natalia, please tell me 1. what varnish would you recommend? (company) 2. Will it be possible to apply paint later without removing the varnish layer if I understand that the concrete ceiling is not mine?
3. Why matte and not glossy?
4. Is sanding necessary?
5. Does it end up being cheaper than painting or not?
Thank you very much for your answers!
- Like
- Save
- Like
- Save
- Like | 3
- Save
Tatiana Mikhaylova interior designer
Good day, Sergey! Here is a simple ready-made and inexpensive solution. This is at my facility, a little unfinished yet, but the principle is clear. The ceiling was cleared of adhering dirt, the wide gap between the slabs was covered with plaster (to prevent crumbs from falling off from the inside), there was a polyurethane cornice with LED lighting around the perimeter, and there was real brick on the wall, slightly tinted. Everything is covered with clear varnish.
Types and materials of ceiling beams
Bearers
This version of the floors can be considered the “skeleton” of the building, without which it cannot exist. Ceiling load-bearing beams can be hidden or played up in the interior of the apartment.
Concrete floors
They are most often used in the construction of urban multi-storey buildings and industrial premises. A concrete ceiling beam will look harmonious in an interior with a modern style, such as loft, grunge, minimalism.
Wooden floors
Rarely used in the construction of urban housing, more often in cottages, dachas or for individual renovations. Solid or laminated timber has a square shape. It is most often used as a ceiling.
The log has a round shape. The material is more expensive than timber, but it looks better in the interior from an aesthetic point of view.
Metal ceiling
Metal is stronger and has a longer service life. In the interior of the house they can be decorated or hidden; when open they will look harmonious in an urban industrial style.
The photo shows a spacious attic room in a high-tech style, the ceiling beams are made of metal.
Imitation
Beams acting as interior decoration should support the overall style.
Tree
Wooden ceiling beams will add rustic coziness to the interior. Ceiling beams made of timber look luxurious and massive; they are best used in a spacious room, as they are quite voluminous and large structures will take up a lot of space.
For finishing standard city apartments or small rooms, it is better to choose boards, they are more compact. The board can also be part of a structure where a solid beam is used as a base.
Plastic
Polyurethane or plastic false ceiling beams can become an analogue of wood. The material is not environmentally friendly, but it wins in price and variety. Visually, such ceiling crossbars will differ little from natural wood.
Drywall
By finishing the ceiling with plasterboard panels, you can hide communications, while emphasizing the desired style in the interior. In addition, it is possible to install lamps in plasterboard ceiling beams.
In the photo, the ceiling beams are constructed of plasterboard and decorated with concrete-like plaster.
Minimum decor
To create an unusual interior, you need to harmoniously combine the geometry of the space with the shape of its constituent objects. At the same time, everything should be simple, without unnecessary details, so that the feeling of freedom of space is not lost.
The decorative element can be polyurethane, wood or metal beams, reminiscent of supporting floors.
Pipes and electrical wiring are not placed in boxes; they are painted black or metallic.
Photos of the interior of rooms in an apartment
Kitchen
In the interior of the kitchen it is worth using materials that do not absorb odors and are easy to clean. A good interior solution would be a suspended ceiling with photo printing or an unusual shape. For example, an original wavy surface above the dining area or bar counter.
Living room
A living room or hall provides more opportunities to realize your fantasies. A ceiling of complex shape, panels and inserts made of various materials, as well as three-dimensional images would be appropriate. The size and color of the structure should be chosen depending on the height of the ceilings and the area of the room.
Bedroom
For a bedroom in country or Provence style, a composition of wooden beams is suitable, for a classic design, beautiful stucco molding or a multi-tiered structure, and a ceiling painted in a rich color will look harmonious in a modern interior.
Children's
The interior of a children's room can be enhanced and made more interesting through original photo wallpaper on the ceiling, unusual lighting or decorative elements.
The photo shows a bright children's room with an airy design. The ceiling is decorated with a plastic lattice, creating an imitation of a cloudy sky.
Bathroom
For the bathroom you should choose a moisture-resistant material. Stretch ceilings, tiles or glass will cope well with this task.
Corridor and hallway
A compact corridor can be visually made more spacious due to reflective surfaces; this could be a glossy stretch ceiling, unusual mirror inserts or lighting. For open and bright hallways, you can use bright colors and original multi-tiered designs.
For standard apartments
Recreating the charm of old America in a typical apartment is a very difficult task. But adding elements of this style and getting as close to it as possible is quite possible. We have already said that Americans were forced to convert production and warehouse premises into apartments - that is why the classic loft implies high ceilings. The most important limitation in urban environments is the height of the ceilings. As a rule, in a typical apartment it does not exceed three meters; in addition, loggias and balconies with a low ceiling height steal natural light.
Everything can be changed if architectural standards allow it. For example, if it is possible to attach balconies and loggias to rooms or combine a corridor and a living room, it’s worth the risk. Visually the space will become larger, creating the effect of high ceilings.
Typical apartments, as a rule, consist of small rooms, the area of which rarely exceeds 20 square meters. meters. In such cases, a plain ceiling in gray or white is best. The surface is leveled and then covered with a layer of primer.
Designers advise avoiding dark shades, as they make the room visually smaller.
In order not to clutter up an already not too spacious typical apartment, preference should be given to small lighting elements. It is best to place the lamps around the perimeter of the ceiling, and if you decide to install a chandelier, then you should opt for medium-sized models without unnecessary decor.
Moldings
Molding is a decorative element of ceiling decoration that enriches the interior design. Moldings appeared in Ancient Rome, but are still actively used by designers. Baguettes are easy to install and remove.
Plinth decorated with wood
Materials for the production of skirting boards.
- Aluminum. Lightweight and durable material. Attaches only to smooth walls using liquid nails or screws.
- Tree. Expensive and heavy, but presentable material. Suitable for decorating rooms that include wooden furniture.
- Polyurethane. The most common material for the production of ceiling cornices. Among the advantages are an abundance of colors, a variety of shapes and an affordable price.
- Styrofoam. The advantage is low weight. Foam baguettes are easily attached to all types of surfaces using liquid nails. Foam skirting boards are ideal for interior finishing work in an apartment. The main disadvantage is the insufficient strength of the material.
Choosing a ceiling plinth
You need to choose a baguette taking into account individual preferences and the height of the room. If the room is high, then it is advisable to use wide baseboards, if it is low, narrow baguettes. If the main selection criterion is cost savings, then it is better to choose polyurethane or polystyrene foam. If you want to create an environmentally friendly interior, you need to choose a wooden or aluminum baseboard.
Self-installation of foam baguette
Let's try to figure out how to glue foam molding ourselves. A plinth made from this material will cost 3-4 times less than a polyurethane baguette. In addition, installing foam molding is much easier than other types of baseboards.
To perform this procedure you need to stock up on:
- liquid nails;
- liquid nail gun;
- spatula;
- finishing putty;
- miter saw;
- miter box;
- painting knife;
Step 1. Use a miter saw to straighten the ends of the baguette, because in most cases they are uneven. This may result in their incomplete contact during installation.
Aligning the ends of the baguette
Trim the corner joints at 45 degrees using the same miter saw.
Corner joints should be cut at an angle of 45 degrees
Another option is cutting corners using a miter box.
Step 2. Make markings to avoid the plinth falling below or above the required level if the ceiling is suspended. Cut a small piece of baguette and attach it to the wall so that it does not reach the ceiling by a couple of millimeters.
You can use a small piece of plinth for marking
Step 3. Make a beating with a cord, and if this is not possible, make marks with a pencil along the entire perimeter of the room. You will look up to them.
Marking
Step 4: Use a paint knife and some sandpaper to trim the rough corner you cut with the miter saw. The latter does not always cut materials exactly at 45 degrees.
Step 5. Spread the baguette with liquid nails.
Applying liquid nails to ceiling plinths
Step 5. Glue the baseboard to the wall. After pressing down from the bottom of the cornice, glue will flow out. Remove it with a spatula.
The plinth is glued
Removing glue residue using a spatula
Step 6. The baseboard will adhere well to liquid nails, but a gap will form at the bottom. Treat it with the same liquid nails or sealant.
After the glue has hardened, the joints between the baseboards are sealed with sealant
Step 7. Before painting, go over the joints of the baguettes with finishing putty.
Step 8. Paint the baseboard in your chosen color and let dry.
Painting the ceiling plinth with a brush
Making formwork
By the way, this is a fundamental point in the work. According to its execution, the installation of the entire building is dependent and error-free.
Important: Before installing the formwork, you should make sure that it will support the full weight, including the reinforcement. To do this, it is better to consult a professional in this field.
Gain
This is the use of iron grating to fill the ceiling. This significantly increases the strength of the floor. It must be performed:
Frame installation
Important: When laying reinforcement, it must be inserted into the brickwork no less than 15 cm. If you are making a home ceiling where there is already a roof, and not in a new building, then to install the reinforcement you need to make holes in the wall using a punch.
Type of reinforced grating
Important: When installing logs, it is necessary to take into account the load on them. Place components perpendicular and firmly to the ground. When loaded, the rack can be pulled to the side and then the whole system collapses
Method for increasing frame rigidity
Pouring concrete
After the frame has been installed, you can order concrete or create it yourself. To do this, you need to prepare a place for unloading or install a kneading tub.
Pouring concrete using a pump
Important: Whatever pouring option you choose, it does not have to be stopped until the formwork is completely filled. You need to work instantly and together.
A selection of ideas for the interior of rooms
For each room you can create a unique loft-style ceiling design. Below are the options for the main rooms.
Living room
There are no restrictions here. Polished concrete, wooden beams, iron pipelines, etc. will look equally beautiful. A combination of materials and multi-level ceilings are often used.
Bathroom
The main condition here is resistance to high humidity. Based on this, the finishing is selected. The classics are rough concrete, imitation brickwork, slats, film tension structures.
Kitchen
This is the place where almost any design solution will fit. Often everything on the ceiling is left in its original form, decorated with slats or metal parts.
Hallway
If the room is small, then you should not overdo it with additional elements, as this will visually reduce it. Smooth ceilings in white or gray colors will look good.
Bedroom
The loft in the bedroom is well complemented by wooden crossbars and false beams. Untreated wood will add coziness and tranquility to the room.
The photo shows an industrial-style bedroom with open communications.
In the bathroom
When decorating a bathroom, this design is very popular - perhaps due to the combination of hygiene and spectacular appearance.
The two-level black stretch ceiling contrasts well with the white walls. Experiment with contrasting textures - matte canvas and glossy brick or vice versa.
However, a simple monochromatic covering is also quite appropriate - this is especially true if you have a low room. In this case, a multi-level design can reduce it even further: we doubt that this is exactly the effect you need.
Hidden LED lighting, which we wrote about above, is a very beautiful way of decoration. Take care of safety - make sure that all wires are insulated from moisture, and the possibility of a short circuit is excluded. There are several protection classes, so be sure to read which LED strip is best suited for ceiling lighting in conditions of high humidity.
You can form the ribbons in the form of some kind of pattern or simply arrange them randomly - loft allows for both solutions, so don’t be afraid to experiment.