Some may think that painting a wooden floor is a simple matter that does not require special skills and knowledge. It would seem that you bought paint and a brush or roller and you can get to work. It should be noted that this approach is absolutely wrong. In order for a wooden floor to have a beautiful appearance, it is necessary to pay due attention to the entire painting process, starting with the selection of tools and paint, ending with checking the quality of the work done.
Necessary tools for painting
First of all, we start by selecting the necessary tools. High-quality floor painting requires the presence of: paint brushes of different widths, rollers, a spatula, a painting tray, a chisel and masking tape.
When choosing a paint brush, you should opt for the so-called “flutes” - flat brushes of different widths. They are used to process floor edges, baseboards, corners, and other surface areas that are difficult to reach with a roller.
It is better to carry out the main part of the painting work with a roller - this will not only speed up the process, but will also allow you to apply the paint in even layers. It is best to use rollers with short naps, as too long naps will result in a rough or uneven floor surface.
Masking tape, or tape, is used to prevent paint from getting onto surfaces that are not to be painted. Its main feature is that after removing the tape, no traces remain on the sealed area.
To make it more convenient to put paint on the roller, you need a paint tray. As a rule, these containers have a raised bottom on one side, beveled at a slight angle, which has a relief surface, which allows you to remove excess paint from the roller.
To achieve a smooth surface of the wooden covering, it is necessary to remove excess knots on the boards using a chisel. A spatula will be necessary if you need to fill existing cracks.
Paint selection
The most important aspect when painting a wooden floor is the choice of paint type. Building materials stores offer a wide range of these products, so it’s important not to go wrong. Floor paint must have a high level of resistance to chemical and mechanical stress and not be susceptible to abrasive wear. When deciding which paint is best to purchase, you need to take into account the following floor features:
- the type of wood it is made from;
- conditions in which the surface will remain (air humidity, intensity of mechanical load, antistatic);
- presence of previous coating (varnish or paint).
It is best to use oil paint, alkyd enamel, alkyd and acrylic impregnation or alkyd varnish for a wooden floor. If the floor is new, then it is best to use acrylic or alkyd impregnation, but for a previously painted surface you need to use oil paint or alkyd enamel. It should be noted that the service life of enamel is about 6 years, while oil paint will last up to 3 years without losing its attractiveness.
You need to buy paint from one batch, so before you go to the store, you need to calculate how many cans you will need for the entire floor. Typically, 200 grams of paint are consumed per square meter of wooden floor, and you also need to take into account how many layers of painting will be done.
Ways to paint a wooden floor
There are several options for painting the floor, the choice of which will depend on the condition of the floor and the desired final result.
First way. Suitable for floors that have no visible defects, it is the simplest and fastest. First, the wooden floor is covered with drying oil or primer, after which it is given 2-3 days to dry. Next, the first layer of paint is applied, which dries for several days. When the surface is completely dry, apply a second layer. It may take 4 days to a week for the second layer to dry completely.
Second way. Used for floors that have cracks, gaps between boards or other imperfections. The preparatory stage consists of applying drying oil or primer, which dries well. After this, the floor surface is putty using a special oil putty, which should be the same tone as the floor. The putty areas dry and are sanded, after which the procedure is repeated. Before painting, problem areas of the floor are primed and painted several times until the putty is visible. Next, two layers of paint are applied alternately, as described in the first method.
Third way. This painting option is characterized by high labor intensity and complexity of the finishing stage of work, which can be performed using two methods.
- According to the first method, the floor surface is covered with drying oil, dried and putty several times, with each layer of putty thoroughly sanded down. After this, the floor is puttied for the last time, a primer is applied and the surface is painted in three layers.
- The second method is that after the first layer of putty has been cleaned, the next mask-like layer of putty is applied to the surface of the wooden floor, on which tightly stretched gauze is applied and embedded in it. The surface dries, after which the putty is applied a third time, it is cleaned, primed and painted in three layers.
Painting technology
Regardless of the method, painting the floor consists of a certain number of steps, the sequence of which must be followed. First of all, it is necessary to carry out the preparatory stage, and only then begin painting.
- If the surface has previously been waxed, it must be removed, as it will interfere with the paint drying. A good remedy would be laundry soda diluted in water (7-8 liters of liquid are needed per glass of soda).
- Grease stains from the floor can be easily removed with white spirit
- Use a spatula to scrape off old, peeling paint.
- If the boards are loose, they must first be nailed down, and the nail heads must be driven in to a depth of 3-4mm.
- Using a chisel, you need to clean out the knots that are on the surface.
- Having previously removed the remaining paint, sand and other debris, it is necessary to prime the cracks between the boards and the places where the old paint has peeled off or worn off. It is better to use drying oil.
- If the cracks are quite wide, then you need to use tow or rope and, after soaking them in a 15% aqueous adhesive solution, fill the holes.
- To eliminate cracks, you can also use sawdust putty, which is prepared from sifted fine sawdust and oil putty.
- The putty must be applied with a spatula, moving it perpendicular to the surface. The first layer of putty is used to fill and level the cracks.
- When the first layer is completely dry, large irregularities are sanded, after which continuous puttying is carried out using a wide spatula. The spatula must be kept parallel to the boards while working.
- The next step is to sand the surface. After sanding, the surface of the wooden coating is cleaned of dust and primed with drying oil or oxol. The primer must be given 2-3 days to dry completely.
- Before starting work, the paint must be poured out of the cans and mixed until a mixture of one tone is obtained.
- The paint must be thoroughly mixed so that there are no lumps or clots.
- It is necessary to stick masking tape on the surface of the wallpaper - this will help prevent paint from getting on them.
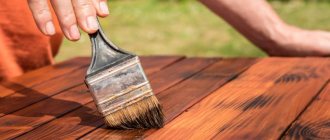
- You need to start painting from the baseboards, using a small brush.
- Using a brush, you need to pick up a small amount of paint on it, getting rid of its excess by squeezing the brush against the edges of the tray or jar.
- Wood floors should be painted in the same direction as the grain of the wood.
- The paint is applied in thin layers, because thick layers begin to swell over time.
- The brush should be held at a slight angle relative to the surface, slightly pressing it to the floor.
- When painting the floor with a roller, you must first wring it out. Using a special paint tray, excess paint can be removed on a textured surface. Movements with the roller must be performed away from you, without lifting off the floor.
- If the floor has been painted before, one coat of paint may be sufficient.
- New wood floors require two coats of drying oil or primer and 2-3 coats of paint.
- The second coat of paint is applied only after the first has completely dried.
- In order to remove any remaining drying oil or oil on the surface, the floor must be wiped with warm water for a week after drying. You can add vinegar to the water, but you cannot use soap, soda or powder, as they will damage the paint.
Read also: What is heavier, copper or iron?
Paint check
After the last coat of paint has been applied, the surface must be allowed to dry completely, which usually takes several days. To check whether the floor is dry, you can use a fairly simple method: just press your finger or a piece of paper onto the painted surface; if it does not stick, you can safely walk on the surface.
After completing the work, you need to pay attention not only to whether the paint has dried or not, but also to the quality of the paint. The floor surface should not show through the lower layers of paint, stains, wrinkles, drips, marks from a roller or brush. If such defects are present, another layer must be applied.
An important detail in the interior of any home is the flooring. The floor in the house affects the overall perception of the room more than other elements, so its design is given no less importance than the arrangement of walls and ceilings. Recently, leading positions have been occupied by floorings, which, as a rule, are decorated with paint. You can do the painting yourself at home, but before you begin, you should learn all the intricacies of the process.
Peculiarities
Any type of repair work has its own characteristics, and painting the floor is no exception. Most often, wooden flooring is chosen as flooring. Before you buy paint or varnish for the floor, you need to understand the origin of the existing floor covering. The material used for its manufacture is important when choosing paint or varnish, as well as the means with which the preparatory work will be carried out. You can paint the floor using acrylic, oil, wear-resistant and universal rubber paints.
It is necessary to take into account the characteristics of the room where painting work is planned. The intensity of use, exposure to external factors, average temperature and humidity are very important when selecting paint, since the service life of the painted surface will depend on its properties. If the surface itself has been previously painted, then it is necessary to determine the degree of compatibility of the used paint with the new product.
If the goal is not renewal, but the application of a new layer, then you need to either prime or treat the surface with a special compound before applying the decorative layer.
Natural drum upholstery
Sheepskin is used as a natural fur coat. This upholstery is the best choice for working with surfaces of any complexity. All types of paints are well retained on sheepskin, which allows for high-quality work with minimal consumption. Another advantage of natural fur coat is its long service life. When painting a ceiling with water-based or acrylic paint, a sheepskin coat will be the best choice.
What to paint with?
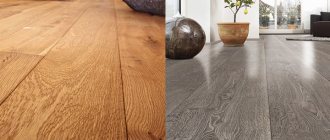
Today, there are various types of paints and varnishes that can be selected for both wooden flooring and concrete floors. There are two types of products that can be used to cover the floor: colorless and opaque. Clear varnishes are great for wooden surfaces. They are durable and fade resistant, and dry quickly. Decorative varnishes have many tones, thanks to which a wooden surface can be given a beautiful shade without blocking the structure of the wood. Beech, oak and other expensive flooring have a beautiful structural pattern, and a varnish with a translucent or transparent consistency will perfectly highlight it, give it shine and protect it from moisture.
It is worth remembering that the varnish is not resistant to various mechanical damage, and therefore it is better not to cover surfaces in rooms with high traffic. Otherwise, it is worth applying additional impregnations.
Do not use this product on flooring made of soft wood (spruce, pine). It is better to treat them with paint that maximally protects the surface from mechanical damage.
Brief classification of household paints and varnishes
There is a whole class of protective paints and varnishes for wooden floor materials:
Enamels
These are multicomponent film-forming protective and decorative compositions. The following are used as a basis:
Oil enamel MA-15.
- Mineral oils. Most often this is drying oil of various brands. The resulting oil paint is opaque, fits perfectly on metal products, and is suitable for concrete and wood. It is a universal mixture, meaning it can be used inside and outside buildings.
- Solvents. This category includes mixtures of cellulose ether resins in acetone and other similar compounds - nitrocellulose and others. Do not confuse with alkyd and urethane enamels: they contain white spirit or nefras, but they are not the basic components.
Which paint is better?
Paints of various colors are divided depending on the chemical composition into acrylic, oil, wear-resistant and rubber:
- Non-toxic acrylic paints , which are water-based, perfectly paint over solid wood surfaces. They are quite durable (service life is approximately 10 years), and therefore are in high demand. The components present in the paint are not afraid of temperature changes and high humidity, which means that the paint itself is suitable for use in rooms without heating. There is no pungent odor when painting, and the surface with paint dries quickly.
- rubber paints which are environmentally friendly and safe for the human body , appeared relatively recently, but have already gained popularity. They are characterized by high strength, super elasticity, water resistance and low consumption. The polymers contained in the paint protect the wooden surface from fading and temperature changes.
- Oil paints are inexpensive and extremely common painting materials. They have a uniform consistency and are quite resistant to temperature fluctuations. Having high viscosity, they are ideal for painting OSB panels consisting of glued chip particles. Water-based paints are not suitable for such panels, as there is a high probability of swelling and bending of the slab. Over time, cracks may form on the painted surface. In addition, the paint takes a long time to dry and has a very unpleasant odor.
- Unlike oil-based types, wear-resistant paints are durable. Surfaces with such paint are not afraid of peeling or fading. It is easy to apply a layer, and the paint dries quite quickly. Their smell is quite specific; it disappears from the room only after a few days.
Read also: Diagram of DC welding machine VD 305
Color solutions and decor
Gone are the days when only one color was used to paint a floor. Brown paint and several of its shades were produced specifically for wooden flooring. Today, manufacturers produce a wide color palette, thanks to which you can choose absolutely any shade. Water-based paints are especially distinguished by their color range. There are both ready-made options and those that can be given the desired shade using a special colorant. White paint is the base, to which a certain amount of the desired color is added. In order to get the desired shade of paint, you can add several colors.
Matte varnishes also have different colors and shades. With their help, you can give any wood flooring a touch of noble wood. Painting the floor covering can be done using one color or shade, evenly distributing the product over the entire surface. There are special stencil devices with which the surface of the old floor is transformed by applying a pattern. The technology is simple: a stencil with a cut out pattern is applied to the floor surface, and paint is applied to the open areas.
You can use either a sponge or a roller as a tool.
Work technology
Floor painting, like any other job, has its own technology. The final result depends on a competent and consistent approach to this type of activity. Before you begin the process, you need to prepare the tools that may be needed both during the preparatory work and for painting the floor:
- The main tool for covering the flooring is a roller. Today, manufacturers produce a wide variety of rollers of various sizes and materials: foam rubber, polyacrylic, fur, polyamide and even textured. Each type has its own purpose. For painting the floor, the best option is a fur roller marked VMP. They are produced in accordance with GOST and are the most durable compared to foam rubber options, and the layer of paint applied by them will lie evenly.
- To ensure uniform absorption of paint, it is better to purchase a special container with two-level planes. The product is poured into one half, and the other is used to squeeze out the roller.
Surface preparation
Preparatory work is carried out based on the condition of the coating surface. If the flooring is new, then you need to sand the surface well using a sanding machine, then remove dust and debris. If the coating is old, then first remove the paint layer using either a mechanical (using a hair dryer) or chemical (solvent) cleaning method. The resulting cracks are puttied, and after drying the surface is leveled.
If the coating is to be varnished, then there is no need for a primer. Such floorings are treated with special impregnations that protect the wood from mold, fungi and accidental fire. To prepare the floor for painting, use drying oil or a special primer, which gives the flooring antiseptic properties and prepares the surface.
A smooth and level floor with good adhesive properties will greatly facilitate the adhesion of paint to the flooring.
How to paint?
After preparation, you can start painting the floor in the apartment. There is a certain sequence for this stage of work. Before painting, the composition must be thoroughly mixed in a jar to remove clots, and this procedure is carried out regardless of the color (black, white, colored) of the paint. Then you can begin painting the surface adjacent to the walls, starting on the opposite side of the entrance. It is more convenient to do this with a small brush, since it will not be possible to thoroughly paint every corner with a roller.
After applying a layer around the perimeter, you can begin painting the central part of the floor. The applied layer of paint must dry completely, and only then can you begin installing the skirting boards. In order not to stain wallpaper or other facing materials on the walls, you need to cover the part adjacent to the baseboards with masking tape or other available means. Next, you can start painting the baseboards using a narrow brush. After the first layer has dried, a second layer is applied to the baseboards. After waiting the required time for it to dry on the baseboards, you can begin applying paint to the central part of the surface.
When the painted surface is completely dry, you need to prepare the floor for use by washing it thoroughly.
Instrument care
For long-term further use, you should carefully monitor the tool.
For this purpose, the following materials are prepared:
For each roller you should prepare a bucket of warm water. Add a couple cups of softener to each and mix until smooth.
You can clean the roller with water or dishwashing liquid. Before cleaning, the remaining paint on the roller is rolled out onto newspapers if you place an improvised canvas on the floor.
The sequence of actions is as follows:
If work was carried out with oil paint, alcohol or turpentine should be used. These are aggressive substances that can cope with even severe pollution.
After cleaning, the roller is hung on a nail or hook to dry. If this is not done, the roller pile will most likely lose its original shape and become unsuitable for use. When the instrument is dry, it is covered with aluminum foil or plastic film to protect it from dirt and dust.
If repairs are temporarily forced to stop, the roller should be placed in a plastic bag and placed in the refrigerator. This will preserve the quality of the instrument. However, when storing at low temperatures, it may be necessary to defrost the roller first.
Painting with a roller is a complex and time-consuming stage of repair. However, with a competent approach, the result will be pleasing to the eye, and the costs are not so high compared to the purchase of other finishing materials. The main thing is to follow the technology and not skip the preparatory stages. Painted surfaces will create an atmosphere of warmth and comfort in a residential space, as well as rigor and conciseness in an office building.
Source
Advice from professionals
There are several professional tips that can help you achieve the best results:
- The application of any decorative coating requires a clean surface, so the base must not only be cleaned, but also dried after washing. Preliminary surface treatment is required for floors made of any material (concrete, tile, wood, plywood).
- When preparing the surface of a concrete floor, quartz sand should be added to the primer. It will make the floor less slippery. In addition, to increase the strength of the cement surface and get rid of dust, you can use a special impregnation topping.
- When preparing wooden flooring for varnishing, it is better to treat the surface with oil or a wax mixture. This treatment will help protect the surface under intense loads.
- For plywood floors, it is better to pre-treat with an acrylic primer, which protects this material well from moisture and mold.
- The readiness of the surface after primer treatment can be checked by placing your palm on the floor. If the composition does not stick to your hand, then you can start painting.
You will learn more about how to properly paint a floor in the following video.
It seems that there is nothing complicated in choosing a paint roller, but in fact it is an important element for painting that requires special attention. The roller determines how the paint will adhere to surfaces, how convenient it will be to paint, whether it is suitable for reuse, and so on. Not only the dimensions of the handle and the roller itself are important, but also the materials that were used for it.
Therefore, for its readers, “Dream House” has prepared a full review that will help you choose a high-quality paint roller and easily cope with painting any surface and any type of paint.
Read also: How an intercom circuit works
How to choose a paint roller
Mistakes when painting with varnish yourself
Often, when painting the floor on their own, home craftsmen are faced with various problems:
- Poor drying of varnish. This usually happens when the varnish is incorrectly selected or the recommended temperature conditions are not observed during work. If a two-component composition is used, then slow drying indicates an insufficient amount of hardener.
- The appearance of whitish stains on the varnished floor. This indicates that moisture has entered the coating due to high humidity in the room.
- Formation of air bubbles on the surface and swelling of the coating. Such problems arise due to violations of varnish application technology.
- Uneven and uneven coverage. This is a typical mistake that inexperienced craftsmen make. Some types of varnishes dry out very quickly, which does not allow a person who does not have the skills to apply the composition evenly.
Only professionals can make a beautiful and smooth floor covering. Don't skimp on quality! Order this work, which has been finishing and painting wooden houses for over ten years.
We employ qualified craftsmen who have undergone special training, have extensive experience and the necessary work skills.
You can contact us using the coordinates on the “Contacts” page.
Calculate the cost of painting and insulating your home right now
Select types of work:
Select materials:
What types of rollers are there for painting surfaces?
Paint rollers types and sizes
You can use different rollers at home. First of all, they can be used for walls, floors and ceilings. The following paint rollers are classified according to their purpose and type:
- foam;
- polyacrylic (velor);
- fur;
- polyamide made of twisted yarns;
- textured;
- wallpaper rollers;
- frame;
- façade
To understand all their differences, you should familiarize yourself with each type separately.
Foam rollers
These inexpensive synthetic polyurethane rollers do not last long and are not suitable for active formulations. In particular, they are used for priming and painting surfaces with water-dispersion paints. But they are easy to use and affordable. They can be washed and dried quickly. Fur coats can be easily changed, so this option is quite practical and helps save money. Thanks to the foam rollers, the paint is applied evenly and accurately. You can easily paint on the sides and in hard-to-reach places if the roller size allows.
Polyacrylic (velor) rollers
This type is ideal for paints and varnishes, water-based and oil-based paints. Despite the light fleecy texture, no fluff from the roller remains on the surface. The paint is applied neatly and evenly thanks to the velor roller. It can be used on ceilings, walls and other smooth surfaces.
Fur rollers
They are made from natural sheepskin or polyester-based faux fur. The roller has a hard fleecy surface, so it is perfect for enamels and oil paints. The length of the pile should be selected depending on the type of surface. If the wall is not smooth, but rather porous or rough, then you should pay attention to a roller with long pile. They can be used to paint walls, floors and other surfaces.
Fur roller for painting
Polyamide rollers
There are different types of nap rollers, and polyamide is one of this category. They have the longest pile, so they are suitable for painting rough surfaces such as putty, drywall and the like. They are relevant for water-based enamel paints.
Textured rollers
If you are not satisfied with just a smooth surface, but do not want to use wallpaper, then you should pay attention to embossed rollers for decorative plaster, wet putty, and the like. They have a design similar to all conventional rollers, but they do not have a soft coat, but only a rubber base with some kind of pattern. There are many different options that you can choose according to your taste and preferences.
Textured rollers for decorative plaster
Roller with a pattern for walls
Wallpaper rollers
This type of roller is used for wallpapering. During wallpapering, air may be trapped under the canvas; eventually, it must be removed from there. A special roller with a fairly hard surface works wonderfully for this. With it, smoothing the wallpaper will not take much time. After use, it can be easily washed and dried quickly.
Frame rollers
These rollers are called frame rollers because they are made differently from all the others. They don’t just wear a ready-made fur coat. There is a completely finished frame on which the soft covering is attached. When using them with a roller, less paint is absorbed. Their cost is low, but they are easy to use.
Facade rollers
They are distinguished by long pile and the presence of a special intermediate padding, which slows down the rotation speed of the roller. This contributes to better quality painting and the absence of splashes during painting.
Criterias of choice
Many people wonder: which roller to choose for painting the ceiling or walls. There are eight main aspects to consider when choosing a roller:
Don't forget to purchase a cuvette. This small trough allows you to apply paint evenly and remove excess paint from the roller. It is reusable, so it will be useful for further repairs.
Dimensions
The rollers differ not only in design, but also in size. The instruments are classified according to their sizes:
There are also separate rollers for working with bitumen and structural paint.
Foam rubber
The cheapest option, suitable for water-based paints for interior work. Its main drawback is its low resistance to aggressive compounds. The foam roller is not suitable for oil and alkyd paints.
Velours
The velor roller is chosen by those who value quality. It allows you to create smooth surfaces if the painter is professionally trained. If there is none, it’s worth practicing, as all the defects will stand out.
Fur varieties are used for applying enamel, oil, latex paints and silicates. The shorter the pile of such a fur coat, the smoother the surface will be. These rollers are considered classic, since their history goes back to the past, when our grandparents painted fences and walls of houses with them.
Polyamide thread
Rollers with threads instead of a coat allow you to apply paint quickly, but not too carefully. In this case, the movements should not be sharp, since paint tends to splash from the roller.
What to look for when choosing a paint roller
Which roller for which paint?
When you come to the store, it is difficult to analyze the quality of the roller solely by its appearance. Not all sellers have personal experience in using paint rollers, so they can only advise on manufacturers, price and similar characteristics. The paint roller should be chosen correctly so that it is convenient to use, and the resulting result fully satisfies expectations.
Here are some tips to help you choose the perfect paint roller:
- When painting the ceiling, you should choose a tool that is not heavy, so that your hands do not get tired in the first couple of minutes. Ideally, rollers with a long handle are suitable for the ceiling so that you can paint while standing on the floor, but they weigh a lot and are more suitable for professional painters.
- For walls, the weight of the tool is also significant. Take, for example, a fur roller. After impregnation with paint, it becomes even heavier, and it is very difficult to use it for a long time without good physical preparation.
- The colors of the fur coat can also be different. It is much more convenient to work with a white fur coat or any other. Rollers with dark piles have the ability to fade over time, and the long pile of low-quality rollers can remain on the wall along with the paint.
- Make sure that there are no seams on the fur coat, because this will cause discomfort during painting. Such rollers leave marks on the surface. Of course, they can be removed, but to do this you will have to apply another layer of paint, and maybe more than one.
- Don’t be shy to try each handle for strength. You can press on the roller to see how hard it is and whether it bends during use. Also, the handle itself should be comfortable; for this you need to hold it in your hand.
The most important thing when using a paint roller is that the painting process is uncomplicated, and the surface turns out well painted even after the first coat. At the same time, I want the cost of the tool to be low. A huge selection of options in construction stores fully fulfills all the requirements of customers, so feel free to go looking for your roller, armed with our advice.