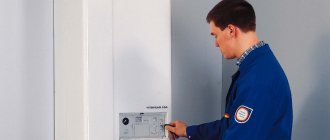
Agree that a socket in general is not the most important decoration of a room, and therefore you should not focus on it and place it in a prominent place. Of course, the location of the outlet for the air conditioner does not greatly affect the overall interior of the room, but it should be carefully considered so as not to damage the wall in the future and not to use extension cords again.
We will tell you where to install air conditioning outlets. We will suggest the best and safest places to place a power point. The article also provides recommendations for masking sockets and cords from air conditioning equipment.
Interblock communications how to do
A hole in the wall for the passage of communications is drilled using a hammer drill with a drill with a diameter of 4-5 cm. If the interblock route includes a drainage pipe for condensate removal, then the channel must be made with a slope (5-10 degrees towards the street). It is advisable to hide the section of the route from the indoor unit to the point where it enters the wall in the wall. When gating, a lot of dust is generated, so if renovations have already been made in the room, then it is better to lay the route outside, subsequently covering it with a decorative box.
Interblock communications can be hidden in a decorative plastic casing
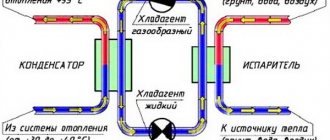
The inter-unit communication route includes copper freon pipes, power supply and equipment control wires, as well as a drainage pipeline (according to the rules, condensate from the indoor unit must be drained into the sewer system, but many simply drain it outside). The required length of wiring and pipelines is determined by measuring the total length of the route (plus a small margin of 30-50 cm).
To cut copper pipes, you must use a pipe cutter, not a grinder or a hacksaw, to avoid the formation of sawdust, which can subsequently lead to breakdown of the air conditioner. Before installation, the pipelines are placed in a heat-insulating shell; to prevent debris from entering, the pipeline openings are closed with plastic plugs. All components of the route are laid together, rewound with vinyl tape, after which the route is installed in place.
After laying the interblock communications, they begin to connect the wires and the freon line. The installation instructions for the air conditioner must contain a wiring diagram that must be followed during operation.
The length of the tubes is adjusted (we cut off the required size), then it is necessary to remove the burrs (we remove the chamfer using a reamer). After threading the nut, each edge of the tubes is flared by rolling. Then the edges are connected to the fittings of the indoor and outdoor units, tightening the nuts with a torque wrench (the connections must be absolutely tight).
After checking the tightness, air is removed from the line using a vacuum pump; a manometric manifold makes it possible to control the pressure
Having finished connecting the route, check the tightness of the line and “vacuum” it (remove moisture and air) using a vacuum pump. To do this, a vacuum pump is connected to the service port of the outdoor unit through a manometric manifold, which, by pumping air out of the system, creates a vacuum in it. This process lasts about 20 minutes (depending on the volume of the circuit). After turning off the pump, observe the change in pressure for half an hour; if the pressure gauge needle does not deviate, then the system is sealed. Only after a thorough check of the tightness is it possible to open the taps of the outdoor unit and fill the circuit with freon
Attention, a freon leak can cause a compressor breakdown, but more important is the extremely harmful effect of freon on the human body
So, the system is assembled and filled with refrigerant, all that remains is to connect the air conditioner to the electrical network and check its operation. The connection diagram for the air conditioner is simple; in most household split systems, the power supply is connected to the indoor unit; to do this, you just need to connect an outlet to it.
Now you have a general idea of how to install an air conditioner yourself. We were talking about installing a split system as the most efficient type of household air conditioners. The video instructions below will help you figure out how to install an air conditioner.
Installation of a mobile air conditioner does not require the intervention of highly qualified specialists: you just need to place the device within 2 m from the window (to remove hot air), and then connect it to the network.
Preventive Maintenance
Cleaning (prevention) of an air conditioner installed in a house or apartment includes the following work:
- periodic change of filters;
- cleaning elements from dust and dirt;
- diagnostics, refilling with freon;
- if problems are identified, repair or restoration.
In standard cases, maintenance is performed 1-2 times a year. Mechanical filters require monthly cleaning. You can do this yourself. First you need to remove the panel, then remove the filters and wash them thoroughly under water using dishwashing detergent. Then dry it well and put it in place, covering it with a panel.
Power Line Requirement
Requirements for a separate power supply line:
- availability of a machine on the line
- presence of grounding
- only copper cables
- wire cross-section from 3 X 2.5 and above
It is also necessary to conduct power supply from the internal unit of the air conditioner to the external one. if possible, the cable can be laid together with the freon interconnect route.
When connecting the air conditioner, you must follow the operating instructions, which, among other things, indicate exactly how to connect the electrical wires. The instructions also provide a detailed wiring diagram for this specific model.
The second solution to obtain information for installing a specific air conditioner is the electrical diagram presented on the inside of the cover of the air conditioner units, or on the units themselves. It details how it is necessary to connect the air conditioner units to each other and how to connect the split system to the existing electrical network.
Let's look at the most common sequence for connecting a home air conditioner.
We connect the power wire to the mounting block. In the air conditioner mounting block, connect the power wire strictly according to the diagram on the cover.
The black wire that comes from the machine is connected to terminal L
Blue wire connects to terminal N
The yellow-green wire is connected to the ground of the air conditioner
The connection of the outdoor unit must be carried out following the user manual or the diagram located on the air conditioner. The split system units are connected to each other using a power cable with a cross-section no less than that indicated on the cover.
The cross-section of wires recommended for use with air conditioner power up to 4.6 kW is 3 X 2.5. Install a 20A machine. To connect the air conditioner, you must use only copper cables.
Carry out the electrical installation slowly and strictly adhere to the diagram. Lay electrical cables in grooves and decorative boxes, not openly; use a corrugated pipe of a suitable diameter. This will allow you to remove or replace the wires if necessary. If you place the drainage together with the cable, do not neglect to hide the cable in a corrugated tube.
General recommendations
The electrical circuit of an air conditioner for household services differs from the connection of a three-phase device, which is used in large offices for various purposes, business centers, and supermarkets.
It must be remembered that electrical installation is carried out in accordance with the Installation Rules and relevant regulations.
Before connecting the units to the electrical network, you should carefully prepare.
To do this you should:
- carefully read the diagrams and specifications for components and materials of the device;
- inspect the existing electrical supply system, including the location and cross-section of incoming cables;
- test the intended route with a detector for the absence of internal electrical wiring and metal elements of building structures;
- analyze the composition of the walls on the surface or inside of which electrical work will be performed.
Connecting the air conditioning system is impossible if there is old aluminum wiring in the house and there is no grounding.
Direct cable laying must be carried out taking into account the following requirements:
- the distribution box, switch, socket for a household air conditioner are located in an accessible place;
- the socket is installed at a distance of at least 50 cm from the floor and grounded metal elements (batteries, water and heat supply pipes);
- The wire is laid only horizontally and vertically;
- when laying horizontally they recede:
- from the cornice 5-10 cm,
- from the ceiling - 15 cm,
— from the baseboard – 15-20 cm;
- there must be at least 10 cm between the vertically stretched wire and corners, as well as window and door openings;
- laying parallel to gas pipes is carried out at a distance of 1 m from them;
- The electrical wire is protected from heating pipes with insulation.
In addition, the following rules must be observed for connecting devices to the electrical network:
- It is strictly forbidden to connect wires by twisting. Extension is carried out using terminal blocks or bolts;
- It is not allowed to connect a wire made of aluminum and copper due to their different electrical conductivity (for a copper cable this figure is one and a half times higher).
External wiring
If the method of laying on the wall surface is chosen, then the cables are fixed every 50-60 cm with plastic clamps, which in turn are secured to the wall with screws. When using boxes in which the wire is laid, they are secured with glue or screws.
Internal wiring
Cables hidden in the wall are laid in plastic corrugated pipes, having previously made a recess (groove) of the required length. Typically, the corrugated pipe is secured inside the wall with clamps. If the depth of the groove is 2 cm or more, then it is allowed to carry out work without a corrugated pipe.
Wires must not be laid in bunches and at a distance from each other of less than 3 mm.
What types of air conditioners are there?
Today there are several types of air conditioners. The most common are:
- Window;
- Mobile;
- Split system;
- Multizone system;
Split system
The window air conditioner crashes into the window opening. This type of climate control technology was common more than 10 years ago, but now its popularity has decreased significantly. Such devices have more disadvantages than advantages. The advantages of such air conditioners are:
- Low cost;
- Ease of installation.
The disadvantages of such systems include:
- Low power, such a device cannot effectively cool the room, especially if it is of non-standard shape. And if the window is closed with thick curtains or curtains, then cold air will not enter the room at all;
- The noise level is too high due to the fact that the compressor is located in the middle of the room;
- Reducing the illumination of the room - the air conditioner blocks part of the window and reduces the access of sunlight to the room.
Mobile air conditioners are perfect for those people who often change their place of residence. They have also proven themselves excellent in country houses. To electrically connect such a device, a regular outlet is sufficient. To remove hot air, you need to remove a flexible pipe into a window or a special hole in the wall. The advantages of such devices include:
- Ease of movement;
- Ease of installation.
Mobile air conditioning system
The disadvantages of such air conditioning systems are many times greater, including:
- High cost - sometimes comparable to the cost of a stationary split system;
- Increased noise level due to the compressor indoors;
- Low power, such a device will not be able to efficiently cool a large area.
Split systems are the most popular today. They are presented in a large assortment in household and HVAC stores. You can choose based on design and performance characteristics. The advantages of such systems are:
- Large selection, making it easy to choose the desired design;
- Low noise level; the compressor in such systems is located outside.
Such split systems have only one drawback - they require the involvement of specialists in installation. Although there are home craftsmen who, without any problems, independently connect split systems in private houses and apartments located on the lower floors.
Multizone systems are more often used in office premises. With the help of one such air conditioning system, up to 30 rooms can be efficiently serviced. Moreover, for each of the rooms an individual indoor unit of a suitable design is installed. The advantages of such systems are:
- Possibility of servicing a large number of rooms without changing quality;
- Long service life, maintaining all technical characteristics at the entire stage of operation;
- Maintaining a comfortable temperature in each individual room.
Multizone system
There are only two disadvantages of multizone systems:
- High cost, which is not affordable for everyone;
- Difficult to install.
The type of air conditioning system must be selected based on the area of the room and its purpose. It will be important to familiarize yourself in advance with the technical characteristics of the purchased air conditioner and the intricacies of its connection.
What is good about this cooling method?
Let's talk about this using the example of wall-mounted air conditioners. The fact is that they are convenient for small spaces. And in large ones it is impractical to install a wall block. If placed on the wall, the device will not create enough air flow to reach the middle of the room, not to mention the ability to blow on the opposite wall.
Invisible and effective
You can, of course, hang the room with wall elements around the entire perimeter, but the cost and aesthetics of such a solution are unlikely to interest the user. This is where installing an air conditioner with a unit built into the ceiling structure will be useful.
Cassette air conditioners cope best with cooling large areas, and, being semi-industrial products, are most often suitable for air conditioning:
- Trading halls
- Large lobbies
- Catering establishments
- Shops and workshops
- Exhibition complexes and galleries
Having a working evaporator located around the perimeter of the outer panel of the housing, the cassette air conditioner is capable of blowing cooled air in four directions, covering a larger area than a classic wall-mounted unit.
Requirements
It is important to remember that the connection diagram of the air conditioner to the electrical network of residential premises is fundamentally different from the industrial version used for offices and factories. The connection in apartments is only single-phase
There are several variations of work with which you can connect split systems.
- Direct connection to a power outlet.
- Creating a separate wire to the electrical panel.
The first option applies to all household devices without exception. This is the only way they can be used. The procedure itself consists of several steps, the execution of which is mandatory. The slightest mistake can lead to the air conditioner malfunctioning.
Option 1
Before directly connecting the split system, it is important to stretch the cable to the outdoor module from the evaporation system. First of all, lay the wire connecting the blocks (external and internal)
Next, establish a connection to the electrical panel (this procedure is necessary for powerful systems). Weak devices, as well as medium-power systems, can be connected via an outlet.
Not only weak systems work through a socket; this connection is also typical:
- window-type climate systems;
- any with a powerful electrical network in a residential area;
- temporarily located air conditioners.
It is important to understand that in order to put the indoor unit into operation, it is necessary to install reinforced sockets in advance, as well as, if possible, a protective system. The manufacturer is required to include instructions in the box, in which you can find:
- air conditioner operating diagram;
- general connection diagram;
- electrical diagram for connecting blocks.
Identical information is present on the surface of the outdoor unit, as well as on the evaporator cover. This will make connecting the air conditioner to the power supply several times easier with your own hands. The connection terminals are located under the decorative panel of the evaporative system. The evaporator wires are connected directly to the outdoor unit according to the numbering, which is clearly stated in the instructions. Also, do not neglect the insulation of free conductors with special tape, this will help prevent short circuits.
It is also important to pay attention to a number of reasons why connecting air conditioners to the electrical network is prohibited:
- old wiring using aluminum wire;
- poor-quality cross-section of wires that may not withstand the load;
- lack of grounding and protection against voltage surges;
- critical condition of electrical wiring, presence of mechanical damage.
Connection diagram of the air conditioner to the electrical network
Option 2
According to manufacturers, one of the safe and practical options would be to use an individual cable to connect the system to the electrical network, and installing a protective device will protect the air conditioner from voltage surges and various reboots, which in most cases lead to the burning of microcircuits and device wires. Also in addition to safety is convenience: your own line allows you to place the module in any place convenient for you.
There are standard requirements prescribed by the manufacturer:
- For safe connection and use, a residual current device and a residual current circuit breaker must be present;
- copper wiring;
- compliance of wire diameter with requirements;
- presence of grounding.
Copper wiring is a mandatory requirement for connecting the device
Let's listen
To begin with, we simply plugged the Niagara 3000 into the network, after which it occurred to me to press my ear to the device. A distinct “electric” hum is heard - its presence is also noted by the manufacturer. However, from a distance of 30 cm this sound is already indistinguishable.
The heating that sometimes accompanies the operation of such devices was absent in our case. Related to this, by the way, is the documented possibility of installing the Niagara 3000 not only horizontally, but also vertically - if it’s more convenient, then why not?
To test the AudioQuest Niagara 3000, we used a less than standard audio package. The amplifier with a power of up to 100 W per channel was supplemented with a network player to test the digital setup. The analogue version was represented by a textbook vinyl player.
But for the acoustics - a pair of compact floor-standing speakers, exactly matching the power of the amplifier - they decided to add a couple more subwoofers to increase the load. I’ll leave the model names out of brackets, I’ll just note that all the equipment requires power, and this set was also carefully configured in advance.
If we analyze the level of components, then perhaps the Niagara 3000 has become a slightly redundant partner for such a set. Well, it’s all the more interesting what you can get with its use.
Two sockets for powerful devices.
At the top left is the Power Correction switch. On the other hand, our audio kit forced us to try the Niagara 3000 in more diverse modes. Judge for yourself: having three powerful consumers at once - two subwoofers and an integrated speaker - and only two powerful sockets for them, we had to invent options. And we decided to connect the components one by one.
So, first of all, the sound of subwoofers. On recordings with serious punch, the bass stood out, became more prominent, tangible and concrete. However, it cannot be said that its volume ratio has changed. Rather, it's about intelligibility, if such a term is appropriate in relation to a set of a pair of 10-inch woofers with a pair of passive radiators of the same caliber.
It was not possible to activate the overload indicator during the test
Our unemotional and precise amp added emotion to its understated precision, expanding and clarifying the stage and separating the top percussion. Particularly worth noting is the improved microdynamics, which was appreciated even with the full forte orchestra and chorus from Grieg’s “Peer Gynt” (“In the Cave of the Mountain King”).
However, I consider the main advantage that the AudioQuest Niagara 3000 was able to bring to the sound of our setup to be air. The pauses became clear and deep, and the solo instruments fell into place and came to life.
This was especially evident when working from the Niagara 3000 amplifier-turntable combo. We decided to use Smokey Robinson's classic, although not often heard, album, Yes, It's Your Lady, recorded in the early 80s.
I was not delighted with the initial “tuning” audition. Vocals, backing, instrumental parts - everything mixed into a single lump and did not want to separate. There were too many sounds and they interfered with each other.
Niagara 3000 helped put all this in its place. Playback literally jumped a class higher. The sound became “the one”, carrying the atmosphere of the heyday of disco-soul in the 80s. The soloist's sweet voice stood out and came to life. Everything became visible - and, unfortunately, the flaws of our vinyl...
On the other hand, the operation of a high-resolution DAC connected to the player system in the presence of an air conditioner and without it, in my opinion, did not have any pronounced differences. Of course, we could also try to connect both the amplifier and both subwoofers to the conditioned power supply, but, on sober reflection, we did not do this - the information received was already quite enough.
What not to do
Let us emphasize what basic requirements exist when installing an air conditioning device in a room:
- do not place the device next to large furniture - it will interfere with the correct movement of air flow
- negative decision - the location of the air conditioner is connected with the localization plane of a large number of people
- cold air should not be directed directly at a person - this will provoke the occurrence of colds
- You should not install the device above constantly operating heating appliances - it will wear out, which will negatively affect its service life
- The device also cannot be mounted in places with high-frequency operating devices - the commands and settings of the processor responsible for the operation of the cooling system may be lost
- do not install the device in areas with a difficult air circulation system, otherwise the required air temperature in the room will not be maintained: pushing off from an artificial obstacle, the air will return to the air conditioner, the automation of which will decide that the necessary thermal conditions have been achieved and will simply turn off the device
- The indoor unit of the climate control unit should be installed as level as possible so that the condensate flows through the tube into the street and does not drip onto the floor of the apartment
- if there is a canopy over the external structure, you should make sure that it is not an obstacle to the removal of exhaust air from the system
In general, there are three basic schemes for introducing an air conditioner into the electrical network. Which one to choose should be decided situationally, based on the living conditions of a particular room.
Please note that installing the device yourself and connecting it to power may negatively affect the functioning of the entire system. Sometimes it is better to spend a small amount and invite a specialist to at least consult with him about the installation process.
Guided by the recommendations given in the article, you can carry out competent installation of a climate control system in a residential area, correctly connect it to the electrical network, and also extend its service life for many years.
Principle of operation
The built-in air conditioner operates on the principle of constant movement of refrigerant in the circuit, which is provided by the compressor. Hot air coming from outside is first cooled by the evaporator and ends up exiting through several channels.
The functionality of the equipment directly depends on the design of the indoor unit, as well as on the installation method used. If the structure is fixed at the top, the cooled air flow will go along the ceiling, evenly distributed throughout the room. In cassette-type models, the air masses are evenly divided on 4 sides. When choosing equipment with floor mounting, circulation occurs from bottom to top.
Air conditioner installation steps
At each stage you will need tools and certain knowledge. Each split system comes with detailed instructions on how to connect the installation. You can look at it like a cheat sheet.
Stage one – electrical connection of the split system. Electrical wiring should always be separate; it is also better to allocate a separate circuit breaker for it in the electrical panel room. Any air conditioner is a fairly powerful device, so there is no 100% guarantee that old electrical wiring will cope.
Installation of an external air conditioner unit
In houses that are more than 20 years old, it is better to immediately change all the wiring, since previously laid wires were not initially designed for increased load.
Stage two – installation of the external unit of the split system. It is necessary to make holes for fixing the metal clamps. If the external unit is planned to be located on an unglazed balcony, then standard bolts are sufficient. If the balcony is closed or there is a desire to attach the device to the wall, then brackets will be needed. All experts note that this fastening device is capable of fixing and reliably holding weight greater than the weight of the air conditioning device. If the living space is on the top floor, the system can be installed on the roof.
If the home is on the ground floor, then it is better to hang it at a height of at least 2 meters and place it in a grid. Otherwise, unscrupulous people may steal it. It is also necessary to install a metal canopy. It will save the device from snow or falling icicles.
There are some points when installing an external unit, it is recommended to pay special attention to them:
- The supporting wall must be sufficiently solid and smooth;
- When installing, it is not advisable to bend the drainage pipes; freon operates through them. Otherwise, the compressor will stop pumping it.
Installation of the indoor unit of the air conditioner
Stage three - installation of the indoor unit of the split system. If the system is mounted on a wall, it is attached to the wall with screws; if it is ceiling-mounted, then you will need to first install the brackets into the wall, then fix the unit. We check the strength of the installation.
The case with a floor-standing indoor unit is the simplest. It does not require additional means of fixation. You just need to choose the right location for it so that it doesn’t blow too much and doesn’t get in the way. After completing all work with communications, it is not advisable to move it, so as not to disrupt the functioning process.
Places where the indoor unit cannot be located:
- Above the heat source, most often a battery. Otherwise, the air conditioning device will constantly function and cool, and therefore may quickly break down. In addition, the heat constantly rising from the thermal fluid means that the plastic casing may melt;
- In a room where work is carried out using devices emitting high-frequency vibrations. They disrupt the work of the processor running in the block;
- Above the bed, table or work area. A strong draft can lead to constant colds;
- In places where air circulation is difficult. The standard distance to any large objects should be at least 3 meters. If the distance is smaller, then the cooled air will be reflected from the obstacle and return back with the same initial temperature;
- If you have decided to connect the split system yourself, then you need to be very careful that the device “stands up” smoothly so that the water located there does not leak out.
Stage four - punching holes in the floor or wall. Immediately before starting the process of connecting the system to the electrical network, you need to make ceiling or wall holes to connect freon tubes and electrical wires.
If there is no desire or opportunity to ditch, then you can disguise the wires under the baseboard or place them in a decorative box.
Stage five - checking the correct connection of the split system using a testing program. To do this, the air conditioning device is switched on to test program mode. While she is checking the condition of the device, you need to carefully listen to extraneous sounds and see if the case is shaking.
Installation of the internal part
Installation of simple cassette air conditioners begins with the installation of the indoor unit. The best place for an air conditioner is in the center of the room. The device will be most effective and useful and will be able to create the correct air flow.
Before installing the unit, a cardboard sample is created that matches the size of the device (if such a sample is not included with the device).
The sample is applied to a place on the wall or ceiling to determine the scope of work. If there is such a need, the ceiling profile (aluminum) is trimmed, but only after it has been thoroughly strengthened. To reduce vibration of the indoor unit, the ceiling is additionally equipped with foam inserts before installation. For the studs on which the air conditioner will be held, holes are made using a drill.
Nuts are put on each stud, after which the internal block is attached to the grooves. With the help of nuts the body is well secured.
Installation of additional pipes
Using a level, the position of the block is checked (otherwise liquid will collect in the future). After this, the distance for the future freon line is measured. The pipes that come with the device are carefully trimmed to fit the measurements taken. It is important to clean out any metal shavings that may remain in the scraps. Special tools are used to process the edges of pipes.
To install pipes, insulation is carried out using adhesive tape or adhesive tape. Then the pipe is insulated and hung on prepared hooks. Pipes are secured using ties to prevent them from loosening during the passage of air. Bent pipes require additional fastening - do not bend the pipe manually, this can damage or break it. If the pipe length is not enough, you can increase it by increasing the diameter. The final fitting of the pipes is welding of individual parts.
Connecting the internal part of the system
Fixed pipes should be connected to the block. To do this, the following steps are carried out:
- pipes are connected to the nozzles of the inside of the device;
- the nut is put on the pipe;
- a cone is attached to the pipe;
- the cone is securely fixed;
- Insulation is attached between the block and the pipe.
After the final fixation of the connecting parts, a strip is installed that covers the pipes. Using a level, the cladding is installed - the internal block is completely covered and adjusted to the decor.
If the decorative elements do not fit tightly, tighten the fastening nuts. All parts must be firmly fixed to prevent damage to the device and damage to the ceiling.
Selecting a location
The presence of two or more units of climate control equipment requires a choice of location for each of them. Before starting installation work, you will need accompanying documentation.
Do I need permission to install an air conditioner?
Structurally, the air conditioner is a system with an indoor and outdoor unit, which is mounted on the facade.
Multi-storey building, on the basis of Art. 246 of the Civil Code is common property with the right of disposal by all owners. Installation of equipment without approval is a violation:
- the device makes noise, buzzes, disturbing the peace of the neighbors;
- condensation can damage the façade of the building or get onto the balcony below;
- the overall block blocks the view or view and windows;
- There are risks of wall cracking, wiring shorting and fire.
Based on paragraph 1 of Art. 25 LCD installation of a split system is considered as a reconstruction or re-equipment of the premises. Clause 3.5.8 of Resolution No. 170 states that it is prohibited to install an air conditioner without permission from the management company and neighbors. Consent or refusal can only be obtained after a meeting of the residents of the house.
Important! Residents of private homes can begin installation immediately after purchasing the device. Permission is required if:
Permission is required if:
- installation work is carried out on the front part of the high-rise building;
- the user lives in a house that is valuable from a historical and cultural point of view;
- the split system is located above the pedestrian paths;
- There are no special fences on the window opening where the block is located.
Important! The management company does not have the right to remove air conditioners. Art. 330 of the Criminal Code considers such actions as arbitrariness
Dismantling of devices is carried out only by court order.
Choosing a location for the indoor unit
Installation of the internal air conditioner module is carried out with your own hands so that cold air flows do not cause discomfort. It can be placed above the head of the sofa, on the side and behind the workplace. Construction regulations define the order of location of the indoor unit:
- from the structure to the ceiling - at least 15 cm;
- from the module to the right or left wall - at least 30 cm;
- from the block to the floor - 280 cm, but for apartments on the ground floor, the external block is mounted at the same level or lower than the internal one;
- from obstacles to the movement of air flows - no less than 150 cm;
Advice! In a room with a sofa and TV, it is better to place the air conditioner above the sofa.
Where to locate the outdoor unit?
The outdoor module is placed near a window opening or on an open loggia. If the balcony is glazed, the block is placed on a fence with good load-bearing capacity or on the facade. Residents of the 1-2 floors need to determine a place for the outdoor module as far as possible from passers-by. On the 3rd or more floors, it is allowed to place the device under a window or on the side.
In a private house, the outdoor unit is placed on a wall with high load-bearing capacity. On ventilated facades, a special fastening is organized or the block is placed on the plinth.
Determining the distance between blocks
The maximum length of the intermodule route is 6 m; if it is exceeded, additional freon injection will be required. If the external and internal modules are placed at a distance of 1 m, the route should not exceed 5 m. The excess of the system is formed into a ring and placed behind the block.
Interesting to know! Manufacturers indicate different maximum distances between blocks. For Daikin equipment it is 1.5-2.5 m, for Panasonic - 3 m.
Conclusions and useful video on the topic
Since installing an air conditioner and sockets for it takes a lot of time and effort, the issues of its power supply must be taken as seriously as possible. Before installation, you should take the advice of electricians and designers.
Some recommendations for installing sockets in an apartment are given in the video below:
If possible, you should design the location of an individual outlet and lay a separate power line to ensure uninterrupted operation of the climate control equipment. This can be done both at the stage of major renovation of the premises, and during the installation of an air conditioner in an already renovated room.
Tell us where and how you placed the electrical outlet for the air conditioner in your apartment/office/house. Share the nuances of the location known only to you. Please leave comments, ask questions, post photos in the block form below.
Connecting the air conditioning system
- the connection point is connected directly to the junction box. In this situation, they do without a socket and plug. But with this connection method, it should be taken into account that the electrical wiring used must withstand the load during the simultaneous operation of all household devices connected to it. The distribution panel is additionally equipped with a system that controls automatic shutdown in case of overload;
- If an air conditioning device is installed during general repair work, a closed structure is most often used during installation. A special channel is installed in the wall. It houses the cable. One end is connected to the distribution panel, and the other is secured to the outlet terminal. At the final stage, the channel is sealed. At the same time, the interior of the room does not deteriorate. The wiring is not influenced by external negative factors;
- Installation of the socket under the air conditioner can be done in an open way. This method is used if the repairs have already been completed and residents do not want to further damage the wall. One of the ends of the wiring is connected to the junction box. A socket is connected to the other end. The cable is located on the surface of the wall covering. It is placed in a decorative box.
Advantages
Built-in air conditioners have a special set of obvious advantages:
- Easy access simplifies repairs and servicing
- Uniform distribution of flows creates a comfortable mode
- Good power, high performance, reduced noise
- Simplicity, ease of use
- Doesn't take up much space
Based on the information presented, it becomes clear that ceiling-mounted climate control systems have many clear advantages without any disadvantages.
What kind of socket is needed for an air conditioner?
The main selection parameter is the rated load when connecting. It is recommended to buy a model with a power reserve of at least 10%. Rated voltage 220 V, 16 A. According to the installation method, models can be external, overhead or hidden. The first ones are mounted on the wall surface. They are rarely used if it is not possible to make grooves.
Overheads are similar in design, but are designed to connect to wiring coming out of the wall. Can be used as temporary or when it is impossible to form a recess for hidden installation.
Hidden - the most common models. Most of the body is located in a wall niche, the front part protrudes slightly flush. Installation is more complicated than the two described above, but these models have a better design and fit into the interior of an office or apartment.
Additional characteristics:
- must be connected to grounding;
- protection class – IP54;
- connection type – F or C.
The last parameter depends on the design of the plug (plug). If the air conditioner was produced for the countries of America, Asia, Great Britain or Switzerland, it is recommended to replace the plug with a standard European one. An alternative is to purchase adapters for your specific model.
Type “C” models are gradually going out of sale because they do not have a grounding function. To power a split unit, you need to buy “F” type models.
Flaring of copper tubes
We move on to the stage of preparing the tubes.
Error No. 5 You can cut them only with a special pipe cutter, no hacksaws or grinders!
When making a cut, it is necessary to hold the end of the copper pipe strictly downward in order to prevent any chips from getting inside.
The ends are processed with a rimmer.
Use the rimmer carefully to avoid scratching the skirt. The quality of rolling is one of the most important aspects in installing an air conditioner.
Flaring is carried out using a special tool with an eccentric. Don't forget to put the connecting nut on the tube before this step!
The width of the flare should be such that the connection eventually fits freely and unhindered into the nut.
The height of installation of the tube in the rolling clamp is strictly regulated.
The simplest and most proven old-fashioned way to determine the quality of rolling, at least at the initial stage, is to see your reflection in the “skirt”.
Flaring of the pipes of the outdoor unit will have to be done outdoors on weight. Otherwise, the line simply will not fit through the hole.
Error No. 7 Please note - if the installation does not take place on a hot, warm day, then when bringing copper pipes home from the street, close their ends and be sure to wait time for the copper to reach room temperature.
If you bring them in cold and open, then due to the dew point effect, condensation will form inside the tube, which, on a poorly evacuated air conditioner, can lead to dire consequences.
Do I need a circuit breaker or RCD?
Protection of electrical communications in buildings from short circuits and overloads is carried out by automatic switches. Safety for human health and life from possible current leakage is ensured by a residual current device (RCD). This low-voltage device is not protected from overcurrents, so it is installed together with the machine. There are also differential circuit breakers, which include an RCD and an automatic circuit breaker.
What is more rational to install: a difavtomat or an RCD with a machine? So, the differential switch will take two module spaces on the panel (more expensive ones will take one), and the RCD and the circuit breaker will take three. To save space on the distribution panel, preference is certainly given to a circuit breaker.
As for electrical installation work, it is somewhat easier to install a difavtomat than to link a pair of RCDs plus an automaton.
It is more convenient to diagnose problems in electrical networks with an RCD. In this case, each of the devices operates independently of each other. The differential switch will not be able to identify the specific cause of the failure, since it shows the diagnosis without triggering the modules. Here we have to analyze each diagnosis separately.
If we talk about repairs, then in a pair of RCDs and a circuit breaker, one failed element is replaced. This is much more economical than changing the automatic transmission completely.
Installing an RCD with a circuit breaker will be 1000 rubles cheaper than a differential circuit breaker. However, experts advise that when laying one line, choose the second option, which, along with reliability, saves space on the panel. The socket for a medium-power household air conditioner is also installed with an automatic switch.
When connecting several air conditioners or other household appliances, the advantage is on the side of the RCD, which serves 2-3 lines simultaneously.
Connecting the split system to the network must be carried out carefully and accurately. If you are not confident in your knowledge of electrical engineering and have sufficient experience, you should seek the help of professionals.
It’s better to choose a cable or mat
The cable consists of one or more cores with insulation and an outer sheath. Installation of such a wire will be carried out in a tie, the thickness of which is 3–5 cm.
It is recommended to install the cable under:
ceramic tiles, porcelain stoneware, natural stone, self-leveling flooring, laminate, parquet boards, PVC tiles, linoleum, carpet.
This floor can be called almost universal.
There are two types of mats on the market – convection and infrared. This cable is thinner and is fixed at the correct distance on a mesh base. Mats take up less space; a smaller screed thickness of up to 5-10 mm is required. Installation is simple and does not increase the planned height.
Simple installation often determines the choice in favor of a mat. The film is laid lengthwise on a thin layer of thermal insulation, and the floor covering is installed on top. Unlike the first option, you do not have to make a screed and fill the floor with cement. This approach allows you to use mats on a vertical surface. Having assessed the advantages of the presented materials, many prefer the latter. Such efficiency and ease of installation captivates many users, which is why the popularity of mate flooring is growing every day. It's worth watching the video once to learn the editing technology.
Warm floors are the key to comfort for home residents. It can be an auxiliary element of the heating system or replace it. The main advantage is ease of installation and significant savings in resources. But for the system to function correctly, you need to select the right cable. The selection criteria are very diverse - from the cross-section to the expected load. Be sure to decide on the functionality to be assigned to the heated floor. Then the cable selection process can be greatly simplified.
You can make a warm floor yourself using simple panels that can be installed even without pouring cement. It is worth carrying out installation procedures to evaluate the benefits of heated floors in action.
What to consider
Before installing a device in a residential area, it is necessary to clearly calculate its total power and compare it with the same values for existing household installations. For this purpose, excess heat in the apartment is calculated. If the room is equipped with heat-generating devices or its windows have a southern exposure, the air conditioner power should be increased by 20-30 percent. In the opposite situation, incorrect operation of the device will lead to its rapid breakdown.
Drainage
Please note that the drainage hose must be located below the freon line.
Connect the air conditioner drain hoses.
For extensions, many use a regular metal-plastic pipe d-16mm. The factory drain tube is flared and metal-plastic is inserted into it, sealing the connection at the top with electrical tape.
However, over time, a fungus may form inside the metal-plastic material, which will not allow the water to drain away quickly enough.
Therefore, other installers use only corrugated pipes as drainage.
In addition, it is the corrugated drainage that allows you to connect directly to the bath without additional connections.