Share on social media networks:
When carrying out repair work, a very important procedure is to check the evenness of the wall surface. Especially in old buildings, in Stalin and Khrushchev buildings, this factor is very relevant, since at the time of construction this issue was not given due attention. The presence of crooked walls, the presence of dents and bumps on them and other defects can completely ruin the impression even with the most luxurious renovation. In our article we will look at how to check the evenness of walls.
What is a level?
A laser level, or so-called level, is a device that allows you to accurately build horizontal and vertical stripes. In addition, it is an indispensable assistant in the construction of structures and during interior finishing work.
The level contains LEDs and prisms, which are characterized by visible vertical and horizontal lines. Thanks to the laser level, it is possible to build smooth walls, level beacons, level the floor, ceiling and other surfaces, quickly and evenly lay out tiles, laminates and perform other work.
Room layout
Control points in the room are in the corners of the ceiling and floor. The corners in a room that has four corners must be right so that the room is a perfect parallelepiped. The camber of the corners must be measured using a tapping cord and a plumb line. Lines are beaten diagonally on the ceiling from corner to corner, then the diagonals are measured, they should be equal. If the diagonals are of different lengths, then you need to correct it by marking the correct points on the line. By connecting the points with segments using a painter's cord, we get a rectangle with all right angles. At least one point of the rectangle must coincide with the actual angle of the ceiling. Applying a plumb line to the indicated points, you need to mark the corresponding points on the floor. After marking in this way, it is necessary to check that pairs of diagonals in any plane passing through four control points must be equal in length. This marking technique allows you to minimize the collapse in the corners of the walls. Mainly, marking the room is needed in order to find out in which place you need to attach the starting profiles and hangers for the frame of the plasterboard structure.
Assessing the curvature of a rough wall
Assessing the curvature of the rough wall helps determine the amount of work and draw up an approximate list of future material consumption. The level works by constructing a virtual plane that is parallel to the wall surface and measuring the distance from the vertical plane to previously marked points.
How to use a laser level to check the evenness of a wall:
- We select a mode on the laser level that helps to build a vertical plane, since the wall surface is located vertically. In the case of such work, a horizontal plane is displayed on the floor.
- We move the level as close to the wall as possible, while the plane should be parallel to the wall, the beam should not touch it anywhere.
- We prepare a ruler (a tape measure is not suitable), which we apply to the wall at different points. The resulting trace from the laser level determines the distance from the wall surface to the virtual plane.
- At different levels, every 40-50 cm we take measurements, which we enter into the table.
In this way, you can determine the point that corresponds to the most convex and most concave line, find the overall unevenness compared to the base vertical and determine the volume of plastering work.
How to check the right angle between walls - We build and repair
From the author: Hello, dear visitors of our construction portal. Not so long ago, when carrying out repair work, we were all forced to use various complex and not very accurate methods for various types of measurements.
Fortunately, progress does not stand still. More and more tools are appearing in modern stores that make life much easier and save us a lot of time and nerves. And today we will talk about one of them.
During repairs, a very important procedure is to check the evenness of the walls. This is especially true in old houses, where not much attention was paid to this issue during construction. Curved walls, the presence of bumps and dents on them and other defects are ways to completely spoil the impression of the most luxurious renovation.
That is why it is necessary to carefully measure their evenness. And today a laser level, which is also called a level, helps us with this.
Today we will talk about how to use a laser level to check the evenness of a wall, how to use it at all stages of work - when determining how crooked the rough surface is and how much plaster it will need, when checking a finished one to see how well the builders plastered it, yes and during the plastering itself.
Assessing the flatness of a wall using a rule
Without using a laser level, you can check the evenness of the wall surface after finishing using the rule.
How to check walls for evenness after plastering using the rule:
- We apply the device to the wall surface and determine whether there is a gap between the wall and the rule.
- Using a ruler, measure the amount of clearance. Basically, the unevenness of the finished wall corresponds to several millimeters, so it is very difficult to determine the value with a ruler.
- We use a laser level, thanks to which we can make more accurate measurements.
- When determining vertical evenness, turn on the mode for constructing the vertical axis. If it is necessary to determine horizontal evenness, then we use the horizontal axis.
- For convenience, draw a corresponding line on the surface of the wall.
- We place the level at an angle of 45 degrees to the wall surface.
- The resulting laser line looks straight only if the wall surface is perfectly flat:
- If there is a bubble on the wall, then in this area the line will deviate towards the level.
- If there is a concavity, then in this place there is a deviation of the beam from the vertical line away from the device.
- When installing the tool at an angle of 45 degrees, the size of the unevenness is determined, which corresponds to the distance from the drawn beam to the bent line.
Important! The level can also be used to determine the evenness of corners. In this case, we direct the beam at the junction of the walls and thus check its verticality. If there is an even angle, then the beam will be strictly located. Otherwise, the unevenness of the corner is immediately visible when it is tilted in any direction.
Currently, the level is a very convenient tool. In the old days, they used old-fashioned methods and somehow managed without this device, but now using a level saves a lot of time and effort, and facilitates the repair process, so it is worth using the latest technologies and not giving up modern developments.
How to use a building level
A building bubble level, or, more correctly, a spirit level, is a tool that is a strip of plastic, wood or metal with transparent inserts - bulbs with “eyes”. At construction sites it is simply called “spirit level”.
There are other types - a hydraulic level (a tube with water), called a “water level” at a construction site, a plumb line and a laser level, abbreviated as “laser”. How to use other types of building levels is described in the relevant sections. But in this article we will analyze in detail the bubble option.
“Eyes” are flasks with a colored liquid (alcohol) in which a bubble floats. Special indicative marks are applied to their body. Levels with a metal body are preferable - they are both reliable in operation and not afraid of water, because they are made mainly from corrosion-resistant alloys, and are less sensitive to mechanical damage, which, as you understand, is practically impossible to avoid at a construction site.
Checking flatness over a large area of the wall
This technique is convenient to use when determining the volume of plastering work, but can also be used at the time of completion of painting and plastering work to assess the quality of the completed process. Basically, before plastering, you can visually determine differences on the wall, which are already noticeable.
How to check the evenness of a wall after plastering over a large area:
- We prepare a laser linear level (plane builder) and turn on the vertical plane.
- We install the laser level near the edge of the wall, while the vertical laser plane should be located parallel to the wall surface.
- We make marks on the floor along the entire wall, which should be at the same distance from wall surfaces A and B.
Important! The builder builds a plane that is parallel to the planned surface of the wall treated with plaster (not the plastered surface itself, but a plane that is parallel to it).
- We evaluate the work. If a wall fragment that does not have a laser beam appears on the wall opposite the level, this indicates that the beam is interrupted due to the presence of a bulge on the wall.
- We move the laser level from the wall surface and mark new points A and B.
- To check differences on the wall surface in one vertical section (from the floor surface to the ceiling), we take a wooden or steel meter with a millimeter scale. The instrument must have no moving parts.
Important! Almost every tape measure is equipped with a movable hook, so the tape measure is not suitable.
- On a selected vertical section of 1-2 cm, install the meter parallel to the wall surface. In this case, the free end of the meter should rest against the wall at right angles to the wall surface, and the laser line should appear on the plane of the meter. In this way, the first value is found, corresponding to the distance from the base laser plane to the wall surface.
- Then, on the same vertical segment, we rearrange the meter a little lower and determine a new value.
- We measure as many times as necessary.
- Now we compare the obtained dimensions along the vertical line with the data on the vertical segment of the wall surface after 40-50 cm, thus determining the curvature of the wall relative to the base vertical.
Plumb
The cord on which the plumb line will be attached is best hung on a nail protruding from the wall by about 3 cm
For this test you will need a cord 1.5–2 m long and a weight tied to it. The thread should be fixed near the ceiling and see if it stretches to the floor parallel to the wall. If not, the latter is bent. It is most convenient to work if one person holds the cord under the ceiling, and the second takes measurements. If you have to work alone, you can hammer a small nail into the wall under the ceiling and then plaster the hole.
Checking flatness in a small area
After finishing the plastering work and preparing the wall surface for painting or wallpapering, as a rule, there are irregularities on the wall of 1-3 mm, which are inconvenient to find with a ruler. Defects are especially obvious on walls prepared for painting and painted in dark colors, on which direct sunlight falls at an angle. There is a simple technique that is used to determine the evenness of the wall after final finishing before wallpapering or painting.
How to check the verticality of a wall in a small area:
- At the beginning of the wall being measured, on the floor surface, we visually mark a square, which can be marked with some objects or drawn with chalk. This figure is needed in order to subsequently place the builder at the angle to the wall that you need.
- We make marks: point A corresponds to the laser plane perpendicular to the wall, point B defines the laser plane at an angle of 45° to the wall surface.
- Then we find points C, D, E, which are determined by dividing the corresponding segment between the wall and the previously selected mark. As a result, the angle values are obtained: 45/2 = 22.5, 22.5/2 = 11.25, 11.25/2 = 5.62.
- When the plane falls on the wall, it is level at any angle of inclination only if the wall is characterized by a perfectly flat surface. The presence of irregularities bends the beam, and the sharper the angle, the greater the curvature observed.
- In areas of unevenness, the beam will bend relative to the central point of the measured fragment:
- If the beam is bent away from the builder, that is, point A1, there is a hole in this place on the wall.
- If the beam is bent in the direction of the builder, which corresponds to point A2, then the wall is characterized by convexity.
- When the horizontal beam is tilted at an angle to the wall (in this case, the builder must be inclined relative to the horizontal plane), an unevenness will be detected on the wall from left to right, which corresponds to a horizontal curvature, and not from top to bottom, which is observed with vertical curvature.
Important! The dip or convexity can be calculated in millimeters. To do this, you will have to remember the trigonometric formula from the high school course. We will use the cotangent, which is defined as the ratio of the side adjacent to the corner (which corresponds to the distance A1) to the opposite side (which is the desired value, that is, the roughness X).
By changing the angle of incidence of the beam on the wall surface, the ratio of A1 to the desired value X changes. The smaller the angle of incidence, the greater will be the value of A1 or A2, which means the greater will be the coefficient: A1 / ctg “angle of incidence of the beam on the wall” = X.
Methods for checking work performed indoors
The work performed is checked according to the following points and methods of their control:
- Deviation from the vertical is no more than 1 mm per 1 m. It is measured using a rule of at least 2 meters in length by applying it to the wall every 2 meters.
- The angle between the walls in a rectangular room should be 90 degrees. Measured using a tape measure. The length of the two diagonals of the room must be the same - this means that the corners of the room are equal to 90 degrees, and the walls are parallel. Another measurement option is with a construction square with a shoulder of at least 50 cm. It is applied to the corner over the entire distance from floor to ceiling.
- Parallelism of walls. Measured with a tape measure. The distance between the walls along their entire length should be the same.
- Deviation of slopes, pilasters, pillars vertically and horizontally - no more than 1 mm per 1 m. Measured using a building level.
- Surface evenness. Measured using a two-meter rule applied to the wall vertically and horizontally.
We offer you to watch a video on the topic “How well is the surface of the walls plastered”:
Rules for accepting results
When accepting completed plastering work, you should adhere to the following rules and requirements:
- The layers do not peel off and are firmly bonded to the surface. Cracks, waves, bubbles, and noticeable roughness are unacceptable.
- All deviations are within the acceptable range: vertical and horizontal gaps, slopes.
- Special types of plaster (waterproofing, sound-absorbing, X-ray protective and others) meet the requirements.
- Angles correspond to 90 degrees. They are given special attention. All corners of the room must have a flat surface and clear edges.
- When you hit the surface of a wall with an open palm, there is no booming sound or sensation of the surface crumbling. If these indicators are present, poor quality work is performed.
- The fact that errors were detected horizontally and vertically was in the range of up to 20 mm, which means that work was performed to a “C” level. This error will be noticeable even to the naked eye. Anything above this value is a marriage that needs to be fixed.
Acceptance of plastering work is an important stage in repairs. The final result, pleasant appearance, and service life of the repairs depend on the quality of their execution.
Read also: Calcemin® instructions for use
Plastering using beacons and level
This method is one of the most accurate and fastest modern methods, which produces a perfectly flat surface in a short time.
How to do the job using a level and beacons:
- We first prepare and treat the surface with a primer.
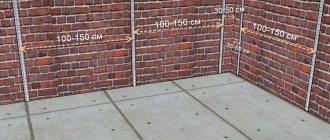
- We mark the vertical lines on which the beacons will be located, departing from the angle of 10 cm so that the distance between adjacent ones is 15-20 cm less than the length of the rule.
- On the laser level we turn on the mode, thanks to which we create a vertical plane.
- On adjacent walls that are adjacent to the wall surface being repaired, mark points that have a distance of 5 cm from the corners.
- We set the level plane according to the marks.
- At a distance of 4 cm from the edge we make marks on the rule.
- Using a level, we set the rule vertically according to the marks; as a result, a gap is obtained between it and the wall, which, depending on the unevenness, corresponds to plus or minus 1 cm.
- We install beacons into the resulting gap and make sure that they will pass at any point of installation, even if it is necessary to move the laser vertical plane.
- After the final marking and monitoring of the actions performed, we prepare the plaster and treat the wall surface with a small amount, while observing the markings every half meter.
- We attach the beacon to the wall surface and treat it with plaster.
- We attach the rule to the beacon, correct it in the necessary places, tamp it so that the marks on the rule align with the laser beam. If this procedure is performed by hand, and not by rule, then the beacons can be bent.
- We remove excess plaster from the lighthouse and the rules.
- Once again we control the verticality of the lighthouse and leave it for a while so that the lighthouse can freeze.
Important! The drying time is affected by the amount of plaster and the surface material.
- Let's move on to the next lighthouse.
- After all the beacons have dried, we prepare a plaster mixture, which we apply between the two beacons.
- Using slow movements from bottom to top, we press the rule against the beacons and, shaking the tool left and right, smooth out the plaster.
- We remove the excess mixture from the rule.
- Using a trowel or spatula, fill the cracks in the wall surface.
- Using the rule, we make the finishing pass.
- Let's move on to the next two lighthouses.
- As a result of the work performed, an almost perfectly flat surface is observed, which is ready for finishing.
In addition, the level is used when constructing a right angle in the bathroom or kitchen, as well as for installing large furniture. In this case, you need a tool that allows you to build vertical perpendicular planes. Currently, almost every model has a similar mode. How to check the evenness of the walls and draw the necessary perpendicular planes:
- Using the marks that were noted when leveling the wall, we set the level relative to the prepared wall surface. You can also mark new marks, then check that the laser plane is perfectly parallel to the wall surface and cut off a right angle.
- After this, we mark the adjacent wall.
- Following the above instructions, we beat off and set up beacons.
- We treat the wall surface with a plaster compound.
- As a result, an angle corresponding to 90 degrees is obtained between the planes.
The use of a laser level in various repair operations
Nowadays you won’t surprise anyone with the use of a laser level in the repair process.
The benefits of this device are not at all exaggerated - with the help of laser lines you can very quickly perform many operations that take much longer when using a conventional bubble level.
A laser level is not always able to replace a regular level, but it can become a faithful assistant in almost all finishing work.
In this review, we will not consider the varieties and classifications of these devices; we will leave this pleasure to the authors of advertising catalogs. We will directly consider the techniques of using laser lines in certain works.
Measure the room for differences and deviations
As a rule, before starting any work, you need to have an idea about the differences in floors, walls, and other things. A laser level will also help you check the work performed.
Floor level
Before pouring screed or installing any other types of floors, it is necessary to measure all differences in the base. Experts call this operation “gender mapping.” It’s hard to imagine taking measurements without a laser level; it’s practically indispensable here.
To take measurements, it is enough to place the device in the initial room on an elevation, such as a stool, or use a tripod (if it comes with the device).
Using a tape measure, the distances from the base of the floor to the horizontal beam are measured at all points of interest. Typically, measurement points are located near all corners and one point in the middle of the room.
All measurement results are recorded on the floor plan or written on the walls near the measured point.
When measurements are taken in one room, the level should be moved to the next room.
In order not to lose the initially set height, before moving you need to place a mark along the laser beam on the wall, to which the beam will reach from the next room.
Having moved the level, you should adjust the beam to the left mark and proceed to the next measurements of the distances from the base to the beam.
When all the rooms have been measured and marks have been placed on the plan, based on the height of the marks, all slopes and elevations of the floors can be judged with fairly high accuracy. These measurements allow you to determine the height of the finished floor, the thickness of the screed and, ultimately, the type of work required in general.
Check the evenness of the walls
Assessing the deviations of walls from the vertical is also quite simple and quick.
To do this, you need to place the vertical beam parallel to the wall, 5-10 cm from it, and using a tape measure, by analogy with floors, measure the distance from the wall to the beam.
To position the level itself correctly initially, you can first set equal distances from the wall on the floor and align the beam using the marks.
This operation will allow you to judge the required layers of plaster, the possibility of facing with plasterboard and other materials.
Also, to observe the required layers while maintaining the geometry of the room (parallel walls, 90 degree angles), the beam of the laser level must be aligned with the pre-marked optimal axes of the room.
Axes are a rather difficult topic to describe; perhaps there will be a separate article about this.
To check angles, both internal and external, it is enough to simply direct the vertical beam to the angle being examined.
Laser level for beacons
One of my most frequently used laser level operations. Installation of beacons is done without threads and rules. It is convenient to display beacons on the floor, walls and more...
Floor beacons
This method works with preliminary placement of screws under the beacons. However, you can do the same with other methods of placing beacons.
When there is already a level mark for the screed, the level is installed in any place from where all beacon installation points can be captured with a beam.
It is necessary to set the level so that the floor level mark is slightly below (5-10 cm) the horizontal beam. Using a tape measure, the exact distance from the screed point to the beam is measured, and the thickness of the beacon is subtracted from the resulting distance.
When installing beacons without self-tapping screws, directly onto the mortar, the thickness of the beacon profile is not subtracted.
Now, guided by the laser and tape measure, the screws or beacons are set exactly to the size obtained above. As practice shows, such manipulations are much more effective than using the rule and bubble level.
Beacons for plaster
The operations for installing beacons for plaster are similar to those described above, with the only difference being that the work is carried out in a vertical plane, corresponding to the vertical level line.
The device is aligned with the beam to a line marked on the floor (a couple of marks are enough), which is parallel to the plane being set.
Well, then everything is the same: we find the difference between the exposed plane and the beam, and using this difference we set up plaster beacons, or self-tapping screws for them.
Unlike the floor, setting beacons for plastering walls using a laser level is much simpler compared to the standard method (setting a frame of thread with two plumb lines).
It is worth noting that to obtain high-quality exposed beacons, you need to use an accurate instrument and a good tape measure. Naturally, no one canceled the attentiveness and accuracy of the master.
Having mastered the horizontal and vertical alignment of beacons, it will not be difficult for you to set up floor joists, profiles for plasterboard cladding, and much, much more with similar skills.
Laying tiles using laser
Here, of course, you cannot do without a standard bubble level; the laser level serves as an auxiliary device. Despite this, his role is very significant.
When laying tiles, a laser checks the evenness of vertical and horizontal seams. Any tiler knows that when tiling a room in a circle (bathroom, bathroom), it is extremely important not to deviate the horizontal seam.
Inexperienced tilers often deviate from the horizontal, resulting in a difference in horizontal seams in the corners. After all, for the eye to perceive it, it is enough to deviate by one millimeter and the difference will be striking.