Even for large local areas of country houses, they try to ensure that their territory is optimally planned. And for small plots of dachas and cottages, this is a prerequisite for comfortable living. One of the factors of proper planning is the compact arrangement of buildings for utility purposes. And it’s not uncommon for a garage and a utility room to be located under one roof. This combination has only advantages - it has no “cons”.
Inspection hole
This is an optional, but very convenient element of the garage. Arranging a viewing hole may present certain difficulties. So, in an area where water occurs at a depth of more than 2.5 meters, everything can be done easily and quickly. But if the water flows higher, then the inspection hole must be provided with a drainage system.
- First, a hole is dug for the hole. This takes into account the desired depth of the finished pit, as well as the thickness of the drainage, waterproofing, sand cushion and finishing screed.
- A layer of gravel (100 mm) is poured into the bottom of the hole and compacted.
- A layer of sand (50 mm) is placed on top and compacted too.
- A trench is dug along the perimeter of the finished pit for drainage.
- Then geotextiles are laid with overlaps of 80 cm on each side.
- Next, a layer of gravel is poured into the trench and a drainage pipe is laid with a slight slope.
- The pipes are covered with gravel and covered with geotextiles.
- The floor of the pit is covered with clay.
- Lay waterproofing.
Waterproofing inspection pitSource stroyservis-74.ru
- Formwork and a reinforcing frame are installed at the bottom of the pit.
- The bottom is filled with concrete with the addition of waterproof components.
- Another layer of waterproofing is laid on the dried screed.
- The walls of the pit are also treated with clay.
- The walls can be lined with brick or monolithic concrete. The second option requires formwork and reinforcement.
- The finished surfaces of the walls and floors are covered with cladding. Any option of the owner's choice will do.
- A metal frame must be laid along the perimeter of the upper edge of the finished pit.
- A safety rail is placed on top of the frame to prevent the car's wheels from accidentally falling into the pit.
Lighting
It is almost impossible to live in a cellar without light. The main lighting branch is usually connected to a 220 V network. The electrical cable must be securely strengthened. It is mounted to the ceiling. Usually the cable is laid in a pipe to protect it from rodents and moisture.
The lighting lamp is placed on top, above the entrance to the cellar. If you mount it on the ceiling, it may frequently touch while moving around the room.
Setting up a cellar under a barn with your own hands is quite simple. If you follow all the rules and recommendations, the work will go quickly and without any particular difficulties. A properly equipped room will serve for many decades.
Garage or carport
Before answering this difficult question, let's figure out what these two structures are:
| Garage |
|
| Canopy | A simple and lightweight structure made from a fairly strong frame structure made of coated wood or metal. Supports are free-standing pillars or racks. Usually has no enclosing walls. Sometimes it can serve as an alternative to a garage and its cost is significantly lower. It can also be used in combination with it as a temporary location for a car. In the latter case, it is installed directly in front of the entrance to the garage. |
Project for several machines
Advantages and disadvantages
Now we will find out their positive and negative sides so that we can make the right choice.
Pros of a garage:
- constant protection of the car from all weather conditions, as well as vandalism and animals;
- makes it possible to comfortably troubleshoot breakdowns and carry out maintenance;
- convenient utility room for storing tires, tools and spare parts;
- allows you to easily start the engine in cold weather;
- sometimes it is a place of solitude in which you can calmly repair and maintain your car.
Cons of a garage:
- Due to temperature differences and poor ventilation, condensation may appear on the surface of the car, which can cause rust;
- the price of construction can be quite high, taking into account the costs of materials and labor;
- occupies a large area;
- may create some discomfort from daily opening and closing of gates (except for automatic models).
Polycarbonate carport for a car in the country
Advantages of the canopy:
- occupies a small area of the site, can be located right next to the house;
- does not clutter the area;
- protects the car from direct exposure to adverse weather and sunlight;
- good ventilation of the machine, due to which corrosion spreads in minimal quantities;
- the cost of construction is significantly lower and takes 2-3 days;
- a wide range of materials for the manufacture of structures;
- can be quickly dismantled and moved to another location. It can also be lengthened or expanded;
- design for several cars does not require large additional financial costs;
- convenient access to the car, as well as loading luggage and disembarking passengers;
You can make a canopy between the house and the garage
Disadvantages include:
- there is no protection from slanting rain, as well as from snow during gusts of wind (the solution to the problem is the installation of canvas walls);
- must be behind a fence or in a secured area, otherwise the likelihood of theft or vandalism of the vehicle increases;
- storage of household equipment, spare parts and tools is excluded. But, you can make a canopy right next to the utility block;
- difficulties when servicing a car during cold periods;
- The car is quickly collecting dust.
From the above, there is no clear answer to the question – which is better, a garage or a shed. Each structure has its own advantages that the other does not have. An alternative is a carport in front of the garage, which has many more advantages than disadvantages.
Entrance to the cellar
A hatch is placed at the entrance to the cellar. They also often use a regular door. It is installed at the entrance from below. It is usually made from sheet metal or wood. Hang it on a wooden or metal box.
For steep descents, it will be equipped with a metal hatch. Often there is a version of a product made from boards. The hatch hinges are welded to the pins, which are concreted into the floor of the barn. You can also make eyelets for the lock.
Design Features
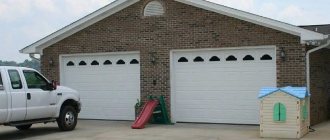
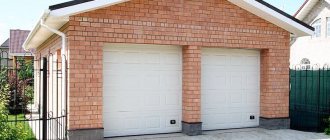
Garage for two cars with utility room
To save space on the site, homeowners often place a garage box together with outbuildings:
- bath;
- pumping room;
- boiler room;
- shower;
- pantry.
Then a project is created taking into account the space for them. The dimensions directly depend on its purpose. Most often, garages for two cars are combined with outbuildings, in which you can store not only small garden equipment and accessories, but also car accessories. To do this, it is enough to add 3-3.5 meters in the project and provide for the presence of a partition. It is better to make it from foam block or brick.
Also, a garage for two cars must be equipped with an inspection pit measuring 4 x 0.9 m. When creating the project, the occurrence of groundwater and the strength of the foundation are taken into account, since it will bear the load from the walls, roof, two cars, things and equipment in the utility room. Perhaps in the future you will want to add an attic space or dig a cellar. In the latter case, it is better to plan it at the design stage.
Video on the topic
Garage for two cars with utility room and cellar
The dimensions of the basement should always correspond to the dimensions of the garage
By “cellar” we mean an underground room that releases heat into the surrounding space, so the need for ventilation is obvious. Otherwise, the appearance of fungus is inevitable. You also need to take into account the risk of flooding and consider a drainage system for water disposal.
The dimensions of the basement must correspond to the dimensions of the garage. The depth of the cellar is usually 2-2.2 m. Before pouring the foundation for the garage, the following steps should be taken to arrange the cellar:
- the bottom of the pit is carefully compacted;
- then covered with crushed stone (10 cm);
- compacted again;
- pour hot bitumen;
- after it dries, line it with waterproofing (roofing felt, roofing felt or film);
- concrete mortar is poured onto the floor (30 cm) with reinforcement bars around the perimeter;
- install and fasten formwork panels to fill the basement walls;
- reinforcement is placed in it, tied with wire;
- concrete is poured with constant tamping;
- after the solution hardens, the shields are removed;
- Clay is poured and compacted between the walls and the pit;
- the inner part is plastered with cement mortar in a thick layer (2 cm).
The construction of the cellar and inspection pit is ready. Its walls will be the foundation for a double box with a utility block.
To fill the garage floor, shields are used, which are installed under the channels and secured with spacers. Don't forget to leave space for ventilation pipes. Then reinforcing bars are laid out on them, leaving free space for the entrance and inspection hole. Then a concrete floor is poured, which overlaps the reinforcement by 5-6 cm. The thickness of the floor should not be less than 10 cm.
The basement is provided with supply and exhaust ventilation. The channels for air inlet and outflow must be in opposite places. The supply opening is twice as large as the exhaust opening and is covered with a rodent mesh. The exhaust pipe is installed above the roof ridge. Thus, intensive ventilation was carried out in the basement.
Video on the topic
Garage for two cars with utility room and canopy
Under a canopy you can not only hide your car, but also spend time comfortably
This structure is the best option for storing and servicing cars. And when the space under the canopy is free, it can be used for comfortable relaxation. An attached canopy does not require a solid foundation, can be made of any materials, provides sufficient ventilation underneath, and does not take much time to install.
Corrugated sheets, polycarbonate, boards, tiles are suitable for the roof, and metal pipes or timber can be used as supports:
- The distance between supports should be 1.5-2 m;
- The holes for them are made with a diameter and depth of 0.5 m;
- Then they are placed strictly vertically, reinforced with stones and fragments of brick;
- Poured with concrete;
- After a day, the supports along the upper perimeter are connected by jumpers, onto which the canopy frame is installed;
- The roof is being installed.
The floor is poured with concrete or laid with paving stones or paving slabs.
Overlap
A ready-made barn floor can be selected as the ceiling of the cellar. In this case, it should be strengthened. You will have to not only mount beams on the ceiling of the cellar, but also install supports. They are usually made from metal channels. The supports can also be made of brick.
If an independent ceiling of the cellar is provided, it is arranged on the basis of a welded frame, which is made from a channel. The gaps should be sealed with reinforcement. When making the floor frame, it is important to leave holes for the ventilation pipes.
The plank ceiling of the cellar is laid on the frame. You can also use chipboard sheets. They are covered with earth on top. Often, a previously raised floor of the structure is mounted on the laid floor.
Project No. 10. Three car garage project
The author of the project conceived it as a garage with a living area for service personnel. The solution will be of interest to owners of large plots of land who place increased demands on their own comfort. On a total area of 145 m² the following zones are located:
- a garage for three cars, but, alas, there are only two entrances, so one of the cars will be constantly blocked, which can be considered a drawback of the project;
- two small bedrooms with an almost mirror layout.
They propose to build the garage on a monolithic foundation, build the walls from brick, and use metal tiles for the roof.
Finishing the walls and floor of the cellar pit
The walls are finished with a clay castle, which is located between the masonry and the ground. The masonry is placed on a strip base or on solid ground. A foundation for the wall is necessary if the bottom of the pit is filled with sand. To build a clay castle, you need to measure 40 cm from the walls.
After the above steps, you can start laying bricks in 4 rows. There should be greasy clay between the bricks and the ground. Every 3 rows, the space between the soil and the masonry is filled with clay. This helps insulate the cellar from rain during heavy rainfall.
The evenness of laying bricks in rows is measured by level. If verticality is not maintained, the masonry may soon collapse. Racks and shelves are attached to special hooks that are embedded in the wall.
The bottom of the pit is covered with sand (about 30 cm high) and a brick floor is placed or filled with concrete. It is better not to use wood, because... Due to humidity, it loses its original properties.
Project selection
Of course, a garage with a utility room is not a house. Its construction is not so labor-intensive and responsible, therefore, even if hired specialists were involved in the construction of the house, the owner often prefers to build outbuildings with his own hands. There is nothing wrong with this, you just need to remember that even a simple gazebo requires skill.
And a barn with a garage is, although not too large, a permanent structure. Although it can be large if, for example, the family is rather large and has several cars.
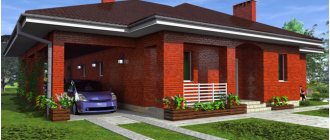
In addition, you can try to ensure that the courtyard buildings are built and decorated on the outside in the same style as the house, as shown in the photo below.
All buildings on the site are in the same style
Of course, such construction, and even finishing, can only be carried out according to the project. And yet, by carefully studying ready-made design or already implemented solutions, you can glean many interesting ideas for yourself. Our instructions will help you understand these nuances.
Parameters and configuration of buildings
If you decide to build a garage with a utility room, first of all, you need to think about where it is most convenient to place it. You will have to solve a difficult problem, because usually the barn is hidden somewhere in the backyard.
And the garage should be so close to the entrance to the site that when parking a car in it, you don’t have to cross the entire yard, risking running into the beds or flower bed. There is only one way out: when placing a garage-shed on the site, you will have to be guided solely by considerations of ease of entry for cars.
The garage is usually located closer to the street than the houseMore likely, it will be in a very visible place - perhaps even more open to view from the street than the part of the yard on which the house is located. This means that from an aesthetic point of view, such a building should look no worse than the main building.
Outbuilding with canopy
Rack that can be placed in a utility room
Such a canopy, by the way, can serve another purpose. In every family there are some events when many people gather and it is difficult to accommodate them in the house. In such a situation, benches can be placed under the canopy, or tables can be set.
In principle, in private houses, sheds are provided in the yard for these purposes. But since events with a large influx of guests occur infrequently, the rest of the time the canopy will serve as shelter from the sun or precipitation for the car.
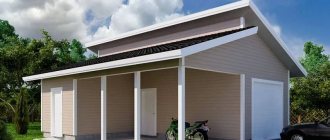
Project of a utility room with a carport
So:
- If it’s just a utility block with a canopy, then its dimensions can be the same as in the picture above. There are two separate rooms of 9 m2 each, and an adjacent area with a canopy measuring 21 m2. In one room you can store gardening tools, and in the other - spare parts, auto chemicals, oils and wheels for a car.
- This project is the easiest to implement on your own, since this is a frame building. The most labor-intensive thing about it is the strip monolithic foundation, which will be common to both the premises and the canopy - and even then, it is buried to a maximum of 40 cm. Although for frame construction, a columnar foundation is also very convenient.
- During the pouring process, reinforcing bars are embedded into it to fix the framing beams, or embedded parts in the form of steel forks or glasses to which the canopy support posts are attached.
Frame wall cladding scheme
The frame of the building is assembled using beams and boards of different sizes. The floors in the rooms are hemmed along the joists, the walls are assembled according to the pattern you see above.
The roof, which is common to both the premises and the canopy, has a traditional rafter system and is covered with absolutely any roofing material. This design option requires the least amount of construction time, especially when the foundation is not monolithic, but piled.
Major garage with shed
Frame building project: outbuilding with garage and shed
In this case, the garage does not have a basement or inspection hole. That is, before you is the simplest design option for such a building. Even the floors in it can be earthen. But considering that the frame is still wooden, it requires a drier microclimate, and rodents can harm it, it is better to concrete the floor.
In general, you can build a utility block with a garage from any material: logs or timber, brick, concrete blocks. Accordingly, its finishing options can be very different.
Boxes and racks
Usually the boxes are placed at the very bottom of the cellar. Root vegetables and vegetables are placed in them. On top there are shelves on which boxes with fruits and jars are placed. Place boxes and racks along the walls. Bottom boxes can be retractable or stationary. You can do them yourself. In the first case, they are equipped with runners. Shelving is usually made of sheet metal. This option is the most reliable and durable. If you use wooden planks for shelves, they may be exposed to moisture.
Wall-mounted shelves are another good solution. They are hung on hooks, which are sealed with anchors in the wall. Small walls can be made from brick into which the boxes will be placed.
Ventilation and power supply device in the superstructure
After installing a two-story garage, it’s time to move on to equipping the attached room with a staircase and installing a floor surface. The inside of the room is plastered, and the walls are painted in any color you like.
Other interior finishing options are possible, but most of them entail an increase in load on the foundation and walls of the underlying room. And this, in turn, can lead to divergence of the walls and subsidence of the foundation, which will negatively affect the durability of the structure being built and its strength characteristics.
In the event that the second floor was completed with the purpose of establishing a work workshop in it, then the premises must be equipped with high-quality ventilation and heating. Comfortable temperature and humidity levels are impossible without an air exchange system.
In principle, even if the superstructure is equipped for living in it, these communications should also be taken care of. But if the room will be used only for storing tools and work equipment, then there is no need for communications.
There are several options for ventilation in rooms of this kind:
- Installation of valves on doors and windows of the room.
- Exhaust device under the ceiling.
To ensure good traction, many experienced builders advise equipping superstructures with special insulated sandwich channels.
The duct of such an exhaust system is led to the roof and is equipped with a hood, as well as a protective mesh, thanks to which it will be possible to prevent precipitation, large particles of dirt, beetles and rodents from entering the room.
Heating of such extensions is best organized using fan heaters called heat guns, electric heaters
In order for heating equipment to operate without interruption and not cause a fire, it is extremely important to take care of the quality of the electrical system
You should carefully select the electrical wiring and, if it is already available, make sure that it is fully operational.
If we are talking about a newly created electrical system, then it is advisable to create a pair of circuits in the superstructure: the first will be used for sockets, the second for lighting. In addition, it is recommended to place 16A circuit breakers on the DIN rail. The electrical network cable system is hidden in special cable channels.
Also, if possible, it is better to give preference to energy-saving lamps and LED strips: they are economical and do not pose a big threat to fire safety.
Preparing and digging a pit
Before digging a pit, you need to take care of at least a little mechanization of the process. After all, for a cellar that is located in a barn measuring three by four meters, you will need to dig and pull to the surface no less than ten cubic meters of earth. That's a lot. Therefore, it is better to acquire a hand winch and some kind of bucket in advance for lifting soil from the pit to the top.
The entrance to the cellar is best located on the center line of the barn, or more precisely, closer to the entrance to it. In this case, you can safely dig and at the same time observe the settlement of the foundation. If you initially start digging near one of the walls of the barn, then the risk of soil falling down and simultaneous weakening of the foundation of the existing building cannot be ruled out.
After removing the floor in the barn, you should initially dig a rectangular niche in the ground. If we started to look at an example on a barn with dimensions of three by four meters, then we will continue to do this, therefore, the size of the niche will be one by two and a half meters, and you choose the depth arbitrarily, but usually it is about two meters. Boards are laid at the bottom of the niche. Next, a ladder is installed that can be used to climb up and down during the work process.
A metal or plastic container (its volume is about 50 liters) is installed under the wooden stairs. This is necessary for collecting soil. A manual or electric winch should be installed on the ceiling of the barn. In order to avoid deformation of the foundation of the existing shed, the dug two-meter niche should be gradually increased in size, this is done by uniformly removing soil from the walls of the niche along its entire perimeter. If you use a winch, then it is quite possible to dig a pit and prepare it for subsequent finishing in two full working days.
Material selection
Often, a garage with a canopy is built from timber or rounded logs. When choosing wooden materials, be sure to remember to reliably protect the wood from the negative effects of moisture, rotting and the proliferation of harmful insects. Construction wood must be treated with special antiseptics and fire protection agents.
Metal pipes, which are characterized by a high level of reliability and durability, can also be used as supports. Corrosion often forms on their surface, which can become a serious problem. To prevent this, you need to clean the material, treat it with a solvent, coat it with a primer and paint it. Whatever material the supports for the shelter are made of, for safety, the area for construction must be concreted and tiles installed on it. The greater the mass of the building, the deeper the foundation is made.
The roof of the canopy is made of polycarbonate, corrugated sheets, wooden boards, roofing felt or tiles. To temporarily protect a vehicle, you can use an awning attached to a metal frame. The latter can be either stationary or collapsible; the second option allows you to even transport such a canopy if necessary.
Staircase device
To figure out how to build a cellar, you should consider all the subtleties of the process. A capital staircase usually takes much longer to build than an extension staircase. For such work you will need bricks or concrete. To give the structure durability, you must first weld its frame. It consists of metal corners. In some cases, such a staircase is performed using a welding machine. The steps in this case are made of sheets of corrugated metal.
A capital staircase can be arranged in this way:
- first arrange the brickwork;
- reinforce it with a welded frame.
When creating a steep descent into the cellar, an extension ladder is installed on the descent. It is usually welded from metal corners. The structure can also be knocked down from timber. The extension ladder usually has a length that is equal to the depth of the cellar pit. An excellent solution is a staircase made in the form of a ship's gangplank.
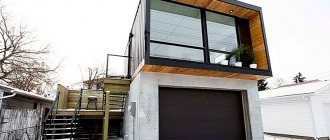
Project No. 7. Project of a garage with an attic and a second light
This project provides for the construction of a truly luxurious garage. However, it’s hard to call this building just a garage. Due to the presence of a full-fledged living area in the attic, the garage can be used as temporary housing, a guest house or a security house.
Features of the project:
- spacious garage for two cars with three windows and a separate entrance;
- the storage room on the ground floor is great for storing garden tools or temporarily unnecessary household utensils;
- on the second floor there is a spacious studio where you can equip a living and sleeping area, and, if necessary, even a small kitchen;
- also on the attic floor there is space for a hallway and a small bathroom;
- The highlight of the project is a balcony in the attic, as well as a second light, due to which both the first and attic floors will seem lighter and more spacious.
The total area is 88 m2, and thanks to the correct layout it was possible to place a lot of useful spaces in this area.
How to build?
Many owners of suburban areas can quickly make a simple outbuilding with a canopy with their own hands. To do this, they initially draw up a drawing of the structure and make calculations according to which materials are purchased.
Selecting a location
If the carport is planned for a car, the location should be chosen close to the gate or with easy access to it. The route to the parking lot should not coincide with a heavily visited part of the yard. The building is not brought closer to the windows of a residential building so as not to block the view.
Once a location has been selected, the site is leveled and prepared for construction.
Materials
For future construction it is necessary to purchase wooden blocks, metal profiles, crushed stone, cement, sand. To install polycarbonate, you will need thermal washers and self-tapping screws.
Foundation
For a small outbuilding and supports for a canopy, you will need a columnar foundation. To erect it, markings are made on the ground according to the diagram, using pegs with ropes. In the marked places, holes are dug for pillars 50-100 cm deep. The number of pillars depends on the size of the cabin and the weight of the canopy.
The main four supports are installed at the corners of the building. Depending on its size, you will need intermediate pillars located in increments of one and a half meters. At the same time, the piles under the canopy are also installed.
Using crushed stone and concrete, the supports and foundation are cemented. Allow it to dry from 2 to 7 days, the timing depends on weather conditions.
Frame
When the foundation dries, they begin to work with the base for the floor, lay boards placed on edge (joists), pour expanded clay between them and cover with a rough board. The finished flooring is installed after the walls are erected.
At the next stage, a strapping is made in the upper part of the supports, beams or longitudinal beams are installed horizontally (if the frame is metal), and a drain is mounted . Then the sheathing of the walls is built - either with wooden beams or profile pipes. The walls of the frame are sheathed with boards, sheets of metal profiles or other building materials.
Roof
The rafters are installed on the top frame, a sheathing is created and the roofing covering is installed - boards, bitumen shingles, roofing felt, any other material. The seams are overlapped, they should fall on the joists. In the case of polycarbonate, on the contrary, small gaps are left between the sheets, otherwise the material may crack in the summer heat.
You can build a utility block with a canopy from various materials, but if the aesthetics of the yard and the ability to fit the building into the landscape design are important, it is better to choose materials that duplicate the main building - a residential building.
Review of the canopy with utility unit in the video.
Source
Stages of construction of the facility
Main stages of garage construction:
- preparatory work;
- construction of the foundation;
- construction of a basement;
- walling;
- construction of floors, if necessary;
- roof construction.
The foundation is erected based on the size of the structure and its expected weight. As noted above, a brick building requires a more powerful foundation than a frame building. Some garages are built with plinths, so they are equipped immediately after the foundation is ready.
The walls are erected taking into account the type of building - whether it is one-story or has an additional floor. This point also affects the construction of the roof, including the choice of its preferred design.
Advantages of working with our company
We do it on time or for free. Construction is divided into stages with a specified completion date. "Full construction". All work is done by one company. Possibility of accepting payments in installments or on credit. No hidden fees. The price is final at the contract stage. Quality control is carried out at every stage of house construction by our competent services. Thanks to high-quality construction work. We have more than 300 successfully completed projects. Delivery of materials within 200 km from the Ring Road for freeGet a free estimateIn what style is it better to implement projects?
Every car owner wants his garage to be comfortable, cozy and visually presentable. However, you need to understand that a garage is not a house, and it is difficult to give it an appearance that matches any style decision. The garage has no windows; the roof is traditionally single- or double-slope, flat. The appearance of the gate is standard and laconic.
In this regard, the question of giving individuality to the structure consists of choosing several parameters:
- roof type;
- type of construction and finishing materials;
- location and appearance of the gate.
Arranging a chalet-style garage guarantees a warm and cozy environment.
The internal structure of the garage can be made in a certain style. The “chalet” is popular, the main accents of which are space, minimalism and comfort. Only natural and environmentally friendly materials are used in decoration: wood, glass, ceramics. Such a garage can be single or double.
Art Nouveau style is colder and more modern
The external appearance of the building can be given a certain style solution with the help of a canopy and arrangement of a parking area. The Art Nouveau style is characterized by metal and paving stones. This is the traditional design of the surrounding area.
Thus, all questions regarding design, determination of optimal dimensions and selection of materials for garage construction can be resolved independently. This will take time, searching and analyzing information, as well as using creative abilities. But all this will pay off in financial savings and moral satisfaction at the sight of your own respectable garage for two cars.
What tools and equipment are needed?
To implement the project, special tools and equipment are required. First of all, this:
- shovel;
- Bulgarian;
- sledgehammer;
- saw;
- concrete mixer;
- welding machine;
- building level, tape measure;
- several buckets.
Don’t forget to prepare all the necessary tools.
You also can’t do without materials:
- brick, sand;
- cement, clay;
- boards, beams;
- reinforcing bars.
You should use only high-quality materials, then the building will be suitable for safe use for a long time.
Appearance and equipment
We offer several dozen types of finishes. For these projects we take the following materials:
- metal roofing with additional elements
- vinyl siding for facade
- roofing (soffits)
- drain
- windows and door
- insulation, hydro and vapor barrier
- sectional doors
- attic staircase
Garage for 2 cars
One car garage
All materials are mounted on a LSTC frame.
If necessary, we can change the project. For example, add a window or door, make a partition inside, or install automatic gates.
Download prices:
Options for using a two-story garage
Unlike the one-story garage, additional space appeared on the second floor. In the room you can do:
- place for guests
- storage areas
- rest room, etc.
The second floor can be reached via a staircase located inside the building.
Due to the fact that the length of the garage is 8.4 m, on the ground floor it is possible to place not only a car, but also motorcycles or an ATV. When installing a partition, you will receive an additional utility unit.
How to buy
You can buy a two-story garage at our sales offices. Our specialists will calculate the package, advise on installation and arrange delivery to the site.
Almost every motorist wants to have a spacious garage, in which, in addition to the car, there will be a warehouse for spare parts, a full-fledged workshop, and at the same time there will be enough space for comfortable repairs. But not always the space on the site allows you to build a garage of this size. As one of the options, you can consider a 2-story garage, which is a common solution when there is a small space for development.
Further in the article we will analyze the features of the arrangement and construction of a two-story garage, and also take into account the simplest building codes. You can often find additional extensions on top of regular garages that are used as living quarters, although this is contrary to the unspoken standards of safe construction.
When drawing up a plan for a 2-story garage, you must immediately determine the purpose of building an additional room. Typically, the entire project is not much different from building a one-story garage with a wooden roof.
If the second floor is planned to be made into an attic using a rafter system, and heavy furniture or other objects will not be located on the floor itself, then for such a building it is enough to strengthen the load-bearing walls. If a multi-story garage provides for a full second floor with walls made of stone, then not only the walls, but also the foundation need to be strengthened.
When planning a second floor premises, professional builders and unspoken norms strongly do not recommend furnishing a living space for a number of reasons, such as:
- Presence of odor
. Considering that the garage is a technical room in which fuels, lubricants and other chemicals are stored, the presence of a characteristic odor is an integral part. Of course, it is possible to carefully insulate the second floor with airtight doors, but the cost of construction from these measures increases many times over. Such measures will require the use of expensive materials and special skills, which is unjustified in the case of a garage. - The second floor in the garage will turn out to be very cold
, especially in the winter, since the lower floor will significantly cool the ceiling. It will be very expensive to heat the upper room; in addition, high-quality thermal insulation will be required not only for the floor, but also for the attic floor. If the garage itself is attached to the house (see), it is well insulated and has a heating system on both floors, then the problem with hypothermia disappears, but the cost of construction increases significantly. - Sounds
. If the garage is used not only for storage, but also for regular repairs and maintenance, then the presence of constant characteristic sounds is inevitable.
Construction simplification options
If you do not have a lot of free time, but construction is necessary, then you can use construction equipment. For example, an excavator to reduce groundwater on a site or to dig a pit for a cellar. After all, the hole can be significant if the size of your cellar is large. It is worth paying tribute to modern construction technology. With its help, you can do in a few hours what would take more than one working day if done manually. But renting construction equipment is an expensive business.
There is also an option to involve your acquaintances and friends in the construction; this will also significantly save time, and perhaps your money. You will decide for yourself how to make a cellar in a barn, or rather, which path you will take.
Beautiful examples
Outbuildings can be beautiful in their own way, we offer examples of finished buildings to see this.
A utility unit with a canopy for a car is practical, convenient and, if well designed, can become a decoration for the site.
For an overview of the carport with a utility room for a car, see the video below.
Source
Disadvantages and advantages
Considering the advantages of a garage with a utility block in the country, first of all I would like to note the aesthetic side of the issue. So, if you use one material during construction, the final structure will be comfortable and beautiful in appearance.
Many car owners do not limit themselves to a utility block, and design garages with a gazebo under one roof, a utility block, and some even add a bathhouse or sauna.
The choice is quite simple and logical, because such an arrangement allows you to significantly save space on the site, especially if there is not too much free space.
Among the disadvantages of such buildings, it is worth noting possible unpleasant consequences. For example, a garage is a high-risk room, and the same is true for a sauna.
Therefore, having several premises for various purposes under one roof, it is necessary to carefully consider the details of the project so as not to encounter very serious problems in the future.
And now, the combination of a utility room with a garage has been thought out and planned, it’s time to proceed to the first important step - calculating the future dimensions of the room and designing.
Frequently asked questions before construction
Most often, people face the following questions when building a garage:
- Where can I get a good project? You can draw it yourself, find a ready-made sketch on the Internet, or order it from professionals.
- What materials are best to use to build a garage? Brick is considered the most ideal option. More economical - foam block. You can also build a place to store a car from wood and even metal.
- What type of garage design with a utility block is the most convenient to use? Most people choose spacious buildings, complemented by an inspection hole, a basement, or a cellar.