When installing fencing in the private sector, the main design requirements are protection and durability. If you use brick, you can achieve additional rigidity by strengthening the structure.
A fence with brick pillars is a good option for a fence with reliable supports. By following the step-by-step instructions from the masters, you can build it yourself.
Users often search for:
- Brick fence for a private house
- Brick fence caps
Determining the type of structure
They begin work by carefully drawing up a drawing. The diagram should show:
- soil type;
- type, height of the foundation;
- height of pillars;
- location, area of the fence on the site;
- dimensions of gates, wickets;
- step between supports;
- material for filling openings;
- communications that can pass under the fence.
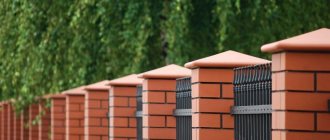
Scheme of a fence with red brick pillars
It is important to correctly calculate the load on the base so that the fence can withstand the weight of the materials and does not begin to collapse.
In addition, it is worth remembering the SNiP requirements for fences. You will find detailed recommendations of the current legislation in the article: “What distance should be from the house to the neighbors’ fence.”
Installation of gates and wickets
Canopies for wickets and gates are welded in advance - before laying bricks.
After installing the supports in the ground, pouring concrete, welding the mortgages and lining the pillars with bricks, you need to start hanging the gates. Preliminary welding of the hinges to the posts is required. You cannot attach parts to mortgages. They must be welded to the channel sections. The load of the gate when unlocked is distributed unevenly between the hinges. There is more pressure on one element than on the other. With prolonged use, this will cause bending of the metal and warping of the canvas. A loop welded to the bracket will provide a more uniform load. The welding sequence depends on the type of parts. Work with a direct configuration is considered.
The process involves the following steps:
- The channel is welded to the embedded parts.
- The places where the loops are attached are marked.
- The upper halves of the parts are welded to the gate lying on the ground.
- The lower parts of the loops are grabbed onto the posts in the marked area.
- The gate is lifted in weight and put on the hinges. You can't lower them all the way.
- The loops are caught in several more places. Supports are installed under the gate.
- The pieces are welded into place by making a seam from top to bottom.
- After the loops have cooled, the seam is placed one more time on the other side.
- The seams are cleaned using a grinder.
At the welding stage, you should check how easily the blade opens and closes and whether there are any distortions. The hinges are not welded by weight.
Materials for sections
Let's look at each type in more detail.
Corrugated sheet
Goes great with brick pillars. Large selection of colors. Light in weight. Resistant to corrosion. The sheets do not fade in the sun. The price is affordable. Popular among summer residents and owners of private houses. You can make such a fence with your own hands.
The only drawback of such a fence is the mandatory presence of a metal frame on which the sheets will be attached. It is possible to install corrugated sheets on a frameless base, but in this case the strength of the structure will be much less.
Forging
The fence has a long service life and aesthetics. Does not require maintenance. In the hands of a master, a forged fence can turn into a real picture or ornament. Any element of the fence is made to order. Cost per 1 sq. m ranges from 2500 rubles and above. If necessary, a drawing is developed. But it is better to install such a fence with specialists.
Tree
Natural raw materials, which are recommended for use as sectional material for fencing, but nothing more. Wood is susceptible to rotting, so it should not come into contact with the ground, otherwise the service life of the product will be limited.
Subject to high-quality treatment with antiseptics and other protective compounds, the service life can be extended to 50 years.
To fill the openings of a wooden fence with brick pillars use:
- Euro picket fence;
- wicker;
- boards;
- panel frame.
In addition, every few years the fence needs to be re-treated and painted.
Metal profile
The basis is taken from profile pipes, from which fence posts can be erected, and sections can be filled with corrugated sheets and slate. Another option is to make a welded structure from rods, pipes, and install it between brick and stone pillars. Artistic forging created in the chosen style will perfectly complement the composition.
Eurofence
Ready sectional material. A type of reinforced concrete concrete. The spans are made of concrete with the addition of various dyes. Can fit any design ideas. The price is affordable. The structure needs a foundation.
Possible problems
Laying out row after row, a beginner can make subtle mistakes that will degenerate into serious deviations at the top level. Here's what you need to pay attention to:
Shape and dimensions of the brick row
Not everyone is able to lay out a row in a perfect square with exactly the same dimensions. As a result, the top rows of the column may be 20 - 30 mm larger than the bottom ones. There is also a chance of getting a diamond instead of a square, so the resulting post will be quite crooked.
Pillar laying process
The solution is to use a carefully calibrated template made from blocks. We lay it on a brick row and immediately see all the flaws.
Verticality of corners
Ideally, the corners of each subsequent row should be located strictly above the corners of the previous one. If you allow even minor deviations in this regard, with each row the masonry may fall to one side or acquire a helical curvature.
The verticality of the corners must be controlled by a plumb line. To simplify this process, after laying out the 2nd row, you can fix steel corners on the corners of the post, aligning them plumb to a strictly vertical position. Self-tapping screws should be used as fasteners, screwed into the seam between the 1st and 2nd rows. After this, all that remains is to place the bricks in the corners, without worrying about the evenness of the structure.
When constructing fences, preference is given to either brick or concrete pillars. Concrete fence posts come in a variety of types - decorative, monolithic, with grooves. Read about each type in detail on our website.
You can familiarize yourself with the types of wooden fences at the link.
Seam width
Another difficulty is to give all seams the same width. If you have a template, the vertical seams will turn out the same automatically, but with horizontal ones everything is more complicated. To solve this problem, use a square steel rod measuring 10x10 mm. Having laid out a row, such rods are laid along its perimeter, and then the solution is applied so that it slightly rises above the rods.
Calculation of distances between posts and marking of the fence
Next, lay out the bricks and use a rubber hammer to bring them into a horizontal position (check with a level). Relying on the rods, the blocks will not fall below the required level, so the horizontal seam will be perfectly correct. After this, the rods are removed and a solution is added in their place.
You can also borrow from stove makers a tool called an ordering machine. This is a straight piece of wood with nails protruding from one side. Nails are driven into the seam between the rows, so that the row occupies a strictly vertical position along the future corner of the post. The peculiarity of this instrument is that it has risks corresponding to the level of each row.
Thus, the ordering simultaneously helps ensure that the corners are vertical and the horizontal rows are equally wide.
Selecting a brick
It is important to remember that the higher the fence, the greater the weight of the masonry on the foundation.
For the load-bearing capacity of supports there are no strict requirements for choosing the type of brick. Allowed use:
- silicate;
- ceramic;
- facing, etc.
You will find detailed technical characteristics, properties, pros and cons of each type in the article: “Brick fence”.
The main thing is that the constructed column can withstand any lateral loads from gusts of wind or when opening gates.
The brick must be intact, without chips or cracks.
The orange ceramic facing bassoon is in demand. The latter creates an imitation of natural stone. If you decide to lay out the pillars with silicate, then alternating contrasting colors of white and black or red will look aesthetically pleasing.
Common mistakes
When attaching gates to brick supports, mistakes are usually made. Mortgages are welded to a metal post to strengthen the gate. But only two pillars should include these details; they are not required on the rest.
The gate will not have a high degree of reliability, since it will not be held by small sections of brick from which a metal rod sticks out. To install the structure, it is necessary to carry out a preliminary layout, marking those pillars that serve as support.
Installation is carried out by electric welding. It prevents the appearance of metal deposits.
How many bricks are needed when laying fence posts?
To accurately calculate the amount of material for the pillars, the height of the fence is divided by the thickness of each stone, taking into account the seam.
So, for a 2 m fence with pillars 2.2 cm high, a brick with dimensions of 25 * 12 * 6.5 cm is used. We take the average seam width - 1 cm.
We calculate:
220/(6.5+1) = 29 rows.
With standard masonry technology, each row will require 4 pieces. To build one support you will need 116 pieces, but it is better to take 120-122 pieces with a reserve.
Using the same method, you can calculate how much raw material is required to create a connecting wall between the supports (if it is specified in the project).
The free space inside the post is filled with an element of rigidity, which gives the fence strength. They will use a profile pipe with a cross section of 12*12 cm or a welded structure made of metal corners.
To help new builders, there are electronic versions of calculators that greatly simplify the calculation process.
Do you need mortgages?
There is no clear answer to this question. If it is decided to weld them in advance, the installation site must be carefully marked. I provide two of them for the gate, and three for the gate leaves. Brick laying is carried out in such a way that the mortgages are located directly in the seam being formed, and are symmetrical relative to the top and bottom of the supports. In this case, all work must be done extremely carefully. Only individual people can cope with such a task.
Mortgage in a brick pillar
An alternative option is to weld the elements directly during the bricklaying process. To do this, the bricks are laid to the required height, and then the mortgage is fastened in any convenient way. This can be done using bots, a clamp, or simply welding the element to the support
This version of the sash design allows everything to be done not only very accurately, but also very beautifully, which is important for finishing the supports, which many people decide to do on their own. Subsequently, it will be possible to paint the protruding elements with paint of the same color as the brick to hide traces of installation work
Option for attaching to a finished pole
If the support is installed and the brick is laid, then you can secure the support in two ways:
- Through the clamp. In this case, the completely finished post is “encircled” by a frame-collar welded from a corner. Sometimes it is placed in the form of three rings, placed at equal distances relative to each other along the entire length of the support;
- To the reinforcement bars. To do this, using a hammer drill, fairly deep holes are drilled, the diameter of which is slightly larger than the transverse dimensions of the reinforcement. Work begins from a point located on the seam of the brickwork. Next they move down, positioning the drill at a certain angle. Reinforcement is driven into the holes prepared in this way.
Both options allow you to slightly increase the strength of the mounted structure. However, in this case, the appearance of the mounted structure significantly deteriorates. This can only be avoided by following the technology for installing support elements.
What masonry methods should be used?
For massive fences with brick pillars, one and a half or two bricks are recommended. Both types are considered optimal for fences made of heavy building materials, since they are able to withstand the load from gates, gates and the structure as a whole.
Photo: a pillar 1.5 bricks wide.
To strengthen the fence, the rows are reinforced with metal mesh.
Let's look at the technique of creating pillars using these methods in more detail.
Two by one and a half bricks
The laying is carried out in the following sequence:
- The base of the pillar is formed from 6 bricks, stacked against each other.
- In the second row, 2 outer and 2 halves are placed across the elements of the first row. Between them you need to install 3 bricks parallel to each other.
- On the third row, 4 bricks go spoon to spoon at right angles to the first row. In the free opening, place 2 bricks with spoons towards the second row, poking each other.
- The fourth row reflects the previous one - it is turned over 360º.
Two by two bricks
Scheme of laying a pillar with 2 bricks.
The order of work is as follows:
- At the base of the support, 8 bricks are placed in 2 rows facing each other.
- Then, on the longer side of the post, 2 pieces are laid with pokes at right angles to the bottom row. 4 bricks are placed in the free openings perpendicular to the side elements. They must go parallel to each other.
- The next row completely reflects the previous one.
- The latter is formed similarly to the first, except for the direction of the bricks. They should go at an angle of 90º to the first row.
Preparing for work
Laying a pillar based on reinforcement and concrete
The first step in the construction of pillars is to determine their number. Typically, the distance between structures should be 3 meters. But if the length of the section is 150-200 meters, the indicator should be 4 meters.
To make a brick pillar, the master will need:
- bayonet shovel;
- container for concrete solution;
- galvanized buckets for gravel and crushed stone;
- spatulas and trowel;
- Boer;
- reinforcing bars;
- scaffolding for laying bricks at height;
- fabric gloves;
- plumb line;
- building level;
- lace;
- concrete mixer.
You will also need a hammer-pick. Using a tool, the brick is given the desired size. For a more precise fit of elements, they often resort to using an angle grinder.
We build a fence with brick pillars with our own hands
As an example, consider a fence made of corrugated sheets.
We calculate the amount of brick using a formula based on the height of the fence and the thickness of the raw materials.
Diagram of span sizes between fence posts
For the solution you need:
- cement grade M400;
- sand;
- fine crushed stone or gravel;
- lime.
To knock down the formwork, you need to stock up on wooden boards.
Tools that will be useful:
- rope and pegs;
- bayonet, shovel;
- building level;
- roulette;
- hammer drill and metal drills;
- hammer;
- welding machine, electrodes, mask;
- screwdriver;
- concrete mixer or drill with a whisk;
- spatula, brush.
When all materials have been purchased and tools have been collected, you can begin the construction process.
Thematic material:
- How to screw corrugated board onto a fence
- Choosing corrugated sheets for the fence
Marking
The first row of pegs should be driven in along the perimeter of the future fence and the cord should be pulled tightly between them. The second row of markings is carried out parallel to the first, at a distance of half a meter from it.
The space between the pegs should be equal to the distance between the posts. On average it is 2–7 meters.
Foundation
Its type is selected based on the relief features of the area, dimensions, and fencing material. Columnar should be used on stable soil, in areas where supports are installed. In the version with brick pillars and corrugated sheets, it is better to choose a strip one. It is poured along the entire length of the future fence.
Preparing the base and frame for fencing installation
For high-quality pouring and hardening of the foundation, the work must be completed in one day, pouring a layer of mortar evenly in all areas.
Initially, a trench is dug up to 70 cm deep, in places where pillars are installed from 1 m (if the fence height is 2 m).
It is worth considering that the depth of the trench under the supports is half their height. Otherwise, when the soil freezes, extrusion and deformation of the pillars will occur. The pitch between the pillars should be 2 m or more.
When the trench digging is completed, you need to begin installing the skeleton of brick supports - installing profile pipes. The depth of the hole for the pipe is 30 cm. Having secured the pipe, the opening is filled with crushed stone and, if possible, concreted.
Formwork, reinforcement
The photo shows an example of formwork for a strip foundation for a fence.
Photo: formwork assembly, metal profile installation
It is recommended to cover the bottom of the trench with plastic film as waterproofing.
The formwork is assembled from half-cut boards. Its ground part must be at least 20 cm.
The trench is reinforced with metal mesh and rods laid between the pipes. A mesh is tied around the pipes.
Quality solution
Mix by hand or with a concrete mixer. Moreover, in the latter case, the concrete will be 20% stronger and more ductile.
To mix the solution, you must adhere to the following proportions: for 2.5 parts sand and 3.5 crushed stone, you will need to take 1 part cement of a grade no lower than M400. Water is poured in gradually until the consistency of thick sour cream is obtained.
You can increase the plasticity of concrete by adding liquid soap to the mixture in proportion to cement of no more than 0.2% or by purchasing ready-made plasticizers. Sometimes small crushed stone is mixed into the solution.
Fill
Photo: concrete hardening stage.
Carried out within one day. The trench is evenly filled with mortar to the top of the formwork. The prepared volume should be enough to fill the entire foundation. Depending on the depth, concrete hardening takes from 1 to 3 weeks. To prevent the solution from cracking, it is covered with plastic film.
Steel frame
When the base is ready, it is necessary to weld 2 parallel profiles to the previously installed support pipes - at the top and bottom of the structure. Sheets of corrugated sheets are subsequently attached to them. The finished frame is cleaned and painted.
Laying brick pillars
At this stage of construction, you should adhere to the following recommendations:
- The proportion of the solution (cement: sand: lime) is 1: 4: 0.5.
- To obtain a beautiful black seam, add a little soot to the mixture.
- The recommended thickness of the seam between the elements is 1 cm. They can be made slightly recessed or jointed separately after laying.
- Each row must be placed under a level.
- When erecting pillars, it is important not to forget to weld plate-shaped inserts to the pipe. At the location where the gates are installed, you will need 3 of them: at a distance of 15 cm from the foundation, in the center and at a height of 15 cm from the top row of masonry.
- The inside of the pillar and pipes are filled with concrete mortar.
In the area where the gate and wicket are fastened, it is better to make the masonry in two bricks; in the intermediate sections, a thickness of one and a half bricks is enough.
Installation of sheets, caps
The finished brick pillars must stand for 2 weeks without any load, after which caps are installed on them. Preference should be given to a concrete base. The main purpose of the caps is to protect the inside of the pillars from precipitation and excess moisture. In addition, they will become an aesthetic completion of the composition.
The corrugated sheet is mounted on a ready-made welded profile frame using a drill and self-tapping screws.
Construction of foundations for fence posts
The choice of foundation depends on how heavy the fence will be, as well as on weather conditions. For a combined fence with wooden or corrugated sheet inserts, a foundation on piles is suitable. If you are planning a completely brick fence or the area is subject to constant exposure to strong winds, the choice should be made in favor of a foundation with additional reinforcement.
Features of foundations on piles
Pile foundation
A pile foundation is made in several stages:
- The first stage is drilling a pit of the required depth. For a standard pillar size of four bricks, it is advisable to make a base with a diameter of 25 cm.
- Afterwards a sand cushion is made. To do this, a layer of crushed stone is poured onto the bottom of the pit and compacted.
- The next step is to install the pipe. The pipe should be installed strictly vertically. The pipe not only serves as a foundation, but is also located inside the future pillar. Thus, the structure will be more stable. If the soil is heaving, it is advisable to strengthen the structure by welding additional elements to the pipe. Metal corners or large diameter rods are suitable.
- The last step is pouring the concrete. It is necessary to choose a cement mortar of quality no less than grade M300.
The depth to which the piles will need to be driven depends on the properties of the soil. Clay soil is prone to winter heaving. It also has high groundwater levels. Therefore, piles must be driven as deep as possible, 20 cm below the soil freezing depth. Sandy soil has good drainage; piles can be buried no more than 80 cm deep.
Strengthened reinforced foundation
Strengthened reinforced foundation
For heaving soil, it is necessary to make a foundation with an additional reinforcing structure. The piles are connected using a grillage. A reinforced concrete strip is used as a grillage.
The bond is made after the piles are poured. A trench is dug between the pillars. It should be larger than the grillage, since it will be necessary to make an air cushion and install formwork. Low-density foam 10 cm thick is laid at the bottom of the trench, as well as near the piles. It creates an air cushion that will strengthen the structure. The reinforced frame is made using metal rods. Four rods with a diameter of 1 cm are connected by a fifth rod of a smaller diameter. Afterwards, the piles are connected using rods and concrete is poured. The formwork must be removed when the concrete has completely hardened.
The last element is the cap on the top
A cap on a brick pillar is needed to prevent precipitation from getting inside. Moisture is the main enemy of the builder: because of it, the clay freezes and cracks, and the service life of the materials is greatly reduced.
You can use anything as a cover: for example, buy a ready-made version or make it yourself from roofing iron. A simple concrete cap, slab, or some metal will do. You can look at examples of cap implementation on the Internet and understand what you want to see on your fence. It is important not to forget it, otherwise the fence will not last long.
Read other blog articles: we regularly publish step-by-step instructions and simple useful tips. Still have questions? Call us!
You can call our team to build brick fence posts if you don’t have time to do it yourself.
Lack of channel
It often happens that the channel is missing or hidden under a layer of brick. You'll have to install it. If the brick support has thick metal reinforcement inside, it will be enough to simply fasten a short piece of channel on it, approximately equal in height to the length of the sashes. This fastening is carried out using mortgages, which are metal rods or reinforcement, driven into the masonry along the edges of the channel and welded to it.
In order to perform this operation more accurately, it is recommended to make holes in the rolled metal. This will allow you to hide the mortgages driven into the post from prying eyes. It goes without saying that the holes will need to be welded and cleaned with a grinder. If necessary, they can be puttied.
No internal reinforcement
Example of channel installation
More problems will arise if there is no internal reinforcement in the column. But a way out of this situation can also be found. In this case, you will also need to install a channel. This will require a longer piece, which is buried deeply and concreted. In order to get a guaranteed result and securely secure the gate, you will need an underground lintel. What does it mean? In fact, everything is very simple. It is necessary to dig a ditch across the opening of the entrance group, into which another U-shaped metal sheet should be laid horizontally in addition to the two vertical ones.
Important! The third channel is laid so that the lower edges of the vertical ones are connected to it.
Next, this entire structure must be simultaneously filled with concrete. Then the channel, located horizontally, should be covered with soil and a normal passage should be arranged. If these measures are not enough, you need to install another one on top, but in this case the height of the fence is very important, because if it is not sufficient, the truck is unlikely to be able to enter the yard. True, fences the height of a truck are not made, so the upper channel can be turned into an arch, thereby hiding imperfections and giving individuality to the site.