The degree of insulation of apartments located in old buildings is not of high quality. This problem is especially relevant for the floors of those apartments that are located on the first floors of houses. The floor covering in such rooms is separated from the cold basement space only by a concrete floor slab. This material does not have the ability to retain heat, so in winter the comfort of residents is at risk. Many people are starting to think about insulating the floor in an apartment on the ground floor themselves, which will improve the situation and make the home warmer and more pleasant to live in.
Materials to choose from
There are two types of coverings in apartment buildings: wooden and concrete. Depending on this, the appropriate type of insulation is selected.
Bases for warm floor coverings come in liquid, bulk, and also in the form of blocks and rolls. They can be used together with each other or separately.
Liquid
The insulation can be a cement mixture filled with expanded clay, polystyrene foam or other materials. Currently, polymer penoizol is widely used.
However, in order to work with it, special equipment is needed.
Bulk
Insulation materials in this group include expanded clay, foam chips, and sawdust. They are suitable for insulating floors in apartments with an unheated basement.
Expanded clay is strong and durable, has low thermal conductivity. But, having chosen it as insulation, you need to take care of high-quality waterproofing, since its granules absorb moisture well.
Block
They come in the form of slabs and mats of mineral wool, polystyrene foam, and basalt fiber.
Polystyrene foam has low thermal conductivity, costs little and is environmentally friendly. But it is fragile, and when heated strongly, it melts, releasing harmful fumes.
A more modern version of polystyrene foam is expanded polystyrene. It has better density and does not burn. Sheets of such insulation are convenient because they can be used to install a heated floor, install a plank floor, fill a screed, and so on.
The most environmentally friendly material among blocks is vermiculite, which is obtained by processing mineral products.
However, it is by no means cheap and in order to save money, you can use its analogue, granulated vermiculite.
Rolled
Insulation materials are made in the form of rolls from polystyrene, cork, mineral wool and foil bases. When the thickness of roll-type insulation is not enough, they are laid in two layers or used together with blocks.
Mineral wool, being a cheap insulation material, guarantees low heat transfer. But, you need to take into account that over time it can become denser, causing its properties to decrease. In addition, during installation, mineral wool crumbles and forms dust that is harmful to health, so it requires the use of a respirator and special clothing when working with it.
Ceramic tile
Second rule
All areas with ceramic tiles must be heated.
This is due to the high thermal conductivity of the tile itself. If you put your hand on any board in your apartment, it will seem a little warm to you.
And if you place your palm against the metal door of a refrigerator or an unheated oven, you will feel a certain coolness.
However, their temperature will be absolutely the same - room temperature. Iron things always seem much cooler because they have higher thermal conductivity. That is, they transfer their temperature to your hand faster.
Thus, we exchange temperature with any object we come into contact with. However, you can warm up small objects and things - watches, clothes, a chain with your body, but you will never be able to warm up a layer of concrete with tiles.
On the one hand, the coolness from ceramic tiles seems slightly pleasant, but it all ends in illness.
Another important point is the following. Tiles are mainly laid not because they will last a long time, but because of their moisture resistance.
For example, it is placed in the hallway. Come in from the street with wet shoes and immediately put them on the tiles.
It's hard to imagine a bathroom without tiles on the floor. At the same time, you can safely spill water in it, without fear of subsequent swelling of this floor.
However, after you spill this water, you still have to clean it up. And in order to dry the bathroom, it is not enough to simply turn on the exhaust fan.
It also needs to be warmed up so that over time mold fungus does not grow on the walls.
Therefore, if you want to maintain your health and also use your finished floor for a long time without repairing it, be sure to think about forced heating.
Concrete floor
Concrete is durable and therefore very often used as a floor. However, this material is very cold. Therefore, in those houses where it is used, careful thermal insulation is required on the first floors. Otherwise, any heating will not be able to warm up properly.
Apartment owners must do the insulation of the concrete floor of the first floor with waterproofing, since dampness often forms in the basement, as a result of which, without appropriate work, mold will appear on the walls.
Instructions for carrying out work
The process begins by preparing the base. To do this, you need to remove the entire coating and check the slabs for cracks, chips and cracks. If there are defects, they are eliminated with a special solution based on concrete or cement. After the surface hardens, it is treated with a special impregnation that strengthens the layer.
Next, waterproofing should be done. Polyethylene film is quite suitable here. It should extend onto the walls by about fifteen to twenty centimeters. A special deep penetration primer will also cope with the task.
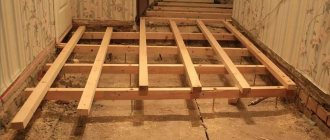
To install the insulation, a frame is made. To do this, beams are laid, and under them - pieces of roofing felt. Logs are placed on the bars, and the entire structure is attached to concrete.
After this, you can install bulk insulation alone or in combination with a liquid version. Mineral wool is placed on top of it in the cavity of the structure. You can also use foam or other material.
Use of expanded clay
Let’s say right away that this method is the least effective of all those given above, but you can also resort to it. One of the few disadvantages is that the screed will take quite a long time to dry - about 1 month. Obviously, filling with expanded clay can only be done where the height of the ceilings makes it possible to raise the floor by 15-20 cm.
This is also true in multi-storey panel-type buildings, in which the floors can hardly be considered warm, especially in winter.
Stage 1. The old coating is dismantled, the concrete slab is cleaned of dirt and debris.
Stage 2. Next, a layer of waterproofing is laid - in other words, a polyethylene film is laid down. It is necessary to ensure that the latter extends onto the walls to the height of the future insulating layer.
Stage 3. Dry backfill of thermal insulation material is made on top of the waterproofing. In order to ensure uniform backfilling and maintain a uniform level, beacons (wooden slats) are placed. The first beacon is installed 3 cm from the wall, the rest - parallel (the step depends on the length of the rule with which the level will be set).
Expanded clay backfill
Expanded clay is backfilled from the far wall towards the front door.
Stage 4. The surface of the insulation is treated with “cement laitance”, which will ensure more effective adhesion of the granules to each other. Preparing such “milk” is not difficult: clean water is mixed with cement in a ratio of 4:1.
Expanded clay filled with cement laitance
Note! Experienced builders recommend insulating the floor with multi-fraction expanded clay. So, for a city apartment you need to mix granules with a diameter of 5 mm or 10 mm with expanded clay sand.
A day after the insulation is leveled and secured with mortar, the surface is covered with a concrete screed.
Floor screed with expanded clay
Wooden floor
Modern high-rise buildings no longer have wooden floors. But they can often be found in old-type houses.
Wood is a warm and environmentally friendly material, but over time it tends to dry out, causing gaps to form in the floor. And they cause drafts. Therefore, it would be correct to further process such coatings.
Insulation technology
To insulate the ground floor, you need to perform the following steps:
- dismantle the old coating, check and, if necessary, replace it, and if it is in normal condition, it can be put back in place;
- treat the surface with antifungal antiseptics and allow to dry;
- install insulation and cover it with a vapor barrier film;
- A board is laid on top of the surface.
Why you should insulate the floor on the lower floors
Some people don't understand why they need to insulate. Therefore, it is recommended to understand in advance why people insulate their floors.
It is the floor covering that separates the warm room from the basement or ground located outside. In winter, when the temperature outside drops below zero, the soil begins to freeze. Because of this, the soil gradually cools the foundation and floor.
Sometimes this leads to mold and mildew beginning to appear on the surface of linoleum, laminate or tile.
The indoor temperature also decreases. To prevent this from happening, it is necessary to do insulation.
Work from the basement
It is possible to insulate an apartment on the ground floor from the basement side. For this purpose, thermal insulation material is attached to the ceiling in the technical room. It can be polystyrene foam or polystyrene foam, which are simply glued on. Mineral wool is also suitable for this purpose. But attaching it will be more difficult. To do this you need:
- fix the bars a couple of centimeters thick than the insulation layer;
- lay mineral wool between the elements of the installed structure;
- Using a stapler, install a vapor barrier membrane on the surface
- cover the structure with plywood or fiberboards.
If you have access to a basement
The easiest way, which does not require dismantling the floor in the apartment, is to insulate the basement. You can only apply it yourself if you have access to the basement. For example, this method is good for owners of private houses or townhouses.
To implement this method of floor insulation on the 1st floor you will need:
- putty;
- polyurethane foam;
- insulation boards;
- parachute dowels;
- glue for foam plastic.
Even a woman can do this work with her own hands. Small cracks on the basement side are covered with putty, and then insulation boards are placed on the glue. Their joints are carefully filled using polyurethane foam, and in addition, each slab is secured in several places with dowels.
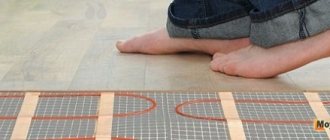
Heated floor system
This type of insulation is becoming increasingly popular. Thanks to it, the floor surface on the first floor will always be warm, the humidity in the apartment will decrease, and its microclimate will improve. The system is:
- electric, mounted in a screed or on top of a rough covering;
- infrared, from a special film installed under the final coating;
- water, when the liquid is constantly heated and pumped into the heating system.
It is best to lay such structures in a leveling screed. A water floor can also be used for wood flooring. But this will be more difficult to implement, since polymer pipes must be placed in the grooves made for them and covered with foil. The finishing is installed on top of the system.
Technologies for improving thermal insulation
All floor reconstruction technologies using bulk, sheet, and block heat insulators are built on the principle of creating an artificial obstacle made of materials with low thermal conductivity in the path of cold air.
When planning insulation, you need to calculate their weight, volume, and method of placement.
The most popular is the construction of an additional volume under the wooden floor, into which heat insulators are placed.
Simple structures are built by laying a wooden frame (lag) under the floor, between which a heat insulator is placed.
A new floor is laid on the outer surface of the joist.
The disadvantage of this method is a significant reduction in the useful volume of the apartment - when reconstructing the floor, its height can increase up to ten centimeters.
For old apartments, an accurate calculation of the weight of the heat insulator is required, which may be excessive for worn-out floors.
Self-leveling floor
This coating is used not only as decorative, but also as insulation for the floor, especially on the ground floor. Special mixtures guarantee thermal insulation and waterproofing, as well as fire safety.
They are made from environmentally friendly materials that can be installed independently.
Installation instructions
Before starting installation, it is important to properly prepare the base.
- whatever the rough surface is - concrete, wood, ceramic tiles or cement screed, it must be carefully checked;
- seal cracks, cracks, loose elements, dismantle and replace;
- clean the entire coating;
- sand wood and concrete;
- Prime the floor generously so that all pores are completely closed;
- a day after this you can start laying.
The prepared mixture is simply poured out of the bucket and leveled with a spatula. The entire room is covered at once to create a flat surface. At the end, to avoid the appearance of bubbles, you need to go over the entire coating with a roller with needles. Polyurethane varnish is applied to the dried floor.
Final cost calculation for floor screed: which is cheaper?
Installation of a dry screed will cost at least 900 rubles per square meter, this is due to the relatively high cost of materials, and repairs can be continued immediately after laying the floor.
A traditional wet screed will cost you about 800 rubles per square meter or more. This is an inexpensive way to level the floor, but the process is quite complex, “dirty” and takes time - you will not be able to begin subsequent finishing work until the screed is completely dry.
A semi-dry screed costs from 350 rubles per square meter and, in comparison with the wet method, today is the best option both in cost and in terms of the strength and practicality of the coating.
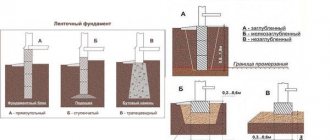
Floor on the ground
In houses without basements, the floor of the first floor can be made according to two schemes:
Which of the two options will be better and easier?
In houses without a basement, floors on the ground are a popular solution for all rooms on the first floor. Floors on the ground are cheap, simple and easy to implement, and are also beneficial to install in the basement, garage, bathhouse and other utility rooms. A simple design, the use of modern materials, and the placement of a heating circuit in the floor (warm floor) make such floors comfortable and attractive in price.
In winter, the backfill under the floor always has a positive temperature. For this reason, the soil at the base of the foundation freezes less - the risk of frost heaving of the soil is reduced. In addition, the thickness of the thermal insulation of a floor on the ground may be less than that of a floor above a ventilated underground.
It is better to abandon the floor on the ground if backfilling with soil is required to a too high height, more than 0.6-1 m. The costs of backfilling and compacting the soil in this case may be too high.
A ground floor is not suitable for buildings on a pile or columnar foundation with a grillage located above the ground surface.
General recommendations
In order for the floor insulation work in the apartment to be successful, you need to take into account some points:
- the basement walls are examined to identify cracks, holes and chips that must be repaired;
- Ventilation holes in the basement can be covered for the winter, but not completely;
- installation of a vapor barrier is required.
Apartments on the 1st floor are practically not in demand, as they have a lot of inconveniences. Most often, residents of such premises have to deal with cold floors. Insulating them with your own hands will not be difficult, so you should not immediately refuse a lucrative purchase offer, because apartments on the 1st floor are usually a little cheaper than others.
Using Spray Polyurethane Foam
We’ll talk about this insulation technology separately, because it requires the participation of professionals - you can’t do it on your own, especially without the appropriate equipment. The material is laid in the form of foam having a cellular structure; the foam expands after application and forms a seamless monolithic mass. For application, a special machine is used - in it the liquid polymer is mixed with carbon dioxide at high pressure.
Stage 1. The concrete base is prepared - the old coating is dismantled, debris is removed (it can worsen the adhesion of the foam). It is characteristic that the floor does not need any leveling in this case.
Stage 2. Next, wooden logs are installed (they can be made from timber or 40 mm boards) in increments of 0.7-1 m. To fix the logs, dowels, screws or corners can be used.
PPU floor insulation
Stage 3. To improve adhesion, the concrete base is moistened. Foam is applied between the joists, but it should be taken into account that in the future it will increase in volume.
Stage 4. The foam hardens for about 24 hours, after which the floorboard or any other floor covering is laid.
Floor insulation with polyurethane foam
Note! Do not leave polyurethane uncoated for more than two to three days, as it may deteriorate when exposed to sunlight.
If the floor is covered with boards or parquet
Such floors on the 1st floor can often be found in an apartment located in one of the high-rise buildings built in the early nineties. In this case, the structure will have to be dismantled before insulation. Each board will need to be marked so as not to waste time on adjustment later. It is quite easy to insulate such a floor with your own hands if you have the necessary tools. To speed up the work, it is best to invite an assistant.
To seal the cracks at the top, you will need:
- putty;
- cement-sand mortar;
- polyurethane foam.
Use putty to seal small cracks. Larger ones are filled with cement mortar, and it is best to use polyurethane foam in the seams between the floor slabs and the joints around the perimeter of the room.
The wooden floor is mounted on joists, which must be leveled and secured with special steel studs or racks. Insulation must be placed between the joists. The most commonly used materials are mineral wool, expanded clay or slag. Place a layer of vapor barrier material on top and return the boards to their place.
Performing thermal insulation along joists
If the selected thermal insulation material is not able to withstand significant loads, then it is necessary to carry out insulation along the joists. For the design, even bars with a cross section of 50 by 100 mm are suitable, which it is highly advisable to pre-treat with an antiseptic solution. It will protect the logs from the penetration of fungus and extend their service life.
- After clearing the surface of debris, waterproof it. To do this, using a brush, you need to apply a layer of bitumen mastic, also covering the walls to a height of 5 cm.
- The logs are laid from timber; the first and last logs should be located close to the wall.
USEFUL INFORMATION: How to repair a parquet floor with your own hands
Tip: in order to avoid unnecessary cutting of insulation material supplied in the form of rolls or sheets, the distance between the logs can be chosen equal to its width, but not more than 90 cm. When using bulk material, the rule applies: the thinner the logs, the smaller the distance between them .
- The laid logs are leveled and secured with anchors. You don’t have to fasten it if the beams rest securely against the wall.
- Having laid insulation between the joists, if necessary, lay a layer of vapor barrier and lay sheets of plywood or chipboard, fixing them with self-tapping screws on the joists. It is recommended to lay two layers, shifting them relative to each other. A gap of 1.5–2 cm is left between the sheets and the wall.
- A finishing coating, which is a laminate, carpet or linoleum, is laid on the substrate thus obtained.
Independent floor insulation on the first floor is not particularly difficult, and the variety of materials and technologies allows you to choose one of several methods that is most suitable in terms of labor costs and financial investments. Let your apartment always be warm and cozy!
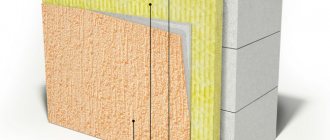
What to do if the apartment has a rough finish
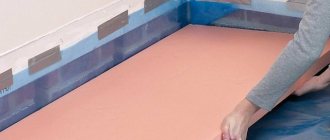
You can prepare floors for laying ceramic tiles, laminate, parquet or linoleum using thin slabs of polystyrene foam or polystyrene foam. In addition to the insulation itself, to prepare the floors of the 1st floor for final finishing you will need:
- cement mortar;
- vapor barrier material;
- polyethylene film;
- edge tape;
- mesh for reinforcement.
In this case, first the floors in the apartment are cleared of debris, then a layer of vapor barrier, insulation and film are laid. The last layer needs to be a cement screed. It is quite difficult to do this work perfectly with your own hands, so it is best to use not an ordinary solution, but a special mixture that creates an ideal surface. A mesh is placed in the screed to create structural rigidity and an edge strip. To do everything correctly, watch the video, which provides detailed instructions for this type of work.
How to insulate a floor on the ground?
In some private houses, the floor is installed directly on the ground, and therefore also requires serious insulation. Thermal insulation of such structures should be considered at the stage of building a house.
When building a house, the top layer of soil is removed and removed, and crushed stone and sand are poured in its place. Each layer is poured to a height of about 10 cm and compacted well. Insulation of the floor of the first floor in this case can be carried out using sand or concrete screed. In the first method, the thermal insulation material is laid directly on compacted sand, in the second, a concrete slab up to 12 cm thick is first poured.
It is best to use polystyrene foam as insulation, which is not afraid of moisture. The perimeter of the room is treated with damper tape, and waterproofing in the form of a polyethylene film or vapor barrier membrane is spread over the insulation. Then a cement screed with reinforcing mesh is poured over this entire structure. After the solution has dried, the floors of the first floor can be covered with a decorative coating.
How can you do without dismantling
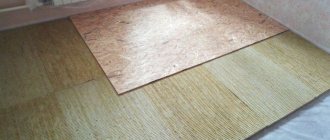
The best way to carry out floor insulation work in an apartment is if you have time to completely dismantle the covering. It is necessary to remove everything up to the concrete base of the 1st floor, but this option is not always acceptable to the owners. There may be several reasons for the reluctance to carry out global work, but most often they refuse to overhaul the floors on the 1st floor due to lack of time or due to the impossibility of living in the apartment during such repairs. In this case, it is advisable to do the following:
- the final coating is leveled (only boards or parquet will do; the tiles will still have to be removed, just like the laminate);
- a thin backing made of flax, cork or polystyrene is laid;
- the insulation is fixed on top with plywood or fiberboard, which is screwed with self-tapping screws;
- As a final finish for the floor, linoleum with a soft fleecy base is laid, its edges are pressed with a plinth.
Insulating the floor using this method may not be completely ideal, but you will feel the difference almost immediately. In addition to the fact that your floors on the 1st floor will become warm, caring for them will be very simple. Linoleum has another advantage - it retains its appearance for a long time.
It is possible to insulate the floor in this way only in an apartment with high ceilings, since during installation the floor can rise to a height of up to 15 centimeters (depending on the thickness of the substrate).
Advantages and disadvantages
Advantages of using water pilaf in apartments:
Economical . Compared to radiator heating, the savings will be from 20 to 30% of heat, less often - up to 60%. If we compare with an electric floor, then the water floor is 5–7 times more economical in terms of operating costs.- Safety . The pipes have a heating temperature that is comfortable for safety; they are carefully embedded in the thickness of the floor. You cannot get burned while operating the system.
- Comfort . The air is heated evenly. You can walk on the floor barefoot. It gives a pleasant feeling.
- Aesthetics . The built-in water floor system is hidden, practical and hassle-free.
- Smooth heating without the effect of “heat shock”.
- Harmlessness of exposure to radiated electromagnetic floors . The air is saturated only with positive ions and does not dry out.
There are pros and cons:
- Labor intensive installation . The surface must be perfectly flat and prepared, which is costly and time-consuming to do.
- An expensive installation that pays for itself in the first year of active operation.
- Impossibility of installation in small areas . An example is a staircase or a narrow corridor.
- Difficulty in eliminating a leak if it occurs . To identify the location of the damage, it is necessary to completely dismantle the floor covering and remove the first layer of screed.
Heated floors
Owners of apartments on the 1st floor often prefer to play it safe and install a heated floor system in the premises. This is a 100% way to create uniformly warm flooring throughout your apartment. You can connect a heated floor system with your own hands only if you have at least basic builder skills and detailed instructions. The easiest way to insulate your floor is with a system that is powered by electricity (but be prepared for high energy bills). To do this you will need to do one of the following:
- put infrared film under any floor covering without the need to make a screed (this is the simplest option that can be done on the 1st floor yourself);
- fill the screed and lay a resistive cable (it independently heats up the cold areas);
- lay fiberglass mesh and carbon fiber rods (most often this option is used under the tiles and secured on top with glue for installing ceramic coatings).
Review of insulating materials
The problem of cold floors on the ground floor is typical for both private houses and urban high-rise buildings. To properly resolve the problem, you need to find out the reasons for this situation:
- for private houses the reason often lies in poor quality/absent thermal insulation of the base;
- in high-rise buildings, a cold floor is a consequence of an unheated basement.
In the first case, everything is quite simple - you need to get rid of the cracks in the floor. For this purpose, the base is checked, and all detected cracks are sealed with polyurethane foam. Next, the floor is insulated using one of the possible methods.
Foaming cracks in the floor
Note! The ventilation holes, which are located in the basement of the house, must under no circumstances be closed, otherwise the increased humidity will lead to rotting of the wooden floor elements (such as, for example, sheathing).
The ventilation hole cannot be removed or sealed tightly
And if everything is clear with private houses, then with city apartments everything is much more complicated. There are a number of possible insulation methods; let’s take a look at each of them.
Insulation with mineral wool. This material has excellent sound and thermal insulation properties, it is impervious to aggressive chemicals and high temperatures.
Minvata
Types of mineral wool by density
Thermal insulation with foam plastic. Among its advantages, it is worth noting low cost, good insulating properties and durability. The material is lightweight and can be laid not only on concrete, but also on tiles, wood, etc.
Styrofoam
| Brand of foam boards | PSB-S15 | PSB-S25 | PSB-S25F | PSB-S35 | PSB-S50 |
| Material density, kg/m3 | 10-11 | 15-16 | 16-17 | 25-27 | 35-37 |
| Compressive strength at 10% linear deformation, MPa, not less | 0,05 | 0,1 | 0,12 | 0,16 | 0,16 |
| Bending strength, MPa, not less | 0,07 | 0,18 | 0,2 | 0,25 | 0,3 |
| Thermal conductivity in dry condition at a temperature of 25 (+-5 degrees), W / (m * K), no more | 0,037 | 0,035 | 0,037 | 0,033 | 0,041 |
| Humidity of slabs, %, no more | 1 | 1 | 1 | 1 | 1 |
| Self-combustion time, sec, no more | 3 | 3 | 3 | 3 | 3 |
| Water absorption in 24 hours, %, no more | 1 | 1 | 1 | 1 | 1 |
| Service life, years (minimum-maximum) | 20-50 | 20-50 | 20-50 | 20-50 | 20-50 |
Thermal insulation with plasterboard or fiberboard.
Drywall
Using a "warm floor" system.
Electric heated floors
Insulation with expanded clay. Not the most reliable, but affordable option. It is characteristic that expanded clay can not only be used to fill the base, but also added to the concrete screed.
Insulation with expanded clay
| Material | URSA | ISOVER | IZOVOL | IZOBEL | ECO WOOL |
| Thermal conductivity, W/m*°С | 0,04 | 0,041 | 0,034 | 0,035 | 0,035 |
| Operating density, kg/m3 | 11 | 11 | 35 | 28 | 35 |
| Recommended layer thickness, mm | 200 | 200 | 150 | 150 | 150 |
| Cost of insulation, rub/1m3 | 1347,22 | 1470 | 1800 | 1270 | 1050 |
| Cost of insulation, rub/1m2 | 269,44 | 293,8 | 270 | 187,5 | 157,5 |