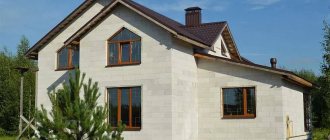
Concrete block fencing is ideal for people who value reliability and solidity, functionality, durability and aesthetics. Even at first glance it is clear that this fence is for centuries. A fence made of concrete blocks is reliable from all sides: it must stand on a foundation, and the top is covered with parapets and finials.
A fence made of concrete blocks is strong, beautiful and reliable.
- 1 Advantages of a fence made of concrete blocks
- 2 Types of concrete blocks
- 3 How to make your own fence from concrete blocks
- 4 Marking the territory
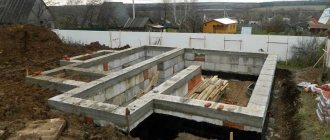
- 5 Foundation construction
- 6 Masonry fencing
- 7 Caring for a concrete fence
- 8 Features of expanded clay concrete blocks
Types of concrete blocks
The blocks are made by vibrocompressing concrete in special forms. If you have a vibrating table, you can easily make blocks with your own hands near the installation site of the fence. The main binder for concrete blocks is cement. Fillers can be very different:
- gravel;
- crushed stone;
- broken concrete;
- granite screenings, slag;
- broken bricks and glass;
- expanded clay
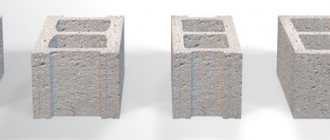
Concrete fence blocks can be purchased in different colors. You can buy or make:
- solid or hollow blocks,
- ordinary or decorative,
- gray or colored in the mass in any color.
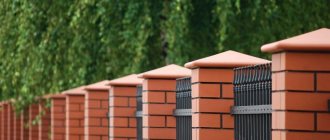
Despite the fact that the dimensions of a typical block are 200 by 200 by 400, there are many varieties in size, shape and texture. For the installation of concrete block fences, similar blocks are used for pillars, caps - tops and parapets.
Sample of a concrete block fence section.
Advantages and disadvantages
Each of the technologies used for the manufacture of concrete sections gives the product qualities that distinguish vibration-cast blocks from vibration-pressed ones. The former have a smooth surface, but less strength and frost resistance. The latter can withstand a greater number of freeze-thaw cycles and are stronger, but their surface is rough. Both pillar blocks have common advantages in comparison with natural stone and brick:
- Solidity. It is achieved by reinforcing the void and pouring concrete. This design is more resistant to mechanical stress than a support made of brick or stone.
- Quick installation of the pole. The decorative block is larger than a brick, which speeds up installation, but selecting boulders along their edges is a difficult task and takes time.
- Large selection of compositions due to the variety of textures and colors. Posts can be built for any fencing blocks.
- The costs of erecting a fence on supports made of concrete sections are lower than the costs of constructing the same structures from brick or natural stone.
Stacked sections of posts have good compatibility with any fencing materials, be it corrugated sheets, forged metal or wood. Like natural stone, block products last for decades. The only drawback concerns all heavy supports: a foundation needs to be laid under them.
How to make your own fence from concrete blocks
A block fence is laid in the same way as a brick fence. For DIY construction, it is better to choose hollow blocks - they are lighter, easier to process and cut, and can be reinforced to increase strength. What is important is that hollow blocks are much cheaper.
Which is better: heated floors or radiators?
Warm floorBatteries
Hollow decorative blocks.
What to consider when choosing a material
There are two types of gas silicate blocks available for sale:
- full-bodied;
- hollow.
It is more economical to use the latter to create fences. In addition, hollow products are convenient to reinforce and hide wiring in them.
When purchasing, pay attention to:
- identical block sizes;
- uniform, uniform color coverage;
- smooth edges.
It is better to take material from one batch so that during construction there are no differences in dimensions or shades.
In addition to standard aerated concrete, decorative blocks began to be produced for exterior use. They are several times more expensive than regular ones, but are protected from moisture and do not require additional finishing.
A large selection of colors and textures allows you to make a fence that will harmoniously combine with other structures on the site.
Territory marking
Pegs mark the installation locations of corner posts and gate supports. A synthetic twine is stretched between them and places for intermediate supports are marked in increments of 3-4 meters. The location of the intermediate supports can be calculated in this way: parallel to the marking line, lay out the blocks in one row for the post and for the fence (don’t forget about the mortar joints).
The middle of the block for the pillar will be the axis of the second support. This will be necessary so that there is an integer number of blocks in the span.
Since a heavy fence will require a strip foundation, it is necessary to draw 2 lines - along the outside of the fence and along the inside. The width of the trench should correspond to twice the width of the block. The depth depends on the depth of soil freezing.
If the soil is very heaving, you need to deepen the trench below the GPG.
Negative qualities
Such pillars have several characteristic disadvantages. This mainly concerns:
- High cost. The construction of such a structure is very expensive and economically unprofitable;
- Large mass. Such a pole necessarily has a steel pipe inside, which increases the weight of heavy concrete;
- A very complex technological process. Working with concrete requires great care. The slightest failure to comply with the technology will lead to loss of quality and reduced service life; You can forget about reliability.
Return to contents
Masonry fencing
Scheme of a combined fence made of blocks and picket fence.
Wall blocks are laid in rows similar to brickwork along a building thread. Do-it-yourself stone border for a flower bed? Each row is checked with a level for horizontal and vertical masonry. The masonry is done with rustic jointing with a recommended masonry joint thickness of 1-1.5 cm.
The voids of the first row and reinforcement outlets are filled with concrete mortar. The laying of smooth and decorative blocks can alternate to create an original pattern or ornament.
Laying wall blocks.
- If you plan to install a combined fence - with a bottom made of concrete blocks and a top made of corrugated board, picket fence or forged lattice, then cover slabs are laid on the last row of blocks.
- At the end, a cover is placed on each pillar, and a parapet is placed on the panel. The seams are additionally treated with hydrophobic impregnation.
- The finished fence can be painted in the color you like, tiled, porcelain stoneware, or finished with decorative plaster. Lamps installed on the tops of the fence look impressive. You can put a forged lattice, decorative tiles or panel along the top row of the fence.
A fence made of concrete blocks of different textures.
Application
The spread of the trend with decorative pillars began several centuries ago, and in order to get a rough idea of architectural traditions, just look at the design of palaces in St. Petersburg or Paris.
The classic combination of metal and stone has been borrowed by modern builders for fencing government buildings and luxury mansions.
Installation at the dacha
The modern construction industry, which has mastered dozens of new materials, has expanded the concept of decorative fence posts. Brick and natural stone remain the classic option for any type of fence.
But concrete, mesh structures with crushed stone, and plastic appeared, which decorate the most primitive options. There are multiple price lists with numerous examples that give an idea of what decorative blocks for fence posts are.
Variety of options
The use of pillars has expanded the scope of demand, but has not limited it, and on modern construction sites you can find many unconventional options for using decorative pillars - from an enclosed atrium and veranda to a large balcony, observation deck, canopy in front of the house, equipped for decorative purposes.
The differentiation of the scope of use of pillars, pillars and columns has led to the need for a targeted choice made taking into account all components.
Fence of a private house
The criteria for selecting the necessary style components were:
- design options and methods of its installation, construction and stability;
- manufacturing material, in which there are possibilities for stylization, replacing natural decorative stone with no less expressive fakes made of plastic;
- durable frame devices, giving the chance to use lighter and cheaper raw materials without loss of visualization and strength;
- dimensions, parameters and configurations to create a unique or standard constant of the same familiar brick fence;
- additional decorative elements (balls and cones, lamps, combinations with metal elements, stucco or its imitation);
- color scheme (contrasting, similar in color perception and tone, combined, imitating geometric or abstract patterns);
- modification of shape (parallelograms, rounded outlines, cones, columns with pedestals or pedestals).
Storage of finished racks
Features of expanded clay concrete blocks
A fence made of expanded clay concrete blocks has its own characteristics when laying, which must be taken into account:
Fence made of expanded clay concrete blocks.
Fence blocks are used to speed up the construction of fencing and reduce the cost of fencing and installation. Different textures of the decorative surface can imitate: stone, brick, wood. That is why block fences have gained popularity in modern private construction.
Combination
Kermazi concrete is an excellent solution for the construction of a combined fence. You can lay out 5 rows of blocks, create columns, and then use corrugated sheets, forged structures, or other fencing. There are many options for filling the fence.
Remember that if you decide to install a combined fence, then before moving to another material, lay the final row with the holes down. It is important that the surface is flat, without depressions. Then install the partition blocks in approximately two rows.
Upon completion of installation work, the columns should be closed with special covers made of plastic or metal. If you prefer a solid fence, then cover the walls with parapets and finials. This will protect the masonry from bad weather and give the structure a pleasant appearance.
Building a fence from cinder blocks with your own hands
The fence is the face of any site, so it must combine reliability, decent appearance and durability. The building materials most often used for constructing a fence are corrugated sheets, chain-link mesh, and forged metal products. They do not provide reliability, so we will not dwell on them now.
Natural stone is good in everything, but it is too expensive, and its installation can be difficult. The best option is a cinder block fence. It is not inferior in strength to brick, but is cheaper, and you can build such a structure with your own hands faster and easier.
Advantages of a cinder block fence
Fences are built from cinder block relatively rarely, considering them too labor-intensive. However, such structures are built to last for decades, unlike other materials. We list the main advantages of such construction:
- Extraordinary durability of blocks, amounting to more than 50 years. If the outside material is additionally lined, the building will last much longer.
- A cinder block is one and a half times lighter than a brick, so the load on the foundation is reduced.
- Relatively low cost compared to other solid materials. The cost of construction is further reduced if the blocks are made by hand.
- The fence can be given a decorative look by facing it with ceramic tiles, which fit perfectly on this material.
- Environmentally friendly building material that does not harm people and nature.
- Construction can be done with your own hands, without the involvement of craftsmen.
Preparatory work
Before starting construction of the fence, you should stock up on the necessary materials and tools. We will need the following building materials:
- Cinder block in the right quantity. The most affordable ones are ordinary, gray blocks. Along with them, torn, chipped, and colored cinder blocks are also produced. Do-it-yourself flower garden made from plastic bottles? They have a rough surface that imitates wild natural stone.
- Components for preparing cement mortar and making a cushion: water, sand, crushed stone, cement.
- Rolled waterproofing (bikrost, roofing felt, stekloizol).
- Gravel, rubble stones, broken bricks, rebar. This is necessary for pouring the foundation.
From the tool you should prepare:
- Shovel.
- Trowel for laying mortar.
- Construction level, plumb.
- Roulette.
- Pegs and rope for marking.
When a cinder block fence is being erected, the entire construction can be represented in the form of several successive stages.
Making the foundation
Even an untrained person can build a foundation with his own hands, because the procedure for its construction is practically no different from arranging the foundation for any building. The general operating procedure looks like this:
- According to the markings, a trench is dug under the foundation. Do-it-yourself antique wooden gate? The width of which should be approximately 10 cm greater than the width of the cinder block. The depth of the trench depends on the climate in which you live. Usually a depth that does not freeze during the winter is sufficient.
- A gravel-sand cushion is formed at the bottom of the trench, which levels out the heaving of the soil. If the groundwater at the construction site is high, the presence of such backfill is considered mandatory. Layer thickness is about 10 cm.
- Reinforcement tied with wire is placed in the trench, which serves as a load-bearing frame. You can also place rubble stones and broken bricks in the trench.
- Before pouring the cement mortar, the pillars are laid. It is recommended to use metal pipes that are buried below the foundation level. Subsequently, cinder block or brick columns are formed around these pillars. Such columns usually exceed the width of the fence in size. The distance between the pillars is chosen to be 2–3 m.
- At the soil level, you construct the formwork with your own hands.
- The concrete solution is poured into the trench and distributed evenly between the elements of the load-bearing frame and the stones.
- The surface of the poured concrete is leveled using a building level.
- The foundation is left to harden for 10–14 days.
Causes of destruction
Sketch of the correct design of the structure
Often we can see destroyed fences that seemed to have such a strong structure. The whole trouble most often begins with the supporting elements. The supporting part of the fence can collapse for several reasons:
- non-compliance with installation rules, for example, small depth;
- the design of the support element pit does not correspond to the characteristics of the soil;
- the use of low-quality material in the manufacture of a product or in the construction of a foundation.
All such shortcomings will reveal themselves after the first wintering of the structure, so you shouldn’t take risks. It is better to consult with specialists, play it safe several times, than later be disappointed in the fencing structure and regret the money wasted.
Well, if all the work was done efficiently, in compliance with all standards and rules, then such a fencing structure will last for decades, especially if it is provided with decent care.
Construction of support pillars
The first step is to erect support pillars. Their function is not only to ensure the presentation of the cinder block fence, but also to increase the rigidity of the entire structure. The foundation for the pillars is laid at the foundation construction stage.
Next, only the cinder block supports are laid on top of the concrete pour. The height of the pillars should be such that they exceed the calculated height of the walls.
Often, special pillar blocks are used for laying pillars, which are hollow inside. Their dimensions are 320x320 mm, and their height is 188 mm. The void inside these blocks is reinforced and filled with concrete.
Wall masonry
Do-it-yourself laying of cinder blocks on a frozen foundation in the following order:
- A layer of waterproofing is laid on top of the foundation. The individual pieces are stacked with overlap.
- The outer blocks located between two adjacent pillars are laid on the cement mortar.
- A cord is stretched between the blocks, along which the first row is laid. If the whole block does not fit in a row, it is cut to the required size.
- This fills the entire first row within one section.
- The second row and all subsequent rows are laid out in the same way. The cord is consistently moved higher and higher.
- During the laying process, the verticality of the masonry is periodically checked using a plumb line and level.
- A layer of concrete mortar is applied on top of the last row of blocks to prevent moisture from getting between the blocks.
- Canopies made of galvanized metal are installed on top of the fence and individual posts. Their function is protective and decorative. Overhangs add a finishing touch to a cinder block fence.
- If necessary, lamps and other decorative elements are installed on the fence.
Improving the appearance of the fence
After laying all the rows of cinder blocks, you can give the fence a decorative look. To do this, it is primed, puttied, and then covered with a layer of oil or facade paint.
There is also a decorative cinder block on sale that can be used as inserts in a gray wall. Colored cinder blocks can be laid in rows, or you can form some compositions out of it. If chipped (torn) cinder blocks are used, then the fence takes on a presentable and rich appearance.
Using a cinder block, in a short time and with minimal effort you will build a durable and strong fence that will decorate your site and also protect it from uninvited guests.
How to treat the surface → Room decoration → How to choose the right paint → Surface treatment technologies → Leveling and finishing the walls → Selecting and applying a primer → Removal from the surface → Stretch ceilings and technologies → Reviews and testimonials