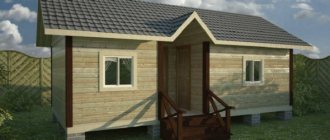
Almost all city dwellers have a dacha outside the city, where they go for a weekend getaway with family or friends. To make the time spent on it as comfortable as possible, it is necessary to build all important buildings on the site, such as a bathroom and an outdoor shower. It is best to make a heated shower so that taking water procedures even on cool summer evenings will be pleasant.
Features of an outdoor shower for a heated cottage
The need for a shower in a country house with heated water arises mainly due to the lack of a full bathroom in a country estate. There are a number of other reasons why owners of summer cottages install such a structure with a warm water supply:
- the shower room is located outside the house - it does not have a heating system, thick walls and a roof;
- the need for water procedures not only in summer, but also in spring and autumn;
- There is no centralized water supply with hot water supply, so the container is located above the pressure cabin, and the heaters are directly in the shower room, and not in the house.
Another important point is the lack of a central sewerage system. For this reason, you have to equip a drain or septic tank when installing a heated garden summer shower for your dacha.
It is these features that distinguish a heated shower in a country house from a conventional bathroom and from an ordinary summer shower. Depending on the number of people in the country, the frequency of the need for water procedures, the availability of electricity, a septic tank, and the climatic conditions of the region, they choose which heated shower to install.
Recommendations for choosing a tank
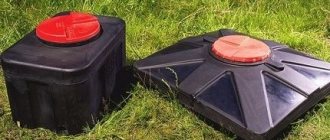
You can buy a ready-made water tank by choosing one of the models you like, or you can make the tank yourself from scrap materials, for example, from a 200-liter barrel.
The tanks on the market, depending on the shape, come in several types: square and rectangular, flat and oval
Ready-made tanks can be made of plastic, metal or galvanized steel. On sale there are containers of simple design, the design of which has a bevel and holes for installing heating elements, and models that are already equipped with heating elements.
When choosing a tank, you should be guided by two criteria:
- the material from which it is made;
- capacity of the tank.
A 100 liter tank is enough for a family of two. And for water procedures to be carried out by three or four family members, it is better to install the 200 liter option.
Do you want to make a heated tank yourself? There is nothing complicated about this. Buy any suitable container. You purchase heating elements separately on the construction market.
A 1-2 kW heating element equipped with a temperature controller is suitable as a heating element, for installation of which you will need two nuts and a ½ inch bend.
On sale you can find heating elements with remote power regulators, in which the adjustment varies from 0.5 to 2 kW. Their only drawback is that they are not able to maintain the set temperature.
To install the heating element in the center of the tank, maintaining 15 cm from the bottom, make a hole. At the bottom of the container, closer to the edge or in the center of the bottom, another hole is made for arranging a drain. The outer part of the heating element is hidden in an electrical box.
To drill a hole for a heating element with a nut, you will need a drill D 40 mm, for an overflow of ½ inch - a drill D 20-21 mm.
Types of warm showers for a summer residence
There are many ways to create a shower in a suburban area. You can get by with a simple device, but there are also serious, solid structures with utility networks and wiring. The principle of a heated shower is the same - a flow of warm water comes from a container that is located above the person’s head. This design can be mobile or stationary according to the wishes and capabilities of the summer resident.
Portable shower for a summer cottage with heating
Mobile devices for showering in the country are adapted for easy installation and are as easy to use as possible. The main difference that affects the cost of a portable shower is the principle of heating the water.
Mobile shower with naturally heated water
Naturally heated shower - the container is filled with water, which is heated by the rays of the sun. Using the trigger mechanism, the water supply is turned on and you can use a portable shower anywhere in the garden. Portable shower devices are not connected to water supply systems and electricity. All you need to take a shower is a sunny area to naturally heat the liquid. There are different models based on the principle of water supply:
- Portable shower of the “Camp Shower” type. As a rule, a soft tank filled with water is attached to any structure made of metal, plastic or wood above a person's head using a hanger or rope. In order to take a shower, you just need to turn on the water supply with a simple movement of your hand. Standard models usually come with a 20-liter black tank, which, due to its color, heats up faster in the sun.
- Pocket device of the “Toptun” type. This is a lightweight, compact foot module that consists of a rubber mat with two diaphragms, tubes and a mount. One tube is lowered into any container (bucket, basin) with water heated in the sun or fire. By alternately pressing your feet on the mat (stomping), the liquid flows through another tube into the shower head.
Mobile shower with forced water heating
Such devices are convenient to use in cool or cloudy weather, when it is not possible to heat water naturally.
A mobile heated shower for a summer cottage is connected to the network, the water heating module is placed in a container of water. As a rule, in 10-15 minutes standard water heaters with a power of 1.9-2 kW heat water to a temperature of 45-50 degrees. Usually the heater is easy to fix in a bucket or barrel with a hook.
By turning on the pump, water flows through the hose. Many models of heated mobile showers have a temperature regulator and a convenient shower head with a pressure lock.
Advice! If the electricity is often cut off at your dacha, then you should take care of purchasing an adapter for a heated shower that can work from a car cigarette lighter.
Stationary garden shower for a summer cottage with heating
Typically, the stationary design of a heated summer shower in a dacha consists of a water tank and a cabin, the size of which depends on the size and number of people visiting the dacha.
On the roof of the shower house there is a tank - a metal or plastic container. The water in the tank is heated by sunlight or electricity using a heating element built inside. A pipe is built into the bottom of the water tank, to which a shower head and tap are attached. When the valve is opened, water flows downwards under its own weight, providing good pressure. Through holes in the floor of the shower, the used water goes into the septic tank or into the ground if the flow rate is small. Modern models of heated shower cabins are presented in different variations in design, material, size, sections, and price.
The most popular models are plastic heated showers for summer cottages.
As you can see in the photo, the designs are quite simple, so making a heated shower in the country with your own hands will not be difficult.
Purchasing the necessary materials
In addition to making or purchasing a heating tank, you must purchase plastic water pipes D 50 mm. It is convenient to use a flexible silicone hose to supply water.
To set up a system of materials you will also need:
- gutter reinforced with metal mesh;
- ball valve;
- valve with float;
- divider
To make a foundation pour when constructing a cesspool, you will need cement marked M150 and higher. The drain can be covered with waterproofing roll materials or hydroglass insulation.
To make a wooden floor in the shower, it is best to use a tongue-and-groove board, treated with a water-polymer emulsion or oil white.
For the final finishing and arrangement of the bathroom, you will need paint for exterior and interior work, spacious shelves for bathroom accessories and hooks for clothes.
To erect the structure you will need the following tools:
- building level;
- roulette;
- corner;
- screwdriver;
- self-tapping screws
To pre-mark the area, you also need to stock up on a skein of twine and wooden pegs.
What is a warm shower for a heated cottage made from?
When building a shower room in a country house, practical and simple materials are chosen, so building a heated shower can be quite a budget-friendly endeavor. The walls of the structure can be made of different materials.
Brick is solid masonry that will last a long time (you can use bricks left over from building a house). Wood is a completely environmentally friendly basis. High-quality ventilation is necessary to preserve the material and its treatment with a fire retardant due to the proximity of the heating device. Polycarbonate is a lightweight and durable material that does not deform from natural precipitation. It is easy to cut and install.
Sheet plastic is another moisture-resistant resource. You need to choose durable, non-toxic varieties that do not emit harmful substances when heated. Some use corrugated sheeting - a durable material that does not corrode. Its advantages are ease of installation and design.
Sheet materials are used to form the side walls of the shower; the frame is made of profiles, metal pipes or wood blocks. Regardless of the wall cladding, the top layer on which the tank filled with water will stand must be strong and firmly supported by the vertical bases of the frame. Lightweight shower options in the country are left on stilts, while heavy massive structures require a poured foundation.
The size of the tank is selected based on the number of visitors who will use the heated shower in the country house. The volume recommended for a family of 3-4 people is 100 liters.
For heated shower tanks, plastic or steel tanks are used. From steel tanks choose:
- metal;
- made of galvanized steel;
- made of stainless steel.
Recently, steel tanks have faded into the background due to their heaviness, which implies a more solid frame. Containers for country showers made of plastic have become increasingly popular due to their lightness, quick heating and the ability to withstand temperature changes from +60 to -60 degrees.
There are tanks that are already equipped with a heating element with the function of adjusting and maintaining the required temperature.
Preparation for construction
Next, we will consider the process of constructing an all-weather shower, as the most in demand throughout most of our country.
Choice of frame material
Before starting construction, you need to select the frame material. As was said, plastic pipes are no longer needed due to insufficient strength, so you have two options to choose from: wood or rolled metal.
Wood
Positive sides:
- low cost;
- ease of processing.
The disadvantage is a short service life due to susceptibility to rotting and drying out.
Beams of a certain cross-section are suitable for the frame
Specifically you will need the following lumber:
- for the bottom trim: insulated shower - timber with a section of 150x150 mm, lightweight - from 60x60 mm (optimal - 100x100 mm);
- for racks, oblique connections and top trim: board with a section of 100x40 mm.
How to build a warm shower in the country with your own hands
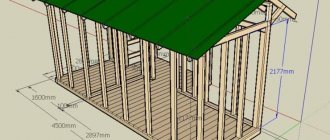
Construction of a heated shower in a country house with your own hands begins with choosing a location. The optimal location would be a sunny hill at the edge of the site or along the fence. They clear the land 2 by 1.5 m - this space will be quite enough for a shower with a locker room. To make it easier to perceive the future booth and calculate the required material, it is worth sketching out a drawing on paper.
When developing a project, you need to take into account the free space inside the shower stall - it should be enough so that you can freely bend over and move your arms while bathing. The minimum dimensions included in the drawing are 1 by 1 m. They also think about a place for a locker room where dry towels and clothes hang. For comfortable storage of personal belongings, leave 0.5 square meters. m. The optimal design is 1.5 by 2 m with a height of 2.2 m.
Used water should flow freely and not accumulate on the floor to avoid dampening the entire structure. To do this, form a concrete base with a slope. Dig out the top layer of soil 20-25 cm, cover it with gravel and fill it with solution. A comfortable covering for the feet is formed on top.
If the booth will be used by more than 2-3 people, then make a drainage hole. To do this, dig a small ditch and lay a drain pipe into it, which goes directly into the pit. The pit into which the water will flow is made 1.5-2 m deep at a distance of 2-3 m from the cabin itself to avoid subsidence of the structure. The drainage pit is made sealed (tires, plastic tank) to isolate soapy water from fertile soil. The top of the drainage ditch is covered with boards or metal sheets for safety. In order for the water to flow directly into the pit, a solid tray is placed on the floor of the shower stall, and an adapter into the drain pipe is attached to the drain hole.
After forming the base of the shower and the drainage area, they begin to build the frame. They make the bottom trim around the perimeter with a 100 by 100 mm beam, fastening it with anchors.
Vertical posts are attached to the base with steel corners and long self-tapping screws with additional fixation with diagonal boards.
The top trim is formed from the same timber, fastened with nails or self-tapping screws.
Important! All wooden components are treated with fire protection and coated with a water-repellent preparation.
Boards are stuffed along the top frame or moisture-resistant plywood with a hole for the pipe is placed. The upper part of the frame must be reinforced with strong sheets due to the heavy load of the water container. Install the tank on the cabin.
They fix it, install the outlet and install a faucet with a shower head.
To fill the shower tank for a heated cottage with water, install a pump.
If the tank is no more than 100 liters, then you can choose a low power device. In order to avoid overfilling the container, install a valve that shuts off the flow when filling.
The walls are covered with the selected material: polycarbonate, siding or boards.
To delimit the space between the dressing room and the shower stall, hang a waterproof bath curtain or install a polycarbonate partition. The outer door should close tightly to keep cold air out, but to avoid deformation from moisture in the future, it is better to leave a gap. This distance is covered with a seal that is attached around the perimeter of the doorway. After covering the walls and installing the tank, they move on to the interior arrangement of the shower in the country. Shelves for hygiene items and hooks for clothes are attached to the walls, and a rug is placed on the floor.
Preparatory stage: project drawings, dimensions
Any summer shower needs to be thought through and developed before construction. Doing this kind of work is easier than it might seem. The height of the structure must be at least 2.5 m so that a person is not cramped during the shower procedure.
Approximate drawing of the future design
It is also necessary to provide free space inside the cabin, sufficient to allow you to bend over while bathing without bumping into the walls with your elbows. The minimum dimensions of the room are 1 x 1 m. At the same time, you should think about where to store towels and personal items so that they do not get wet. For a “locker room” an area of 0.5 m² is sufficient. In reality, the most comfortable design will be 1.4 x 1.9 m.
Advice: the small area of the constructed shower will subsequently cause its destruction. To ensure the stability of the structure, it is recommended to place the cabin on a pile foundation.
Heating selection
You can provide heating by purchasing an electric heater, but this is expensive and therefore unprofitable, because the country shower is used only periodically.
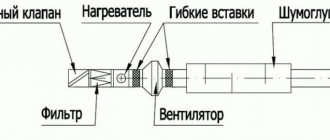
You can heat water with a blowtorch, but the pipes must be made of metal. Here's how such a structure is mounted:
- The pipe supplying water to the tank should be led outside the perimeter of the shower room. Outside the booth, a shelf is fixed to the wall on which the heat exchanger should be installed.
- The last unit is made of a thin tube, twisted into a spiral, and then fixed in a casing. Such a “coil” is easy to make - just wind a thin pipe around a thick pipe. To obtain warm water, 4 turns are enough, but a hot shower will be achieved if you make at least 8 such turns.
- After this, take a large saucepan. Its size should allow the coil to fit, as well as the blowtorch.
- The free ends of the “coil” must be connected to the water supply pipeline. If you make the connection using couplings, then you can remove it for the winter.
There is another way - to build a small greenhouse above the tank. For this purpose, the frame is covered with film. Such a design will increase the water temperature by 10 degrees, and the wind will not be able to cool it.
Advice: we recommend covering the greenhouse from the north with reflective material. The presence of a mirror plane will allow you to get warm water faster.
Required materials and tools
To build a shower stall you will need some tools:
- hammer;
- roulette;
- level;
- corner;
- bolts;
- nails;
- tank and pipes;
- a pair of taps;
- shovel;
- shower head.
And also the following materials:
- boards;
- slats;
- brick;
- plastic sheets;
- a frame that would be more conveniently made from pipes;
- cement and sand (to organize the foundation and lay the brick);
- insulation, plaster, any paint (for finishing).
How to insulate a shower at the dacha
To make taking a shower in a heated dacha comfortable in any weather, the walls and roof are insulated to prevent cold from entering from the street. To do this, choose mineral wool or polystyrene foam. Sheathing a heated shower in a dacha with thermal insulation material is no different from the procedure for insulating other rooms - the material is fixed to the frame and walls with suitable fasteners (if the thickness of the material allows, with a construction stapler to wooden parts). When insulation occurs from the outside of the shower, the fixation is performed in the usual way. If the material is placed inside the booth, then care must be taken to protect it from water splashes. It is best to cover the insulation with thick cellophane film and foil on top of it.
Comment! It is important to insulate not only the shower walls, but also the ceiling. Warm air will instantly evaporate if the ceiling is not insulated.
Ventilation
Before you start using any bathhouse, you need to take care of a high-quality ventilation system. There are two types of similar systems that are relevant for wooden showers:
- Natural - two windows located at different heights. Through one, the flow of fresh air enters the room, through the other it is discharged outside.
- Forced - the design resembles a natural system, but a fan is installed at the exhaust vent, which speeds up the process of air circulation in the room.
The second ventilation option is suitable for large showers. The first is sufficient for small buildings.
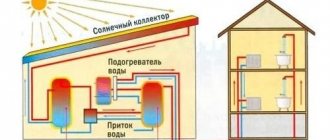
Heating water for a shower in the country
Heating water in the tank can be done in two ways:
- Naturally, the tank along with the water is heated by the heat of the sun. To do this, install a flat black tank. On sunny days, the water usually warms up to a comfortable temperature by lunchtime.
- By forced method - the water in the container is heated using a heating element. This electrically heated garden shower allows you to bathe in warm water in any weather conditions.
Many modern shower tanks are already equipped with heating elements, which significantly simplifies, but also increases the cost of providing warm water. Anyone can install such a structure on their own if you use the heating system for a shower in the country.
A heating element with a power of 2 kW or more is installed in the lower part of the tank, fixing it with rubber gaskets in a pre-drilled hole. A thermometer is installed on the container, which indicates when the heating device can be turned off, or an automatic thermostat. A prerequisite for self-assembly of a tank with a heating element is the installation of a device that shows the water level. This is an important point, because the heating elements react to the lack of water and fail.
Warning! To avoid short circuits, the wire from the network to the shower stall is laid in one piece.
Shower design options
The comfort and ease of use of the structure depends on how well the summer shower is designed. The task of a thrifty owner is to build an economical, easily constructed and at the same time maximally functional shower, equipped with heating.
The easiest option to implement is an open shower.
An open summer shower is a framed, collapsible block or a modular container, one of the walls of which is adjacent to the main building
When choosing this arrangement option, the tank is installed on the load-bearing wall of the building, positioning it in such a way that the sun's rays hit it at a right angle.
Do you prefer closed designs that are convenient to use both in the warm season and in the cold months? Build a stationary summer shower with a simple heating system. It can be a frame structure or a permanent structure.
The main advantage of this solution is that in warm times the water in the tank is heated by the sun's rays, and in cold months by means of a heating element
Traditionally, when building a shower with enough space for an adult to bathe, they focus on the following parameters:
- height – 2-3 m;
- width – 1.5 m;
- length – 1.9-2 m.
These dimensions are convenient when building a structure from wooden boards. Taking into account the thickness of the walls in its finished form, the area of the structure is approximately 2 * 1.5 m, of which an area of 1 sq. m will be allocated for the shower stall. m, and for the locker room - 60*40 cm.
When using boards of standard sizes, the material is consumed with virtually no residue.
In addition to wooden planks, the most commonly used building materials for the construction of cabins are:
- polycarbonate sheets;
- moisture-resistant plywood;
- sheet metal;
- flat slate;
- lining;
- brick.
When choosing a facing material, it is important to focus on the exterior of the site so that the building harmoniously complements the already created architectural ensemble.
Useful tips
Installing a heated summer shower at your dacha with your own hands is a completely feasible process for any summer resident. There are several clever tips that will make organizing your work easier and save you from problems during operation in the future.
- To enhance heating by the sun's rays, a polycarbonate roof is placed over the tank or a film is stretched to give a greenhouse effect and retain the heat of the water.
- The volume of the drainage pit must be at least 2.5 times larger than the water tank.
- The farther the septic tank is from the shower stall, the less the risk of an unpleasant stagnant odor.
- When forming windows in a summer shower room, cracks and joints are sealed to prevent drafts.
- If there is not enough space on the site, the minimum size of the booth can be 1 by 1 m. Hooks for clothes and towels can be placed on the outside of the structure to prevent moisture from getting on the fabric.
Combination of steam room and washing room
If there is a lot of space in the bathhouse, you can combine a steam room with a washing room.
To do this, the room must be delimited with special glass doors that are installed on guides. This way you can combine both rooms into one or make a distinction during the bath procedures. The shower room in the bathhouse is a special room in which people wash themselves of sweat, dirt, and leaves after visiting the steam room. Its interior design and arrangement raises many questions among novice bathhouse attendants who have recently built a bathhouse. To make your shower unique, you can come up with a custom design.
Stylistic design
The beauty of the interior depends on the direction in which the room is kept. To make the bathhouse look like a single whole, the design of the shower room becomes a natural continuation of the space with the steam room. The design can use related styles or options that have similar features.
Rustic
The classic Russian style will harmoniously fit into the interior of the log house. The room has many wooden details decorated with hand carvings. Textiles with national ornaments were placed on the windows, shelves and tabletops. The rubberized floor mat visually resembles a path with geometric patterns.
Russian interior designSource banya-ili-sauna.ru
Heavy, rough furniture is appropriate in rustic design. The color of the wood of the interior items does not match the shades of the walls, floor and ceiling. Instead of benches, you can install wicker boxes with pillows. Household chemicals were placed on the shelves in containers resembling clay pots and bowls.
Chalet
The abundance of rough wood in the finishing of the bathhouse washroom makes the Alpine interior visually similar to a Russian rustic one. Stone-like tiles are used to decorate the shower. Antique faucets were made of bronze. On the walls there are forged hooks, hangers and shelves made of solid wood.
Rough, untreated furniture looks brutal and luxurious. Lamps in metal frames were placed under the ceiling of the washing room in the bathhouse. The interior of the room can be complemented with a real or decorative woodpile.
Alpine interior in a washroomSource ladizium.at
Minimalism
Decorating a shower in a bathhouse in a restrained style makes the room elegant and laconic. The simple geometry of the cabin blends harmoniously with the shape of the room. In a compact space, a pallet is used, and instead of doors, a curtain on rails is used.
Laconic direction in the soulSource houzz.se
Natural wood will add natural notes to minimalism. The panels on the walls are polished to a shine, and the floors have simple gray tiles. Instead of traditional furniture, a podium made of wood is installed. Spotlights are installed along the perimeter of the ceiling.
Simple design Source intercom.in.ua
Loft
Brutal industrial style will fit perfectly into the interior of a room of any size. The design of a shower in a bathhouse is characterized by a deliberately rough finish. The walls in the washing room are often decorated with tiles reminiscent of the texture and color of plaster. The decor imitated with wild stone or brick looks original. The roughness of the finish is combined with a glossy floor covering.
Industrial style Source pinterest.com
The type of shower in the bathhouse depends on the parameters of the room. A full-fledged cabin with glass doors will harmoniously fit into a spacious room. In a compact space, the “wet” zone can be distinguished visually (finishing, lighting) or physically (half walls). The loft uses practical modern furniture.
Eco style
The natural direction harmoniously combines the simplicity of minimalism with decorativeness. A beautiful, comfortable interior is created using natural finishes. The design of a shower in a bathhouse combines the warm texture of wood with the smoothness of marble or the roughness of sandstone. Greenery details (stabilized moss, flowers) are appropriate indoors.
An eco-style shower is tiled with stone-like tiles or waterproof panels reminiscent of wood. Traditionally, sliding transparent partitions are used; there are options with half walls. The interior is furnished with furniture made from natural raw materials with minimal processing.
Conclusion
The washing room is a comfortable, practical room in which it is pleasant to be. Before making a shower in the bathhouse, the room is equipped with a sewerage system, water and electricity are supplied. The beauty of the interior depends on the correct finishing and style.
Laying the foundation
The building being erected will rest on a foundation of bored piles. Such supports are very easy to construct:
- Using a garden auger, you need to drill a well, the bottom of which is located 30 cm below the freezing depth of the soil. The diameter of the well should be 100 - 150 mm.
- At the bottom of the well, a 30-centimeter sand or gravel-sand cushion is made. It needs to be compacted, pouring generously with water.
- We lower a plastic pipe of the appropriate diameter into the well. It will simultaneously play the role of formwork and waterproofing for the concrete pile.
- Inside the pipe, it is necessary to secure a reinforcing frame made of 3 vertical rods with a diameter of 8 - 12 mm, equally spaced from each other, connected by crossbars made of rods with a diameter of 6 mm. All frame elements must be connected with annealed wire - welding is not allowed.
- All that remains is to fill the pile with concrete. At the final stage of pouring into concrete, you need to monolith the anchor bolt (in the center), on which the grillage beam will be placed.
Foundation for a shower
In soft soil, instead of bored piles, you can use driven piles made from a steel pipe with a diameter of 60 - 150 mm with a flattened end. In this case, the anchor bolt for fastening the grillage beam should be welded to the pile.
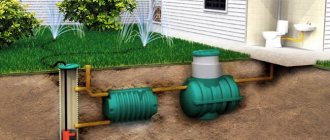
Water supply technology
The choice of location for the structure depends on access to communications. Automated liquid supply systems facilitate the operation of the steam room. If there is a centralized water supply nearby, then an additional thread is laid to connect to the main line.
When supplying from a well, a pump is installed and the wiring is carried out. Natural sources are divided into 2 groups:
- Underground. Spring and artesian water are suitable for use in washing baths. The collection is carried out by drilling or during the operation of wells.
- Superficial. There are a lot of pathogenic bacteria in open reservoirs, so before being supplied, the liquid goes through a multi-level filter system.
When laying pipes, preference is given to polyethylene or polypropylene types. The inexpensive material is easy to install. Metal models are more durable than plastic counterparts, but have high weight and complex installation (welding equipment).
Underground springSource banya-expert.com
Utility networks in the shower of a bathhouse are often hidden from view under cladding in the walls or in the floor. Open communications are safe and easy to establish. If there is a breakthrough, the parts can be easily replaced without dismantling the partitions or coating. Shut-off valves are needed for hot and cold water. For polypropylene pipes, couplings, clamps and adapters are additionally used. The quantity and type depend on the length of the water pipe.
How to add water Source byrcompany.ru
To prevent the appearance of condensation in the shower bath, during installation, pipes with cold water are placed under hot water. The heated air will not rise up and, after cooling, fall onto the finish. When installed hidden, all elements are additionally protected with thermal insulation, otherwise the cladding and wooden parts will rot from moisture.
Extra options
To determine the optimal size of the steam room in the bathhouse, you need to consider what position the steamers will be in during the procedures - sitting or lying down. In addition, other options may be provided - sitting on a shelf with legs bent, or lying down with legs on supports. Consequently, the location of the sunbeds, their number and size, significantly influences the dimensions of the steam room.
If we are talking about a small steam room designed for four visitors, where shelves allow you to both sit and lie down, the starting dimensions will start from 150x200 cm.
By adding to this value the area of the approaches to the benches and the dimensions of the stove, we can talk about the acceptable size of the steam room.
In paired compartments with forced ventilation, as a rule, no windows are provided. However, if there is no such system, to ventilate and dry the steam room you will need a window with dimensions of 40x40 cm. It is placed on the side opposite from the stove at the level of the top shelf. The glazing is double.
Drain pit equipment
From a biochemical point of view, draining wastewater from the shower and street toilet into a common pit is a gross mistake. It is necessary to build a separate pit under the cabin. To equip a summer shower, which is supposed to be used only from time to time, a drainage hole with a capacity of no more than two cubes is sufficient.
When calculating the required volume of a structure, adhere to the rule that its capacity should be 2.5 times greater than the contents of the water tank
The drain should not be located under the shower building itself or even near its walls, but two to three meters from the building.
This arrangement allows you to solve two problems at once:
- prevent the appearance of unpleasant odors of decaying organic matter;
- minimize the risk of foundation failure.
To construct a drainage pit, dig a pit 2-2.5 m deep. At this depth, wastewater will be discharged into the soil below the fertile layer. Thanks to this, soil microliving creatures will not suffer from such a “neighborhood”.
To make drainage, the bottom is lined with gravel and sand. The thickness of the drainage layer should be 20-30 cm.
When creating a waterproof layer, you should not use clay, since during operation, as a result of the natural erosion process, it can simply break the drainage system.
To avoid shedding of the walls of the drainage pit, they must be laid out in several rows with bricks or decorated with used tires.
The upper part of the drainage pit must be tightly closed. The lid can be made from a wooden panel or a piece of sheet metal.
The technology for constructing a tire drainage pit is described in this article.
Possible breakdowns
With proper care, tankless water heaters last a long time, from 8 years. Breakdowns are rare, mainly:
- leak;
- poor heating;
- does not turn on;
- stale smell.
With prolonged use of the tank, its surface is corroded by corrosion and cracks appear. Gaskets dry out over time and require replacement. Before leaving, you need to drain the water and wipe the inside of the container dry with a soft cloth.
If there is a leak, you should call specialists from the manufacturer. The technical passport usually contains all their contacts.
When heating hard water for a long time, the heating element becomes covered with limescale. It needs to be cleaned periodically. Otherwise the heating element will burn out. If it does not turn on, you should call an electrician.
Installation of the barrel
A tank with an electric heater and thermostat can be installed on top of the cabin.
Such products are sold today in a wide range. But this option has significant disadvantages:
- A significant part of the heat is spent on “street heating”.
- All household members, regardless of preferences, will have to wash with water at the same temperature or wait until the water reaches a comfortable temperature after the previous user.
A more practical option is to attach an inexpensive boiler to the wall outside the shower, protecting it with a canopy. An ordinary barrel is placed on top, from which water is supplied through a tee to the mixer and to the boiler. The outlet from the boiler is connected to the second pipe of the mixer.
Before you start building a shower room in a country house, you need to study a lot of nuances, because when dealing with water, you need to be able to prevent possible leaks and damage to the foundation in advance. Do-it-yourself shower in a private house - recommendations on the order of construction work.
You will find tips on making a shower tray with your own hands in this article.
Device order
The exhaust duct is located in the corner of the steam room opposite from the stove
Hole preparation
Supply and exhaust ventilation in the steam room begins with creating holes for the ventilation duct. The procedure for creating them is similar for both “inflow” and “outflow”, only the location of the holes changes. The size of the hole for the ventilation duct should be 2-3 mm larger than the size of the pipe being installed. Once the markings are made (taking into account the gap), you can begin the process of creating the hole. A hammer drill with an appropriate attachment is best suited for this. The tool must be held horizontally, but the minimum downward slope must be observed. This will allow you to gradually expand the hole without putting much strain on the nozzle and the hammer itself.
Pipe installation
The ventilation pipe is placed in the hole made and then equipped with a fan, for which it is also necessary to provide an electrical supply. The most rational option is to purchase a ventilation pipe with a fan already built into it. All that remains is to install the pipe and blow it with foam, which will fix the structure and prevent its destruction.
Final stage
It is necessary to bring the system into proper shape. To do this, we remove the dried polyurethane foam and, using the self-tapping screws that come with the fan, install the ventilation grilles. When creating ventilation in a steam room, the main thing to remember is that the reliability and efficiency of such a system depends on the quality of the materials used. It is better to install a system from expensive structural elements than to periodically redo the ventilation due to wear and tear of parts or materials.
List of sources
- www.stroy-dom.net
- banya-expert.com
- ventkam.ru
- banyaspec.com
- poparimsya.online
- bannyi-den.ru
- 9ban.ru
- strmnt.com
- santehnicheskij-mir.ru
- SdelatBanyu.ru
- kaksdelatbanyu.ru
Installation principles
To independently install a shower in the washing room of a bathhouse, you do not need to have practical skills. It is enough to familiarize yourself with the theory, correctly connect the tubes for supplying and discharging water.
Preparation and design
You need to prepare the room: install a water drain and a liquid supply point. Select a method for heating the liquid. Install a boiler or flow circuit.
Tools and materials
To install a shower stall in a bathhouse, you must prepare:
- set of wrenches;
- plastic tubes of different diameters;
- hoses, clamps;
- anchor, hammer drill.
After preparing the tools, you need to choose a shower stall.
Choosing a shower stall
The choice of shower stall depends on the size of the room:
- if there is enough space inside the washing room, it is better to choose a shower with hinged doors;
- For small washrooms, the best option is a special small-volume tray or a design with folding doors.
If a bath attendant wants to spend time in the shower in comfort, it is better to choose a closed model. If you just need to wash quickly, open it.
Installation
The shower stall must be installed on a level base. To prevent it from shaking and to stand steadily, it is necessary to nail the legs under the base to the concrete floor with anchors. Hoses, tubes, drains should be arranged as indicated in the instructions. It comes complete with a shower stall.