For a stable supply of water with the required pressure values, it is not enough to simply buy a pumping station. The equipment still needs to be configured, launched and properly operated. Admit it, not all of us are familiar with the intricacies of settings. But the prospect of damaging devices through incorrect actions is not very attractive, don’t you agree?
We are ready to share with you valuable information about how the pumping station is adjusted. Our article provides techniques and rules for eliminating operational problems associated with insufficient pressure.
You will learn about the causes of pressure drop and become familiar with methods for eliminating them. Graphic and photo applications will explain how to properly configure pumping equipment.
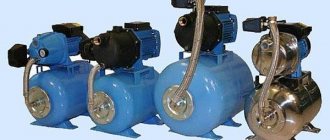
Features of the pumping station design
A ready-made pumping station, equipped by the manufacturer, is a mechanism for forced water supply. Its operation scheme is extremely simple.
The pump pumps water into an elastic container located inside a hydraulic accumulator, also called a hydraulic tank. When filled with water, it stretches and puts pressure on the part of the hydraulic tank that is filled with air or gas. The pressure, reaching a certain level, causes the pump to turn off.
During water intake, the pressure in the system drops, and at a certain moment, when the values set by the owner are reached, the pump starts working again. A relay is responsible for turning the device off and on; the pressure level is controlled using a pressure gauge.
Malfunctions in the operation of a household pumping station can cause breakdowns of plumbing equipment
Our recommended article will introduce you in more detail to the principle of operation, types and proven installation diagrams for a pumping station.
Technical indicators
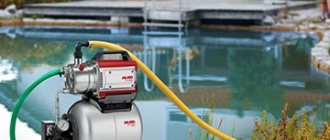
If you plan to install a pumping station for a dacha or household, when choosing it, pay special attention to performance. The best solution would be a design that will provide the required pressure from the well, capable of satisfying the need for water for domestic needs and for a personal plot.
For a comfortable stay outside the city for a family of 4 people, installing a water station of medium or low power is suitable. Typically, such designs are equipped with a hydraulic tank designed for 20 liters. They lift liquid from the well in a volume of 2 - 4 cubic meters per hour and create a pressure of 45 meters or more.
In addition, before installing a pumping station, when purchasing, take into account its dimensions, the water level when the pump is off and running, the type of filter and the cross-section of the pipes.
Causes of hardware problems
Statistics of malfunctions in the operation of household pumping stations indicate that most often problems arise due to a violation of the integrity of the accumulator membrane, pipeline, water or air leakage, as well as due to various contaminants in the system.
The need to intervene in its work may arise for many reasons:
- Sand and various substances dissolved in water can cause corrosion, lead to malfunctions and reduce equipment performance. To prevent clogging of the device, it is necessary to use filters that purify the water.
- A decrease in air pressure in the station causes frequent operation of the pump and its premature wear. It is recommended to measure the air pressure from time to time and adjust it if necessary.
- The lack of tightness of the joints of the suction pipeline is the reason that the engine runs without turning off, but cannot pump liquid.
- Incorrect adjustment of the pressure of the pumping station can also cause inconvenience and even breakdowns in the system.
To extend the life of the station, it is recommended to carry out periodic inspections. Any adjustment work must begin by disconnecting from the power supply and draining the water.
Energy consumption and maximum pressure should be checked periodically. An increase in energy consumption indicates friction in the pump. If the pressure drops without any leaks detected in the system, then the equipment is worn out
First start
Before starting the pumping station, it is necessary to fill the pump with water. To do this you need to do the following:
- We unscrew the plug from the hole for filling water on the pump body. Sometimes a valve may be installed instead; open it.
- After this, you need to fill the pump unit and suction pipeline with water. It is necessary to fill the liquid until water begins to pour out through the filler hole.
Before starting an automatic water supply station for a country house or cottage, you need to check the pressure in the accumulator. We described how to do this above. If the pressure is not normal, it can be increased by pumping air with a car pump, or decreased by releasing air through a special nipple on the hydraulic tank.
Rules for the first start of pumping equipment:
Spare parts and frequent breakdowns of pumping stations
- After filling the suction line and the pump unit with water, you must tighten the plug tightly or close the valve.
- Connect the pump to the power supply.
- Open the valve on the unit body slightly to ensure that any remaining air is removed from the pumping equipment.
- The pump should run for 2-3 minutes. During this period of time, water should flow from the outlet of the pipeline or open tap.
- If the liquid does not flow out of the pipe, you need to turn off the pumping equipment and add water again into the filler hole on the body.
- After this, the startup attempt is repeated.
Inspection of the storage tank
When starting work on adjusting the equipment, disconnect the system from the network and close the pressure valve on the water intake side. Unscrew the tap and drain the water, and drain the remainder through the pressure hose, disconnecting it from the membrane tank. First, check the air pressure in the accumulator tank.
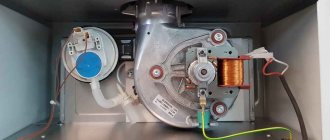
The role of the accumulator in the operation of the system
The membrane tank of a pumping station is, in fact, a metal container with a rubber bulb located inside, which is designed to collect water.
Air is pumped into the free space between the rubber bulb and the walls of the tank. In some models of hydraulic accumulators, the tank is divided in half by a membrane, which divides the container into two compartments - for water and air.
The accumulator tank maintains pressure in the system and creates a small supply of water. Once a month, check the pressure in the hydropneumatic tank with the pump turned off and the water drained from the supply pipe
The more water enters the device, the more it compresses the air, increasing its pressure, which tends to push the water out of the container. This allows you to maintain a stable water pressure even when the pump is inactive.
The hydraulic accumulator requires regular maintenance, removing air from the bulb, which enters it along with water in the form of small bubbles and gradually accumulates there, reducing the useful volume.
For this purpose, a special valve is provided on top of large tanks. With small containers you have to make some tricks to remove the air: turn off the power to the system and drain and fill the tank several times.
The selection of a hydraulic tank by volume is made taking into account the highest water consumption for a particular consumer. The permissible number of switches per hour specified by the manufacturer is taken into account, as well as the nominal switching pressure, switching pressure and user-specified pressure in the hydraulic tank
Air pressure control
Although the manufacturer adjusts all elements of the pumping station at the production stage, it is necessary to double-check the pressure even in new equipment, since at the time of sale it may decrease slightly. A device that is in use is inspected up to twice a year.
For measurements, use the most accurate pressure gauge possible, because even a small error of 0.5 bar can affect the operation of the equipment. If it is possible to use a car pressure gauge, with a scale, with the smallest graduation, this will provide more reliable results.
The air pressure in the membrane tank must correspond to 0.9 times the switching pressure of the pumping station (set using a relay). For tanks with different volumes, the indicator can range from one to two bar. Adjustment is carried out through the nipple, pumping or bleeding excess air.
For normal operation, the station is equipped with mandatory control and regulatory devices:
Image gallery
Photo from
Required components of a pumping station
Springs for setting the pressure switch
Specifics of changing pressure using a relay
Using a pressure gauge when setting up a relay
The less air is pumped into the system, the more water it can accumulate. The water pressure will be strong when the tank is full, and weaken more and more as water is drawn.
If such differences are comfortable for the consumer, then the pressure can be left at the lowest acceptable level, but not less than 1 bar. A smaller value may result in the water-filled bulb rubbing against the walls of the tank and causing damage.
To install strong water pressure in the water supply system, it is necessary to fix the air pressure within about 1.5 bar. Thus, the pressure difference between a full and empty tank will be less noticeable, ensuring an even and strong flow of water.
Briefly about the main thing
Before starting a system for drawing water from a source underground, you need to make sure that the equipment is connected correctly. If an ejector is used, check the presence of a recirculation line and its connection to the storage tank. When using a single-pipe connection to the pump, you need to prepare the hydraulic accumulator for operation in advance.
To start the system for the first time, you must completely fill it with water. And after checking the functionality, carry out the final adjustment of the automation. This will allow you to achieve better system functionality. Also, after adjustment, the equipment will be able to operate in a more gentle mode with greater productivity.
Using a relay to regulate pressure
A pressure switch is responsible for automating the system - a device that controls the pumping station, performing the function of turning the device on and off. It also protects the system from creating excessive pressure.
The pressure switch controls on/off cycles when the user-specified operating pressure is reached. The performance of the pressure switch is monitored using a pressure gauge
#1: How the pressure sensor works
The main element of the relay is a group of contacts, which is fixed to a metal base and is responsible for turning the device on and off.
Nearby there are two springs of different sizes to regulate the pressure inside the system. A membrane cover is attached to the metal base below, under which the membrane itself and a metal piston are placed. Everything is covered with a plastic cap on top.
Products from different manufacturers and the principle of their operation are almost identical, they may differ only in minor details
During the operation of the operating device, several stages can be distinguished:
- When you turn on the tap, water flows to the plumbing point for some time from the filled tank. In this case, the pressure present in the system gradually begins to fall, and the membrane stops pressing on the piston. The contacts close and the pump turns on.
- The pump works by pumping water to the consumer, and when all taps are turned off, it fills the water tank.
- As the accumulator tank gradually fills, the pressure increases, and it begins to act on the membrane, which presses on the piston. As a result, the contacts open and the pump stops working.
The frequency of switching on the station, water pressure and even the service life of the equipment depend on how the relay is configured. If the parameters are incorrectly set, the pump will not work at all or will work continuously.
The pressure switch piston and sensitive metal plate, which reacts to the pressure created by the hydraulic tank membrane, are hidden under the housing - access to them is completely closed
#2: Adjustment and calculation of the required pressure
The new device already has factory relay settings, but it is still better to check them further. When starting to set up, you need to find out the values recommended by the manufacturer for setting the permissible pressure threshold (for closing and opening contacts).
If the pumping station breaks down due to improper adjustment, the manufacturer has every right to refuse its warranty obligations.
The manufacturer calculates the permissible pressure when turning the device on and off, taking into account the expected operating conditions. They are taken into account in the development of operating parameters for different models of pumping stations.
The inclusion value is equal to the sum:
- The required pressure at the highest point of the water supply system where water is drawn;
- Differences between the height of the highest water withdrawal point and the pump;
- Losses in the water pressure pipeline.
The shutdown indicator is calculated as follows: add one bar to the shutdown pressure and subtract one and a half bars. In this case, the shutdown pressure must not be allowed to exceed the maximum permissible pressure that occurs at the outlet of the pipeline from the pump.
A common mistake that affects the operation of a pumping station is not taking into account the entire sum of horizontal and vertical sections, as well as hydraulic losses when transporting water to water collection points
#3: Set Recommended Settings
Before changing settings, you must record the previous values using a pressure gauge. After turning on the pump, record the pressure values at the time of turning off and turning on. This will help determine in which direction to adjust - down or up.
It must be remembered that any change in the set pressure threshold in the relay also requires corresponding changes in the air compartment of the accumulator
Further actions are in the following order:
- Disconnect the station from power, drain the water and open the relay cover with a wrench.
- The pump activation pressure is adjusted by rotating the nut that holds the large spring (P). By twisting it clockwise, the spring is compressed and the required switching pressure is set. In different device models, permissible values can range from 1.1 to 2.2 bar.
- By turning the small nut (∆P) clockwise, you can increase the gap between the cut-out and cut-in pressure of the device, which is usually 1 bar. Thus, the shutdown pressure can be fixed at values in the range from 2.2 bar to 3.3 bar.
An important nuance is that the small spring does not regulate the shutdown threshold, as some people mistakenly understand.
It sets exactly the delta between the values of turning on the station and turning it off. That is, a completely weakened spring will not create a difference - the delta will be zero and the on and off values will be the same. But the more it is delayed, the greater the difference between them will be.
The small spring of the pressure switch is more sensitive and must be compressed extremely carefully
Check the correctness of the set values using a pressure gauge. If it was not possible to achieve the required values on the first try, continue the adjustment.
#4: Selecting non-standard pressure values
You can set a different pressure level in the device, different from the manufacturer’s recommendations, by adjusting the equipment to the individual needs of the user. By increasing the range when switching on and off, the station is triggered more rarely.
This makes the device last longer, but makes the water pressure uneven. By reducing the difference, a stable pressure is achieved, but this way the pump will operate more often.
Choosing an installation location
Pumping stations are installed near a water source - a well or a well - in a specially equipped pit - a caisson. The second option is in a utility room in the house. The third is on a shelf in the well (this number will not work with a well), and the fourth is in the underground.
Installing a pumping station in the underground - the noise from its operation may be too audible
How to Determine Suction Depth
When choosing a location, they are primarily guided by the technical characteristics - the maximum suction depth of the pump (from where the pump can lift water). The thing is that the maximum lifting depth of pumping stations is 8-9 meters.
Suction depth - the distance from the water surface to the pump. The supply pipeline can be lowered to any depth; it will pump water from the level of the water surface.
Wells often have a greater depth than 8-9 meters. In this case, you will have to use other equipment - a submersible pump or a pumping station with an ejector. In this case, water can be supplied from 20-30 meters, which is usually sufficient. The disadvantage of this solution is expensive equipment.
Suction depth is a characteristic that determines the installation method
If you are just a meter short of being able to install conventional equipment, you can install the station in a well or above a well. In the well, a shelf is attached to the wall; in the case of a well, the pit is deepened.
When making calculations, do not forget that the water level “floats” - in summer it usually drops. If your suction depth is on the verge, there may simply be no water during this period. Later, when the level rises, water supply will be restored.
Security Considerations
Another point that must be taken into account is the safety of the equipment. If you plan to install a pumping station near a permanent residence, there are fewer problems - you can choose any option, even in a small shed. There is only one condition - it should not freeze in winter.
Installing a pumping station in a barn is suitable for permanent residence and insulation/heating conditions for the winter
If this is a dacha where people do not live permanently, the matter is more complicated - you need to arrange a room that does not catch the eye. The safest way to install a pumping station is in the house. Although they can take it away in this case too.
The second place where you can install a pumping station is a buried camouflaged caisson.
Installation diagram of a pumping station in a well
The third is on a shelf in the well. Only in this case there is no need to make a traditional well house. You need a steel lid that can be locked with a reliable lock (weld hinges to the ring, make slits in the lid on which to hang the locks). Although, a good cover may also be hidden under the house. Only the design needs to be thought out so that it does not interfere.
Convenience and operating conditions
Installing a pumping station in the house is good for everyone, except that the equipment is noisy during operation. If there is a separate room with good sound insulation and this is possible according to the technical characteristics, no problem. Often a similar room is made in the basement or on the ground floor. If there is no basement, you can make a box in the underground. Access to it is through the hatch. In addition to sound insulation, this box must also have good thermal insulation - the operating temperature range starts from +5°C.
To reduce the noise level, the station can be placed on thick rubber to dampen vibration (created by the cooling fan). In this case, it is even possible to install it in the house, but the sound will certainly still be there.
Caisson made of concrete rings
If you choose to install a pumping station in a caisson, it should also be insulated and also waterproof. Usually, ready-made reinforced concrete containers are used for these purposes, but a caisson can be made from concrete rings (like a well). Place the ring with the bottom down, and the ring with the lid on top. Another option is to build it out of brick and fill the floor with concrete. But this method is suitable for dry areas - the groundwater level should be one meter below the depth of the caisson.
The depth of the caisson is such that the equipment is installed below the freezing level. Insulation foam polystyrene. Better - extruded. Then at the same time you also get waterproofing.
For a caisson made of concrete rings, it is convenient to use a shell (if you find a suitable diameter). But you can also slab polystyrene foam, cut into strips and glue it. For rectangular pits and structures, slabs are suitable that can be glued to the walls using bitumen mastic. Coat the wall, apply insulation, you can additionally secure it with a pair of nails/dowels.
Connection procedure: step-by-step instructions
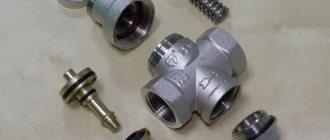
Not everyone knows how to properly connect a pumping station. When installing block equipment, assembly involves combining the pressure and suction pipelines. A filter with valves is connected to the pipe immersed in the well, and it is brought out through an adapter or head.
The suction line is carefully sealed. Otherwise, air will enter the water supply system, which will damage the pump. The pressure part is equipped with a valve.
12 steps to connect a pumping station:
It is worth considering how the pumping station is connected to the well when choosing modular equipment. Connecting a well to a pumping station includes the following steps:
- Hydraulic accumulator piping. First of all, install a fitting with 5 pipes. It is connected directly. After this, the protective relay, pressure gauge and water inlet are configured and installed. The remaining outlet is used to connect the pressure pipe. Submersible pumps are installed in wells more than 10 m deep. This avoids the problems caused by the need to install an ejector and a suction part.
- Pipeline outlet. Produced through the source head. Pressure pipes are laid in a trench leading to the house. The elements must be located below the soil freezing depth.
- Connection to the electrical network. During the installation process, the station's starting block is installed, and the output is connected to it with copper wires. The pump must be powered through a separate automatic switch.
After completing the assembly process, the tightness of the connections is assessed. For the first time, the accumulator is filled slowly so as not to damage the integrity of the membrane.