Some boiler malfunctions may be caused by incorrect parameters in the service menu settings. This can happen, for example, after unqualified intervention or... as once happened in my practice, after flooding the boiler board with water.
Of course, first of all, the service menu serves to configure, adjust and diagnose the operation of the boiler. In this article I will share how to enter the service menu of the Ariston Class 24 FF boiler and how to change the parameters, as well as give the values that were set in my boiler from the factory.
Before you begin any settings, it is important to carefully consider the menu structure, as well as understand whether you need to intervene and change any parameters. Incorrect intervention can lead to serious problems. For example, there is a parameter that is set depending on the boiler version and is used by specialists when replacing the board.
Considering all of the above, you should understand that some of the parameters I have given as “Factory settings” may differ from those you need specifically, and therefore you carry out all these movements and settings at your own peril and risk.
Quick navigation through the article
Ariston boiler menu structure
At first it may seem complicated, but once you figure it out, everything will be simple and clear, so:
Each parameter is indicated by a three-digit digital code. For example 228 (this is just a parameter code that depends on the boiler version)
The first digit of the three-digit code means a separate menu group; the boiler has six separate menu groups, each responsible for its own settings section. Here they are.
2 - Boiler settings
3 - Solar collector and storage boiler
4 - Zone 1 parameters
5 - Zone 2 parameters
7 - Testing and maintenance
8 — Technical parameters.
The second digit of the three-digit code indicates the submenu, and the third is the parameter itself to which access is granted.
For example, code 228, already known to us, is deciphered as follows: 2 - Boiler settings (this is the Menu), 2 - Basic boiler settings (Submenu), 8 - Boiler version (Parameter).
So by typing the three-digit code 228 we get access to the set value of this parameter, which, according to the table, can vary from 0 to 5 and depends on the boiler version.
I will provide tables with menu codes and a description of what is regulated by a specific code below, but for now let’s figure out how to enter the boiler service menu.
Boiler service menu
For all manipulations with switching modes, only 4 buttons are used - Plus, Minus, Ok/Menu, ESC.
It is important to understand that not all boiler menu items will be available to you; some of them will only become available when additional devices are connected to the boiler, such as external sensors or a solar collector.
And most menu items are accessible only by service code, I’ll talk about this below, but for now let’s “practice on cats”
Our cats will have meanings that are open to free access. But first, read how to work with the menu.
Check what
The traditionally practiced reset for error 607 of the Ariston boiler will not help. This is also stated in the fault table (User Manual).
Fan
- Performance is assessed in dynamics (~220 per terminal). Remove the casing of the Ariston boiler, unplug the wires, and apply voltage from the outlet. If the impeller rotates, there are no complaints about the device.
- The presence of U coming from the ED is checked. If error 607 of the Ariston EGIS PLUS model occurs, the multimeter will show zero - no fan control.
Boiler pressure switch
Controls the operation of the fan. If the device turns on, it sends a signal to the electronic board that the Ariston boiler is ready to ignite. There is a microswitch under the cover of the pneumatic relay; a movable membrane is responsible for its operation. It shifts with air pressure flowing through the capillary tubes from the fan. The pressure switch is checked by closing the contacts: if the Ariston boiler ignites, there is a malfunction in the sensor.
Pressostat and boiler fan Ariston clean
Causes
- Clogged tubes. A common problem. Blocking of the channel is caused by the ingress of condensate and tiny dust fractions. Blow and the 607 error will disappear.
- Membrane deformation. Over time, solid particles accumulate on rubber goods, elasticity is lost, and when pressing on the microswitch, the contact group does not work. The solution is simple: the sensor body is non-separable, you just need to shake it a little and tap on the cover. But the service life after such actions is low, and the risk of error 607 appearing again for the same reason remains - the pressure switch will have to be changed.
- Microswitch failure: contacts sticking. The processor regards this as normal fan operation and does not give a command to turn it on. Unrecoverable, the pneumatic relay is rejected.
How to work with the menu
By pressing the “OK” button once, the number 2 will blink on the digital indicator - this will be the first digit of the future three-digit code (Menu Group Number)
Using the plus and minus buttons you can change this value from group number 2 to any other group. To fix the selected group for further entering the code number, you need to press “OK” again - after this the second digit of the future three-digit code begins to blink (Submenu)
Having selected a submenu, fix it by pressing the “OK” button again and similarly select and fix the third digit (Parameter)
All! Now the screen will no longer display the three-digit code itself, but the set value of this parameter, which can be changed by pressing “plus” or “minus”. Having made the necessary changes, do not forget to commit them by clicking “Ok”.
Please note that after selecting the desired menu, after a few seconds of inactivity, a three-digit code will begin to be alternately displayed (to remind you where you are) and the parameter corresponding to this menu.
The ESC button is used to exit the settings menu and return to the previous step. The exit is carried out step by step, one press is equal to one step back.
Let's practice
Now, if you want, practice to better understand the switching order. For example, enter menu code 701; this will turn on the forced air removal mode, essentially turning on the pump in the boiler for 6 minutes.
When this mode is turned on, the “P I -” symbol will light up on the display. You can exit the “Anti-Air” mode without waiting 6 minutes by pressing ESC.
Then, using ESC, try to go back and switch to mode 300, which means (Set water temperature in the boiler) in the values you can see the temperature that is currently set by your DHW regulator.
How to enter closed menu sections using an access code
So, if you understand how to work in the menu, then it’s time to move on to more serious things. The vast majority of all settings are protected from accidental intervention by an access code. Therefore, to begin setting up the boiler, we perform the following steps.
Press “Ok” several times until the indicator shows the value 222 - Then hold down “Plus” until the value becomes 234 - then “OK” again - Everything is ready!
Now we have one number 2 constantly glowing and another 2 blinking - Which, as you understand, means the following - Menu 2 is turned on and you can select a submenu, and then a parameter. Having set the required three-digit code and clicking “OK”, we will see the parameter value that can be changed.
Use the ESC button to go back and move on to select other menu items and submenus.
Tables with three-digit codes, descriptions and set values
The values added in the white fields are the values used in my boiler. If there are no corrections, then I have the same values as those printed in the table. To enlarge, click on the photo of the table.
Table 3
Do you want to install individual heating in your home? Have you already installed and connected gas equipment? Great, then all that remains is to figure out how to turn on the gas boiler. Do you think it’s enough to insert the plug into the socket and select the temperature? No matter how it is. Before this, it is necessary to bleed the air and fill the system with water. You will find instructions with the sequence of actions in our article.
First start of the boiler: beginning
The initial startup allows you to assess the condition of the heating system.
Important! In case of problems when switching on independently, the service center may refuse warranty. Perhaps the best solution would be to contact a specialist.
In any case, a specialist must make the connection to the gas pipeline. Installation and wiring of equipment is carried out strictly according to the scheme. It is important to comply with the requirements for the room for wall-mounted and floor-standing boilers, the distance from the wall and the floor. If all installation work has been successfully completed, proceed to the next step.
Filling the system with water
In order for liquid to enter the system, the water valve must be opened. It is located at the bottom of the body. More precisely, you can look in the instruction manual for your model “Ariston”, “Proterm”, “Navien”.
Unscrew the valve gradually; water should not flow in abruptly, otherwise an air lock will occur. As a result, heating problems will begin. Monitor the pressure gauge while filling. As soon as the values reach 2-2.5 Atm, close the tap.
Work with water must be carried out in the warm season, otherwise the liquid will form plugs. If the temperature outside is sub-zero, warm the room to 20 degrees.
After installing and filling a double-circuit or single-circuit heating boiler, proceed to remove the remaining air in the pipes.
Bleeding air from the system
Automatically switched on equipment may have an air release function. But it’s more effective to do the work yourself. If you want the room to maintain a stable temperature, then eliminate the possibility of blockages in the pipeline. This is true for old and new models.
Start the process with radiators. Open the Mayevsky taps located on them.
Place the containers first, because water will flow with the air. As soon as the whistling and hissing stops, you can close the taps.
Bleeding begins with the battery, which is located above the rest.
Before starting the boiler, remove air from the pump. Can you do it yourself? It is better to carry out the first bleeding manually, despite the automation. How to proceed:
- Remove the case by unscrewing the screws;
- Connect the Visman, Kiturami, Aton boiler or the one you have at your disposal to the outlet;
- As soon as the device is started, the pump will turn on and you will hear a gurgling sound;
- Using a slotted screwdriver, unscrew the pump nut;
- As soon as water flows, tighten the nut back. Repeat the procedure until the gurgling stops.
Monitor your pressure gauge readings. If the pressure has dropped, add fluid to the circuit.
An important point is setting up the batteries. Far radiators are turned on at maximum, and near ones at minimum. As soon as a comfortable indicator is reached, proceed to the next stage.
Crimping the circuit
During startup, this step is often ignored by users. But in vain! The procedure allows you to immediately find out how reliable and tight the system is. Judge for yourself: if a leak occurs at the height of the heating season and you are left without heat, the costs could be much higher. All you need is a pressure pump at hand.
Blow out the system with a powerful air stream. The interval between starts is 10 minutes. During this time, keep an eye on the pressure gauge. Has your blood pressure started to drop? This means there is a leak that needs to be found and fixed.
Cleansing by rinsing
To ensure that nothing interferes with water circulation in the future, open all the taps on the radiators. Now supply the liquid under pressure of 4 bar, having previously placed the containers. The stream will clean the pipes of rust and sediment. Then clean the filters from dirt.
How to turn on a gas boiler?
The system is prepared, proceed to start the independent boiler. Is it possible to turn it on without gas? No, you need to follow the sequence.
For mounted units “Bosch”, “Vailant”, “Beretta”, “Ferroli” (Ferroli), Protherm, Celtic and other models:
- Plug the device into a power outlet;
- Unscrew the gas valve;
- Press the “Start” button (depending on the model there may be a different key. See the instructions);
- Using the “+” or “-” buttons on the control panel, set the desired temperature;
- The burner with electronic ignition will light up automatically when switching to hot water supply (DHW) or heating. For piezo ignition, hold down the flame control for a few seconds, then press the piezo button.
Important! During the initial start-up, air may have accumulated inside the gas line, so ignition may be blocked. To remove the lock, press the Restart button.
For parapet boilers of the Aton type, switching on is carried out in a similar way. If there is a remote control, then you can set the mode using the remote control.
How to properly turn on the floor-standing units “Buderus” (Buderus), “Baxi” (Baxi), “Lemax”, “AOGV”, “Conord”, “Danko”, “Siberia” and others:
- Ventilate the room;
- Make sure there is draft in the chimney;
- Open the appliance door;
- The control and temperature selector must be in the “Off” position;
- Open the gas valve;
- Set the selector to the piezo ignition position;
- Press the selector for 5 seconds and simultaneously press the piezo button. The burner should light up;
- Use the same knob to adjust the temperature values.
Is it possible to leave the boiler on while away? If you're leaving home for an extended period of time, simply set your settings to minimum. Low temperatures and frosts will lead to freezing of the entire system and other equipment. Metal pipes can burst under pressure, then you will have to completely change the heating circuit.
The last stage of installation of almost any heating system is its first trial run, debugging and commissioning. By and large, if boiler equipment is started up for the first time, then this work is a priority for service centers. During the first start-up, service center specialists check the correct connection of the boiler, perform its debugging and put this equipment under warranty. If you carry out the first launch yourself, then you can’t count on a warranty service center. Starting and debugging the heating system can also be done while the system is in operation - you won’t have to turn to specialists every time. Owners of individual heating simply need to know this process. We will study it with you in this master class with step-by-step photos, in which, together with the website, we will study in detail the issues of how to start the boiler and how to debug the heating system with your own hands.
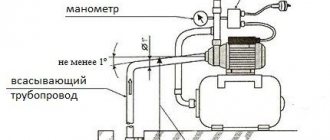
Filling the heating system with water
Starting a gas boiler begins with filling the heating system with water. Everything is simple here - modern double-circuit boilers do not require the installation of a special system feeding unit. It is already built into the boiler and equipped with a special tap, which, as a rule, is located at the bottom of the boiler in close proximity to the cold water connection pipe. Open the feed tap and slowly fill the system with water.
Starting the boiler - how to fill the system with water
A very important point in the operation of any boiler equipment is fluid pressure. To control this parameter of the heating system, almost all boilers are equipped with a pressure gauge. During the process of filling systems with water, it is necessary to monitor the pressure and after it reaches 1.5-2 atm, filling the system will need to be stopped. In principle, the operating pressure of a boiler may vary depending on the manufacturer and model - therefore, see the instructions for the boiler for the exact operating pressure.
Do-it-yourself first start-up of a gas boiler
Decoding
Group 6 codes are caused by problems with the duct system. With error 607, peripheral devices have nothing to do with it: it is a consequence of problems with the equipment. In boilers of the Clas 24 FF series, it manifests itself in the form of ignition failure when Ariston is turned on, with the 607 symbols simultaneously displayed (accompanied by rotation of the fan shaft). The EGIS PLUS 24 FF models are different: the blades do not rotate.
Error 607 on the Ariston boiler display
The instructions say that the pneumatic relay contacts are closed even before the boiler is turned on. But the electronic board (“the brain” of Ariston) cannot be excluded from the list of “suspects”. Equipment diagnostics is carried out in stages, starting with the simplest actions.
Removing air pockets in the system
It's better to start with batteries. To remove air pockets, a Mayevsky tap is usually installed on them. We open it and wait for the water to run. Did you run? Let's close. Such manipulations must be done with each heating device separately.
How to start a boiler with your own hands photo
After the air is removed from the batteries, the pressure in the system will decrease and the pressure gauge needle will drop. At this stage of work, the solution to the question of how to start the boiler involves re-filling the system with liquid.
Now, the most difficult thing is that starting gas boilers requires bleeding air from the circulation pump. To do this, the boiler needs to be disassembled a little. We remove the front cover and look for a cylindrical object with a shiny lid in the middle, which has a slot for a screwdriver. After we have found it, we put the boiler into operation - we supply it with electrical power and set the water heating controls to the operating position.
Relieving air from the circulation pump when starting the boiler photo
The circulation pump will immediately turn on - you will hear a faint hum and loud gurgling and many incomprehensible sounds. This is fine. As long as the pump is aired, it will be so. Take a screwdriver and slowly unscrew the cap in the middle of the pump - as soon as water starts seeping out from under it, screw it back. After two or three such manipulations, the air will come out completely, the strange sounds will subside, the electric ignition will work and start working. Check the pressure again and add water to the system if necessary.
Basically, that's it. While the system is warming up, you can begin to study the instructions in detail (if, of course, you have not already done so) and start debugging the system that involves starting the boiler. Everything is simple here - the batteries closest to the boiler need to be screwed on, and the ones farther away need to be turned on to their full potential. This debugging is carried out using control valves installed on the supply connection pipe to the heating radiator.
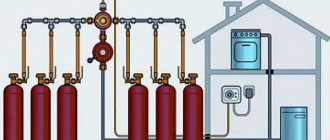
Double-circuit gas appliances make our lives more comfortable and enjoyable. They are quite practical to use, suitable for heating country houses and small apartments. They are used for heating industrial or warehouse buildings with an area of no more than 500 sq.m.
The advantages of Ariston boilers are that in addition to heating buildings in winter, they heat water used in everyday life all year round. This is quite convenient and does not require the installation of additional equipment.
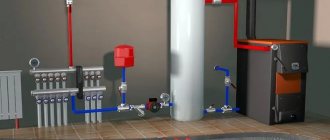
Installation of heating equipment
Before describing the sequence of actions for installing the device, it should be noted that the installation of gas equipment - heating or any other - can only be carried out by certified specialists after you have received permission from the organization supplying main gas.
Installation of the boiler is carried out only by qualified specialists
In general, boiler installation occurs in the following sequence:
- A coaxial angle is set through which combustion products will be emitted and fresh air required to maintain the operation of the burner will be taken in.
- The place where the coaxial channel comes into contact with the material of the house wall must be protected with special gaskets, and the pipe itself must be secured with a clamp.
- Then the boiler itself is installed . For this purpose, the brackets included with the equipment are used. Remember that you only need to fix the device on a solid wall, since interior partitions, especially plasterboard ones, will not support its weight.
- Between the back of the boiler and the wall it is necessary to make a gasket of non-combustible material to protect the building structure . This is a mandatory fire safety requirement.
- Then, shut-off valves are installed on the boiler inlet pipes, through which all pipes are connected: heating . The use of taps allows you to shut off the water flow and dismantle the boiler in case of breakdown without draining the coolant from the system.
To get started, you just need to press a few buttons
Once the installation of the boiler is completed, it can be started. To do this, the system is filled with water, air is removed from it using air valves (Mayevsky taps), after which the device is turned on according to the instructions. There is no need to carry out any more complex manipulations.
General characteristics of Ariston boilers
The description of Ariston gas units must begin with the characteristics of their main part - the burner. This element is used to burn fuel and release thermal energy into the heating system.
Types of boiler burner:
- regular
- modulation
The modulation burner is more convenient to use. It provides automatic power control depending on the temperature of the device.
According to the type of exhaust of combustion products, burners are divided into:
- closed type
- open type
Units with a closed burner are safer to use. In this case, natural gas combustion products do not enter the room. No use required. A coaxial pipe is simply connected to the device and taken out.
The design of the coaxial pipe provides for the presence of two layers, which ensures the simultaneous removal of waste and the flow of air from the street into the burner.
Equipment with an open burner requires the use of a chimney to remove combustion products.
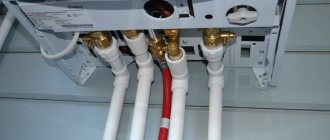
Wall mount
Initially, I installed a coaxial angle on the boiler and measured the distance from the edge of the boiler to the center of the corner - it, as indicated in the instructions, was 105 mm.
The distance from the center of the corner to the top of the boiler is 105 mm
You can immediately fasten the narrow clamp, not forgetting to put the sealing gasket.
Before tightening the clamp, it is necessary to insert a sealing gasket
My house is sheathed on the outside with vinyl siding, so I immediately decided to mark it so that the hole for the pipe would fit entirely on one strip of siding.
Some sites suggest first making a hole for the chimney, and then screwing in the mounting strip. I decided to screw the bar first. As mentioned above, the kit includes two dowel nails. They are designed for mounting the boiler to a brick or concrete wall. Since the house was built from sandwich panels, I fastened the plank with roofing wood screws.
The bar is set horizontally and secured with five galvanized screws
Further in the wall, a through hole with a diameter of 10 mm was drilled. The center of the hole corresponded to the center of the coaxial pipe. I cut out the hole for the pipes on both sides using an electric jigsaw.
After cutting the hole and hanging the boiler, you can install a coaxial chimney
It is better to install the chimney together - one pushes the pipe from the outside, the other puts on the internal insulating gasket (made of hard plastic) and the clamp (it is more convenient to immediately screw the screws into the clamp).
The pipe is installed, the clamps are tightened
Due to the fact that the outer insulating gasket is quite elastic, it fits quite tightly to the siding.
Coaxial pipe after installation
I'll end this for now. Next comes the soldering of polypropylene pipes, the connection of polypropylene pipes with metal-plastic ones and the installation of additional taps on the heating system. Only after this can Ariston be launched.
To be continued…
- https://sovet-ingenera.com/gaz/equip/kak-podklyuchit-gazovyy-kotel-ariston.html
- https://starsb.ru/shop/folder/skhemi-podklyucheniya-kotlov-ariston
- https://xn--80ayehece2h.xn--p1ai/installation-of-boiler-ariston/
Technical data of Ariston gas appliances
- Ariston boilers are used for heating and water heating, that is, they are double-circuit.
Each modification has its own characteristics, but the common type of fuel is gas. - The gas combustion chamber can be either open or closed.
If there is a chimney, units with an open chamber are used. And in apartments of multi-storey buildings, where there are not always chimneys, equipment with a closed combustion chamber is used. - Power.
Using this indicator, the gas consumption required to heat the room is calculated. - Compactness.
Wall-mounted units are used in small, narrow rooms. Floor-standing units used in production or warehouse areas are heavier and require more space for installation. - Availability of a control unit.
This element is indispensable when the water is turned off or when there is a sharp decrease in gas. In case of any malfunction, the unit will immediately turn off the device, which will prevent breakdown. It can also help you save fuel consumption.
Ariston boilers are used for heating and water heating, that is, they are double-circuit
Distinctive abilities
According to reviews of Ariston gas wall-mounted double-circuit boilers, they have 4 distinctive features that are useful for their owners:
- All models of this company are equipped with automatic protection systems.
- The presence of a water pump, which is necessary for constant circulation of water through the pipes.
- Possibility to choose a model with an expansion tank. With its help, pressure will be automatically adjusted inside the heating system.
- Ariston equips its equipment with various types of ignition. It can be automatic, which will make life much easier for the owner of a particular boiler. Otherwise, every time the unit starts, the person will need to press a special button.
Characteristics of Ariston boiler models
A distinctive feature of Ariston boilers is their high quality. After all, the name of the company is translated from Greek as “the best.”
Its products are especially popular among middle-income consumers. Gas boilers of this brand are purchased for heating rooms up to 500 sq. m. The company's products are universal. The transition to liquefied fuel is carried out only by replacing the burner.
Double-circuit wall-mounted gas appliances are practical to use. It is represented by three lines, each with its own modifications.
All boiler modifications have in common:
- small size.
- supply of hot water, in the absence of a centralized supply.
Different modifications differ in structure, but what they have in common is their low cost and high-quality parts.
Basic equipment of units from Ariston:
- double .
- electronic control module.
- carbon monoxide control.
- microclimate support in a building or in a separate apartment.
- control of water freezing inside the system.
Let's take a closer look at existing types of Ariston equipment.
Ariston Genus
- Available with double heat exchanger.
All modifications are double-circuit and wall-mounted. - This model is considered the most functional of all Ariston devices.
Has an LCD display and a button control panel. Ariston Genus can be configured to work autonomously for a whole week. - The display shows basic data on the status of the device and a list of possible errors.
The burner is modulating, that is, completely controlled electronically. This function increases the comfort of using this model of gas appliance, due to minimal control by the consumer.
The Ariston Genus line includes the Evo and the more expensive Premium models.
The Evo model is a dual-circuit gas appliance with both types of burner: open and closed.
Genus Premium condensing boilers. They are used for heating residential and commercial buildings. Power range from 24 kW to 35 kW.
Ariston Clas
- The device is small in size.
- This is a boiler with two circuits and an elegant appearance.
The reduced dimensions did not impair its functionality in any way. - Expansion tank 8 l.
Hot water heats up quickly
Existing modification:
- Evo is available with open and closed combustion chambers.
Power with an open burner is 24 kW, with a closed burner - 24 - 28 kW. - Premium Evo is a condensing type device.
Has advanced comfort and frost functions - Premium simple condensing unit.
Ariston Egis
- Installed mainly
in rooms up to 200 square meters. - Our most common model of gas appliance is Ariston.
It heats the water with a stainless steel heat exchanger, and a copper heat exchanger is used for heating. - The compact device is economical and can be used in difficult weather conditions.
For example, at sharp subzero temperatures. - The device is equipped with a modulating gas burner
, which allows electronic control over the operation of the boiler.
This model is adapted to work in harsh climatic conditions. Normally withstands gas pressure changes. The device is equipped with a collector into which condensate flows. This ensures operation at temperatures below 50 degrees.
What to do
Checking that the parameters are set correctly
If the electronic board has been replaced, you need to make sure that it is “adapted” to this Ariston boiler model. Otherwise, errors cannot be avoided.
Checking connections
Code 105 is evidence of a lack of information exchange (or a failure in the GP-GIU chain). By inspecting the inside of the Ariston boiler, the signal lines are assessed. Breaks, short circuits (insulation melting) are the causes of error 105. The condition of the contact groups is checked for the absence of mechanical defects, oxides, contamination, and the quality of fixation.
Power check
- A low voltage value causes error 105, which is noted on thematic forums. Raise it and the fault code will disappear.
- Incorrect electrical connection. Error Ariston 105 is often displayed when a powerful consumer is turned on simultaneously with the boiler (with the “Comfort” mode set). By removing “COMFORT”, you can get rid of the 105th fault code by restarting the heating unit.
Grounding check
Illiterate organization, a violation of contact in the boiler-ground circuit initiates the appearance of error 105. It is also caused by interference, leading to malfunctions of the electronic board.
Advice
To eliminate the influence of stray currents on the operation of the Ariston boiler and the risk of errors, you need to install a dielectric coupling on the gas pipe. It's inexpensive and solves a lot of problems.
Connecting a dialectical coupling
Checking boards
- For dampness. Typical for Ariston boilers installed in rooms without heating. Condensation on the board causes various errors to appear. The problem is eliminated by blowing a stream of warm air.
- No damage. Panel curvature, breaks in conductive paths, burnt (melted) radio components are the probable causes of error 105.
- Diagnosis of nodes cannot be done at home - you need a special stand. But according to user experience, boiler error 105 can be removed by replacing the capacitors. They are located in the stabilizer circuit; loss of capacity leads to the appearance of a fault code (shown in the photo).
Display of capacitors on the Ariston boiler control board
If the operation of the boiler is not restored, you need to contact a service organization. And it must be certified by the manufacturer. Professionals interpret code 105 not as an error, but as information that the heating unit is in parameter setting mode. Their recommendations:
- install the display board on a working heating unit and check its operation;
- flash the electronic board.
It cannot be done at home, only in a hospital. The decision is justified - repairing the unit will cost several times less than purchasing a new one.
Choosing a gas appliance for heating
Ariston products can be found in catalogs. There are many models of gas appliances available there. The main mistakes when choosing the wrong unit are made from a lack of information. Therefore, before visiting the store, you should familiarize yourself with the basic tips for choosing a wall-mounted gas appliance.
When choosing a boiler, consider the following points:
- The size of the kitchen as the place where the heating device is most often installed.
In the store, the choice begins by considering the overall dimensions of the device and selecting it individually for your kitchen. - Next, move on to the technical data and study the type of water heater in the device.
If there are a large number of people in the family, then it is not recommended to purchase a boiler with. - In this case, it is more rational to purchase a boiler with a storage tank for hot water
and select equipment for the amount of water that you will need for everyday use. - Evaluate the combustion chamber of gas equipment.
It can be closed or open. It is recommended to choose a boiler with a closed chamber because it is safer to use. The presence of a chimney is not necessary, which is important in multi-storey buildings. All you have to do is buy a coaxial pipe and put it outside.
Other breakdowns
In addition to those described above, the following codes may appear:
- 608 - the system generates this error when the fan starts, but the pressure switch does not work.
- H45 - the last two digits may change.
The reason lies in the NTSc sensor, there is no hot water at the outlet, the safety valve is leaking. If there is no hot water, but the heating system is working, most likely the water flow sensor is faulty or clogged with debris. Another reason may be that the turbine blades have worked too hard, stuck to the housing, this can interfere with rotation, replace the blades or the turbine itself.
The second reason in this situation may be the NTC sensor; to check its functionality, measure the resistance at its contacts with a multimeter; if it is unstable, replace the sensor with a new one. If the safety valve is leaking, the gaskets may be worn out, replace them.
NTC sensor
How to determine the error code if the device does not have a display or does not have a dial, such as on the Ariston BS II 24FF model? This device is equipped with indicator lights, thanks to which you can determine the breakdown. So, for example, if the 90 indicator and the crossed out water drop icon are on, this means that the boiler has overheated and is blocked. To eliminate this, you need to check the pressure switch and its connection to the board.