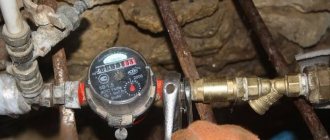
If the owners have a desire to install a full-fledged heating system in their garage to spend time in comfortable conditions, then, in principle, they can build everything themselves. But you will need to delve into the installation process, taking into account even the slightest nuances. In a heated garage, it is more convenient for the car owner to repair the car and inspect it for breakdowns. When organizing heating, you will need a chimney. It is convenient to form it through the wall. And after installation, it is important to always remember the operating rules and care measures.
Chimney in garage through wall
How to properly install a stove in a dacha?
Attention: installation and first firing of the furnace is carried out only with the participation of a specialist from the manufacturer or supplier!
The stove can be installed on a foundation or directly on the floor. When installing the stove on a wooden floor, lay out a platform at least ¼ brick thick; its size should be such that the distance from the stove to the edges is at least 250 mm. A cement screed or metal sheet is laid on top of the brick. It is necessary to have a metal sheet under the combustion door. It is strictly forbidden to install fences around the stove that impede air exchange.
Distance to flammable materials:
- From the back and sides of the stove: at least 500 mm
- Door side: 1250 mm
- Top: 1200 mm.
The distance on one of the sides can be reduced provided that the flammable material is protected by brickwork ½ brick thick with a gap of at least 30 cm from the combustible surface. In this case, the distance from the other side of the stove to flammable materials should be 1 m or more. It is not permissible to reduce the safety distances behind, above or at the front of the oven!
Chimney. It is recommended to use thermally insulated sandwich modules in combination with single-wall pipes. The internal pipes of the sandwich are connected by inserting the upper element into the lower one, the external ones - vice versa: the upper segment is pushed onto the lower one. Remember: sandwich modules are under no circumstances installed at the base of the chimney, where it comes into contact with the stove; a single-wall pipe is installed in this place.
Where the chimney passes through the ceilings, a steel ceiling trim must be installed. The cutting thickness should be 70 mm greater than the thickness of the overlap. The gaps between the grooves and the floor structures are insulated with stone wool, expanded clay or other non-combustible materials. A special roofing passage unit is installed in the roof. When venting a chimney onto a roof made of flammable materials, it is necessary to install a spark arrester on the pipe.
The height of the chimney from the grate is at least 5 m.
The distance to flammable structures from the inner surface of the pipe is at least 500 mm. It is allowed to reduce the distance to 380 mm, provided that combustible structures are protected with a metal sheet on asbestos cardboard (8 mm) or plaster (25 mm) on a metal mesh.
The height of the chimney depends on its location and roof configuration.
- At a distance of less than 1.5 m from the ridge or parapet - at least 500 mm from the top point of the ridge or parapet.
- At a distance of 1.5 - 3 m from the ridge or parapet - not lower than the ridge or parapet.
- At a distance of more than 3 m from the ridge or parapet - not lower than a line drawn from the ridge downwards at an angle of 10° to the horizon.
- Above a flat roof - 500 mm.
We will allow the chimney to exit not through the roof, but through a wall made of non-combustible materials, subject to all installation rules. In this case, for normal removal of combustion products, the chimney pipe must be installed at an angle of at least 45° upward; horizontal placement of the chimney is unacceptable.
It is possible to heat the second floor by using heat from the chimney pipe. To do this, sandwich modules are installed only in places where they pass through the ceilings, and a single-wall pipe is installed in the heated room.
Potbelly stove in a country house
Choosing material for the chimney
To build a chimney for a potbelly stove yourself, you need to know what material is best to take, what tools and components. Materials must meet the following criteria:
- made of stainless steel;
- wear-resistant;
- react normally to high temperatures.
If it is not particularly important what material to use, then you can make a brick channel. But costs will increase and maintenance will be more difficult. In this regard, preference is often given to metal corrugations.
Suitable materials
For installation you will need:
- metal conductors – 16 cm in diameter;
- tee - may be required to organize a tap;
- knees for joining - they help change the direction of the channel - you must take into account that the size is at least 16 cm;
- mushroom - it is attached to the head, it is needed as protection and to enhance traction;
- sealant - it reliably seals the joints to ensure that the system complies with safety standards;
- materials for thermal insulation, they are used in areas of passage through walls;
- bitumen resin.
How to make a Loginov potbelly stove with your own hands?
Making a Loginov potbelly stove does not require special tools or materials. The master must be able to weld, cut and rivet metal, and strictly adhere to the diagram.
Tools
When working with metal you will need the following tools:
- Grinder for cutting metal.
- Welding machine and accompanying protective equipment.
- Gun for riveting metal.
- Tool for cutting threads of different diameters.
- Drill and drill bit for metal.
Materials
Materials for making a Loginov potbelly stove:
- Sheets of metal with a thickness of at least 3 mm, with a total area of 1.35 m2.
- Iron rods 45cm long – 6 pcs.
- 100mm pipe for chimney. The length depends on the height of the room.
- Pipe 80mm and 30mm for blower and outlet.
- 200mm pipe about 10cm long for the firebox door.
- Plug 220mm.
- The metal angle for the legs is about 1.2 meters, depending on the intended height of the structure.
- Rivets 6 pcs.
Step-by-step instruction
- Cut the metal into the required pieces in the form of a rectangle according to the diagram (above, in paragraph Diagram and drawing).
Prepare the leaf pieces
- Cut holes for the firebox door and ash pan in the pipes and sheet metal for the front of the stove, and also make a hole for the chimney pipe in the top sheet.
- Cut threads on the ends of the 200mm and 30mm pipes, inside the firebox door and the vent plug.
Carve pipes
- In the 30mm pipe in the thread area, drill holes in a circle in a checkerboard pattern. There should be no holes outside the thread.
- Weld a blower from 80mm and 30mm pipes according to the diagram, weld the edge of the 80mm pipe. Make a plug for the blower.
The blower can also be upgraded as in this photo
- Weld the sheets of metal together, weld the chimney outlet, fuel door and ash pan to the holes.
Weld the body
Weld the remaining parts to this body
- Weld iron rods onto the walls of the stove.
- Place the stove on its feet by welding a metal corner. Cut the corner legs and bend them as in the diagram.
- Weld the screen. Using a special gun, rivet the sheets together as in the drawing, bending the sheet of metal at the back of the screen.
- Weld the chimney pipe at the smoke exhaust point.
Weld the chimney
- Check for defects, assemble and remove the chimney to the street.
- Perform a test fire. If the stove does not smoke and has good draft, then the work is finished. The oven is ready for use.
Nuances of insulation and diagrams of wood-burning stoves for the garage
To maintain a comfortable household temperature inside a single garage, you will need to install a furnace capable of producing 2-2.5 kW of thermal energy; for an operating temperature of 16-18 degrees, 1.8-2 kW will be sufficient.
Wall insulation helps to significantly increase heating efficiency. Usually the thermal insulation layer is placed on the outside, but this is expensive and technically impossible when the garages are wall to wall.
For internal insulation, self-extinguishing types of fiberboard and chipboard are suitable, but not plastic - when heated, it can emit toxic gases, which means this material is incompatible with wood-burning stoves.
Brick garage wood stoves
Brick stoves are rarely installed in garages due to their bulky design. The devices take up a lot of space, and the large internal heat capacity increases the loss of time for heating the oven to operating temperature by 1-1.5 hours. However, in some cases, installing a brick kiln is justified. Here are the most common ones:
- the garage is used as a workshop or semi-residential space;
- the building has sufficient area and high ceilings;
- there are no other garages, residential or household buildings nearby;
- there is no excess moisture in the garage that could harm the solution if the stove is left idle for a long time.
For laying a wood-burning stove, fire-resistant and fireclay bricks are used, and fire-resistant clay is added to the binding solution.
The fuel chamber is equipped at the bottom, usually at the level of the third row; if necessary, windows for the cleaning and ash chamber are provided
Particular attention should be paid to the chimney - its design must ensure effective removal of smoke and soot into the external environment
The design of a classic wood-burning stove made of brick with a cleaning window and without a blower ensures long-term burning of wood and high heat transfer. Due to the relative ease of installation, the devices are often found in practice.
Sheet metal products
Metal wood-burning stoves are popularly known as “potbelly stoves”.
They are a single-chamber structure made of sheet steel, equipped with a chimney pipe and an ash pan in which solid combustion products accumulate.
Often a potbelly stove is supplemented with a platform for cooking. Compared to brick stoves, metal devices have the following advantages:
- compactness and mobility;
- low cost of raw materials;
- high rate of room heating;
- ease of implementation of the chimney, removal of ash and ashes.
To make a potbelly stove yourself, it is enough to have basic skills in working with a welding machine and plumbing tools. Designs designed for installation in single garages are very simple.
In modern hypermarkets of construction and household goods you can find industrial-made potbelly stoves. Obviously, their price will be higher than homemade devices, but such products are reliable and durable.
Use of waste cylinders, device drawings
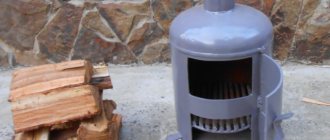
Empty gas cylinders can be used to make a very convenient wood stove in just a few days. This design combines the advantages of brick stoves and potbelly stoves, allowing you to create a not too bulky, convenient device with long-lasting and intense heat transfer.
Photo 1. Drawing of a stove-stove for a garage from a gas cylinder. Represents the horizontal design type.
If assembled correctly, such a stove provides a thermal power of more than 5 kW, which is enough to heat a large garage. One full load of firewood guarantees 3-4 hours of stable combustion - this indicates the efficiency of the stove. The structure can be easily equipped with a cooking area if desired. Among the types of wood stoves considered, it is the balloon stove that has the optimal ratio of price of materials, efficiency of use and ease of manufacture.
Photo 2. Drawing of a wood-burning stove from a gas cylinder. The design is vertical, the dimensions of the device are indicated.
Types of potbelly stoves
The furnace body can be made of several types of metal:
- become;
- cast iron
When the stove is made of cast iron and heated with wood, we can talk about a very large weight. Warming up such a mass requires time much longer than heating the steel structure.
However, this inertia quickly becomes a positive quality when the oven begins to cool. Steel walls remain hot only in the presence of a combustion process. As soon as it stops, they instantly cool down.
Cast iron cannot cool down so quickly; it will give off heat for quite a long time after the combustion stops and is completely extinguished.
The service life of a cast iron stove is much longer than its metal counterpart. Burnout of the walls occurs very slowly. But unfortunately, there is one significant drawback. If the stove is hit with a heavy object, it may crack and become unsuitable for further use.
The “stove stove” models are available in several types:
- without legs;
- with legs;
- rectangular;
- barrel-shaped.
The most suitable fuel for such a design, according to its manufacturers, is rectangular firewood. There are many more of them in the firebox.
cb678e447e48d3d55624aaee2a5bf068.jpe 575569543b630d3d5e4d27e16a8bd004.jpe ab80d2e71c5bd0767f7505f6bbb68c3e.jpe
When a “potbelly stove” is made with your own hands, it is most often given a barrel-shaped shape.
Creating a chimney for a stove
Before you begin installing a chimney pipe on a potbelly stove, you should select the material to be used. Since such a heating unit is portable, there is no point in installing a brick chimney. The choice is limited to asbestos-cement or metal pipes.
According to experts, it is best to use pipe products made of metal, namely stainless steel - this way the chimney is easier to manufacture and it will have little weight. The chimney pipe must be correctly installed and optimally positioned.
When a potbelly stove is installed outdoors, there will be no difficulties with arranging smoke removal. In this case, the main thing is to make the pipe high enough.
If the unit is installed indoors, then a simple option for creating a chimney involves the presence of two parts - external and internal. They are connected to each other either at the level of the under-roof space or in the attic. Since the heating device consists of two elbows for the chimney, if one of the chimney segments burns out, it can be easily replaced without resorting to dismantling the entire structure (pro
Safety Recommendations
dry firewood and logs
What must be observed for safe operation of the potbelly stove:
- The stove must be installed on a non-combustible base;
- All objects and flammable surfaces must be no closer than 70-80 cm from the stove;
- You should not put more than three kilograms of fuel into the potbelly stove at one time;
- The firebox door should always be closed, except when loading firewood;
- It is prohibited to operate the stove if there is a problem with the exhaust pipe;
- Do not leave the oven running unattended for a long time or in the presence of small children;
- It is forbidden to touch the oven body while it is running or immediately after the flame in it has gone out; the entire surface heats up to a very high temperature;
- Do not leave or keep flammable objects or materials near a working stove.
If all the rules are followed, the potbelly stove will heat the room for a long time.
How to securely ensure tightness?
It is especially important to ensure that all conditions for tightness are met if the chimney pipe is installed vertically upward. For this purpose, a glass is mounted in the ceiling covering, and all seams are carefully treated with an effective sealant
You can use bitumen. It is applied in a thin layer directly to the outside of the chimney pipe. A special protective umbrella, the so-called “mushroom,” helps protect the pipe from moisture and precipitation.
Video: fixing a leak on the roof near the pipe
Leaks appear on roofs near chimney pipes. In order for everything to be sealed and moisture not to get inside the garage, the leak must be properly eliminated. The following video will help you do this efficiently.
https://youtube.com/watch?v=YK8P7vyiWD0
Installation of a potbelly stove
It should be remembered that the installation and operation of a potbelly stove, as a temporary heating device, is almost always a struggle for the presence of draft in the furnace of the stove. When installing the stove, you should not abuse the length, as well as the number of elbows and bends of the chimney, since each of them increases the resistance to the gas flow, and accordingly, reduces the draft. But it is still desirable to have a horizontal section of the chimney leading from the stove to the exit from the room, the so-called hog. Since the hog significantly (up to 25%) increases heat transfer and, accordingly, the efficiency of the potbelly stove. The hog can be quite hot and therefore must be equipped above the average height of the people in the room. The outlet of the potbelly stove chimney from the room is equipped, as a rule, through a window (in light structures such as huts, tents - and through the ceiling), using a cutting - a metal sheet with a hole for the chimney, which isolates the hot chimney pipe from the wooden frame of the window and the awning of the tent.
Firebox of the new furnace
In the morning after installing the stove, it was decided to check its capacity. The entire firebox was not filled with firewood, only small ¼ was added. The logs were made of birch and aspen. After the wood was in the firebox and set on fire, smoke began to emerge—probably the paint was burning through. During the entire burning period, work was carried out at maximum capacity; later I wanted to ventilate the room. The entire incomplete stack burned out in 30 minutes.
What we have:
After there were a few red coals left in the stove, it was decided to add another portion of firewood. The floor under the stove became very hot, you can touch it, but you cannot hold it with your hand. The wall behind the stove, opposite the stove, is hot, but you can hold your hand for a couple of seconds.
Sandwich too - you can hold it for a few seconds. Then, for an hour and a half, the firebox continued in the long-burning mode.
After the first fire, the temperature in the room was +22 degrees, after the second - +25.
After the first fire, it was possible to say that the stove worked well and I really liked it, the power adjustments were simple, but at first it was not clear how the glass blowing worked.
The glass remained clean after operation of the firebox. After finishing the fire, two hours later the stove was quite warm. I won’t argue about the heat capacity comparable to brick stoves; one must demand from each heating device what it can give, and receive from it what it is designed for. We can conclude that Chinese-made cast iron stoves are very functional in operation and give impressive results.
Stove installation
The installation rules are based on protecting surrounding objects and walls from the hot walls of the potbelly stove:
- Base. It must be non-flammable. Of course, a concrete slab is ideal, but few people can afford such a high-quality foundation at their dacha. A section of ceramic tiles and a brick base are suitable. Models with legs are not so demanding on the base, since the legs, although they heat up, are to a lesser extent. Here you can use a sheet of tin.
- Distance to walls. If the walls are wooden or lined with flammable materials, the distance to them should be at least 70 cm, if plastic, even more. The same principle applies to furniture.
- Chimney. Pipe diameter from 85 to 150 mm. If possible, you should avoid joining pipes, especially in a residential area, but if you have to join, the joint must be completely airtight. The joints should not coincide with the place where the pipe passes through the floors and roof. In these areas, a fireproof barrier is made of brick, ceramics or concrete, which will protect the floor materials from fire. Often the stove pipe is placed out the window, and the stove itself is placed in the middle of the room. In this case, the section of pipe extending from the furnace (horizontal or inclined) will act as an afterburning chamber and transfer heat to the room.
- Ventilation. The potbelly stove burns with an open principle. This means that it will take the necessary oxygen from the room in which it is located. Therefore, according to the standards, it needs to provide a sufficient amount of fresh air: for 1 kW - 10 m3 per hour. Few country houses can boast of good supply and exhaust ventilation, so the problem is usually solved by ventilation. Otherwise, people will experience unpleasant symptoms of oxygen starvation.
Stove after installation
To make the potbelly stove mobile, that is, to be able to move it from place to place, part of the chimney can be made from fireproof corrugation. You just have to pay more attention to cleaning, because the corrugated area will become a place where soot accumulates.
Installation of a chimney through a wall
Craftsmen rarely agree to hire craftsmen to build a chimney for a potbelly stove in the garage. Most owners believe that they themselves are able to cope with the task. But as a result, many do not take into account the tightness of the structure, making mistakes in this regard. Also, you should not neglect fire safety rules, form good draft, so as not to get poisoned or, especially, not to suffocate under the influence of carbon monoxide. Almost no one pays enough attention to the rules for organizing an effective and safe chimney. It's not difficult, just follow these important rules:
Processing of joints
- Following fire safety guidelines. All areas where the chimney meets other surfaces are treated with fire-resistant compounds, and fire insulation is formed on them.
- You need to build a pipe from 2 or 3 parts; it should not be all metal. This is important in case of burnout, since only one part will need to be replaced, which has deteriorated during operation.
There must be several sections of pipe
- When carrying out an output through a wall, measurements are taken in advance and elements for organizing channel turns are ordered. You can’t do them correctly with your own hands.
Rotating elements
- Secure the chimney only with clamps, do not use welding, because the temperature inside the pipes is constantly changing, the metal expands and contracts, so the welding points may burst, especially during severe frosts.
Clamp
When all the structural parts are assembled and firmly attached to each other, proceed to the next stage - the installation of the cap. The functionality and correct operation of the system must be checked. No sparks should fly out of the potbelly stove when burning.
As a spark absorber, it is permissible to use a mesh with small cells - no more than 5 mm. This is a relevant solution when the roof or other nearby objects are made of flammable material. When there is no fire danger, a simple cap is used. It is put on the end of the chimney, secured with a clamp, and securely fastened with rivets.
Cap
Differences: output through the wall
To remove the chimney through the wall, you do not need a PPU or master flush. All you need is a pipe, an outlet and a deflector. It is easier to organize removal through a wall, since it is easier to properly seal cracks in a vertical surface.
But it is not always possible to drain through the wall. Often, garages are installed in rows without gaps or the available distance is not enough to install a full-fledged system. Another garage may also be located at the rear of the building. In this situation, there is only one outcome - organizing a drainage through the roof.
The gaps in the wall for the outlet, which remain between the pipe and the wall, are treated on both sides with a sealant with heat-resistant characteristics.
Chimney installation steps
After studying the nuances and basics, you should refer to the detailed installation instructions. She will help you build everything with your own hands, ensuring high quality work.
The sequence of how to do it correctly is as follows:
- Fastening the very first part of the chimney to the chimney hole in the potbelly stove.
- Extension of the knee to the wall - removal will be carried out through it.
- Now a hole with a diameter of at least 16 cm is formed. It is important to comply with fire safety regulations.
- A passage glass is mounted into the hole - this is the only way to pass the chimney pipe.
- Connecting the pipe to the outer elbow.
- A layer of bitumen resin is applied to the outer part. It is thermally insulated with a special material, such as mineral wool.
- The fungus is mounted above the upper segment from the outside of the building. It helps prevent debris, dust, and other foreign objects and precipitation from entering the chimney.
After the final completion of the work, you can begin to use the potbelly stove.
Preparing the walls
The wall must be prepared for the passage of a pipeline through it. First, markings are applied, then a hole is made for the passage pipe.
Then the pipe is installed. It is fixed in the hole according to size and must be supplemented with insulation made of foiled mineral wool. Then the pipe is connected to the stove. A three-section elbow is required and connects to the tee through a transition piece.
Hole in the wall
If it is necessary to change direction, a tee equipped with a cleaning cup is used. It is easy to remove for cleaning and is secured with a bracket.
The gas outlet pipe is attached to the wall using a special clamp. The gaps between elements are no more than 2 m.
Features of care
Maintenance of the structure is carried out regularly. Seams are inspected, with special attention paid to areas of increased risk of crack formation. Burnt areas, etc. may also appear. Cleansing is organized at least once a quarter, and definitely at least once every 12 months. This type of maintenance will help maintain the functionality of the chimney.
Cleaning is carried out by burning special briquettes in a potbelly stove. This gas is caustic and harmful when inhaled, but it effectively cleans pipes of soot and burning.
Proper care
How does a potbelly stove work?
The firebox consists of a combustion chamber, where wood is burned, and a chamber for the ash pan, separated from the combustion chamber by a grate. In the upper part of the firebox there is a flue channel and a hole for connecting the chimney.
The ash pan box is designed to collect ash that pours into it from the firebox. In modern stove models, the ash pan door is equipped with a seal and plays the role of a combustion mode regulator.
The oven door is a box with a window made of heat-resistant glass, a seal and a latch. The simplest models may not have a window.
The chimney consists of steel pipes, single-walled or double-walled (so-called sandwich). In the space between the pipes of the sandwich chimney there is a heat-insulating material (for example, expanded vermiculite). This technology increases the fire safety of the chimney by reducing the temperature in the places where it comes into contact with the structure of the house. The inner pipe of sandwich modules is made of stainless high-alloy steel, the outer pipe is made of mirror stainless or galvanized steel. The chimney is equipped with a special rotary damper - a damper for manual draft adjustment.
The furnace body is assembled from heat-resistant steel and covered with heat-resistant silicone enamel or other decorative materials that can withstand high temperatures. Modern stove models may have a special convector casing: cold air, entering it from below, is warmed by the walls of the stove and exits from above through special openings. This simple technology can significantly increase the efficiency of the furnace.
Optional equipment. A hob for cooking can be mounted on the top cover of the oven. There are models with a built-in electric heat gun, as well as with the ability to install heat sinks to supply warm air to adjacent rooms.
Stove for a summer residence (potbelly stove): device
Insulating the house to improve the operation of the stove
A week later, the opening, which is located above the stairs leading to the 2nd floor, was insulated. The frame was made of bars and insulated with foam plastic. Plastic panels were attached to the frame. On the left, near the window, the entire structure is attached to hinges. In general, the entire structure rests on aluminum corners 20x20 mm. All that remains is to fix a couple of blocks at the top right, stretch the cable and make this entire structure rise up. Standing below, I pulled the cable - the door opened, and the cable was secured. I released the cable and lowered the door down. It turned out that the heat remains in the house, but the street remains unheated; now the stove heats even better.
A fan was also installed to improve heating capabilities. From the room where the stove is located, a hole was cut in the wall under the ceiling and a fan with a diameter of 100 mm and a capacity of up to 80 cubic meters was installed. meters of air per hour. A ventilation grille was installed on the back side of the wall. The fan turns on when the stove is lit. The noise is practically inaudible, but warm air enters the next room much faster and all rooms are heated more evenly.
Main functions
Today, such models have a variety of styles. When installing them for heating, they also serve as room decoration.
The fuel for such a system is firewood, the length of which does not exceed 25 cm. You can also use other solid fuels. The main purpose of the potbelly stove:
- heating the building;
- cooking;
- interior detail or decorative decoration.
"Burzhuyka" successfully competes with brick and fireplace systems. However, it has one very important advantage: its dimensions are not large. This stove is easy to transport and connect. It is often used outdoors for cooking on a picnic.
When you constantly have to transport the stove to different places, a collapsible design may be the optimal solution. The top cover, which acts as a hob, is removed. The legs are very easy to disassemble and the chimney to be removed. If desired, you can divide the entire stove into several separate sections.
As a result, you don’t need a lot of space to store the stove; it becomes mobile and easy to transport.
Using such a heating device, you don’t have to worry about carbon monoxide getting into the upper respiratory tract. All harmful gas is removed through the chimney
To achieve this effect, it is very important to carry out the correct installation. The stove's power will reach its maximum if you create good draft
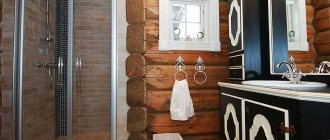
Start of installation: screen, wall protection
The wall near which the stove will be placed is made of wood, with foam inside and plasterboard outside. Therefore, in order to protect the wall from the high temperatures of the heated device and single-layer pipe, it was decided to construct additional insulation for the wall. As a result, profiles for plasterboard 75 mm wide were installed, fire protection was laid inside - “Paroc” with a 40 mm foil gasket and an air gap between the insulation and the wall. Each seam was taped with aluminum tape and a glass-magnesium sheet 8 mm thick was sewn on top.
In one of the photographs you can see that only the lower part is sealed; if it gets cool in the room, then the part on top will also need to be sealed. Clinker tiles under the brick will be laid on a glass-magnesium sheet using a special heat-resistant tile adhesive. The resulting distance from the tile to the stove will be 25 cm. A sheet of drywall will be laid under the stove, and the tile will be placed on top of it using the same heat-resistant adhesive. There will be a varnished wooden plinth around the entire structure.
User manual
The most important condition for operation is good welding quality. Using chalk coating and kerosene, check for fistulas and defects. Be especially careful with the chimney seams. Load firewood into the combustion chamber, light the fire, close the door and regulate the process using the blower. To reduce the intensity of combustion, you need to screw on the blower; to put out the fire, just screw it on completely.
Heat emanating from metal at a temperature higher than that from brick or stone
To adjust the blower, always use a thick potholder, do it carefully and quickly. Clean the oven after it has cooled completely
If there are welding defects, operation is stopped and the defects are corrected. Carbon monoxide can cause death.
According to some reviews, this stove can smoke when the firebox door is opened. This occurs due to decreased cravings. The defect can be eliminated if you increase the diameter of the chimney pipe to 150mm and reduce its length
Slow burning stoves are popular among fishermen and tourists. By replacing a thick sheet of metal with light and thin stainless steel chimney pipes, they successfully use the Loginov scheme for winter fishing and tourism
Welding is rarely used for such furnaces.
Potbelly stove for a summer residence, horizontal version
This is perhaps the easiest option for making it yourself. Like all stoves of this type, at home they are created either from a large diameter pipe or from a propane cylinder, which is much better. You can make such a potbelly stove as follows.
- First you need to open the cylinder - this is a dangerous matter. First you need to unscrew or beat off the tap with a sledgehammer - first, the contents of the cylinder are vented to the maximum, and the condensate is drained. Then the container is filled with water and only then can you cut.
- First, one of its rounded parts is cut off (where the tap was). After it is cut off, the water can be drained and you can work with the cylinder without fear.
- We attach legs to the balloon and install it horizontally.
- On the blind side (top) we cut a round hole with a diameter of 100 mm and weld a pipe of the same diameter to it - this is a chimney. The length of the pipe is about a meter - everything else is built up later.
- Now inside the balloon. At the very top you need to attach a strip of thick metal - this is a flame stopper that will protect the body of the potbelly stove from burning out. If the plate burns out, it is easy to replace. By the way, it should not block the chimney.
- Grate bars. The easiest way to weld them is from thick reinforcement - a kind of grille that is inserted into the lower part of the cylinder and secured there by any available means. It would be better, of course, if it were a removable product.
- And the last point is the door, or rather two doors: the ash pan and the firebox must open and close separately from each other. The ash pan, as in many furnaces (or rather, its door) additionally works with an air flow, with the help of which it will be possible to regulate the rate of fuel combustion.
This design can be supplemented with convectors - pipes through which air from the room will pass and be heated. They are simply welded vertically to the side of the potbelly stove - ideally, the pipes should be bent so that they follow the contours of the stove. In addition, you can additionally weld a plate on top of the cylinder, which will serve as a kind of burner - alternatively, you can cut another hole in the top of the cylinder itself and weld the plate on top of it. Such a burner will work much more efficiently.
Operating a potbelly stove
Using a potbelly stove involves alternating cycles of its kindling, which include:
- fuel loading;
- ignition of loaded fuel in the stove;
- heating the stove (its beneficial use for heating people and premises);
- cleaning ash from the ash pit and combustion chamber.
The most important stage is the loading of fuel, which must be placed in an order that facilitates its ignition. First, paper and thin dry branches are laid, with larger dry chopped logs on top of them. Coal is loaded, as a rule, from above onto already well-lit firewood. To restore draft, quite often you will have to disassemble the chimney and clean its pipes and elbows of accumulated soot. Also, the draft in the stove must be regulated by a damper damper, or by changing the length and position of the chimney pipes. Thus, powered by solid fuel, which can be found almost everywhere, a hand-made mobile potbelly stove made of metal will become a reliable help to the zealous owner in many difficult life situations.
What can a chimney be made from?
To use a potbelly stove, you will need to take care of smoke removal. To do this, you have to build a chimney, selecting the optimal material.
You can invite specialists to carry out the work, or you can do everything on your own, especially since the amount of work is small.
Types of chimney pipes
Various materials are used to make smoke exhaust pipes. Initially, depending on the material of manufacture, there are 2 options:
- Take ready-made pipes made at the factory;
- Make pipes from stainless steel sheets or other sheet metal.
The cheapest way is to make your own pipes
The undoubted advantage here is that the pipe will be of the required diameter, which is especially important for homemade potbelly stoves
For the chimney of a potbelly stove, you can independently make not only ordinary pipes, but also double ones - sandwich pipes. To do this you will need 2 pipes of different diameters and heat-resistant insulation.
The second advantage of homemade pipes is cost. To make them, you can use improvised material, or purchase metal sheets with a thickness of 0.6 mm. Or better yet, 1 mm.
Moreover, you can also make an insulated chimney pipe by making 2 pipes of different diameters from sheets. Or take ready-made metal ones of different diameters.
In addition to making chimney pipes yourself, you can opt for a simpler and faster option - buy ready-made pipes from the required material. The most common materials are:
In addition to these options, the market offers many other products. Thus, you can find pipes made of heat-resistant glass, from which it is quite possible to build an exotic chimney. But this is done extremely rarely - skill is required to install and connect individual structural elements to each other.
It is not advisable to buy expensive pipes for a potbelly stove. To make a chimney, it is enough to buy metal heat-resistant pipes and adapters for installing the entire structure
The right pipe for a potbelly stove
To make a chimney for a potbelly stove, it is not necessary to construct pipes from metal sheets with your own hands. This will require some skill and time. After all, the sheets will first need to be rolled into a tube of the required diameter, and then the seam must be tightly secured using rivets and heat-resistant sealant. It is much easier and faster to buy the necessary products produced at the factory.
To assemble the entire chimney structure and tightly fasten its individual components, you need to use a heat-resistant sealant that can withstand temperatures from 1000 degrees Celsius
As for the material, it is not worth taking cheap asbestos-cement pipes for these purposes - this material will not withstand if the temperature during the combustion process rises above 300 degrees Celsius. And the pipe itself is quite heavy. It will also absorb condensation. But making a hole to clean out soot or remove condensation will be problematic.
Making a chimney for a potbelly stove out of brick is an unreasonably high expense. Firstly, rarely do any home craftsmen know how to do proper masonry. And secondly, this is a bulky structure that requires additional strengthening of the foundation. A potbelly stove is a temporary heating equipment.
It is optimal to take metal pipes made of stainless steel, or better yet, alloy steel. A structure made of such material can serve as a chimney for 7-10 years. This is provided that the pipes are of sufficient thickness - 6-10 mm or more. And the quality of assembly of all elements of the smoke exhaust system plays an important role.
Another undoubted advantage of metal pipes is their lightness. The light weight allows you to carry out all the work on constructing a chimney for a potbelly stove alone.
Image gallery Photos from Brick is a good material for a chimney, but not for a potbelly stove. This stove requires a simpler and lighter design to remove smoke
When choosing between asbestos-cement and metal pipes, you should give preference to the latter - alloyed metal can last about 10 years
The length of the chimney and the material of the pipes will depend on the type of fuel that will presumably be burned in the firebox. If it is waste oil, but you should forget about asbestos pipes
For a potbelly stove installed in a residential area, you should especially carefully construct the chimney, following all safety rules
Chimney brick
Metal pipe
Potbelly stoves using waste oil
Chimney for potbelly stove indoors
Having decided on the material for the future chimney, you can begin purchasing all the components and constructing a correct and functional structure.
Simple designs of potbelly stoves
There are several options for potbelly stoves, each of which has a set of both positive and negative properties.
Potbelly stove from a gasoline barrel
As already noted, this version of a homemade metal stove is not durable, but is captivating with its low cost and ease of manufacture. As a rule, it involves placing the barrel in a horizontal position, but you can equip the potbelly stove in the form of a vertically located metal barrel. In the front wall of the barrel, rectangular windows of the firebox and blower are carefully cut out with a grinder; doors are made from the cut out parts (awnings, a handle, a latch lock, and dimensional strips around the perimeter are welded on), which are hung on the corresponding windows of the front wall of the barrel. There is no need to cut through the blower window; instead, at the very bottom of the front wall, it is enough to drill a series of air supply holes with a diameter of about 20 mm. In the rear part of the upper wall of the barrel, several radial cuts are carefully made from the center marked with a core or punch to the size of the future chimney opening. After which the resulting metal petals are bent upward, forming at the same time the opening of the chimney and the semblance of its pipe.
Potbelly stove for a summer residence from a gas cylinder
As a rule, it is equipped with a horizontally located cylinder, the thick-walled metal body of which forms the combustion chamber of the future stove. The end part of the cylinder with the tap is carefully cut off with a grinder, and a firebox door is made from it (canopies, a handle, a lock - latch are welded), which is hung back on the cylinder - the firebox. In one of the side walls of the cylinder, which will become the lower wall of the combustion chamber, a series of holes are drilled in a checkerboard pattern (with a diameter of about 20 - 30 mm, and in increments of about 20 mm). The drilled holes will serve as a kind of permanent grate for the future stove. From below to the cylinder, completely covering the grate, a separately made iron ash box with doors hung on its window is attached (tacked by welding), and the support legs are welded.
Rectangular stove - potbelly stove
The stove body is made in the form of a rectangular welded metal box with a thickness of 3 mm or more, inside of which a horizontal partition made of a sheet of metal of the same thickness is equipped (welded), dividing the internal space into two chambers: the upper, larger part, the firebox, and the lower part, the ash pan. . A grate window is cut into the horizontal partition, which can be equipped in both removable and non-removable versions. In a simpler, non-removable version, the grate is formed by metal rods, laid parallel with some clearance and welded across this window. The removable grate is made in the form of a metal frame according to the size of the grate window, to which the grate bars are welded in parallel with the gap (the gap to the size of the thickness of the rod used). In the front wall of the box, rectangular windows of the combustion chamber and the blower are cut, onto which the corresponding metal doors are hung. The rectangular shape of this stove is convenient in that its upper wall can be additionally equipped with a cooking hole with a burner, and a metal box with sand can be installed on it, which will significantly increase the heat capacity of the stove and smooth out its heat transfer.
Oil fired metal stove
The designs of metal portable stoves, which use waste motor oil as fuel, stand somewhat apart. Their scope of application is quite narrow, and it is determined both by the specific fumes emitted, which are unacceptable in rooms where people stay for a long time, and by the corresponding fuel, which can only be found in quantities sufficient for heating in car garages, car repair shops and industrial enterprises. The design of this stove is relatively simple. It consists of a “pan” - a container for oil with a filler hole, closed with a plug with a throttle to allow air to pass through.
Potbelly stove for long-burning cottages - three simple options
- Piston stove. People call it the “Bubafonya” stove - most likely, this is the name of its creator. This is a top-burning stove, that is, wood is burned not from bottom to top, but, on the contrary, from top to bottom. Imagine a gas cylinder with the top cut off - firewood is loaded onto its bottom, which is pressed down from above by a piston. The piston has a hole for air flow - as combustion occurs, the piston moves down. The chimney in such a stove is located above the piston, and the wood gas released when wood burns is also burned above the piston. In general, the efficiency is very high, despite some inconveniences - it will not be possible to load additional firewood into such a stove during operation. It must burn out completely, and only after that it is recharged.
- Rocket stove potbelly stove. This is a very complicated stove, so I won’t even talk about its design. I will only say one thing - one load of such a stove burns out within an hour. This is despite the fact that its twisted hopper has a size of 120 by 120 mm - in fact, it works on wood chips.
- Do-it-yourself potbelly stove being worked on. A very simple, but unsafe potbelly stove - if water accidentally gets into it, it can result in a big boom. In addition, problems with fuel may arise - whatever one may say, used oil does not just lie around, and such potbelly stoves have quite a big appetite. The interesting thing about this potbelly stove is that the oil is burned directly in the fuel tank. In addition, when oil burns, a specific, not very pleasant smell is released (firewood smells more pleasant).
This is how things stand with the solution to the question of how to make a potbelly stove with your own hands? As you can see, there is plenty to choose from, despite the fact that this choice is not always easy to make. If this is your first potbelly stove, then, naturally, it is better to start with something simple and move up. Ask which potbelly stove is best? In my opinion, the most interesting and effective is the rocket stove - it is the one that produces the maximum amount of heat with a minimum fuel load.
What types of stoves are there?
To make the case, one of two metals is used:
- Cast iron.
- Steel.
Wood-burning cast iron stoves for a summer residence will have an impressive mass. Its heating takes a little longer than steel.
But inertia pays off when decay occurs. The steel walls are hot while the combustion process is going on, and then they cool down just as quickly. Cast iron retains heat for some time after extinguishing.
In addition, cast iron has a longer service life; such a stove will not burn out for a long time. But at the same time, it can be damaged, for example, by dropping it or hitting it with a heavy object - there is a possibility of cracks appearing and the device will become unusable.
Other differences in models. Potbelly stoves can be:
- With legs.
- Without legs, on a flat base.
The former look more elegant and are safer to use.
- rectangular;
- barrel-shaped.
Barrel-shaped potbelly stove
The latter are most often made with your own hands, for example, from a piece of pipe.
Features of maintenance and care
The garage chimney needs to be cleaned more often - once every six months.
The structure is checked annually for mechanical damage. The garage chimney needs to be cleaned every six months. For this purpose, brushes or chemicals that dissolve soot are used. The mechanical option is more effective, but is unacceptable for stainless steel. In this case, you are allowed to use a hook.
Before the start of the heating season, the tightness of all chimney connections is checked. To prevent the appearance of soot on the inner walls of the pipe, you can use aspen firewood. Special chemicals used to treat logs can dissolve soot. This method is safe for a metal pipe.
If the product has through-hole damage, it must be replaced. They will lead to a decrease in draft and smoke entering the room.
If you correctly build and operate chimneys from a profile pipe for potbelly stoves, the heating structure will fully perform its functions. It is necessary to follow the rules for operating the structure.
How and with what to heat a potbelly stove?
Fuel. Steel stoves are designed for wood heating. You can also use sawdust-based fuel briquettes, which are sold in construction shopping centers. Stoves designed to fire coal are made of cast iron.
Operating modes. Most stoves of this type can operate in one of two modes: intense combustion and temperature maintenance. For intense combustion, after adding firewood and closing the oven door, open the ash pan drawer to ensure that the maximum amount of oxygen enters the firebox. To switch the stove to slow burning mode (maintain temperature), add firewood again and close the ash pan drawer. The slow burning time depends on the design of the stove and can reach 8 hours for models equipped with afterburners.
The draft is adjusted using a damper: if there is excess draft, the damper is partially closed.
Remember: you can use the stove in high-burning mode for no more than 2 hours a day!
ADVICE To extend the service life of the stove, experts recommend heating the stove intensively for 15-20 minutes after the slow burning mode: this is necessary to remove soot formed during the slow combustion of fuel.
A short historical excursion
Initially, a “potbelly stove” was a name given to a steel stove of a certain design, the creation of which took place during the dramatic years of the Civil War for our country. It is not known exactly which of the Russian engineers came up with a very simple, but very effective steel furnace, relatively easily made in a handicraft way from more or less available materials. During the times of “war communism”, after the urban economy with centralized heating in large cities collapsed, this tiny stove, which could be installed almost anywhere in a “bourgeois” apartment densely packed with house committees, saved many lives. By the way, the statement that the stove got its name due to excessive consumption of firewood is a stupid legend born on the Internet. In fact, the potbelly stove is very economical for its type. In conditions of a severe shortage of coal and firewood, the owner of a walnut set by master Gumbs had the opportunity to survive a terrible winter, using the precious furniture as firewood. The name of the furnace was determined by the fact that at first it became widespread among “former” engineers, office workers, and intellectuals who did not emigrate from the country. That is, according to the concepts of the proletariat, “bourgeois”.
Design and principle of operation
What is the difference between the Loginov Potbelly stove and other metal stoves? The point is the L-shaped blower. The ash pan door is replaced with pipes welded perpendicularly. The edge of the horizontal pipe is tightly welded, and the edge of the vertical pipe has a thread for a plug. There are holes made on the thread - by screwing the plug you can reduce the air flow, thereby regulating the combustion process.
Loginov's original potbelly stove
It is important to make a plug with a slight play, so that expansion of the metal when heated will not cause problems. A screen is welded to the sides and back on the stiffeners to increase efficiency
Without such screens, it is extremely uncomfortable to be near the stove - the temperature is too high and can cause burns. The firebox door is also threaded. A 200mm pipe serves as the firebox opening, and a plug with a handle 220mm in diameter is screwed onto this pipe.
12918027525f238194e21c71fdf01c56.jpe
You can see more details about Loginov’s potbelly stove in this video:
Modification
N. Pyankov’s model is distinguished by the presence of an additional combustion chamber. Unlike more complex designs of slow combustion stoves, the Pyankov potbelly stove is manufactured even faster, the model proposed by Loginov. It is enough to weld steel sheets 140-160 mm long to the back and front walls of the furnace at different distances from the top. The distance between the sheets should be 80mm. The grate is installed 80mm from the bottom. Pyankov moved Loginov’s firebox door to the top of the stove and began using it as a hob.
It will not be difficult for a good master to evaluate all the advantages and disadvantages of the two drawings. If desired, you can make a new model of a potbelly stove using only these two developments, changing the rectangular shape to a round one.
An example of a homemade design (in this photo there is a modernized Pyankov stove), but there is practically no difference in the manufacturing process.
Economical and energy-efficient furnaces for the waste garage
A waste oil furnace is considered the most economical, as it eliminates additional fuel costs. If you correctly calculate the materials and strictly follow the manufacturing instructions, then it will not smoke and excessively pollute the air. Such furnaces are designed to operate on transmission, machine or transformer oil. A diesel furnace for a garage operates on the same principle.
Structurally, the unit consists of two containers that are connected to each other by a perforated pipe with many holes. If a decision is made in favor of installing a waste furnace in the garage, then it is necessary that it meets the following requirements:
- maximum weight – 30 kg;
- capacity – up to 12 liters;
- standard size – 70x50x30 cm;
- average fuel consumption – 1 l/hour;
- the diameter of the exhaust pipe is 100 mm.
A wood-burning garage stove made from two gas cylinders is very economical and easy to maintain
It is quite simple to build such a structure. To create it, you don’t need nozzles or droppers, so you don’t need any special knowledge, skills or experience to make it.
Directly for the manufacture of the furnace you will need the following materials:
- steel pipe;
- two metal containers;
- steel corner.
The container can be the housing of an old, unusable refrigerator compressor or a gas cylinder. A furnace for a garage for mining must be made of a material with a thickness of at least 4 mm, since it is expected to heat up to 900 ° C, so thin metal will simply burn out.
The sequence of manufacturing a stove for a garage that operates during mining
A furnace for a mining garage is beneficial if there are large reserves of it.
The process of creating this type of stove for a garage with your own hands includes the following steps:
- Installing the lower container on the legs. For this purpose, parts 20 cm in size are produced from a metal corner, onto which the container is welded in a horizontal position.
- Cutting a hole in the middle of the lower part of the body, which serves as the firebox and fuel tank, welding to it a vertical pipe connecting both tanks. It is advisable that the top part is removable. This is necessary to clean the burner.
- Drilling about a dozen holes in the pipe at a height of half a meter. The first hole should be located at least 10 cm from the main body of the oven.
- Making a hole on the top of the combustion tank for pouring oil and a lid, which will help regulate the heating level of the room and the combustion process itself.
- Welding the pipe on the upper tank.
- Construction of a galvanized steel exhaust pipe at least 4 meters long and its fastening to the branch pipe.
Painting will give your garage stove a presentable look. For this purpose, a mixture of silicate glue, chalk and aluminum powder is used.
Disadvantages of a furnace for a garage during mining, operating features
In order to avoid emergency situations, it is necessary to use such a stove in accordance with clear instructions. To do this, using the bottom hole of the stove, you need to put a small amount of kindling paper into the fuel tank. Next, approximately 1 liter of used oil is poured in. Set the paper on fire and wait a couple of minutes until the oil boils. When the oil begins to burn slowly, it must be added as needed in an amount of 3-4 liters.
Despite the many advantages of this type of garage oven, it is necessary to mention their disadvantages, in particular:
- a very long chimney, which must be at least 4 meters in height;
- it is required that the chimney device be strictly vertical, without bends or horizontal sections;
- Oil containers and the chimney must be cleaned regularly - approximately once a week.
The oil consumption in the furnace during processing is regulated by an air supply damper and is 0.3 - 1 liter. at one o'clock
The process of creating a heating system in a garage must be approached responsibly so that structures such as a waste boiler, a brick stove, or a DIY potbelly stove are profitable and bring maximum heat. It should be noted that economical options must be carefully looked after, and brick structures require some time for kindling. To create a long-burning metal stove, you will need certain skills and knowledge. At the same time, any of the options considered, under conditions of proper construction and subject to operating rules, will make the garage warm and comfortable.
Design
The old models of “bourgeois” were not very diverse; designers did not pay any attention to them. Usually the owner of such a model himself came up with the appropriate design for it. He gave it a more attractive appearance and sought to improve its functionality.
Today you can use modern options that can decorate your interior. These include:
- art casting;
- colored glaze;
- overlays;
- heat-resistant paints.
Such models, in addition to their original external design, also differ in their shape. They can successfully replace a fireplace in the house. "Potbelly stove" will be able to repeat its classic form.
Types of foundations for a stove in a wooden house
There are several types of foundations used for furnace equipment, each of which has its own characteristics, design and operation features.
When choosing a suitable foundation, consider the following:
- Installation cost – the price of building materials, installation and preparatory work is taken into account.
- Characteristics of the foundation and soil characteristics - the choice is based on the total weight of the structure, the type of soil (clayey, sandy, black soil, stone).
- Dimensions of the foundation for the stove in the house - depending on the area occupied by the stove equipment, the total weight of the structure, the required type of foundation is calculated.
Additionally, several other factors are taken into account. The choice of foundation is influenced by the time of manufacture of the foundation (in an already finished building or simultaneously with the construction of the house), the qualifications of the craftsman, weather conditions, speed of work, etc.
All existing foundations are usually classified into several groups:
- On stilts and pillars.
- Concrete bases.
The stove, subject to certain conditions, can be installed directly on the floor.
Foundations on piles and pillars
The base is made in three ways:
- Screw piles are a method that requires material investments. The advantage of using screw piles is the speed of installation. During installation, a worker drives a steel screw into the ground. The steel pillar will be the basis of the future foundation. The piles are tied together, after which a concrete pad is poured on top. The work only takes 1-2 days. Even a heavy cast-iron stove lined with brick can be placed on a screw foundation. The only drawback is the limited service life. The steel base rots after 50-60 years of use.
Bored piles - in this case, holes of sufficient depth and diameter are drilled with a drill. The resulting cavity is reinforced with a mesh to prevent soil from falling out. Knit a reinforcing structure. After reinforcement, the pillars are filled with concrete mixture.
Columnar piles - the process of installing the foundation is the same as in the case of using bored structures. The difference is that ready-made concrete or wooden pillars are used. Massive structures with a large weight load are installed on a columnar foundation. This is the design that is used in the construction of multi-storey buildings.
If you want to make a foundation for a stove in a wooden house with your own hands, without involving outside help, it is better to choose a pile structure, which is easy to install and does not require (with the exception of a screw device) serious material investments.
Concrete bases
The most common type of foundation used for furnace installations is a monolithic foundation made of concrete with mandatory reinforcement.
Concrete foundations are made in two ways:
- Strip foundation - a trench is dug along the perimeter of the structure below the freezing point. A metal frame made of reinforcement is installed. The structure is filled with concrete. The strip foundation of the furnace cannot be connected to the foundation of the house. The foundation of the building is squeezed out of the ground in winter. The intensity of the “walking” of the walls, the rise from the ground varies, reaches 20-30 cm. If you make a common foundation, this will lead to the destruction of the brick cladding, and often to the deformation of a steel stove decorated like a brick. In any case, SNiP imposes a strict ban on making a common foundation for a stove and a residential building.
Concrete slab is another popular solution. The slab is poured with a thickness of 15-20 cm. If installed correctly, the result is a monolithic base that can withstand almost any load. To level and evenly distribute the weight, you will need to make a gravel-sand cushion for the foundation. The layer is thoroughly compacted with plenty of water. After backfilling, a layer of waterproofing is laid, beacons are placed, over which a concrete screed is poured. To prevent the slab from cracking, the freshly poured concrete is covered with oilcloth. The base is watered for 2 weeks.
Floor placement (floor installation)
Existing building codes for installing a home heating stove in a wooden house allow the installation of equipment that does not have cladding directly on a wooden floor. When installing on the second floor, you will need to strengthen the logs with metal corners and channels.
To prevent fire, the tree is protected with a metal sheet or a clay-brick layer. Otherwise, installing a wood-burning stove in a wooden house yourself is not difficult.
Water heating in a wooden house
This is the most common type of heating. The coolant (water) is heated by a heating boiler and, circulating through a system of pipes and radiators, heats the house. Natural gas, diesel fuel, solid fuel - coal, firewood, pellets, peat, etc. can be used as fuel for the boiler. Electricity can also be used to heat water in the boiler.
The most economical option for water heating of a wooden house is gas heating. Therefore, if it is possible to connect to a gas main, it makes sense to take advantage of it. Heating with an electric boiler is quite expensive; it can be recommended in well-insulated houses, where energy consumption for heating will be minimal. Diesel fuel boilers are quite economical, but require the construction of a separate building.
The above heating systems are energy-dependent, i.e. If there is a power outage, the heating will not work. The good thing about these types of heating is that they are carried out automatically, with minimal human participation in this process. This cannot be said about solid fuel boilers, which require constant maintenance - fuel needs to be added to them every 3-4 hours. But this fuel has a relatively low cost, and heating with a solid fuel boiler is non-volatile, it will work even if there is a power outage.
When installing water heating for a wooden house, it is necessary to take into account that wooden houses shrink significantly over time, and also tend to dry out from exposure to high temperatures and deteriorate from dampness, which can be caused by condensation falling on cold pipes. Therefore, when laying heating and water pipes in wooden houses, the following conditions must be met:
- Compensators and sliding-type fastenings must be provided on vertical sections of pipes.
- All pipes must be protected with thermal insulation. Heating - to avoid heating the walls, and plumbing - to prevent dampness.
- When laying horizontal pipes hidden, drilling technological holes in the floor and ceiling beams is inevitable. In order not to harm their load-bearing capacity, this issue must be agreed upon with the designers.
Sawdust firebox
Sawdust is not a high-quality fuel; it burns poorly. But they are easily accessible and popular. The design of a furnace of this modification forms two metal cylinders of different diameters. A pipe with a smaller diameter is placed in a pipe with a larger one, turning into a combustion chamber. A hole with a diameter of 5 cm is created at the bottom.
The chimney is located at the bottom of the outer cylinder. A steel box is welded under the ash. The potbelly stove is equipped with a door. A core of wood up to 60 cm high is inserted into a cylinder of smaller diameter. Sawdust is poured and pressed around it so that it burns as slowly as possible. The core is removed and a fuel chamber is obtained. The stove is ignited through an ash box using shavings and bark. When the fire reaches the top layer of sawdust, the stove is covered with a lid.
So, potbelly stoves have faithfully served people for many years. These unpretentious simple designs still provide heat, although they consume a lot of fuel, which is why they got their name. But modern models have learned to combat the hunger of bourgeois women, giving them a ticket to a long life.
A little history
Potbelly stove Mr. Heath Where did this design come from, and why does its popularity continue unabated these days?
The history of the appearance of the potbelly stove begins at the end of the 18th century. Essentially, it is a cheap alternative to expensive fireplaces and stoves. The device gained particular popularity during the October Revolution, when all the norms and foundations of life were turned upside down. Heating residential and non-residential premises became problematic, so this simple unit quickly spread throughout the country. After all, everything solid that could burn was used as fuel here. And this is firewood, coal, peat, furniture, wooden windows and doors. Potbelly stoves gained a second round of popularity during the Great Patriotic War. In many cities, centralized heating networks did not work, and the country saved energy by sending it to the front. The population had no choice but to use the old proven method - install potbelly stoves in their own apartments.
This stove saved a large number of people from freezing. It worked flawlessly, although it consumed a lot of fuel. And this is its big disadvantage. But this is the simplest and cheapest device that you can make with your own hands, and it is easy to operate.
Currently, potbelly stoves have found their application in country houses, garages, bathhouses and other outbuildings. In modern apartments they were practically not used, if only as a decorative element, creating an antique style. But recently the fashion for them has returned.
True, consumers began to impose more stringent requirements on potbelly stoves:
- Reducing fire danger.
- Presentable appearance.
- Economical fuel consumption.
Let's look at these requirements separately and reveal the secrets of new popularity.
Advantages and disadvantages
Wood-burning potbelly stoves provide the following operational advantages:
- ease of use;
- small size;
- fuel availability;
- low price of heat;
- ease of transportation over long distances;
- moisture resistance;
- ease of installation;
- heats up quickly;
- efficiency, fuel economy (6-10 hours of continuous heating);
- durability;
- there is no need to install a major chimney.
Potbelly stove heating stoves have disadvantages:
- no autonomy;
- there is a risk of fire (minimized, you need to periodically monitor the stove);
- high body temperature, risk of burns.
There are more advantages than disadvantages, so many summer residents opt for a wood-burning stove.
Possible difficulties during construction
The gas cylinder valve is screwed on very tightly. It's not easy to remove. Unscrewing will require a good adjustable wrench and a lot of physical effort. To make the process go faster, it is recommended to fix the cylinder.
Attention! Do not start cutting the cylinder without first filling it with water, as residual propane can lead to an explosion. Cutting metal, cutting sheet steel with a grinder is a labor-intensive process
The work will be speeded up by a plasma cutter, which can be rented from specialized companies.
Cutting metal and cutting sheet steel with a grinder is a labor-intensive process. The work will be speeded up by a plasma cutter, which can be rented from specialized companies.
A finished potbelly stove placed on a base may wobble. This happens if the heater legs are of different lengths. Trim them using a grinder.