In this article we will look at how to make a brick grill for your dacha with your own hands (there will be models for both the street and the gazebo). Models with a place for grilling kebabs and with stoves for installing a cauldron. Let's consider portable and stationary, simple (small) and real (large) barbecue complexes with barbecue, grill, sinks and places for cutting meat. Below you will find more than 18 projects with step-by-step photos, recommendations, instructions and construction tips.
Article menu:
This article contains 22 projects with step-by-step manufacturing photos:
- with a metal frame (.) Brazier made of brick + stove for a cauldron with your own hands (.) Brazier made of brick and metal - portable
— Simple
- Brick BBQ Grill
- Brick grill with table
- Do-it-yourself small stationary brick grill
- Brick grill in the gazebo. Master Class
- Construction of a garden barbecue made of bricks
- Do-it-yourself barbecue with an arched roof in a gazebo
- Outdoor brick grill in the letter W with a roof
— Barbecue complexes = Barbecue complex of 300 bricks (barbecue) = Corner grill made of brick into a gazebo + oven + stove for a cauldron = Project of a wooden gazebo with a brick grill. + Photo = 3 in 1 : brick grill, barbecue, smokehouse
— To the gazebo ☀ Wooden gazebo with barbecue ☀ Wooden gazebo with a simple brick barbecue inside. ☀ Brick gazebo with barbecue ☀ Gazebo with barbecue under the same roof as the house (Annex) with your own hands
— Braziers made of blocks ✨ 3 MODELS of grills and grills made of blocks ✨ Grill smokehouse made of blocks ✨ BBQ grill made of blocks photo gallery ✨ DRAWINGS of grills and barbecues made of blocks
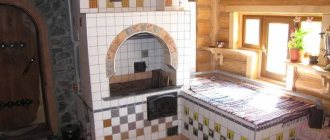
Finished models, photo gallery
Below you can see beautiful photos of barbecues. Here you can find interesting ideas for creating your own barbecue area.
How do you like the article?
Alexey Petrovich
Ask a Question
Which brick to choose?
Before starting construction, you need to know in advance which brick to choose for the barbecue oven. This is what we will do next.
| Facing brick. Mainly used for exterior decoration of barbecues. Use it for decoration only. | |
| Fireclay bricks are great for finishing a barbecue grill, the inside of a stove, and the lower tiers of a smoke box. This brick can withstand up to 1600 degrees. | |
| Vitebsk brick. Its use is typical for laying the outer verst of a barbecue, but not a firebox, because it does not have the same fire resistance as fireclay. |
Progress
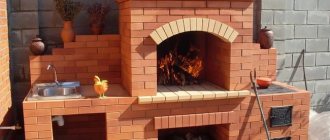
A brick stove for a cauldron with your own hands should be designed so that the open fire is evenly distributed throughout the cauldron, along its outer surface
It is very important! The upper device, the stand for the cauldron, should be similar to a tabletop stand for boiled eggs, so that the cauldron itself fits at least two-thirds into the “mouth”
- Select and prepare the site, clear it and level the surface. Moisten thoroughly with water.
- Mix fireclay powder and fine sand on the base in a ratio of 1:3, making sure that the solution is plastic and not liquid. Break the lumps thoroughly, otherwise they will burn out immediately.
- Start laying the base by laying a 5-centimeter layer of the resulting solution. Level the resulting slab.
- Place the reinforcement on top with a grid. Maintain a distance of 10-12 cm between the rods, this way you will ensure the strength of the foundation slab even with strong temperature changes when the furnace is operating.
- If you do not wait until the base is completely dry, but immediately begin to create a fireplace, the bond will be much stronger. To make even seams, use slatted gaskets, and remove any mortar drips immediately.
- When laying out a stove for a cauldron with your own hands and using refractory bricks, follow the rules for bandaging seams. Start each even row with a half, odd row with a whole.
- After the solution has set, but not completely hardened, remove the spacers.
- Immediately after the first row of bricks, install the blower door, and also do not forget to leave a hole for the chimney. Continue laying in a circle.
- After laying out the third row, install a frame of metal corners, onto which the grille will then be welded. In fact, the blower compartment is already ready; the grate will ensure excellent penetration of fresh air containing oxygen into the firebox to ensure a high-quality combustion process.
Furnace order
- When laying out the stove under the cauldron with your own hands, do not forget about the space for the chimney, work according to a pre-drawn plan.
- After the first row, following the grate bars, install the firebox door and continue to cover it further - up to the full design height of the future stove.
- After the solution has dried, ensure that the joints are opened.
- Take a pre-prepared metal sheet at least 1 cm thick, corresponding to the dimensions of the oven. Draw a hole with a diameter smaller than the circumference of the cauldron by 1.5-2 cm. Using a grinder, cut a hole according to the mark. This is necessary so that the cauldron is lowered into the firebox by two-thirds, and not completely.
Factory sheet for the cauldron
Almost finished design
From fittings and barrels
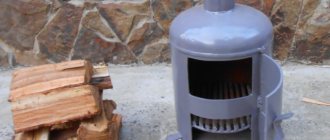
Making a stand for a cauldron from an old barrel is not difficult; it turns out to be a very good and practical solution. The barrel has a larger volume than an old bucket, so this product is more versatile in use. To make a barrel-shaped stand, you will need fittings.
Required materials and tools
What is required to make a stand:
- old barrel;
- door mount;
- handle for the door (a self-tapping screw can be used);
- fittings;
- welding machine;
- grinder with cutting and cleaning wheel;
- hammer;
- chisel;
- drill.
Some of the above tools may not be used or may be used interchangeably. For the beauty of the manufactured device, you can buy a door mount and a small metal handle. The door can be used for storing firewood. If you don't use loops, you can simply cut out a square shape on three sides. Don't touch one. Bend the resulting piece of metal. It will serve as a temporary or permanent door.
Step-by-step manufacturing instructions
A stand for a cauldron, made from a barrel, is made as follows:
- 4 identical pieces are cut from the reinforcement. They will serve as legs. Recommended height: 20-25 cm.
- At an equal distance from each other, the legs are welded to the bottom of the old barrel.
- Several small holes are made at a height of 10-20 cm from the bottom of the barrel. They create draft and allow smoke to escape.
- The top lid of the barrel is removed.
Depending on the size of the cauldron, additional fastening is installed. If the cauldron is large and does not fall into the barrel, then you can install it on top. If cauldrons of different sizes are used, then through holes are made at the top of the barrel, almost under the lid itself, opposite each other. Having made several such holes, you will be able to insert pieces of reinforcement into them. A smaller cauldron is placed on it. This fittings are not welded, since the cauldrons are different not only in volume and diameter, but also in height.
Determining the dimensions
Making a hole for the door and legs
We fasten the legs
Make one small hole for air
Ready
Advantages and disadvantages
This cauldron stand has advantages:
- She's reliable.
- Durability of the structure.
- Looks nice.
- Universal, suitable for cauldrons of any size.
- Does not require additional equipment or barbecue.
Unfortunately there are several drawbacks. These include:
- Additional costs for purchasing a barrel, if one is not available.
- The product is difficult to make for a beginner.
- It’s hard to cope on your own, without help.
- Bulky, difficult to transport.
Where to use
Such a barrel can be installed on a country plot, country house, private cottage or outdoors. If you have the opportunity to take this stand outdoors, you have a chance to cook delicious dishes in the fresh air. The barrel is installed on the ground or a flat surface; it does not require additional fasteners. It is not installed on the grill.
To summarize, we can say that there is nothing difficult in making a stand for a cauldron with your own hands. The most important thing is to have the desire, the necessary tools and material. Anyone can make simple designs. In exceptional cases, the skill and assistance of a second person is required. The result is a stand that will last a long time.
Some features of a barbecue stove with a cauldron
- Several different dishes are prepared in the oven : kebabs, vegetables or fish on a spit. The cauldron is used to create pilaf or baked potatoes and other vegetables in combination with meat or seafood. If the cover for the hole in the surface of the stove, intended for installing a cauldron, is made of metal rings of different diameters, then it is possible to use smaller pots or frying pans in the oven.
- In order for the cauldron to have uniform heating over its entire surface, it must be lowered into the firebox so that the protruding part is 1/3 of its height.
- A brazier is a hearth with an open fire. The height of the working surface of the oven should be about 80 cm . If you make a high stove, then there is a risk of getting burned when working with stirring in a cauldron. A low seating position will force the owner to constantly bend over, which is not very convenient.
- Good quality, aromatic food is produced using the right fuel. Birch firewood is considered the most suitable for barbecuing, as it gives dishes a subtle, unique spirit. You can use alder, apple, cherry, grape branches, maple, oak for the stove. Conifers are not used for cooking due to the large amount of resins in the wood. It is not allowed to light a barbecue or cook on scraps of plywood, chipboard, or other artificial lumber.
Choosing an installation location
When choosing a place for a barbecue and a metal cauldron, you should give preference to a flat area with normal soil moisture. Such a product, in accordance with existing norms and standards, is installed at a distance from residential buildings and households. buildings at least 4 m. It is prohibited to place it near a neighbor’s fence (especially if the fence is made of flammable materials).
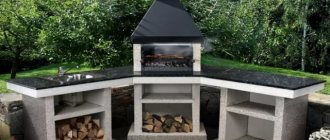
To make outdoor recreation as comfortable and enjoyable as possible, you can place a garden gazebo next to the brazier. Then after cooking, you will have a cozy place for lunch or dinner.