The creation of residential building projects, from the general design to the calculation of the placement of heating radiators, is regulated by state building codes and regulations. It is SNiP that is the main document on the basis of the provisions of which the building design is developed. But this is for new buildings, but what about houses built back in the 40-50s of the last century? Or with the projects of multi-storey panel high-rises that were so popular in the 70-80s? Especially when apartment owners replace old wooden windows with plastic ones with new window sills. In this case, you need to carefully study the regulatory documents and, in accordance with them, plan work on how to install a heating radiator under the window.
How to install correctly
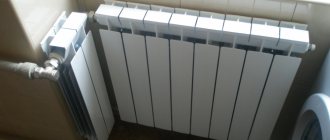
Now about how to hang the radiator.
It is very desirable that the wall behind the radiator is level - this makes it easier to work. Mark the middle of the opening on the wall, draw a horizontal line 10-12 cm below the window sill line. This is the line along which the top edge of the heating device is leveled. The brackets must be installed so that the top edge coincides with the drawn line, that is, it is horizontal. This arrangement is suitable for heating systems with forced circulation (with a pump) or for apartments. For systems with natural circulation, a slight slope is made - 1-1.5% - along the flow of the coolant. You can’t do more - there will be stagnation. Correct installation of heating radiators
Wall mount
This must be taken into account when installing hooks or brackets for heating radiators. Hooks are installed like dowels - a hole of a suitable diameter is drilled in the wall, a plastic dowel is installed in it, and the hook is screwed into it. The distance from the wall to the heating device is easily adjusted by screwing in and unscrewing the hook body.
Hooks for cast iron batteries are thicker. This is a fastener for aluminum and bimetallic
When installing hooks under heating radiators, keep in mind that the main load falls on the upper fasteners. The lower one serves only to fix it in a given position relative to the wall and is installed 1-1.5 cm lower than the lower collector. Otherwise, you simply will not be able to hang the radiator.
One type of brackets
When installing the brackets, they are applied to the wall in the place where they will be mounted. To do this, first attach the battery to the installation location, see where the bracket “fits,” and mark the location on the wall. After placing the battery, you can attach the bracket to the wall and mark the location of the fasteners on it. In these places, holes are drilled, dowels are inserted, and the bracket is screwed. Having installed all the fasteners, hang the heating device on them.
Floor fixing
Not all walls can support even lightweight aluminum batteries. If the walls are made of lightweight concrete or covered with plasterboard, floor installation is required. Some types of cast iron and steel radiators come directly with legs, but not everyone is satisfied with their appearance or characteristics.
Legs for installing aluminum and bimetallic radiators on the floor
Floor installation of heating radiators made of aluminum and bimetallic is possible. There are special brackets for them. They are attached to the floor, then the heating device is installed, and the lower collector is secured with an arc to the installed legs. Similar legs are available with adjustable height and some with a fixed height. The method of fastening to the floor is standard - with nails or dowels, depending on the material.
Dining area by the window
If for you the most important thing in the space of a room is not a work area, but where you can sit down with the whole family and have a meal, fly away with your thoughts somewhere in your cherished dreams, and plus get aesthetic pleasure from beautiful curtains, then be sure to organize a cozy dining area.
If your space allows, then you can simply place a table by the window, and if not, then a folding table will be your saving and convenient option. A bench along the window will look beautiful; besides, it will provide more seating than chairs and can be equipped with drawers under the seats for storing kitchen utensils.
Types of radiators
In Soviet times, all batteries were identical in appearance, resembling accordion bellows. Modern radiators, including bimetallic ones, are produced in different types. Monolithic samples form a section assembled entirely from steel tubes that cannot be disassembled. The dimensions of such a heater device cannot be changed: reduce or increase the number of pipes. If the thermal power of the battery for a particular room is calculated correctly, then a more reliable heating device cannot be found. Such batteries will withstand pressure up to one hundred atmospheres. They are the most expensive bimetallic heaters on the market.
Collapsible (sectional) models make it possible to determine the parameters of the radiator section required for a single room. To ensure real warmth in the apartment, before purchasing a device, you must first determine what its power should be, taking into account any heat loss. The capacity of the heater directly depends on its size. The smaller the capacity, the more economical the heating device operates.
Bypass
The bypass is the same pipe that stands in front of the installed heating device. Everyone has one, it’s needed to bypass water past the battery. If installed incorrectly - too far from the radiator, or in line with the central riser, it does not allow water, which tends to travel along the shortest path, to circulate normally, heating the radiator sections. In this situation, they will either not heat at all or will be very bad. Check how your bypass is installed. Perhaps this is the direct reason why the batteries do not heat up
Distance from window sill to radiator
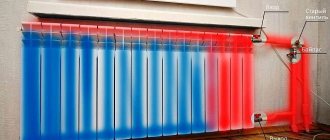
Almost all modern radiators and sectional heating radiators amaze with their high efficiency and efficiency, providing such indicators due to air convection and its natural flow through the heat exchange system. It is precisely because of these design features that it is not enough just to buy highly efficient radiators and power them with coolant; it is necessary to provide conditions for convection - the natural transfer of heat by air. Let us indicate the required distance from the window sill to the radiator, as well as the main installation recommendations, as conditions for maintaining high efficiency.
Window sill board.
When installing marble window sills in an apartment or private house, many focus only on the upper gap of 100 mm, completely forgetting that by choosing an overly protruding, wide window sill, you can disrupt not only the thermal cutoff of cold air, but also change the overall air circulation along the windows. The window sill board should not block the radiator, creating a kind of niche for the battery, suggesting an enveloping movement of heat along it. Unfortunately, a specific size cannot be recommended, and the protrusion of the board should minimally interfere with air convection near the radiator and move it away from the glass.
Radiator mounting.
Before drawing the first mounting point on the wall, carefully study the included instructions for the radiator, as... Most manufacturers inform about the recommended installation gaps that ensure high heat transfer of this particular battery. In the absence of such recommendations, they use general ones, according to SNiP 3.05.01-85. "Internal sanitary systems":
The minimum distance from the bottom of the window sill to the radiator is 100mm, since reducing it reduces the heat flow of air. From the floor to the bottom of the radiator, the gap is in the range of 100-150mm, and increasing the distance increases the temperature difference in the entire room, and decreasing it again reduces the intensity of heat transfer
It is also important to take into account the distance from the wall to the radiator; it is made 25-30mm, because the rear surface also actively participates in heat exchange. If the factory recommendations differ from SNiP, they are guided by the manufacturer who developed the battery.
If the factory recommendations differ from SNiP, they are guided by the manufacturer who developed the battery.
The efficiency of its operation and the comfortable temperature in the room depend on the correct installation of the heating device. For the efficient operation of the heating system, it is important not only the correctness of its assembly, the quality of the equipment and the tightness of the connections, but also compliance with the standardized distances from the heating devices to the surrounding structures (floor, walls, window sill)
It is especially important to maintain the distance from the battery to the window sill, because obstacles from above can interfere with the normal circulation of convection currents. We will list the standards for installing heating radiators in an apartment and a private house. Today you can find radiators on sale in different designs and from different materials.
Today you can find radiators on sale in different designs and from different materials.
They are also divided according to installation methods and come in the following types:
- Floor-standing devices have special legs for installation on the floor in the room. In any case, such radiators are installed at some distance from the wall surface and the protruding horizontal structures of the window opening.
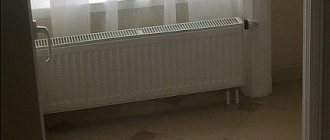
- Wall-mounted radiators are mounted on supporting brackets fixed to the walls of the room. They are usually installed under window openings so that rising convection currents create a thermal curtain in front of the window, because it is through the glazing that the room loses the most heat.
In any case, when installing a heating device, you must follow the rules for installing batteries. It is easiest to maintain the required distance from the wall to the unit when hanging on walls, because in this case special brackets are used, which, due to their configuration, provide the required clearance. When installing a floor-standing device, the distance will have to be adjusted manually.
Alternative
Of course, you can save space by using furniture. For example, put a kitchen island with everything you need for cooking or a small corner equipped with everything you need. However, this will not really solve the problem, especially if there is a large window and you want a wide window sill, which will also take up some of the space. There is a good option - to combine business with pleasure.
Positioning the kitchen along the window is a design solution that is far from new, but very popular. Especially when it comes to a small room. Usually the entire wall along the window is empty if furniture is placed along other walls. And it turns out that the use of space is not entirely rational. If furniture and interior items are placed along the wall with a window, then along the other two you can organize a relaxation corner and a dining area.
This option has another plus - light and air. That is, it turns out that in case of strong fumes, in addition to the hood, you can open the window and quickly ventilate the room, getting rid of heavy odors. However, there is another side to the coin. In the case of the sunny side, bright light can interfere with cooking, so if you still decide to install the kitchen along the window, you can close the window with special blinds or shutters to protect from the bright sun. Another important detail in this arrangement of the room is the absence of curtains and drapes. They will not only be inappropriate, but also dangerous, because there should be a stove or hob nearby.
Battery
Another seeming obstacle to conquering space is the battery. It is no secret that in most rooms the battery is located strictly under the window. When installing furniture there, you need to come up with a good way out of the situation. In principle, you can go in two ways: complex and simpler.
Battery transfer
This is rather a very difficult path. After all, it is impossible to do this on your own, without the skills and, most importantly, special equipment. More precisely, it is possible, of course, but the one who does it will be responsible for the consequences. In this situation, the old fittings along with the pipes are cut off. From the remaining ends of the pipes, special polypropylene or other polymers intended for this product are carried to the desired place where the battery will be located. After which everything is welded back.
Decoration
The furniture can be placed under the window sill, leaving a gap for the battery. You can cover it with a decorative screen or decorate it a little yourself. For example, paint it in an original way. If, for example, the color of the furniture is black or white, you can paint it in the spirit of a piano with keys, but if the kitchen is multi-colored and suggests the presence of bright colors, then it would be appropriate to paint the radiator in a rainbow pattern.
Hide and forget
Another simple way would be to disguise the battery, for example, under a false wall. To do this, it is enough to make a sheathing from a metal profile, and then tighten everything with plasterboard, leaving special ventilation or vents with doors. In this case, the wall will look quite neat along with the furniture.
Conclusion
Furniture placement is an important issue, especially with small rooms, so it’s worth planning and thinking about everything several times before taking action.
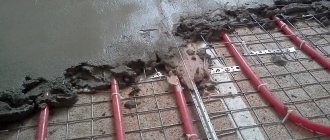
Features of installation of in-floor radiators
These include:
- pressure in the heating system. In-floor water batteries are among the most popular solutions for heating private households, since the pressure in an autonomous radiator heating structure is relatively low and almost never exceeds 2.5 atmospheres. It should be noted that experts do not recommend using such floor radiators for centralized systems, since the coolant supply standards in them require a pressure of 6-12 atmospheres and for this reason the floor heating system will quickly become unusable. In cases where it is impossible to do without built-in radiators, copper batteries should be installed that can withstand a working pressure of 10-15 atmospheres;
- room height. The thermal power of radiators built into the floor, and accordingly the cost of heating equipment, directly depends on how high the ceilings are. The larger the cubic capacity of the room, the greater the volume of air that requires heating. Heat transfer efficiency is calculated in the ratio of 1 kW per 10 “squares” of area;
- When installing underfloor water heating, it is necessary to ensure the supply of all power supply systems. These works should be included in the construction estimate at the design stage of the house or when planning repairs, otherwise it is impossible to ensure the normal functioning of the heating system. The only solution will be to install an electric convector;
- selection of equipment. Currently, choosing heating equipment built into the floor depending on your wishes is not a problem. The assortment is large and the system is chosen based on the materials of the radiators, their shape and size. As a rule, water radiators have a standard design solution, and the instructions for their operation are not much different. Some models are equipped with powerful fans, thanks to which the heat transfer of heated air from the radiators into the room is significantly increased, since the circulation of air masses improves, which means the heating system works more efficiently;
- when radiators are installed in the floor, the dimensions of the channels are determined depending on the parameters of the housing. Experts recommend making them 110 millimeters deep and 190 to 400 millimeters wide. Depending on which installation method is used, the distance from the floor to the radiator can be from 10 to 80 centimeters.
Plastering metal and metal surfaces - preparation for plastering and cleaning
Types of plaster - a brief excursion
Before we talk about preparing metal surfaces for plastering, it is necessary to determine the general requirements for what the plaster should be like. As a rule, a distinction is made between ordinary and decorative plaster. Conventional plaster is made with cement, limestone, clay and other solvents, which turn gray after drying. Therefore, surfaces plastered with conventional solvents must be painted with aqueous or non-aqueous paint mixtures. Decorative plaster is made with colored solvents, to which pigments are added, as well as colored glass, mica or other decorative fillers. This plaster does not require painting, so it is used for the facades of houses, as well as internal surfaces (halls, vestibules, etc.) in public buildings. Before the start of plastering work in the premises, all general construction and special work must be completed. Partitions, window and door frames, mounted ventilation, and hidden electrical wires must be installed and secured. When plastering metal surfaces, builders advise choosing regular plaster. Moreover, instead of wet plastering with various mixtures and solutions, the internal surfaces can be lined with sheets of dry plaster. The requirements for such surfaces are the same as for plastering them with solutions. In general, plastering metal surfaces is no different from plastering brick or stone surfaces, but you need to know some features. When plastering brick surfaces, some metal elements are often used, as an example of which we can consider plastering metal surfaces.
Recommendations from experts
- In order for air circulation near the radiator to be of high quality, it is necessary that the distance between the inner surface of the heat-insulating layer and the battery be at least 3 - 4 cm. If this gap decreases, then air circulation will be difficult, convective exchange will be disrupted, and as a result, the efficiency of the heating system will decrease.
- If the placement of heating radiators does not allow the wall to be insulated with a special heat-insulating material, then foil is attached to the inner surface of the wall facing outside.
- Since heating devices are most often located under window sills, a board that protrudes above the radiator prevents warm air from spreading upward. Therefore, the battery is mounted on an external wall, and the distance from the floor should be up to 10 cm, while the gap between the window sill and the battery should be at least 8 cm.
- For purely aesthetic reasons, decorative screens are installed near the radiators, which block the heating radiator and prevent the flow of thermal energy from the heating device into the room. In this case, the room will be heated by convection, and this will significantly reduce the efficiency of the system.
If there are large windows in the room, then use batteries 30 cm high and in this case condensation will not appear on the glass.
The distance from the radiator to the floor should be 5 - 10 cm, to the window sill and to the wall 3 - 5 cm.
The radiator is installed at an angle of 90 degrees, since any deviation from the norm leads to corrosion of the heating device, as well as to the accumulation of air.
Height calculation
The distance between the radiator and the window sill must be at least 10 cm, regardless of what type of heating device is used. You also need to take into account the height of the battery itself. It is necessary to retreat 8 cm from the rear. The battery itself should rise above the floor by 10 cm, that is, when installing a window sill from the floor according to SNIP, you will need to retreat 70-80 cm.
The projection of the window sill also plays an important role.
: It may extend significantly from the wall or be invisible. If there is no radiator under the window, it is not necessary to meet any requirements, but if heating is present, the projection must be strictly regulated. The task of the window sill is to redirect heat flows. Without it, they will rise upward, and proper heating of the room will not occur, since some of the heat will evaporate and be distributed on the ceiling.
Poor convection can also be caused by a window sill that is too wide. It will not allow warm air to escape, as a result, condensation will begin to accumulate on the window, since the main air flows will go up, and some of them will get stuck under the window, heating the atmosphere
In this case, it is very important to calculate the distance from the window sill to the heating radiator, both in height and how much of a protrusion can be made. You can avoid the problem described above by using a slab that does not extend beyond the wall by more than 8 cm
Tip: when calculating the dimensions, you need to take into account the level of the wall with decoration.
The best option is a solution in which no more than 10% of warm air will be retained in the window niche. To do this, the window sill should not protrude more than 6 cm beyond the radiator, but it should not be shorter than the heating device. If the design solution of the room requires the installation of non-standard wide structures, it is necessary to provide ventilation holes in them. Their size must be sufficient for proper air circulation.
Is clearance necessary?
Some window owners believe that the window sill extends deep under the window frame, but this is not the case. The distance between the window and the window sill is approximately 10 mm. Otherwise, the structure may become deformed. The fact is that under the influence of warm air, the material from which the slab is made expands. The gap is left so that the structure can take the desired shape without being damaged. Visually, this technique is invisible.
How to position the curtain?
The distance of the window sill curtain also plays a role. In order for the curtains to move without clinging, without leaving marks on them, and for warm air to circulate freely, the distance must be at least 5 cm.
Conclusion: it is not always possible to apply the standard distance from the floor, radiator, curtains to the window sill, but you can find a way out by observing certain requirements.
Video: Installation of heating radiators (batteries)
Calculation of heating radiators
In conclusion, it is necessary to focus on the question of how to calculate the number of heating radiators per room or other premises. The required number of sections can be determined in several ways:
The required number of sections can be determined in several ways:
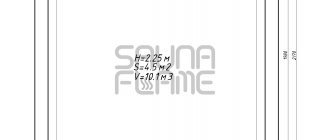
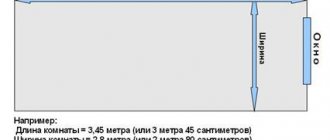
- Based on the area of the room. This method is suitable for rooms with low ceilings (within 3 m). To do this, you need to multiply the number of square meters of room area by the required amount of heat per meter, according to SNiP this is 100 watts. For example, 20 sq.m will require 20x100=2000 W. Then the required amount of heat is divided by the heat transfer of one radiator section indicated in the technical data sheet. The resulting number of sections of the heating device is rounded up to a whole number.
- Based on the volume of the room. This method is relevant when calculating radiators for rooms with high ceilings or staircases and, in addition, is more accurate than the above method. According to regulatory documents, for heating 1 cubic meter. m. of indoor air requires 41 W of thermal power. Accordingly, multiplying the volume of the room by 41, the required amount of heat is obtained, which is then also divided by the heat transfer power of one section and the resulting value is rounded to a whole number. Buildings equipped with modern double-glazed windows require less heating power - 34 W/cub.m. It should be borne in mind that manufacturers are often cunning and indicate heat transfer indicators at the maximum temperature of the coolant, so when making calculations it is necessary to start from the minimum parameters of the heating device.
- A more accurate calculation can only be made by specialists, since this takes into account many parameters, coefficients and tabular values indicated in the regulatory documentation. These include: the amount of heat for a room depending on its location and value, room area, glazing and thermal insulation coefficients of enclosing structures, coefficients taking into account the number of external walls, ceiling heights, type of rooms above and below, outside air temperature in the coldest week and five days and much more. Therefore, to obtain such an accurate thermal calculation, it is necessary to contact an organization specializing in these services.
As can be seen from the materials in this article, choosing radiators of the required size and thermal power is an important step to ensure comfortable living in the house. If you do not pay due attention to this procedure, then you can subsequently forget about the comfort of the room.
- How to fill water into an open and closed heating system?
- Popular floor-standing gas boiler made in Russia
- How to properly bleed air from a heating radiator?
- Expansion tank for closed heating: device and principle of operation
- Gas double-circuit wall-mounted boiler Navien: error codes for malfunctions
Recommended reading
How to make the right choice of heating radiators for a private home? What are the best bimetallic heating radiators to choose? Which heating radiators are better to choose: aluminum or bimetallic? Selection of heating radiators: traditional and alternative options
2016–2017 — Leading heating portal. All rights reserved and protected by law
Copying site materials is prohibited. Any copyright infringement will result in legal liability. Contacts
The kitchen along the window is not scary
An eternal problem is lack of space. Especially in the kitchens of old houses, where this room was not given enough space and most of them today are from 6 to 9 squares, which is very small. Once you look at a photo of such a room, you immediately wonder how to properly arrange it so as not to reduce the space and accommodate everything you need.
Some people solve this problem with square footage by combining several rooms or making a kitchen-studio, that is, a separate corner for cooking and a living or dining area. This is a fairly good option, but not everyone agrees, especially if the apartment is one-room. On the one hand, the kitchen automatically becomes visually larger, and on the other, you get the feeling of sleeping in the dining room.
What sizes are there?
Radiators are available in the following sizes.
Cast iron
According to the specification, standard dimensions:
- Width - 93 or 108 mm.
- Depth from 85 to 140 in increments of 5.
- Height - 588.
Sections made to order can have almost any size.
Knowing the length, the dimensions of the assembled device are determined, since a paronite gasket 1 cm thick is placed between the parts.
If installation is carried out at a point with insufficient space, add the size of the flushing tap.
Important! The distance between the axles is usually 500 mm. Small batteries with a value of 350 are rare
Each section is capable of delivering from 160 W if the average daily air and coolant temperatures differ by 70 degrees. Cast iron can withstand operating pressure up to 9 atm.
Aluminum
Different models have similar internal dimensions. The width is 80 or 88 mm. Depth varies in the range of 10-90 mm. The height is 50 or 35 cm. Models for the bathroom reach three meters in length.
Photo 1. Aluminum radiator model Indigo 500/100 with side connections, section power 196 W, , Russia.
The power of the sections depends not only on the dimensions, but also on the fins of the structure. Low ones develop 150-170 watts, and 500 mm - 185-220. Aluminum can withstand almost twice the pressure than cast iron.
Bimetallic
Standard values are in the ranges:
- Width 80-82 mm.
- Depth 75-100.
- Height 400-420, 550-580.
Power depends on the size, but rarely exceeds 200 watts. This type of section is known for its ability to withstand high pressure, which is due to the steel core. The operating value reaches up to 30 atm, and the test value is 50.
Bimetallic heating radiators, which ones are better, selection instructions
The first heating radiators made from two metals (bimetallic) appeared in European countries more than sixty years ago. Such radiators coped well with the assigned function of maintaining a comfortable room temperature during the cold season. Currently, the production of bimetallic radiators has been resumed in Russia; the European market, in turn, is dominated by various radiators made of aluminum alloy.
Which bimetallic heating radiators are better?
Bimetallic radiators are a frame made of steel or copper hollow pipes (horizontal and vertical), inside which coolant circulates. Aluminum radiator fins are attached to the pipes outside. They are attached using spot welding or special injection molding. Each section of the radiator is connected to another by steel nipples with heat-resistant (up to two hundred degrees) rubber gaskets.
Bimetallic radiator design
In Russian city apartments with centralized heating, radiators of this type can withstand pressure up to 25 atmospheres (with pressure testing up to 37 atmospheres) and, thanks to their high heat transfer, perform their function much better than their cast-iron predecessors.
Radiator - photo
Externally, it is quite difficult to distinguish bimetallic and aluminum radiators. You can make sure that your choice is correct only by comparing the weight of the specified radiators. Due to the steel core, the bimetallic one will be approximately 60% heavier than its aluminum counterpart and you will make an unmistakable purchase.
The structure of a bimetallic radiator from the inside
Positive aspects of using bimetallic radiators
- Bimetallic panel-type radiators fit perfectly into the design of any interior (residential buildings, offices, etc.) without taking up much space. The front side of the radiator can be one or both; the size and color scheme of the sections are varied (self-painting is allowed). The absence of sharp corners and overly hot panels makes aluminum and steel radiators suitable even for children's rooms. In addition, there are models on the market that are installed vertically without the use of brackets due to additionally present stiffening ribs.
- The service life of radiators made from an alloy of two metals reaches 25 years.
- Bimetal is suitable for all heating systems, including central heating. As is known, low-quality coolant in municipal heating systems negatively affects radiators, reducing their service life, but bimetal radiators are not afraid of increased acidity and low quality coolant due to the high corrosion resistance of steel.
- Bimetallic radiators are the standard of strength and reliability. Even if the pressure in the system reaches 35-37 atmospheres, this will not damage the batteries.
- High heat transfer is one of the main advantages of bimetal radiators.
- Regulating the heating temperature using a thermostat occurs almost at lightning speed due to the small cross-section of the channels in the radiator. The same factor allows you to halve the volume of coolant used.
- Even if there is a need to repair one of the radiator sections, thanks to the well-thought-out design of the nipples, the work will take a minimum of time and effort.
- The number of radiator sections required to heat a room can be easily calculated mathematically. This eliminates unnecessary financial costs when purchasing, installing and operating radiators.
Negative aspects of using bimetallic radiators
- As mentioned above, bimetallic radiators are suitable for use with low-quality coolant, however, the latter significantly reduces the service life of the radiator.
- The main disadvantage of a bimetallic battery is the different expansion coefficient of aluminum alloy and steel. After prolonged use, creaking may occur and a decrease in the strength and durability of the radiator.
- When operating radiators with low-quality coolant, steel tubes can quickly become clogged, corrosion can occur, and the level of heat transfer can decrease.
- A contested disadvantage includes the cost of bimetal radiators. It is higher than that of radiators made of cast iron, steel and aluminum, but considering all the advantages, the price is completely justified.
How far should the window sill protrude from the wall?
The width of the model has a functional and aesthetic meaning, which participates in heat exchange, increases the usable area and is the finishing touch of the renovation.
In the kitchen, this element is used as an additional countertop. In other rooms this is a place for plants, so choosing the optimal width is very important.
When replacing window structures, owners want to make maximum use of the usable area and do not know how far the window sill should protrude from the wall.
A model that is too wide will interfere with normal air circulation, the room will not warm up properly, and the glass will fog up.
If non-radiator type heating is used, then you can install a model without a protrusion or a wide 0.5-0.7 m element.
The best arrangement for a PVC and wood slab is to extend it by 6 cm. For wider models, manufacturers provide technological holes for the circulation of warm air with a diameter of 1.0-1.5 cm.
Installation with a protrusion of more than 6 cm is possible by covering the radiator with special ventilation grilles or by choosing a battery with a horizontal flow of heat output. Installing a model made of stone, which does not transmit heat well, requires a protrusion of no more than 5 cm.
Floor convectors
Another common way to heat a room with panoramic windows is to install floor convectors. This option is simpler than in-floor ones in terms of installation - you don’t need to prepare a special niche on the floor, just place the model in the area next to the power source.
Among the advantages of floor heaters are:
- compactness and stability. Many models are equipped with durable legs that support the entire structure;
- small dimensions. Thanks to the design features, it is possible to create very miniature models;
- ease of operation and maintenance. There are no difficulties, everything is very easy.
But there is also a drawback: such heaters do not provide enough heat; they can be used as auxiliary equipment.
Design, technical characteristics and features
Structurally, these heating devices are sectioned batteries consisting of two different metals: steel and aluminum.
The steel part of the radiator has direct contact with water or other coolant, and heat transfer is carried out by aluminum plates with excellent heat conductivity.
Due to the successful combination of the properties of these metals, bimetallic radiators have the following advantages:
- High heat transfer coefficient;
- Pressure up to 4 MPa;
- Corrosion resistance;
- Silence;
- Can work in networks with any pipes;
- Thanks to the sectional design, you can dial any estimated number of sections.
The height of radiators is usually 26, 42 or 58 cm. The standard center-to-center distance is 200-800 mm. The width of one section is usually 80 mm.
This choice of geometric dimensions allows you to install bimetallic radiators in any niches, under regular and panoramic windows.
Bimetallic radiators are coated with durable polymer paint, which reliably protects them from external influences and corrosion, in addition, they have a very attractive appearance.
In closed heating systems with a pH of 7 to 9, where the dissolved oxygen content is extremely low, the steel of the internal structures is almost not subject to corrosion, and rusting occurs only when the system is aired.
After some time, a dark, insoluble sediment forms on the inner surface of new radiators, preventing their destruction.
Thermal power (heat transfer) is the main technical characteristic of heating devices that determines their efficiency. For bimetallic radiators, this figure ranges from 100 to 200 W, depending on the height of the area of the aluminum plates.
This property is due to the excellent heat transfer of aluminum.
Aluminum radiators, which have similar heat transfer, but a lower price, resist corrosion much worse, and when the coolant reacts alkaline, they also emit hydrogen, as evidenced by noise and bubbling in the pipes.
They are distinguished from cast iron or steel sectional batteries by their compact size, light weight and attractive design, while the thermal power of bimetal radiators is higher. Their resistance to internal corrosion differs slightly.
In terms of resistance to increased pressure and water hammer, bimetallic radiators have no worthy rival: they can easily withstand pressure of 3-4 MPa. This indicator for cast iron and steel radiators does not exceed 2 MPa, for aluminum radiators – 1.6 MPa.
This feature is especially important for residents of high-rise buildings, where there is significant pressure in the heating system.
The only drawback is their price - it is higher than other heating devices. However, high reliability and efficiency completely compensate for this drawback.
Washing
If you want to get a modern kitchen design, washing under the window is an excellent solution that has many advantages. Most often, the window is not involved in space optimization. By placing a sink underneath it, you will free up some space for other tasks. You can also save a little on electricity by getting more natural light from the window.
Frosted glass is an excellent analogue to curtains
Having made the choice to place the work area along the window, you need to pay special attention to the curtains. As a rule, it is very difficult to maintain perfect cleanliness where people cook.
Therefore, textiles should be practical and not interfere with the cooking process. Short curtains or blinds are perfect for this.
Modern sunny style
Colorful elements in a bright kitchen make it more interesting
The disadvantage of placing the sink under the window is the additional costs involved. The main costs are the transfer of communications. For example, the most pressing issue will be battery transfer. What can be done to successfully implement such a project?
Connection diagrams
Before installing a heating radiator yourself, decide on the method of connecting it to the network. The most commonly used schemes are:
- Lateral (one-sided) installation scheme for heating radiators, in which the pipe supplying hot coolant is connected to the upper pipe of the heating device. The outlet pipe is connected to the bottom one. This ensures high heat transfer. When connecting the other way around, when the supply pipe is connected from below and the outlet pipe from above, the heat transfer is significantly reduced. Such a connection in a one-pipe system requires the installation of a jumper to facilitate the operation of the system.
- The second, diagonal connection of the heating radiator is as follows. The pipe supplying hot coolant is connected to the upper branch pipe of the battery, and the “return” is connected below, on the opposite side of the heating device. This connection is advisable if the battery is long and has a large number of sections. The diagonal design guarantees maximum heat transfer. But if the supply pipe is connected from below and the outlet pipe from above, the heat transfer will decrease by 6-10%.
- The last method - connecting heating radiators from below - is used when the consumer wants to hide heating pipes in the wall, in the floor or near its surface. With it, the forward and return pipes are connected from the bottom of the radiator, but from different sides. This connection scheme (otherwise called “Leningradka”) is characterized by aesthetics, as well as low heat transfer. Heat loss is up to 15%.
You can ask the specialists how much it costs to install a heating radiator, and perhaps agree to their services. Experienced craftsmen will tell you which connection scheme to choose and what auxiliary elements will be needed for installation.
Sequencing
It is necessary to thoroughly insulate and install double glazed windows!
So, the legal and technically correct sequence of actions if you want to place a heating radiator on the balcony consists of the following steps:
- insulation of external walls;
- coordination of redevelopment, obtaining relevant permits and conclusions;
- choosing the optimal type of radiator and installation method;
- wall preparation - installation of thermal insulation, finishing;
- direct installation.
If you are firm in your intentions, then for apartment buildings it is recommended to move the radiator from the room to the balcony, and not to install an additional one, which will immediately significantly reduce the efficiency of the general building system - this is unlikely to please the neighbors and will entail inspections.