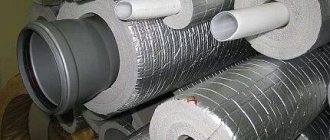
Inserting HDPE pipe into the well
One of the most important technological operations performed during the construction of water supply and sewerage networks is the insertion of a pipe into a well. If it is potable, then high-quality sealing of the walls, including at the points where they connect to the pipes, will prevent dirty surface water from entering it. For sewer systems, it is important to prevent untreated wastewater from entering the ground. Inspection wells contain instruments and shut-off valves that should not be flooded with water. A short instruction and video in this article will help you cope with this task.
Design of a system with a sewer well ↑
There are internal and external sewerage systems. The layout of the internal system depends on the number of plumbing fixtures and the features of their connection. The external structure depends on the design of the storage or treatment tank. Wastewater is discharged either into a septic tank or into a sewer well. Here they accumulate or are filtered depending on the purpose of the structure. External systems can be of different types:
- Separate. They consist of several pipelines through which melt water, rainwater, and household waste flow into various reservoirs. This system allows for rational use of water and high-quality purification of household wastewater.
- Semi-separated. There is one reservoir for collecting wastewater, but water enters them through different pipelines.
- General alloy. Such systems are rarely installed in private homes. All waters flow into them - wastewater, melt, rain.
Elements of external sewerage
Self-contained septic tank systems are typically designed to collect and/or filter domestic wastewater. Tanks can be made from different materials. To decide how best to install a sewer into a well, you need to focus on the type of container, the material from which it is made, and the features of the pipes.
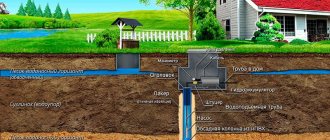
Scheme of a system with a sewer well
Country well water supply diagram
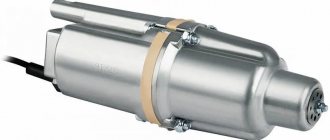
The main working mechanism on which the water supply structure is attached is a pump, which can be submersible or surface. The first type of equipment is located at the very bottom of the well, at a distance of 0.5 m to the bottom. It is suspended on a cable to which a pipe is attached that supplies liquid to a living space or garden area. Construction methods can be different, depending on the material used and the depth of the well.
Wiring is installed inside the house, through which water can flow into the bathroom and kitchen. The more points of water consumption, the larger the diameter of the route. To regulate the water pressure, a hydraulic accumulator is required. For preservation you will need a drain valve. If hot water is needed, a water heating boiler is installed.
Features of materials for the manufacture of wells ↑
Filtering or storage tanks are made of concrete, reinforced concrete, metal, and plastic. All these materials have their advantages, and the features of inserting sewer pipes into wells largely depend on their strength and thickness:
- Concrete and reinforced concrete. The most reliable and practical materials for the construction of storage tanks. They are characterized by high mechanical strength. If properly waterproofed, the tanks will be completely sealed. At the same time, the greatest number of difficulties arise when installing sewerage into a concrete well. The material is thick, durable and difficult to process with tools.
- Metal. Not the best choice for an autonomous sewer system for a private house. Even the highest quality metal tanks last no more than 10-15 years. They quickly collapse under the influence of moisture and chemicals. But it is much easier to arrange the entry into a metal sewer well than into a concrete one. You can always make a hole for the pipe, which will not be much larger than its diameter. This makes it easier to seal the insertion site.
- Plastic. In recent years, industrially produced plastic containers have been increasingly used. They are impermeable to water, do not require additional waterproofing, and tolerate aggressive chemicals well. Problems rarely arise with inserting a pipe into a sewer well, because... ready-made structures are often supplied with all the necessary components. The main thing is not to make a mistake with the diameter.
Welded plastic construction
Advantages of autonomous water supply
The main advantage of autonomous equipment is that it is possible to obtain water similar in quality to spring water. The water is free of: rust, chlorine, bacteria. Other advantages of such equipment include the following:
- Budget savings. When running a water supply from a well to a house, costs are significantly saved; people use natural water without paying for its consumption. In addition, the installation of such water supply is much cheaper than other types of sources.
- Independent control over the operation of the system. You can regulate the water pressure yourself, lay new pipes to the bathhouse, to the summer cottage.
- Lack of harmful substances (chlorine) that are added to purify water.
- You don't have to fill out a lot of paperwork. To obtain permission to drill a well, you will have to collect a lot of documents and go through more than one authority, but with an autonomous water supply system you can forget about these troubles.
Even if there are power outages, you will not be left without water; you can get it in a simple way by lowering a bucket into a well.
What pipes are used for arranging systems ↑
The features of inserting into a sewer well partly depend on the material and diameter of the pipes. Usually ceramic, asbestos-cement, cast iron, and polymer products are used. There are other varieties, but they are used much less frequently - in exceptional cases.
Option #1: ceramics ↑
It is difficult to imagine a more durable material. It has been used for centuries to make sewer pipes. The most popular diameters are 100-600 mm, material thickness is 20-40 mm, product length is up to 1500 mm. The length of the segments and wall thickness depend on the selected diameter. There are two main types of ceramic pipes - threaded and socketed. You should choose based on the features of the system. The advantages of ceramic products include smooth internal surfaces, resistance to most types of negative influences and ease of installation. There is only one serious drawback - low mechanical strength. Due to the relatively short length of the segments, the system has to be installed with a large number of bends and joints. This negatively affects its tightness.
Option #2: cast iron ↑
Cast iron elements of external sewerage are a classic of the genre. For autonomous systems of private houses, products with a diameter of 160 mm are most often chosen. Material – gray cast iron. It is not afraid of mechanical damage and is resistant to corrosion. When there are temperature changes, cast iron does not lose its performance properties. It can serve for several decades. There are also disadvantages. Due to the rough internal surfaces of pipes, deposits appear on them, which over time become compacted and narrow the diameter. There are also difficulties during installation. This is due to the large weight of the products. When choosing cast iron, you should pay attention to the type of soil. The material does not tolerate contact with saline soils.
Option #3: plastic ↑
Polymer materials are lightweight, easy to install, and are resistant to chemicals. The most common material for making products is polyvinyl chloride. One of its main advantages is its reasonable price. Depending on the installation conditions of the system, you can select the class of pipes:
- L (lungs). Suitable for laying in shallow trenches - 0.8-2 m.
- N (medium hard). They are used for systems located at a depth of 2-6 m.
- S (hard). Can be used for laying in ditches up to 8 m deep.
Inserting a sewer pipe into a well ↑
- The pipeline is laid from the outlet from the house to the sewer well at a slight slope. The pipe must run in a straight line, without bends or corners. Any bends, dips and differences can cause blockages and disruption of the entire system.
- The depth of the pipeline should be below the soil freezing level, but above the aquifer. If it is not possible to lay pipes at the required depth or the system is installed in an area with a harsh climate, it is additionally insulated with foam plastic.
- Joints and seams are treated with silicone plumbing sealant, and uneven edges of pipe sections are ground to facilitate assembly.
Input of sewerage into a well
- At the point of entry into the well, a hole is made with a slightly larger diameter than the cross-section of the pipe. This is necessary to avoid problems when inserting. If the well is plastic, then special inputs are provided in advance.
- For a septic tank and a differential well, the pipe is cut flush with the inside of the tank wall.
- If the pipes are made of asbestos cement, ceramics or cast iron, they are concreted in the hole. The sealing solution is prepared from cement and sand (1:3), special liquid plasticizers are added. Plasticizing substances are diluted in the proportions indicated on the packaging. Most often, 1 liter is enough per 100 kg of solution.
- Instead of a solution with a plasticizer, you can use ready-made cement paste for cracks and joints in concrete.
Inserting a pipe into a manhole
Sealing the pipe insertion point ↑
- The entry of the sewer pipe into the well is sealed with liquid glass or penetrating compounds.
- For sealing, you can use Hydrotex or Penetron. These are penetrating waterproofing agents. When they react with concrete, they form hydrophobic crystals, improve the structure of the material, and increase its strength.
- To seal HDPE pipes, special kits are used, which can be purchased at hardware stores.
- A drainage sleeve made of crushed stone is created around the well. Select material of large and small fractions, filling them in layers in turn between the walls of the well and the pit.
Types of plastic wells
Scheme for sealing the joint between concrete and plastic pipe
Scheme for sealing the joint between a pipe and concrete on one side of a concrete wall:
Scheme for sealing the joint between a pipe and concrete on both sides of a concrete wall:
Video: entering a sewer well ↑
You should only take on the design and construction of an external sewer system yourself if you are 100% confident in your abilities. Any errors are fraught with problems during operation of the system. Therefore, if in doubt, it is better to contact professionals.
A leak in a well can seriously affect the quality of drinking water. Through a seemingly small hole in the concrete shaft, household wastewater and technical fluids spilled on the ground will begin to penetrate. Sand will fall off from the horizons lying above the aquifer, which will negatively affect transparency. It's unpleasant, isn't it?
To restore the integrity of the well shaft, a quickly hardening composition will be required, which will allow you to quickly eliminate the defect in the concrete structure. A hydraulic seal for a well will eliminate leaks, large and small cracks forever. We will tell you how to choose it correctly.
We describe in detail the process of applying the repair composition. We offer recipes for making fillings yourself. The information is supplemented by useful diagrams, photos and video tutorials.
Construction and equipment of a technical water well
When introducing a water supply system into a country house, it is necessary to equip a place for installing shut-off and control valves and metering devices. As a rule, the best option for this is to construct an underground technical well, where communications and equipment will not be subject to freezing.
- The role of a technical well in the water supply system
- Excavation and caisson construction
- Introductory part of the highway
- Construction of a water supply manifold
- Equipment in the caisson of the pumping station
- Video on the topic
Types of seals for hydraulic structures
Previously, before the invention of hydraulic seals, wooden boards, hemp and jute materials were used as plugs for wells. A significant drawback of outdated types was rapid delamination and decay, which led to a deterioration in the quality composition and taste of well water.
With the invention of the hydraulic seal, it became much easier to eliminate leaks and operate wells. Modern manufacturers of building materials offer ready-made waterproofing compositions based on polymer materials.
However, many well owners and professional repair teams prefer to use self-made seals, rightly believing that this will lead to cheaper repair work without loss of quality.
Hydroseals are divided into two types:
- Pressure, quick-hardening mixtures . It takes 10 to 60 seconds for them to harden. A special repair compound that has waterproofing properties is applied over such a seal.
- Non-pressure, hardening within 5-7 minutes . Such mixtures are used not for emergency work, but for preventive work, for example, planned insulation of seams.
We'll look at each option in more detail below.
Waterproofing grouting materials (water seals) are often used in emergency cases, when the time of hardening determines how much water will run out or seep in, thus the amount and severity of damage that can be prevented depends on the quality and correct use of the water seal.
High-quality hydraulic seals can eliminate leaks in 30 seconds, stopping the flow up to 7 atmospheres!
Waterproofing seals are used in the following cases:
- to protect drinking water in a well from groundwater penetration
- plugging water breakthroughs in basements, adits, wells
- isolation of a breakthrough in places of contact of the floor, walls, between foundation blocks
- hermetic sealing of seams and cracks in wells
- express pipeline repair.
Waterproofing tasks
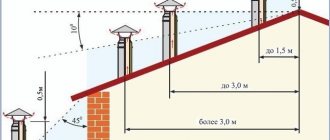
Waterproofing the chimney pipe on the roof is carried out during the final stage of roofing work, so some developers neglect this technological operation in order to save time or money. However, unsealed seams of parts cause leaks and accelerated wear of the structure. High-quality chimney sealing is a comprehensive solution for the following tasks:
- Improving the safety of stove heating. The chimney of the stove, especially if it is solid fuel, heats up to high temperatures, so its outlet on the roof is isolated from the flammable wooden frame.
- Increased energy efficiency. Thanks to insulated seams, heat loss through the roof slope is reduced, which leads to fuel savings and, consequently, lower heating costs.
- Condensation protection. Waterproofing the chimney allows you to maintain the temperature of its walls to reduce the process of condensation.
Exiting the chimney through the roof
Experienced craftsmen note that in addition to practical tasks, sealing the joints between the chimney and the roofing material performs aesthetic functions, making the appearance of the roof more complete and organic.
Ready-made waterproofing seals
Ready-made hydraulic seals for concrete wells are very convenient: to use such a seal, it is enough to dilute the solution with water according to the manufacturer’s instructions. Let's look at the most popular waterproofing sealing mixtures.
Option #1: water plug. This mixture contains fine-grained quartz sand, aluminum cement, and active chemical additives that give the composition plasticity and allow it to quickly harden. Using this type of seal, you can quickly eliminate a leak within 2 minutes.
The waterplug can be used at temperatures from +5 to +35 degrees. It is used in waterproofing swimming pools, underwater bridges and similar structures. Among the disadvantages of this hydroseal is the need for dilution with warm water +20-25 degrees, which in some cases is not entirely convenient.
Option #2: peneplug. Available in the form of a dry powder that must be diluted in water. This mixture is intended for waterproofing concrete wells, as well as wells paved with brick, natural or artificial stone. The hydroseal is based on high-quality cement, quartz sand and polymer additives.
This mixture is capable of stopping a leak with a pressure of more than 5 atmospheres. Hardening time 40 seconds.
Option #3: powder ex
A fast-acting waterproofing seal that sets within 10 seconds after application. This filling has excellent characteristics: frost resistance, resistance to aggressive environments, ease of use.
The disadvantages of this mixture include high cost and the inability to work at temperatures below +5 degrees.
After using any chemicals to perform repair operations, well water should be submitted for analysis to the SES or a laboratory accredited to conduct this type of research. Studying the composition of the water will help to find out whether there are any sources of pollution left in the mine, or whether the repair material has affected the quality characteristics.
Technology of using ready-made compounds
Ready-made waterproofing seals are most often used to seal leaks when the water that leaks or leaks can cause serious damage.
When using ready-made hydraulic seals, it is necessary to strictly follow the work technology:
- Surface preparation . At this stage, using a perforator or hammer, it is necessary to clean the surface of the well from exfoliated concrete. However, first the surface must be cleaned of dust, dirt, and mold.
- Expansion of the repaired area . It is necessary to widen the hole by 20-30 mm and deepen the hole by 30-50 mm. This is done in order to “refresh” the edges of the hole. In this case, you should try to give the sealed crack the shape of a funnel. When sealing a seam, it is necessary to strip it and deepen it by 5-10 mm. To expand, it is best to use a wide spatula, working the damaged area from top to bottom. Small cracks and holes can be expanded in any direction as convenient for the repairman.
- Preparation of the solution. The solution is prepared no later than 2 minutes before use. Recommendations for preparation, proportions, optimal water temperature - all this must be studied before preparing the waterproofing mixture. To dilute the mixture, use a clean metal (not aluminum!) container.
- Filling the crack. We fill no more than 50-70%. This is necessary so that the waterproofing solution, which expands during the hardening process, does not damage the walls of the well.
- Stabilization of the filling. Press the finished filling with your hands for 3-5 seconds to several minutes (indicated in the instructions for use).
- Care. Depending on the mixture used, it may be necessary to periodically wet the seal over a period of 12-24 hours. If the instructions do not provide for this, then there is no need to do this.
- Treating the seal with a waterproofing compound . At this stage, a penetrating waterproofing material is used, which will protect the concrete wall of the well and the installed hydraulic seal from further destruction. From ready-made waterproofing mixtures you can choose: “Osmosil”, “Hydrotex”. Waterproofing can be applied only after the filling has completely hardened, unless otherwise provided by the manufacturer.
When diluting the solution, strictly follow the proportions specified by the manufacturer. You should not skimp and try to dilute the mixture thinner or, in an effort to increase its effectiveness, make it too thick. In both cases, the waterproofing properties of the seal will be impaired.
Often, along with sealing cracks, more serious damage is revealed that requires major repairs of the well. We recommend reading information about their elimination methods.
Excavation and caisson construction
It makes the most sense to dig a hole at the stage of laying the inlet water pipe. The RMNT.RU portal has already written about how to introduce water into a house. This will greatly simplify the insertion of shut-off and control valves and their passage through the walls of the well. As a rule, the pit has the shape of a square with a side of 1.2 m, however, in the case of organizing complex branched systems, more internal space may be required. The enlargement of the pit may be dictated by the need to accommodate more plumbing equipment, or due to the need to apply external waterproofing.
Protection from groundwater is required only when the level is sufficiently high, when there is a risk of soil erosion and collapse. In other cases, it is often more profitable to use special reinforcement that is resistant to flooding. The walls of the so-called wet well are laid out in one brick according to a radial pattern, while the bottom remains ground and a recess is dug in it, which allows you to quickly pump out all the water in case of emergency. A dry caisson is a sealed concrete bowl. Instead of carrying out monolithic work, which requires significantly greater forces and materials, you can resort to proven prefabricated monolithic structures made of a round slab at the bottom and rings connected by bentonite locks.
Making a filling yourself
Self-made hydraulic seals have some features. They are somewhat inferior in quality to ready-made fillings produced by the industrial method.
These disadvantages include:
- there is no guarantee of inertia, i.e. a “homemade product” can come into contact with the environment, thereby changing its properties;
- a homemade filling hardens much slower than an industrially produced one;
- there is a possibility of the seal disintegrating and its components getting into the water.
Based on the last point, we do not recommend using toxic compounds to create “homemade” hydroseals!
The advantages of homemade seals include low cost and availability, which is especially important in emergency cases when there is no industrial seal at hand.
#1: Homemade pressure-free seal
To prepare a waterproofing seal, the following materials are needed: fine-grained, preferably sifted sand, cement of a grade not lower than M300. Proportions – 2 parts sand + 1 part cement. Immediately before use, water is added to the composition.
Water must be added gradually, stirring constantly. The consistency should be thick so that the mixture can be easily formed into a ball that will not spread.
The filling is applied to a large crack by hand, and rubbed into a small crack with a spatula. After the repair is completed, the well section must be covered with an iron plate. After 2-3 days, the iron is removed, and the filling is treated with cement mortar and covered with waterproofing.
This method can only be used to eliminate non-pressure and low-pressure leaks. Under high pressure (over 3 atmospheres), such a homemade composition is quickly washed out.
#2: Seal for seams and small cracks
Despite all their shortcomings, homemade hydraulic seals are excellent for sealing seams in concrete wells. They cope with this task “excellently”, while allowing you to save a significant amount on industrially produced products.
Being environmentally friendly and safe, homemade hydraulic seals made of sand and high-quality cement reliably protect well water from the ingress of groundwater, impurities, and soil.
To increase the efficiency of waterproofing the seams of a well, a “liquid glass” composition can be added to the solution of sand and cement. This mixture will make the sealing better and more durable. Proportions 1:1:1 (sand:cement:liquid glass). It is necessary to add “liquid glass” 1 minute before sealing, because The composition hardens very quickly!
Sealing the entrance to the well is one of the most important and critical technological processes carried out during the installation of sewer water supply networks. It is necessary to approach work with special care when it comes to waterproofing utility networks with drinking water. Only by properly sealing the pipe entry into the well can you ensure that clean water from the well does not mix with the surface and is safe. When inserting HDPE pipes into a sewer well, proper waterproofing limits the flow of wastewater into the soil and thus the environment will not be disturbed.
Selection of the optimal hydraulic seal
Industrial or home-made waterproofing seals are a simple way to eliminate pressure or non-pressure leaks in a well. The technology for using hydroseals is very simple; even a non-specialist can waterproof a concrete well.
When choosing a method for eliminating a leak, pay attention to its characteristics: we recommend eliminating pressure leaks using ready-made, quick-hardening hydraulic seals.
You can eliminate non-pressure leaks, as well as waterproof the seams inside the well, using self-made hydraulic seals. The use of homemade hydraulic seals is only possible in a dry well, because... the available water will wash the solution before it hardens.
The list of well maintenance activities includes not only repairs. Much more often it is necessary to clean the well shaft, the methods and features of which are described in detail in the article we propose.
How to properly insert a pipe into a well?
You can insert the pipe into the well yourself; the main thing is to follow all the steps in a certain sequence.
- Laying begins from the most remote place with a slope towards the sewer well, and knee-shaped dips are not allowed.
- The drain pipe is installed above groundwater, but below the freezing level of the soil, otherwise it will need to be properly insulated.
- Inserting a HDPE pipe begins with drilling a hole of the required diameter in the well, equal to the pipe diameter of 2 centimeters.
- A rubber seal is placed on the end of the pipe, which will strengthen the sealing of the input.
- The end of the pipe is inserted into the hole treated with sealant, leading it a few centimeters into the well to avoid constant wetting of the tank walls (not relevant if a HDPE well is used).
- The input is sealed inside with a special seal.
Sidebar rules
The standard series sewer passage through the foundation is arranged in compliance with the basic rules:
- The sewer pipe is laid at a slope. When calculating, special formulas are used. A simplified version - for each linear meter of pipe a slope of 2 cm is made.
- After laying the pipes, determine the insertion location and make the appropriate marks.
- Polymer materials must be placed in the sleeve.
- The entry point is subject to mandatory sealing.
- The gap between the sleeve and the main structure is sealed with insulation and moisture-resistant material.