The role of underfloor heating in a residential or office space can hardly be overestimated. In winter, when there is frost outside the window, it is not very pleasant to walk on a cold surface both at home and at work. If you are faced with a similar problem, it means that the floors require insulation. The material used for this purpose must conduct heat poorly, be resistant to moisture, be lightweight and have good strength properties. It is recommended to use natural materials for thermal insulation of floors. Wood is considered one of the best. Sheets of plywood are placed on top of the wooden beams from which the logs are made, securing them with ordinary self-tapping screws. Not only high-quality timber is quite suitable for arranging the logs themselves. You can also use second-grade wood and even third-grade material. Different grades of plywood contain different marking options.
Expert opinion
Konstantin Alexandrovich
When insulating floors with plywood with a backing in premises intended for residential use, it is recommended to use plywood under the MK brand. It is resistant to moisture and does not contain compounds toxic to humans.
Tips for carrying out work
Depending on the choice of material for the rough coating, the installation method also changes. For example, with a plywood base, the use of conventional dowels is not recommended. To ensure that the wood veneer can expand unhindered, mounting brackets should be used when installing plywood.
In total, it is possible to use several acceptable options for installing a rough coating:
- If plywood sheets are mounted on a concrete screed, you should take material no thinner than 12 millimeters.
- In the case where there is wiring, pipes or other communications running along the floor, it is more important to install a covering with a lag device. To do this, you can use 2 options for installing “subfloors”, either a double coating of thin sheets, or a single layer of 2 centimeters in thickness.
- If the base is boards or any other wood floor, the thickness of the plywood covering can be any. The main thing is that it does not creak or bend.
The following recommendations concern glue. For flooring, the most suitable options are two-component or alcohol-based. It is also possible to use an aqueous analogue, but only if the device is planned in rooms without high humidity.
It is also important to lay the sheets not in their original form, but to pre-cut them into 4 equal parts. This will help avoid deformation and unnecessary stress during operation.
As for tile floors, to the extent of their properties, such floors will in fact be cool. An additional covering, especially when calculating the installation of a heated floor, in the form of plywood, will have a great effect on the comfort of use. It is much more pleasant to walk on a heated and pleasant surface in the same bathroom than on a cold floor.
Preparatory work - assessment of the condition of the ceiling, renovation, insulation
Before deciding which modification of heated floors is best suited for a particular wooden floor, it is necessary to make a correct assessment of its current condition, as well as the need for its renewal, replacement, repair and insulation. To do this, the following series of procedures are performed in relation to the main parts of the structure (boards, joists and other load-bearing elements):
- Visual inspection of the surface for defects.
- Feeling, scraping, drilling into the material to assess the condition of its structure.
- Replacement of elements with obvious damage - cracks, sagging, rot.
Laying heated floors requires careful preparation of the wooden base. Source sovet-ingenera.com
Cutting and fitting plywood
How to prepare the floor for heated floors
Plywood is cut in accordance with the floor area. It is necessary to take into account that when laying from the wall, an indent of 10 mm is made and the gap between the seams is 2-3 mm. Having cut the sheets into squares of the required size, you need to check their edges for delamination at the ends and the presence of other defects. If the edge is damaged, the workpiece should be replaced.
The plywood is laid in a checkerboard pattern. The sheets are drilled to the base with self-tapping screws along the perimeter and additionally along the surface in increments of about 20 cm. For quick and convenient installation, it is recommended to number the sheets and also mark the fastening points with self-tapping screws.
After fitting, the blanks are removed, the base is cleaned of dirt and dust. Before laying, the prepared sheets should be impregnated with an antiseptic in order to increase their service life. Then you can begin installation.
Briefly about the main thing
Laying plywood over an old wood floor is a great way to quickly and inexpensively prepare the flooring for laying linoleum, laminate or parquet. The plywood floor creates a flat surface for laying the final floor covering. There are 2 main ways of how and what kind of plywood to lay on the floor: laying directly on the old covering and laying on joists. The choice of method primarily depends on the condition of the old floor covering. Regardless of the chosen method, when laying it is necessary to comply with technological requirements: leave damping gaps, arrange the sheets in a checkerboard pattern, use high-quality materials. If all requirements are met, flooring laid on a plywood subfloor will last for many years.
how to do it and what to pay attention to
How to make heated floors correctly, system selection and installation
The installation of heated floors in residential premises has long ceased to be a novelty and is regularly used during renovation work. This popularity is due to the ability to independently install a heated floor on plywood, its versatility (can be laid on concrete, wood or even plywood) and comfort, which improves living conditions.
Features of laying heated floors
Unlike standard installation of heated floors, installation of heated floors on plywood is done without fixing it to the base of the floor, that is, to the plywood. Sheets of plywood are connected using metal staples, rather than attached with dowels. This approach prevents the appearance of cracks and allows you to regulate the expansion of wood with changes in humidity and temperature conditions.
Installation of plywood under heated floors
There are several ways to install plywood:
- on a concrete screed - plywood with a thickness of 12 mm is used;
- similar to a wooden floor - plywood of any thickness is similar, attached with self-tapping screws;
- for wooden logs - use a sheet of plywood 20 mm thick, or two layers of plywood, 9 mm thick.
How to lay a heated floor under linoleum or carpet?
When installing an electric heated floor under plywood, and then linoleum or carpet, it is also necessary to take into account all the subtleties. It is recommended to use all components from the same manufacturer, this will help prevent problems in the future when using heated floors.
Thermal film (warm film floor)
Under the floor covering, a film heated floor on plywood is used. Its assembly somewhat resembles a “sandwich”:
Laying scheme for heated floors
- Placed on the main floor
- Then a layer of thermal film is laid.
- Polyethylene film is placed on the thermal film.
- A rigid floor is constructed on top using plywood or chipboard, and at the same time ensures leveling of the floor.
Important! It is not recommended to use fiberboard or OSB sheets, since they do not provide a flat floor surface, and fiberboard tends to sag under the pressure of gravity. Plywood sheets are attached to the main floor using screws or dowels
It is necessary to “flood” their caps so that the floor surface is free of unevenness. All joints between the sheets will be puttied and after 48 hours you can lay linoleum or carpet
Plywood sheets are attached to the main floor using screws or dowels. It is necessary to “flood” their caps so that the floor surface is free of unevenness. All joints between the sheets will be puttied and after 48 hours you can lay linoleum or carpet.
Laying heated floors under tiles
Often in the kitchen, due to the use of tiles, the floors are cold, but laying tiles on plywood for a warm floor helps to cope with this disadvantage. It is necessary to lay heated floors under the tiles in compliance with all instructions, this will help to avoid adverse consequences in the future. Before laying the tiles, the plywood must be thoroughly processed - cleaned of minor defects, dust and sanded. Warm floors allow you not to worry about the health of your household and create a cozy atmosphere in the house.
Scheme for laying heated floors under tiles
About using plywood flooring
Natural wood is widely used in construction for the manufacture of floors. It has good thermal insulation, a pleasant-to-touch surface, and creates a cozy, warm environment in the house. However, over the years, such a coating loses its attractiveness - the boards dry out, begin to sag and creak. There are ways to renew wood flooring, but often it fails and the wood floor needs to be completely replaced.
If you need to lay laminate or parquet instead of an old floor, it becomes necessary to prepare a high-quality substrate. Modern floor coverings are extremely demanding on the surface, and an uneven wooden covering is not suitable, even if it is well preserved. But if the wood floor is still in good condition, you can lay a subfloor made of plywood sheets over it. This substrate is distinguished by the quality of the resulting surface, speed of installation and low cost.
A wooden floor can retain sufficient strength, but be visually unattractive Source bricoleurdudimanche.com
Plywood is a material made by pressing together an odd number of sheets of rotary-cut veneer. The veneer is made on a special peeling machine. Adjacent sheets are laid in a mutually perpendicular direction, which ensures high physical and mechanical properties of plywood. The material is used in construction, furniture production, carpentry and carpentry. Plywood is often chosen as a substrate for parquet, linoleum or laminate due to a number of advantages:
- The plywood backing provides a smooth surface.
- Large sheet area ensures quick installation.
- Plywood sheets have high strength, wear resistance, and load resistance.
- The subfloor extends the life of the underlying floor covering.
- Creating a plywood backing does not require large financial costs.
You can lay flooring on multilayer plywood Source fanerasnab.ru
Rules for installation on wooden joists
How to install heated floors Review of methods for installing heated floors
The use of wooden logs allows not only to level the floor, but also to reduce heat loss. The floor on joists is much warmer than on concrete.
The main stages of installing a log:
- Wooden blocks with a cross section of 50x50 mm are prepared. First, two bars are leveled at opposite ends of the room at an equal distance from each other.
- A fishing line is stretched between them.
- The remaining longitudinal bars are laid at intervals of no more than a meter. The choice of distance is determined by the thermal insulation material used.
- Short transverse bars are laid between the longitudinal logs, forming a square honeycomb.
Installation of wooden logs
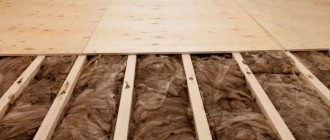
After installation of the structure, the floor is covered with a film that prevents steam condensation, and the voids between the bars are filled with insulation. Mineral wool is best suited for this purpose.
When choosing an option for laying a plywood sheet, you must adhere to the rule that the fasteners must fit into the joint of the timber. Therefore, preliminary markings are made on plywood, and not on the floor. To fasten plywood sheets, self-tapping screws are used, which are conveniently and quickly attached with a screwdriver.
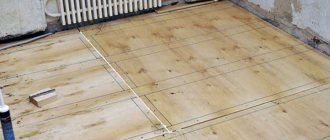
Finished plywood base
At the final stage, the seams between the plywood are puttied and can be varnished. The base for laying the flooring is ready.
Video description
Video example of installing a heated floor on a wooden floor:
- Installation of support bars is in progress.
- Next, material is placed on the free surface between them to reflect thermal radiation.
- A special substrate for the heating cable – galvanized mesh – is laid on top of this coating.
- Then a heating conductor is lined on it.
- All loose elements are fixed.
The choice of base and finishing materials, as well as basic devices, should be made taking into account the following features:
- To avoid overheating of wooden structures, the maximum temperature of heating elements should not exceed 400C.
- The thermal conductor is distributed over the surface as evenly as possible - with the exception of places where furniture and interior items are installed - there should be no heating elements under them.
- The thickness of the finishing coating directly depends on the type of material and thermal conductivity characteristics. For wood, the value of this indicator is 2-2.5 cm.
Selection of installation technology
Plywood as a subfloor under laminate can be installed in two ways:
- without intermediate supports;
- with intermediate supports.
Leveling without intermediate supports
Alignment with intermediate supports
In the first case, fastening to the boardwalk is done using glue and self-tapping screws. The second option involves the use of two types of supports. Here it is possible to install point elements, called slabs, and beams. The use of logs allows for a more reliable foundation, but the first method is preferable in terms of saving material.
Without installing intermediate support points, it is possible to lay plywood under the laminate on the floor with height differences of no more than 1 cm. It is precisely such unevenness that sheets fixed with adhesives can correct.
If it is necessary to correct unevenness of more than 1 cm, then installation is carried out using logs or blocks
It is important to remember that the gaps between the boards, cracks or areas where there are no flooring elements should not exceed 5 cm in width. In case of more serious problems, it is better to go through the rough flooring to prevent problems during operation
Installation with glue
Sheets can be secured using either adhesives or liquid nails. Self-tapping screws are used to provide additional fixation. Two-component, water-based adhesives are used as adhesives. You can use assembly adhesive or bustilate.
Scheme for laying plywood with glue
The work is performed in the following order:
- Checking the evenness of the base, cleaning it from dirt and dust, degreasing.
- The next step could be priming the surface. It is necessary for the adhesive solution to most effectively connect the sheets and wood flooring.
- After completing the preparatory work, they begin cutting out sheets of material. This is necessary to rationally use raw materials and ensure high accuracy of installation. The sheets are laid out so that they cover the entire room (if necessary, cut with an electric jigsaw), leaving a gap between the elements of 2-4 mm. This gap is called a damper seam, it prevents the appearance of waves on the surface when humidity and temperature increase or after the sheets expand under load. This seam is required. Also, a deformation gap is provided between the flooring and the walls. Here it should be 8-10 mm. It is this layout that will ensure the most effective alignment.
- The laid out elements must be numbered. After which they are removed from the horizontal surface. Numbering is necessary so as not to make mistakes during installation and complete it without temporary hiccups.
- After removing the sheets from the floor, holes are drilled in them for self-tapping screws. Using a drill of a larger diameter, these holes for fasteners are countersunk. The location of the fastening elements is chosen so that they are located at a distance of at least 2 cm from the edge of the sheet. In this case, the pitch of the screws is taken within 15-20 cm.
- Having completed the preparation, you can begin the main work. Installation begins with niches, ledges or podiums. First you need to apply glue to the base. The layer should not exceed 2-3 mm. The sheet is installed in the design position and pressed against the surface. Then move on to the next element.
- You can begin installing self-tapping screws only after the adhesive solution has dried. The fastening elements are installed in the prepared holes and screwed.
Important! When laying out the sheets, you must observe the dressing. This means that each subsequent row is shifted relative to the previous one. The shift is taken to be at least 10 cm, but it is better to make it larger, for example by half the flooring element
Laying on joists
Most often, logs are used as intermediate supports. They make it possible to simplify the installation of a frame under plywood, since the number of operations and measurements is reduced. The preparation of the base is carried out in the same way as in the previous case. The labor intensity of the work increases, but it becomes possible to eliminate serious differences without removing the wooden flooring boards.
After cutting the sheets, they begin to install the logs. For their manufacture, boards with a section of 15 by 40 mm are used. The step is selected at the stage of developing drawings or sketches and depends on:
- sheet thickness;
- the width of the sheets (since their joint should be located on the joist).
If a material with a thickness of 14-16 mm is selected, then you will need to assign a lag pitch of 30-40 cm. When using material 18-22 mm, the intermediate supports are laid more sparsely, at a distance of 50 cm from each other. The joists are fastened to the wooden flooring using self-tapping screws; when installing subfloor sheets, you can use self-tapping screws or glue.
https://domzastroika.ru
Technical nuances
Sometimes laying the floor with plywood on joists is the best solution. If wood is expensive in the region, it is cheaper to lay plywood directly on the joists - without a rough wooden floor. The height of the log depends on how much the finished floor level needs/can be raised. If the floor does not need to be raised to a significant height, you can save money and use a board with a thickness of 28 mm or more as a joist. If the floor needs to be raised to a greater height (from 50-60 mm), we take a beam of a suitable cross-section.
The minimum board thickness for joists under a plywood floor is 28 mm
If 50-60 cm is not enough, a small “shortage” (5-8 cm) can be “added” using spacers - cuttings of timber of the required size. All the same, a perfectly level base is very rare, and spacers are used under the logs to bring them “to the horizon” (as in the photo above). If you need to raise the finished floor even higher, then take 150*50 mm timber (for example). If this height is not enough, a sheathing of edged boards is made on top (perpendicularly), achieving the desired height.
How to lay plywood on joists: with edged board sheathing
In any case, we use chamber-dried lumber, first or highest grade. They are usually coated with bacterial protection. It can also be impregnated with compounds that reduce flammability. Before laying, it is advisable to keep the wood indoors for a week. Then there will be a guarantee that the floor will not creak.
Chamber drying boards and timber are very expensive. To save money, you can buy regular lumber (but not raw) and keep it for about a year in a well-ventilated area (in an attic, in a shed) or in a stack outside, covered on top (but not hermetically sealed) from rain. But during the drying process, some of the material will crack, some will twist, etc. So the source material must be purchased with a reserve for rejection. The amount of the reserve depends on the initial state of the forest. The more raw lumber you use, the more waste there will be.
Lag pitch and plywood thickness
The lag laying step is calculated from the center of the beam or board. The beam width is at least 50 mm, the pitch is from 300 mm to 900 mm. The greater the distance between the supports, the thicker the flooring required. That is, the thickness of the plywood for the floor along the joists depends on the distance at which the joists are installed from each other. So when installing a plywood floor, there are options:
- Lay joists less often and use thicker plywood.
- Install the joists with a small gap, use a smaller thickness of the flooring.
Which is more profitable? You will have to count for each region. In some places the first option will be cheaper, in others the second. If you also need to raise the floor to a considerable height, you can get out of this situation by installing joists, nailing the sheathing across them across the battens, and then placing plywood sheets on them.
Table for choosing plywood thickness depending on the joist installation pitch
Laying plywood on a wooden floor under laminate, linoleum is included in the technological map. It is recommended to lay plywood under parquet and parquet boards. In this case, long-term operation of the finishing coating is guaranteed. So, covering the floor with plywood is a justified decision in many cases. It's just expensive. Currently there is cheaper sheet OSB. But plywood has a more stable quality, and with OSB - depending on your luck.
Plywood thickness for floor joists
The thickness of the plywood is selected depending on the selected floor design. The specific thickness depends on the distance between the lags:
- logs every 300 mm, plywood needed 9 mm;
- supports every 600 mm - sheet plywood is required no thinner than 12 mm;
- the logs are installed at 900 mm intervals - we put 18 mm plywood and no less.
Which plywood for the floor to choose?
Coniferous, birch or combined? Birch is better, but coniferous is optimal for the price. When laying on joists, two layers are usually laid. The total thickness should be no less than recommended. Two layers are done to get the most stable floor at minimal cost. Because the material for two layers of 12 mm will cost less than one layer of 21 mm. But when laying two layers of plywood, the installation time will increase and the consumption of fasteners will increase. This is also worth taking into account.
Thickness of plywood on old floor
When laying on any hard base (rough or old plank floor, concrete), one layer of plywood may be sufficient. Moreover, it is possible to level it in this way even on an uneven base. But in this case, two layers will be required and we take their total thickness from the table above. Due to its high degree of elasticity, such flooring can compensate for unevenness.
The thickness of plywood for floor boards is 10-12 mm
Provided there are no significant differences (only a few millimeters are acceptable), the thickness of plywood for laying on an old floor is 10-12 mm (in one layer). This will be more than enough even for coatings that require stability of the base.
How do you attach the joists to the base?
If the sheathing is attached to a concrete base, studs are used. In wood and concrete, a hole is pre-drilled with a drill whose diameter is 1.5-2 mm smaller than the fastener. The length of the fastener must be such that at least half the length of the stud/bolt enters the base.
How to attach joists under plywood to the base
If for leveling you use several shims made of materials of different thicknesses, then you need to drill the hole so that the pin/bolt catches them too. This is a guarantee that the gaskets will be secured and the floor will not sag or begin to creak.
Soundproofing and thermal insulation
In a multi-storey building, you should take care of soundproofing your floor - there will be fewer problems with your neighbors. To do this, it is better to use materials that do not conduct sounds well as leveling pads - rubber, fiberboard, pieces of linoleum. You can also install special vibration damping pads.
You can insulate a plywood floor with any of the materials
For thermal insulation, mineral wool is placed between the joists. In high-rise buildings (second floor and above) this is the best choice. The material dampens sounds and has good thermal insulation properties. Expanded clay should not be used as thermal insulation. Compared to modern materials, it is less effective (the characteristics are 4-7 times worse). You can use polystyrene foam or extruded polystyrene foam. But this choice may be justified if there is an unheated room below or the floor of the first floor in a private house. In this case, foam glass may have even better properties. 100% harmless, excellent thermal insulation characteristics, does not burn. But the price is high.
Please note that on the ground floor of a high-rise building or in a private house, waterproofing is spread over the joists. And it’s better if it’s a membrane rather than a film. The canvas is spread over the joists, the edges are placed on the walls, securing them there no lower than the level of the finished floor.
Laying plywood on the floor: rules
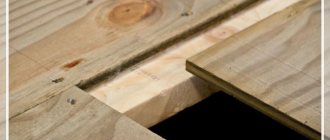
To prevent the plywood floor from sagging and playing underfoot, the first layer is laid so that the fibers of the outer veneer layer are perpendicular to the joists. In this case, the dimensions of the sheet and the pitch of the lag must be selected so that the joint of the sheets falls in the middle of the beam/board.
The junction of two sheets should be in the middle of the board or beam
If the lag pitch is large (50 cm or more), an additional beam is installed under the connection along the short side so that the joint does not hang in the air.
Rules for laying plywood on the floor
When laying out sheets, remember the following rules:
- A gap of 20-30 mm is left between the edge of the sheet and the wall. This way the plywood will not rest against the walls. When temperature and humidity change, it changes size. And this gap compensates for this expansion, otherwise warping will begin and the joints may rise.
- The sheets do not fit together tightly. Leave a gap of 3-5 mm. This is also to compensate for thermal and humidity expansion.
- The second layer is placed so that the seams do not coincide. This is necessary to ensure that cracks do not form in the floor. It also makes the floor more durable and stable.
With a large pitch, transverse bars are added on which the joints of the sheets will rest.
A few words about installing the fasteners. Lay out the plywood sheet and adjust it the way it should lie. Next, mark the position of the joist (middle) and jumpers on it - then it will be easier to install the fasteners.
Plywood fasteners
You can attach plywood to the joists with nails or self-tapping screws. Self-tapping screws are not hardened (they break less often). The length of the fastener is not less than three times the thickness of the sheet. That is, for fastening plywood with a thickness of 12 mm, a length of 35 mm or more is suitable. The fastener installation step when laying plywood is 15 cm.
When laying plywood, do not forget about the gaps
The second layer of plywood is often fixed with glue. They usually use construction PVA, but any type that can be used to glue wood is suitable. “For reliability” they also add screws. To get into the logs when attaching the sheets of the second layer, the position of the supports is marked not only on the plywood, but also on the walls. But, even if the fasteners only connect sheets, this will be enough.
The rules for laying the second layer are the same: compensation gaps are needed. And the seams should not coincide with the seams of the bottom layer. They must be offset by at least 30 cm.
How to check work for quality
When all the work is finally finished, and it would seem visually everything is in the best possible way, you should not stop there
It is extremely important to check everything with the utmost care, because if something goes wrong during operation, there will be a risk of dismantling the entire structure
You can check everything in several ways:
- How flat the surface is is checked using a regular flat rod. It is placed on the floor and unfolded in this way in all directions.
- If there is a long building level, even better. With its help, you can reliably find out how horizontal the floors are.
- The last check also has its advantage in that after laying the plywood using a wooden hammer and tapping, you can find out whether there are voids under the sheets. If the knocking sound is of the same nature, then the work has been done efficiently. If in some places dull sounds are heard from tapping, then there are voids, and deflections are possible in these places in the future.
Types of plywood used for work
The material varies depending on the type of wood veneer used in production. There are the following types of canvas:
What kind of plywood to lay on a wooden floor? There are different brands suitable for certain types of work. In industrial construction, plywood of the FB and FOV brands is used. The FSF and FC categories are suitable for laying flooring in a residential area.
Canvas marked FC can be used to install a wooden floor under laminate in a nursery or bedroom. The material is impregnated with an adhesive composition that does not contain phenol. The fabric does not pose a risk to human health. Such plywood sheets are quite durable and have an average level of water resistance.
Laying plywood under laminate which method to choose
Believe me, this question is asked by almost all of those who are thinking about leveling the floor under laminate with plywood. But there are facts that speak for themselves...
This material has a high level of moisture resistance. It is quite durable, which means it can provide the highest quality and simplest installation, as well as increase the service life of the topcoat. If you use this option, the floor will not sag. The most even base is what you get as a result. A huge plus is additional sound and heat insulation
In addition to the above advantages, there is one more important one: unlike other materials, this one is accessible! Purchase and installation costs are minimal. Quick installation is another plus
You can, with a light heart, refuse the help of specialists and lay the sheets yourself. And this is another “+” to saving money.
Recommended heating systems for wooden surfaces (plywood, OSB, parquet)
It is recommended to use low temperature underfloor heating systems (with underfloor hot water flow temperatures up to 55°C). The surface temperature of the finished wooden floor should not exceed 29°C even in the edge areas. Favorable values: from 26 ° C to 27 ° C.
Distance of heating pipes under plywood
To limit temperature pulsation on the surface (at a given maximum temperature, low pulsation brings a higher average temperature and therefore higher heater output), when heating floors with hot water, the distance between the heating pipes should be from 10 to 20 cm.
Thermal resistance
It should be taken into account that there is a reasonable ratio of thermal resistance of the layers above the heating element (cement screed or dry screed and top surface) and below the heating element (thermal insulation).
Laminate installation
Underlays for laminate
Rolled backing
We lay a plastic film over the leveled wooden base - it will serve as waterproofing. We lay the backing under the laminate on the film. The tasks of the substrate include:
- Compensation for unevenness of the base that was not eliminated during leveling;
- Thermal insulation;
- Soundproofing.
The choice of substrates for laminate flooring today is quite extensive. Can be used:
- Polyethylene foam substrates;
- Substrates made of natural cork;
- Substrates made of bitumen fabric interspersed with cork grains;
- High density polyurethane foam substrates.
Laminate underlays can be produced both in sheets and in rolls. The laying of the substrate under the laminate is carried out end-to-end, and in order to avoid displacement when laying the laminate, it is fixed with tape.
Bonding the substrate
In principle, this is where the preparation ends. All we have to do is put laminate on the wooden floor!
Laying laminate
Today on the Internet you can easily find many video lessons dedicated to the technology of laying laminate flooring. Having carefully studied them, as well as analyzed the algorithm given in this article, you will be able to install it yourself (see Laying laminate flooring on a wooden floor - tips and recommendations from experts)
Laying the first row
So, how to lay laminate:
On the prepared base we lay out the first row of panels horizontally, starting from the corner. We join the panels end to end, constantly monitoring the alignment relative to the wall.
- To maintain a gap between the wall and the laminate panels (8-10 mm), we install stops made of wood or plastic.
- When our row rests against the opposite wall, we measure the required size of the panel and cut it using a jigsaw.
- We begin to lay the next row in such a way that the end seams of the panels of the second row do not coincide with the seams between the panels of the first row (see photo). This way we will provide our floor with a more presentable appearance.
Displacement of seams
- To do this, we begin the installation with a fragment of the panel remaining during trimming in the first row. If this fragment is no shorter than 20 cm, you can safely use it to start a new row.
- However, in this case the offset may not be accurate enough - so, if you want, you can use a new panel, cutting off about a third of it (the so-called “offset to a third of the board”).
- We assemble the second row according to the same principle as the first.
- We join both rows, if necessary, knocking the locks with a hammer through the safety bar.
Laminate lock padding
- We continue to assemble the laminate, checking the correct installation and the presence of gaps between the laminate and the walls.
- The panels of the last row, as a rule, require sawing lengthwise. Try to cut the panel carefully, but do not overdo it - the cut line will still be hidden by the baseboard.
After the laminate is laid, we remove the wedges between the laminate and the wall and install the baseboards.
https://youtube.com/watch?v=v1VVN5H62sM
We hope that the recommendations given in this article will be useful to you, and the question “How to properly lay laminate flooring on a wooden floor?” will not confuse you. Moreover, now - after reading this material - you can safely take on this task!
Conclusion
These instructions can be used not only for leveling the floor with plywood in a wooden house with your own hands. In a similar way, with minor additions to laying technology, surfaces in brick buildings are leveled. Follow the publications on our website and you will learn a lot more new things from our specialists.
To make it clearer for you, we have presented a video in this article, watch and do it.
Selection and preparation of material
A plywood sheet consists of several layers of veneer, when gluing them, the wood fibers are laid perpendicularly. This structure provides the material with strength and wear resistance. Today you can find sheets of different thicknesses on sale. A plywood layer 8-10 mm thick is quite suitable as a base for the laminate.
We put the laminate on the mat
If you purchased the material in the cold season, according to the technology for performing the work, it is recommended to pre-dry it. To do this, the sheets are placed vertically in a dry, ventilated room at room temperature and left for 2-3 weeks. If it is necessary to increase the moisture resistance of the plywood base, it is treated with putty based on PVA glue.
Like any wood material, plywood must acclimatize in the room where installation work will take place within 2 days.
Features of use and fire safety
When choosing any system that is associated with power supply and wooden structures, it is necessary to take into account the characteristics of this material. Most often, in the process of designing a heated floor system with wood, you have to face the following difficulties:
- Combustibility of the material: wood should not come into contact with open fire; it should not be allowed to overheat, which can happen in the electrical system during a short circuit.
- Drying: when wood overheats, moisture leaves it. At the same time, it becomes smaller in size, cracks, and very often becomes simply unsuitable for use.
- Low thermal conductivity. This must be taken into account when covering underfloor heating systems with natural wood. In such situations, heat does not spread well throughout the room and does not heat it to the optimal temperature.
How to make water/electric underfloor heating under a wooden floor an effective source of heat without these problems?
To resolve the issue of fire safety, you should use only those systems that strictly comply with all electrical and fire safety standards and regulations.
Also, special attention must be paid to installation. All contacts must be insulated in accordance with the requirements for installation technology
For heated floors on wooden joists and under a decorative coating made of identical material, it is allowed to use all modern electric heating systems: infrared film, cables, mats, rods. The following rules must be followed:
- the temperature of the heated floor under a wooden covering should not be more than 27°C;
- Care must be taken to ensure that there are no sudden changes in temperature over a short period of time. Over a 24-hour period, the temperature may vary by up to 5°C;
- The heating cable must not come into direct contact with wood.
Laying plywood on a concrete base under laminate
The base for plywood is usually a concrete screed, which can harden in about a week.
(this period must be waited for the layer to completely harden). A waterproofing layer is applied on top of the concrete screed, and only after that can plywood be laid. Note that it should have a thickness in the range of 1.2-1.6 cm. The plywood must be cut into squares according to the intended areas, after which its sheets should be laid out over the entire floor area - this will allow the sheets to be adjusted to fit the entire area of the room. It is worth taking into account all the gaps between the plywood sheets: the size of the damper seams should be 8-10 mm, and the distance between the outer sheets and the walls should be 15-20 mm. Laying plywood on a concrete floor under a laminate is carried out according to the principle of brickwork, i.e. There should be a slight offset to avoid crossing at all four seams. After this, it is worth numbering all the sheets and drawing up a layout diagram.
The standard size of a plywood sheet is 125x125 cm, but it will be problematic for us to work with this size. If you bought plywood sheets of this size, then it would be correct to divide it into four parts - at the end you will get squares measuring 60x60 cm. This cutting of sheets will allow you to create the required number of damper seams, which are very important for compensating for deformations that occur during moisture and thermal expansion. And besides, small squares are not as susceptible to deformation as standard sheets measuring 125x125 cm.
Now, with the help of the drawn diagram and numbered sheets, you can begin the alignment process. Plywood glue is applied to the base of the floor, after which it is secured with screws along the perimeter and diagonally (the pitch between the screws should be 15-20 cm). After fixing the sheets, they are sanded using a grinding machine or coarse sandpaper, which will eliminate all snags and burrs.
Now a visual inspection of the sheets is carried out: they should not touch the walls, there must be gaps between the sheets, the surface must be checked by a level or a rule (a difference of 2 mm is considered normal).
To summarize, we note that if the sheets are laid under a laminate, then it would not be amiss to install a heat-insulating layer - it will serve as a shock absorber and help hide minor unevenness in the coating.
Some styling tips
- Try to use thick sheets, in which case the distance between the beacons, when leveling, can be made slightly larger and naturally the base will be more reliable.
- If the height differences are no more than 20-30 mm, then you can do without lathing, then the height of the covering from the horizon increases by about 30 mm.
- When preparing the surface for linoleum flooring, it is advisable to use an industrial sander.
- The sheets should be fastened both along the edges and diagonally. The pitch length between the screws should be approximately 150 - 200 mm. In this case, make an indent from the edge of the sheet of about 20 mm.
- Self-tapping screws should be used 3 times larger than the thickness of the coating.
- The sheets should be fastened both along the edges and diagonally. The pitch length between the screws should be approximately 150 - 200 mm. In this case, make an indent from the edge of the sheet of about 20 mm.
Is it true that plywood is a panacea?
When a repair specialist is asked what is the best way to level the base with laminate, he will affirmatively say that it is plywood, and he will be right without a doubt. This material has a whole host of positive properties:
- She is very easy to work with.
- Plywood weighs a little.
- It has no unpleasant odors at all.
- Even a beginner can install plywood.
- Has optimal rigidity.
- Has the ability to withstand enormous pressures.
In addition, plywood is also more profitable financially, for example, when compared with the same cement screed. As for specific advantages, they also exist and are expressed:
- Plywood covering is best suited for laminate flooring. The floors will end up being rigid all the way around.
- Due to the fact that the plywood parameters are quite large, the flooring can be done in a short time.
- If the base itself is uneven, the plywood sheet bends in the desired direction, maintaining all its qualities.
- And besides this, it is practically unpretentious; it can be installed under a wide variety of floor coverings, or used as a full-fledged floor.
Why is it important to pay attention to the structure of the plywood itself?
When making the final choice of insulation, you should also take into account what kind of plywood is planned for it.
This component is divided into popular brands:
- FSF has an extremely high degree of moisture resistance, so during installation it requires the use of toxic types of glue. The best options for such coverage are considered to be non-residential premises (garages, warehouses, offices). The basis is a reliable concrete screed that is not afraid of high humidity;
- FC is a material that contains special urea resins that are completely harmless to humans in terms of toxicity. For this type of plywood, wood obtained by processing coniferous or deciduous plants can be used as a base for the flooring.
Taking this into account, floor insulation is selected for the specific environment in which it will serve. And a lot depends on the type of plywood itself!
Advantages of plywood floors
Plywood is usually used to make a high-quality intermediate base for a heated floor system. In the event that the final finishing is a parquet board or piece parquet, fixed to the rough surface with screws or glue, this addition in the form of plywood sheets is simply necessary.
As for the general advantages of using plywood in the construction of rough surfaces and heated floors:
Often, on the eve of repair work, inexperienced citizens receive questions about what types and grades of materials are more relevant to use, and is it possible to use the first available plywood for the rough surface?
In fact, there are many varieties, types and varieties and all of them are, in principle, suitable for installation, but you should make a start in each individual case.
There are 5 types of material in total. Also, one type may be moisture resistant while another is not. For grade 1, only oak, birch and beech veneers are used, and mostly without knots. Such sheets can be laid, but this is a costly task.
To install a heated floor under plywood, it is more important to install a covering made of second-rate material. In this case, the quality will not suffer and will not hurt your pocket.
A variation of the first method - laying on adhesive compounds
Sometimes the surface of the old coating is almost perfectly smooth. It will still not be possible to lay laminate on such a floor, but it is possible to replace the hardware with adhesive compounds. For gluing plywood sheets, water-based glue, mastic, assembly adhesive, bustilate, and liquid nails can be used.
Example of glue used Source eco-stroycity.ru
Warm floor on plywood under tiles, laminate, linoleum
Plywood is the most versatile material. It is used in construction everywhere, from the construction of formwork when laying foundations and ending with the production of cabinet furniture for the home.
First of all, plywood is a sheet material made from natural wood, which is obtained by cross-joining sheets of wood veneer. There are three or more such sheets. Various types of wood are used: pine, beech, oak, linden and others. Moreover, it is customary to say that plywood is made from the wood veneer from which its front surfaces are made.
Plywood floor installation
Plywood floor in the interior
Raw plywood floor
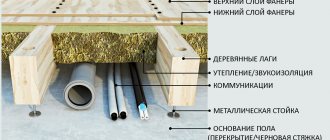
This material is used in the construction of an intermediate base for heated floors. If the main floor is made of block parquet or parquet boards, which need to be secured with glue and screws, then plywood flooring is simply necessary. Experienced craftsmen recommend installing an intermediate plywood floor also for subsequent covering with laminate or linoleum. In this case, plywood will perform the important function of moisture and sound insulation.
Advantages of plywood flooring material:
- material strength;
- environmental cleanliness;
- high thermal and sound insulation properties;
- resistance to excess moisture;
- ease of installation and low labor intensity;
- low cost of materials and construction work.
Types of plywood for flooring
For apartment renovations, plywood of various grades and varieties is used. It is classified according to the degree of moisture resistance and divided into grades, from the first grade to the fifth. First grade plywood is made from birch, beech and oak; only wood without knots is taken. This first-class plywood is used to make furniture. Plywood of grades 2 and 3 is precisely used as a secondary material for heated floor coverings, such as parquet, parquet boards, laminate and linoleum.
Installation of heated floors on plywood
Unlike conventional technology for laying heated floors, installation on a plywood base is carried out without fixation. With this technology, floor sheets are connected using metal fastening brackets, and not with dowel screws. This technique allows the wood veneer to expand as air humidity increases and prevents the formation of cracks and blisters. For more details on how to lay plywood, see the photo.
Several methods of installing the intermediate plywood covering are used:
- laying on a concrete screed: 12 mm thick sheets are used;
- for wooden logs: in the presence of various communications or other interference, thicker sheets are used, 20 mm or two sheets with a total thickness of about 20 mm;
- on wooden floors: you can use plywood of any thickness.
https://youtube.com/watch?v=ZGgDgnGvB18
To see how to make plywood flooring, watch the video. The plywood covering is attached to the concrete base using special glue and dowel nails.
What you need to pay attention to when choosing glue
The adhesives used are of three types: water-based, alcohol-based and two-component adhesive. Each of them has its own advantages and disadvantages. Water-based glue is odorless, but contains water; alcohol-based glue has a strong odor and is also a fire hazard. Two-component glue dries quickly and requires skill to work with it. When working with plywood flooring, choose alcohol-based and two-component adhesives.
When laying plywood, the sheets must be cut each into four parts and laid in a checkerboard pattern. This approach allows you to avoid unnecessary stress in a single sheet; the more thermal seams, the more resistant to deformation the coating is. The gap between the sheets is 5 mm, along the walls and heating devices - 1 cm.
Laying an intermediate floor under linoleum and laminate
When choosing a material, you must be guided by the following recommendations. The plywood sheet should be thicker than the face covering and sanded on one side. The plywood is laid with the treated smooth side up, and linoleum or laminate is laid on it.
For residential premises, it is better to choose an environmentally friendly brand of material with an average degree of moisture resistance - FC.
Warm floor under tiles
Tiled floors can be cold. To cope with this drawback, it is recommended to lay an intermediate plywood floor under the tiles. Before laying tiles, the surface must be cleaned and sanded.
Step-by-step instruction
To install a prefabricated screed yourself, you will need:
- Sheets of plywood of suitable thickness.
- Wooden logs.
- Lining material for leveling the base.
- Antiseptic primer.
- Hardware.
- Soundproofing and/or thermal insulation with components.
- Repair compounds for partial restoration of damaged foundations.
- Waterproofing.
- Damper tape.
- Silicone sealant or elastic wood putty.
- Tape measure, marking pencil, metal ruler or lath.
- Drill/screwdriver or hammer/nail gun (nailer) with accessories.
- Laser or water level.
- Spatulas, brushes, rollers.
- Construction vacuum cleaner.
- Cutting tools with accessories for wood and plywood (circular saw, jigsaw, etc.).
- Grinder machine.
The technology for installing prefabricated screeds is partially presented in SNiP 3.04.01–87 (SP 71.13330.2017) “Insulating and finishing coatings.” In accordance with the recommendations of these standards, installation is carried out in 4 stages.
Preparation
Any repair begins with cleaning the base from debris, dirt and dust. It is advisable to remove oil, bitumen and similar stains, traces of soot and soot from the surface.
No professional will begin work without partially repairing the damaged areas. Rotten, damaged elements of the wooden flooring must be replaced, and cracks and loose areas of the mineral base must be restored. To do this, you need to open up the cracks, remove dust and fill with repair compounds. If possible, it is better to clean off fragile sections, and smooth out the resulting pits using cement-sand, self-leveling and other quick-drying mixtures.
If necessary, the floor is waterproofed. It is needed if:
- it is necessary to protect the structure from residual moisture of the concrete base;
- there is a cold basement under the ceiling;
- the floor on joists is installed in the bathroom and the room located on the floor below should be protected from possible leaks.
To create waterproofing, the entire available range of materials is used: films, membranes, rolled adhesive products, coating compounds, painting agents, and the like.
In some cases, soundproofing of the base is required. According to the rules, the acoustic layer is laid between the base floor and the screed. Therefore, sound-absorbing mats are laid under the logs. If sound-insulating mineral wool (stone or glass) is used, then it must be laid in the openings between the joists, and the support rails themselves must be fixed using point acoustic pads.
Laying logs on acoustic pads.
It is advisable at this stage to treat the timber, bosses and other wooden structural elements with antiseptic impregnations.
Formation of a power frame
The frame of logs can be formed in the form of longitudinally located beams or as a single or double sheathing. Of course, the second option creates more reliable support for the plywood.
SNiP 3.04.01–87 (SP 71.13330.2017) recommends laying slats across the light flow, and in corridors and other rooms with a certain direction of foot traffic - perpendicular to the movement. Of course, in the future the frame will not be visible under the coating, but the essence of the advice is different. The developers of the building code determined that if the frame is formed across the most intensive movement of people, then the loads will be distributed over the majority of the supports of the load-bearing frame, and not among 2-3 elements. Or even worse - between them.
First of all, the zero mark is identified, relative to which the supports are aligned. Next, the beacons are mounted under the joists or the required level is stamped on the wall with thread and dye. But the most convenient way to construct a reference line is a laser level with a plane builder.
If sound insulation is required, before installing the supporting frame, it is necessary to lay acoustic material on the base: slabs, membranes, rolled products.
Now you can begin installing the logs, observing all the necessary gaps:
- Between the outer batten and the wall - at least 20 mm.
- Between adjacent supports - from 30 cm, but not more than 50 cm. We remind you: the higher the load on the floor, the more frequent the logs should be.
- Between the ends of one row – 0–0.5 cm.
For leveling, gaskets made of chipboard, OSB, MDF, etc. are installed under the frame elements. After checking with a level, the bosses or backing boards are attached to the base of the dowel - with nails, screws or anchors.
Plywood linings.
Joists on wooden bosses.
To drill holes for hardware in underlay components, joists and plywood, you should purchase feather or special wood drills with a countersink.
Many craftsmen recommend laying damper layers on firmly fixed supports. Such a preventive measure will prevent the structure from starting to creak in the future.
The penultimate step is to fix the joists over the entire area of the room using suitable hardware. Please note that a wide strip should be laid in doorways, which will protrude beyond the partition by 50–100 mm on each side.
For maximum leveling accuracy, you can use fastening and supporting hardware designed for adjustable floors. Essentially, these are powerful anchors that are installed in the floor slab. The adjusting nuts are screwed onto the main bolts, then the beam is placed and secured with a lock nut. The excess anchor rod is cut off with a grinder or a metal file.
If you plan to insulate the floor, then under the frame, in accordance with the manufacturer’s recommendations, you need to lay a vapor barrier. But after installing the logs, a suitable thermal insulation material is placed in the resulting “windows”: mineral wool, expanded clay, ecowool, linen or synthetic mats.
Laying plywood boards
The most controversial issue is the thickness and number of layers of plywood. There is no single correct opinion. It is clear that the higher the expected load on the floor (weight of furniture, intensity of foot traffic, etc.), the greater the thickness of the slabs should be and the smaller the distance between the joists. This will avoid sagging of the structure and its damage.
What type of flooring is best - single or multi-layer? There is no clear answer to this question. Each type has its own advantages and disadvantages. But the total thickness of the plywood flooring must remain constant - at least 18 mm.
Installation of slabs begins with their preparation. You should cut them to the required sizes, make cuts for communications or enclosing structures of complex shapes. Then a preliminary arrangement is carried out. The first row is laid out from the far corner along a solid wall.
If necessary, plywood sheets are adjusted, drilling points for hardware are marked with a distance from the edge of 2–3 cm and an interval between fastenings of 15–30 cm. An expansion joint of 0.4–1 cm must be maintained between the plates, as well as between the plates and the walls.
After one row of plywood is drilled and the sawdust is removed with a vacuum cleaner, the sheets are fixed with suitable fasteners. Experienced craftsmen recommend starting to screw in hardware from the center of the slab, gradually moving diagonally to the edges, and then along the perimeter. This approach will straighten the plywood and avoid waves. Do not forget that the hardware must be “recessed” into the plywood by at least 0.2 centimeters.
The second and subsequent rows are laid in compliance with the rule that the seams are offset by at least 1/3 of the length. If plywood is installed in two layers, then the joint areas of the first layer should not coincide with the seams of the second.
Specifics of laying sheets on a concrete screed
In private homes, a concrete floor is often used as a subfloor. It has good waterproofing properties, rarely cracks and has no gaps in the thickness through which moisture or insects from the ground can get under the linoleum or laminate.
Concrete floor before laying plywood
Floor with screed
Living rooms need warm and comfortable floors. Plywood is a kind of layer between cold concrete and the floor covering, perfectly maintaining the optimal temperature for the user. The procedure for marking the base is as follows:
- Places for laying sheets are marked, starting from the wall. Plywood is selected according to size - if the width or length is not enough, you can take several individual elements.
- The next stage of marking is the points in the middle of the room. All marks must be connected to each other by straight lines using a construction ruler.
Before laying plywood on a concrete floor, it is necessary to carefully inspect the surface of the base. If there are depressions, unevenness or differences of more than 2 mm, you need to make a screed. Laying wood material on a concrete floor after this construction event is possible only after 45 days. Allow the screed to dry completely, avoiding mechanical pressure.
Which plywood to choose
Several types of material may be suitable for covering a concrete floor - it all depends on the goals pursued by the master. The thickness of the sheets recommended by experts that will need to be laid on the rough base is 1.5 cm. Plywood for a concrete floor is divided into the following subtypes:
- unsanded - after laying under laminate or linoleum, it must be additionally sanded with a machine;
- waterproof - the highest quality, made from wood veneer by gluing its individual parts;
- polished on one side - requires minimal processing costs during installation on a concrete floor.
Stages of sheet installation
You can watch how plywood is installed on a concrete floor in the video. Such step-by-step instructions allow you to avoid common beginner mistakes. The video not only shows how to lay sheets on a concrete floor with your own hands, but also demonstrates the final fastening of the floor covering - laminate or linoleum. In the photo you can see how to correctly mark the base.
Installation of plywood on a concrete floor is carried out in several successive stages:
- Fitting and cutting sheets. The recommended dimensions are 75x75 cm. This increases the number of seams between the plywood, simplifies installation on a concrete floor and allows you not to react to temperature changes.
- Checking the surface for moisture. To do this, take a plastic film and cover the concrete for a period of 2-3 days. If perspiration does not appear, you can proceed with priming with a solution of glue and direct installation.
- Fixing sheets on a screed. The plywood under the laminate is attached to the concrete floor using self-tapping screws with plastic dowels. The distance between them should be at least 15 cm.
- Sanding the sheet surface. After the plywood under the linoleum is laid on the concrete floor, you need to walk over the surface several times with a special tool. This will remove roughness, glue residues, and splinters from it, making the sheet perfectly even.
Advice: laying plywood on a concrete floor must be done on primed concrete. A solution is prepared using glue, which improves adhesion between the two layers. Each sheet must be fastened evenly and neatly. By adhering to the above rules, you can quickly and efficiently lay the sheets on the screed so that the decorative coating will please you for a long time, and the floor will be warm and beautiful.
Choosing a installation method
There are 2 main ways to properly lay plywood on a wooden floor:
- Laying on an old wooden base
The method is used if the horizontal difference of the old base is less than 1 cm, and also if it has sufficient strength. This method is simple, but can be used only in limited cases, since the difference in the old floor is often more than 1 cm
Laying over old coating Source chudopol.ru
See also: Catalog of companies that specialize in home renovation
- Laying on joists
If the difference in height of the old base is significant, plywood is laid on logs made of timber. This method is longer and more labor-intensive, but it allows you to deal with significant horizontal differences and damage to the base. Can also be used if the old floor has failed and cannot serve as a solid base for a plywood underlay
Laying on pre-prepared joists Source slavasozidatelyam.ru
Next, we’ll take a closer look at which method to choose in a particular case and how to properly lay plywood on the floor.
Instructions on how to lay plywood on a concrete floor
Step-by-step instructions will tell you how to cover a floor with plywood yourself and with minimal financial costs. Plywood is one of the cheap building materials that are used in various repair work. When laying new floors on a concrete base, plywood sheets are used as a base, for the manufacture of which natural wood is used. They are produced by pressing thin layers of wood glued with glue.
Depending on the number of layers, the thickness and strength of the material changes. Sheets with a thickness of more than 15 mm are suitable for leveling the floor. Let's take a closer look at how to lay plywood on a concrete floor.
Popular types of plywood used for renovation
Sheets produced by industry are classified according to various criteria:
- wood used;
- presence and method of impregnation;
- variety;
- number of layers;
- surface treatment;
- moisture resistance.
| Brand | Moisture resistance level |
| FSF, FSF-TV | increased |
| FSB, BFS, BFV-1 | high |
| BP-A, BP-V, BS-1 | above average |
| FBA, FC | small |
For repair work, when the part of the structure made of plywood will be hidden from view, it is recommended to use moisture-resistant plywood of grade II or III. The sheet must be at least 10 mm thick, but the recommended value is 14-22 mm. A thinner one will not cope with the load, and a too thick one will be inconvenient to work with.
Plywood thickness and ply
The number of layers is not of fundamental importance. If possible, you should purchase sheets sanded on both sides.
- If possible, the plywood should be dried for 2-3 weeks before starting work. The sheets are dried vertically, at a temperature slightly above room temperature.
We bring plywood into the room
You can increase the strength of plywood using several layers of acrylic varnish
48 hours before the start of work, the material must be brought into the room where it will be installed and laid horizontally. There are two ways to lay plywood.
How to insulate a floor with penofol with your own hands, installation technology, video diagram
Penofol is an effective thermal insulation material that has low thermal conductivity and reliably protects homes from the cold even when laying a thin layer of material. It is often used for floor insulation, since due to its special properties, penofol increases heat transfer resistance.
Scheme of laying penofol with the reflective layer down.
Penofol can be perfectly combined with mineral wool and fiberglass when insulating floors, where it will serve as a vapor barrier. The use of this material will be appropriate in those structures that require not only thermal but also noise protection, but the thickness of the insulator should be minimal. To insulate a floor with penofol, you do not need to additionally use hydro- and vapor barrier membranes, since the material can become a replacement for them.
Penofol classification
Since the production of penofol began, its properties, scope of application and structure have undergone enormous changes. Previously, the material took the form of a roll of cross-linked polyethylene foam, one side of which was foiled with aluminum. This type of material is still used to insulate rooms, as it is highly efficient. In addition to the classic type of penofol, other types of material are produced, which are endowed with a number of useful properties:
Scheme of floor insulation with penofol with double-sided foil.
- With one-sided foil - type “A”. Used in conjunction with other materials for insulation.
- With double-sided foil - type “B”. Standalone use is allowed.
- Type “C” - one side is covered with special glue and protective film, and the other is covered with foil. Installed by gluing to a surface that requires insulation.
- Types “R” and “M” are embossed penofol with one foil side.
- Type “ALP” - has one-sided foil up to 14 microns, which is laminated with polyethylene film.
- Perforated material. It has a special structure that allows air to pass through.
The type of penofol is selected depending on the type of insulation work, i.e. walls, floor, roof.
Penofol laying technology
Penofol characteristics table.
Before insulating the floor with insulating material, you need to decide on its type and installation technology. Penofol types “C” and “A” must be laid under the finished floor. The insulation process begins with a concrete screed mixed with expanded clay, or with the placement of foam plastic slabs with a thickness of 5 to 10 cm. Next, penofol is laid with an overlap of about 10 cm and all joints are taped with construction tape.
It should be noted that condensation may settle on the thermal insulation material, so measures must be taken to prevent this phenomenon. To do this, fill slats up to 2 cm thick above the foil surface, which will create a ventilated space. If a wooden floor is being insulated, then the role of slats is played by logs
It is important to remember that all slats and joists must be impregnated with antiseptic and drying oil to protect the wood from rotting
If insulation is carried out using a “warm floor” system, then penofol is laid with the foil side down on a completely dry screed, and in other cases the material must be placed with the reflective side up. A polyethylene film is spread over the heat insulator, which will act as a vapor barrier. To insulate the floor on the lower floor located above the basement, type “B” penofol should be used.
As a rule, when installing a “warm floor” system, the heating elements must be filled with screed in order to subsequently obtain a flat surface for laying, for example, laminate flooring. In such cases, the “ALP” type of penofol should be used, since its foil side is laminated with a film, and, as is known, cement is aggressive towards aluminum.
Floor insulation with penofol of this type is performed on top of the primary screed, with the reflective side being on top. The sheets are laid with a slight bend, about 10 cm, on the walls and they are glued with aluminum tape. Next, heating elements are installed, a reinforcing mesh is laid, and the entire floor area is filled with concrete screed. When the surface is completely dry, it is necessary to trim the free edges of the insulation.
Using penofol for floor insulation is the best solution. With this material, moisture will not penetrate into the room, noise will decrease and it will become much warmer, since the foil surface reflects heat, directing it back into the house.
Insulation with electric cable
Heating is provided for 30% of the area, this is enough for an apartment with a centralized supply of hot water. When drawing up a cable layout, exclude places under the closet, wardrobe, bed and similar objects. More often, this type of floor heating is done in the bathroom, toilet and kitchen, with a floor covering made of tiled material.
For dry rooms, energy consumption per square meter per hour is 120 W/, with high humidity - 140 W. For example, for a room of 6 m2 you need 720 W/hour.
The thermostat is placed at a distance of 30 centimeters from the flooring. If it is electronic, then you need to install it higher.
The cable is distributed evenly on the foil-insulating material over the entire area of the site, observing a step of 20 to 40 centimeters. The brought out ends are connected to a power source. The maximum cable length should not exceed 6 meters.
After checking the functionality of the entire system, it is filled with concrete mixture. Bubbles from the inside are removed using the rules for leveling the solution (needle roller).
Note: You can use an electric floor in mats, which will significantly reduce the installation time.
Useful installation video
How to insulate a basement
It is extremely necessary to insulate the basement in a private house. Thanks to this, it will be possible not only to reduce heat loss, but also to protect the house from dampness and destruction in the future. To carry out thermal insulation work, you can use penoizol, polystyrene foam, but mineral wool can be used to seal the ceiling on the basement side. The floors and walls of the basement are insulated using polystyrene foam.
The first step is to prepare the surface. And to do this, remove all debris and dirt, apply an antiseptic and primer. This will protect the surface from rotting, and will also make the adhesion of the material to the surface stronger. Attaching a heat insulator is a simple matter that even a beginner can handle. You need to apply glue to the surface of the heat insulator, and then immediately apply it to the ceiling.
Video of floor insulation in a wooden house from the basement:
Insulating the floor below in a private house is a necessary measure to create a comfortable and warm environment. The main thing in this matter is to choose the right thermal insulation material. And although the choice today is very wide, you need to choose the insulation that will be convenient for installation, will suit your operating conditions and will provide reliable protection against heat loss.
Electrical
Modern manufacturers of electrical equipment answer the question of how to heat the floor under linoleum. The desired microclimate is created not by retaining heat, but by additional energy expenditure. The cost of the device is determined by the complexity of the technology used.
Film heated floor
The heating element is produced in the form of sheets. The canvas is laid on a heat-reflecting layer and runs on mains power. Low-power thermal film (up to 150 W/m2) continuously maintains a comfortable floor temperature and prevents overheating.
Infrared
Transparent polyester fabric is fire resistant and moisture resistant. The heating element is mounted directly under the linoleum without the use of cement or putty. This type of insulation is recommended for loggias, where it is effective and safe.
Infrared film floor
Electric
This heating method is suitable for any type of flooring except parquet. Heating cables are laid on the thermal insulation material, and a thermostat is mounted against the wall. The entire system is connected to the electrical network. After the inspection, the structure is filled with cement and linoleum is laid.
Additional insulation
If you need to insulate the floor in a house on screw piles, you should take into account the features of such a housing structure. Typically, houses on stilts are built in swampy areas with high levels of moisture, and they always have basements or basements. On the one hand, this is a plus, because such an elevation provides maximum opportunity for dryness, but the lower part of the house is always blown by the wind, which contributes to strong heat loss. Therefore, it is better to use reliable solid materials such as mineral wool or penoplex as insulation, especially if you plan to live in the house permanently.
Any house on screw piles requires additional insulation due to the high level of heat loss due to the design features. In order to equip the base in advance and eliminate the blowing, you need to either make masonry or build a frame. The masonry is constructed by digging a shallow trench around the entire perimeter of the house. A reinforcing network is laid in the trench, then a concrete screed of the required height is made.
The frame is built by installing sheathing around the entire building - it can be wooden or metal. It is on this sheathing that the heat-insulating material is attached. As a rule, this is EPS or extruded polystyrene foam. The final cosmetic stage is covering the structure with plaster and sheathing with corrugated board.
How to insulate a floor with penofol with your own hands, installation technology, video diagram
Penofol is an effective thermal insulation material that has low thermal conductivity and reliably protects homes from the cold even when laying a thin layer of material. It is often used for floor insulation, since due to its special properties, penofol increases heat transfer resistance.
Scheme of laying penofol with the reflective layer down.
Penofol can be perfectly combined with mineral wool and fiberglass when insulating floors, where it will serve as a vapor barrier. The use of this material will be appropriate in those structures that require not only thermal but also noise protection, but the thickness of the insulator should be minimal. To insulate a floor with penofol, you do not need to additionally use hydro- and vapor barrier membranes, since the material can become a replacement for them.
Penofol classification
Since the production of penofol began, its properties, scope of application and structure have undergone enormous changes. Previously, the material took the form of a roll of cross-linked polyethylene foam, one side of which was foiled with aluminum. This type of material is still used to insulate rooms, as it is highly efficient. In addition to the classic type of penofol, other types of material are produced, which are endowed with a number of useful properties:
Scheme of floor insulation with penofol with double-sided foil.
- With one-sided foil - type “A”. Used in conjunction with other materials for insulation.
- With double-sided foil - type “B”. Standalone use is allowed.
- Type “C” - one side is covered with special glue and protective film, and the other is covered with foil. Installed by gluing to a surface that requires insulation.
- Types “R” and “M” are embossed penofol with one foil side.
- Type “ALP” - has one-sided foil up to 14 microns, which is laminated with polyethylene film.
- Perforated material. It has a special structure that allows air to pass through.
The type of penofol is selected depending on the type of insulation work, i.e. walls, floor, roof.
Penofol laying technology
Penofol characteristics table.
Before insulating the floor with insulating material, you need to decide on its type and installation technology. Penofol types “C” and “A” must be laid under the finished floor. The insulation process begins with a concrete screed mixed with expanded clay, or with the placement of foam plastic slabs with a thickness of 5 to 10 cm. Next, penofol is laid with an overlap of about 10 cm and all joints are taped with construction tape.
It should be noted that condensation may settle on the thermal insulation material, so measures must be taken to prevent this phenomenon. To do this, fill slats up to 2 cm thick above the foil surface, which will create a ventilated space. If a wooden floor is being insulated, then the role of slats is played by logs
It is important to remember that all slats and joists must be impregnated with antiseptic and drying oil to protect the wood from rotting
If insulation is carried out using a “warm floor” system, then penofol is laid with the foil side down on a completely dry screed, and in other cases the material must be placed with the reflective side up. A polyethylene film is spread over the heat insulator, which will act as a vapor barrier. To insulate the floor on the lower floor located above the basement, type “B” penofol should be used.
As a rule, when installing a “warm floor” system, the heating elements must be filled with screed in order to subsequently obtain a flat surface for laying, for example, laminate flooring. In such cases, the “ALP” type of penofol should be used, since its foil side is laminated with a film, and, as is known, cement is aggressive towards aluminum.
Floor insulation with penofol of this type is performed on top of the primary screed, with the reflective side being on top. The sheets are laid with a slight bend, about 10 cm, on the walls and they are glued with aluminum tape. Next, heating elements are installed, a reinforcing mesh is laid, and the entire floor area is filled with concrete screed. When the surface is completely dry, it is necessary to trim the free edges of the insulation.
Using penofol for floor insulation is the best solution. With this material, moisture will not penetrate into the room, noise will decrease and it will become much warmer, since the foil surface reflects heat, directing it back into the house.
Which glue to buy
How to glue tiles to plywood? This issue deserves detailed consideration, because you will have to glue the tiles to a base made of wood material, which is characterized by its instability.
Therefore, when choosing an adhesive composition, it is necessary to take into account some nuances:
- A sheet of plywood is made up of thin layers of brittle veneer, and if the bond is broken, the plywood will delaminate and will no longer be strong. This feature of the material is a good reason to choose an adhesive that does not penetrate deeply into the structure of the material.
- No matter how strong the base is, it can still bend slightly under load. In this case, the cement-based adhesive will not hold the tile, and it will easily come away from the plywood. Therefore, only elastic adhesive mixtures should be used.
The composition of such mixtures includes highly elastic components:
- microfiber;
- fiberglass;
- silicone;
- silane and other modifying additives.
It is important! When purchasing glue, make sure that the list of listed materials for which it is intended to work includes plywood.
Types and scope of application of penofol
Main types of material
| TYPE | COMPOUND | APPLICATION |
| A | Foiling only on the outside | Used in combination with polystyrene foam |
| IN | Aluminum foil lining on both sides | Can be used without additional materials |
| WITH | Self-adhesive type, foil-lined on one side. On the other hand, it is impregnated with a contact adhesive composition. | Installation is carried out without the use of additional adhesives. |
| R and M | The foiling is one-sided, has a relief base | Suitable for interior and exterior work |
| Super NET | NET – means network. Double-sided foiling. | It is used for thermal insulation of pipelines, heating mains, air ducts. |
| A.L.P. | Laminated penofol. A cellophane film is applied over the foiling. | Widely used in agricultural work. |
You may find the brand "Penofol 2000"
- This is the cheapest type of penofol. It is of low quality and less durable.
Scope of application of penofol
The scope of application of insulating material is extensive. The main thing is to choose the right type of penofol.
In construction
reflective heat insulator is used:
Other applications:
- Refrigerators, refrigerators, vans.
- Cars.
- Railway carriages.
Necessary tools, materials
for installation work:
- Wooden beams.
- The slats are 15–20 mm thick.
- Antiseptic.
- Adhesive composition for certain types of penofol.
- Dowels, self-tapping screws for fastening the frame.
- Aluminum tape for gluing joints.
- Scissors.
- Furniture stapler.