Everyone loves laminated floors - they are beautiful, affordable, and they are not difficult to install. Infrared film can also make the floor warm, which will add comfort and coziness to the room during the cold season. This heating method is best suited for laminate flooring because it does not require much labor . In addition, infrared heated floors under laminate do not have a detrimental effect on the coating material. The room can be maintained in the same way as before before installing the heating system. Installing a heated floor under a laminate is easy to do with your own hands, using step-by-step instructions and a video. It's easier than installing an electric floor.
System characteristics
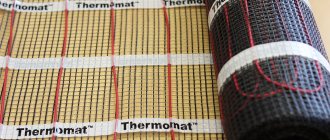
The heating structure of a warm infrared floor is a very thin carbon film. The material has high thermal conductivity with low energy consumption. The parts are connected to the power source using wires. The cable is made from a reliable copper-silver alloy.
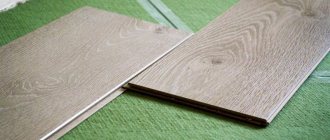
Film for laminate Source optistore.com.ua
The base is laid under the floor covering. The surface emits infrared waves up to 20 microns in length. When heated, the heating system acts on the floor, increasing the temperature in the room. Model characteristics:
- operating voltage – 220 V;
- warming up – 45-55 C;
- power – 150-400 W;
- radiation range – more than 90%.
Advantages of heating
In many respects, infrared floors outperform traditional schemes (cable, water). The equipment acts directly on the floor covering. The heating method creates a microclimate favorable for humans. The oxygen in the room does not burn out or dry out.
The infrared design practically does not raise the floor height. Material thickness – up to 0.5 mm. Installation does not require a dimensional screed, so the equipment does not hide useful squares. The models are relevant for rooms with low ceilings.
Advantages of equipment Source odstroy.ru
Infrared flooring is an ideal option for heating local areas. Electrical elements are located in areas where people are located, not furniture. The design is suitable for:
- bathroom;
- children's;
- kitchens;
- bedrooms;
- places for people to pass.
The infrared floor is not afraid of frost, which allows it to be installed in the countryside and country cottages. In winter, owners do not need to drain water from the system for fear of freezing. Many months of downtime or complete frostbite do not affect the performance of the equipment.
Infrared floors have low thermal inertia of heating. The equipment reaches maximum parameters (45-50 C) in the first minutes after switching on. The design ensures uniform heating of the room. The indicator is appropriate in rooms that are periodically heated. The area of greatest comfort is located in the lower zone – in the legs. There is often a coolness under the ceiling in the room.
Advantages of the system Source teplotown.com.ua
Is additional thermal insulation necessary or not?
Additional thermal insulation when installing an infrared floor is aimed at:
- Protection of the heated room from the penetration of cold air flows from outside;
- Saving heat indoors and preventing it from escaping outside.
The need for additional insulation depends on a number of factors:
- In what room is the floor installed? If it is located on the ground or above the basement, then the thermal insulation layer should be thicker.
- What kind of substrate is laid - that is, the type and its thickness. When using a thin foil product as a flooring, insulation made of expanded polystyrene foam, cork or polystyrene foam is required.
If you do not adhere to these rules, the floor will not work efficiently (heat will be wasted), and this will entail additional costs.
Equipment disadvantages
Infrared floor heating models have disadvantages. The thin surface of the product can be torn if installed carelessly. It is prohibited to place heavy objects (furniture) in areas where the heating system is located, otherwise there is a risk of destruction.
Infrared heated floors run on electricity. The design consumes a lot of energy, so it is better to power it from an individual line. Automatic protective shutdown and grounding will protect users from danger during operation.
Multilayer construction Source diy.ru
Alignment
The very first stage is leveling the floor. Naturally, the old coating must be completely removed, the surface washed and dust removed. If small holes remain in the floor slab itself (they can form during the construction of the house), then they can simply be filled with sand.
If the floor is flat, then it is necessary to lay a special material directly on it to reflect thermal radiation. The underlay for film heated floors is inexpensive and is laid over the entire area - close to the walls. To avoid shifting, this material can be attached to the floor with double-sided tape - just glue it around the perimeter. The presence of a heat-reflecting surface increases the efficiency of the heated floor and significantly reduces heat loss through the bottom. If the floor had holes, then this material will completely cover them.
Features of interaction with laminate
Warm infrared flooring is compatible with tiles and linoleum. Not every board is suitable for a hot surface. For example, PVC models are made from heat-resistant polymers. MDF laminate contains formaldehyde resin, which is used as a fastening ingredient.
The substances are harmless at room temperature (20-27 C), but begin to emit vapors when heated. The operating mode of the infrared floor is 45-55 C. At lower values, the equipment will not warm up the floor covering.
Features of interaction Source uutvdome.ru
Laminate flooring can become deformed when exposed to heat. Boards that are too thin dry out, losing their shape and bending. With constant heating, the finishing material will lose its decorative and performance characteristics.
In order for the laminate to interact without problems with the infrared system, it is important to choose the right model. There is no dangerous formaldehyde in flooring with classes E1 and E0. Even at maximum heating, such boards will not evaporate toxic substances.
To prevent the laminate from deforming under the infrared floor, preference is given to models with a high wear resistance class (31 or more). The lamellas will not bend and will retain their original appearance under constant exposure to increased temperature. The label of the finishing material must contain a marking of the warm system - an icon with a curved pipe.
When purchasing laminate flooring for infrared flooring, we recommend choosing models with a locking connection. If the boards are glued together, then after fixing, a very hard surface is created. With temperature changes and constant physical impact, the connecting layer breaks, which spoils the decorative effect of the finishing material.
What is suitable for IR heating Source krrot.net
What materials need to be prepared
You will need a heating film, as well as wires of the required length to connect the underfloor heating strips, insulation, clamps, and a heat-reflecting substrate.
The last material is calculated based on the area of the room. Installation will be carried out using adhesive tape, and both one-sided and double-sided options will be required. It is not mandatory, but it is recommended to use liquid thermal insulation. If you plan to lay a heated floor under a laminated coating, use polyethylene film. You need to first buy a temperature sensor and thermostat.
Everything you need for installation
How to install
To neutralize the disadvantages of infrared flooring, it is important to install heating equipment correctly. The structure must be placed in an area where people are often present. It is prohibited to place film equipment under furniture. We recommend planning the room in advance, marking the equipment installation areas, and calculating the power parameters of the model.
The base under the infrared floor is cleared of debris. Condensation should not form on the surface, which is dangerous for any electrical appliances. Installation is carried out on a perfectly flat base, so the area is carefully leveled and dried.
The infrared floor film is cut lengthwise into small strips of 25 cm. A waterproofing layer is installed at the base. The blanks are laid out on the surface in activity zones that have been marked in advance. The material should be 30 cm away from the walls. Small gaps (up to 5 cm) are left between the rows of plates.
The blanks are connected into one structure using wires and terminals. Thermal sensors are placed in the center of the strips, with the cables reaching the regulator. The last device to be connected is the one responsible for setting up the IR technology. A thick polyethylene film is placed on top, then the laminate is installed.
Installation of infrared heated floor
To work you will need:
- Film mats of the required length.
- Adhesive heat-resistant tape.
- An installation kit consisting of contact clips for connecting the strips and the power supply, as well as insulating adhesive tape.
- Thermal reflective mylar backing. The best option is products from the same manufacturer as the heating system.
- Polyethylene film.
- Power wire. Its cross section depends on the characteristics of the film heaters used. In particular, for systems with a total power of up to 1.5 kW, it is recommended to use multi-core copper PV-3 with a thickness of 1.5 mm, and for strips from 1.5 to 3.5 kW - 2.5 mm.
- Temperature sensors: main and backup.
- Thermostat of suitable power.
- A set of hand tools: stripper, pliers, press, construction knife, tape measure, marker.
Laying infrared heated floors under laminate is carried out in several stages.
Preparatory work
First of all, you need to develop an installation project. Laying the film chaotically is stupidity, which will seriously hit the pocket of the owner of the premises. Therefore, on paper to scale, draw a plan of each room, mark the locations of heavy furnishings (wardrobes, sofas, refrigerator, etc.). This will allow you to calculate the exact number of film mats, cables and connecting elements. And also decide on the required power and model of the thermostat.
When calculating the heating area, keep in mind that IR mats should not be laid overlapping, but end-to-end. In addition, maintain a distance of 5-10 cm from enclosing structures and interior items.
FACT! The manufacturer claims that for maximum efficiency it is necessary to cover at least 70% of the room area with the heating system. And when using film mats as additional heating, 40% is enough.
So, when the exact area of installation of the IR system becomes known, you can roughly calculate:
Total power of underfloor heating
Multiply the number of square meters by the capacity of 1 m² of film declared by the manufacturer. For example, 15 m²*150 W/m² = 2.25 kW.
To find out which thermostat is suitable for your system, subtract 20% from the resulting figure. In our example it is 1.8 kW. Accordingly, you will need to purchase a thermostat whose characteristics indicate the maximum load level at 1800 - 2000 W.
Approximate energy costs
The formula is simple:
heated floor area * film power * actual operating time * conversion factor
The latter is the temperature level that is planned to be set on the thermostat. For example, if the system operates stably at 50% power, then Kp = 0.5.
The approximate operating interval of the heating elements can be from 5 to 20 minutes per hour, that is, on average about 12 minutes. Thus, for our example the calculation will be as follows:
15*150*0.5 ≈ 1.1 kW/hour.
1.1*12*24/60 ≈ 5.3 kW/day.
5.3*30 ≈ 159 kW/month.
159 *4.01 rubles/kW (tariff for electricity in the Moscow Region at the beginning of 2022) = 638 rubles/month.
Of course, the calculation is very approximate, since the main variables are variable, and there are many individual, climatic and other factors. Taking them into account, you can more or less accurately calculate electricity consumption and heating costs for the period.
The next task is to prepare the base for installation. Concrete or wood floors must be level, clean, dry and durable. All irregularities must be eliminated, dust removed, and preferably primed with a binder.
Installation of the IR system
If the wires supplied to the thermostat from the panel and from the floor heating system are planned to be “recessed into the wall,” then you should first prepare grooves for the cables and a hole for the dimensions of the thermostat. All debris and dust must be removed after completion of work, and the base must be thoroughly vacuumed. If you don’t want to damage the walls, you can simply secure the wires on top of the enclosing structures and cover them with a white or colored cable channel. And fix the thermostat using dowel nails at a level of up to 1.5 m from the floor plane.
In accordance with the layout plan, markings should be applied to the base and a recess 7 mm deep should be prepared for installing a temperature sensor a meter from the wall. Then lay the heat-insulating material with the reflective surface facing up and fasten the mats together with adhesive tape.
Strips of infrared film are laid end-to-end on top of the substrate, in no case overlapping. According to the manufacturer’s advice, it is best to immediately seal the cutting lines of the copper busbar using adhesive tape. The laid mats must be connected around the perimeter with adhesive tape.
Now you need to properly connect the strips into a single circuit. All elements are connected in parallel, as shown in the diagram below.
Wires are connected to the mats using two methods - using contact clips or soldering.
In the first case, the terminals are attached to the busbar and clamped using a press or pliers. The wires are fixed to them and insulated with bitumen tape.
In the second case, connectors are not needed. The cable is carefully stripped of its insulation and soldered to the copper strip. All connection points are carefully sealed.
IMPORTANT! Laminate flooring is very sensitive to the slightest unevenness underneath. And the backing is usually not enough to hide terminals, wires and sensors. Therefore, experienced craftsmen recommend following GOST R 50571.5.52-2011 part 5-52 and making recesses in the subfloor for all elements. Otherwise, constant pressure will lead to their damage, leakage of bitumen mastic in places of insulation, exposure of clips and copper busbars. At best, one of the IR film strips will fail.
The next step is to fix the main and backup sensors and connect the thermostat. The sensors must be placed in a pre-prepared recess and secured with adhesive tape under the heating part of the film. The cable from them is routed to the thermostat and connected. Next, connect the wires from the IR floor and the electrical network according to the manufacturer's instructions.
Next, you need to check the connection, that is, turn on the system for 15-20 minutes and test all the bands.
Laying laminate or other finishing material
It is necessary to lay a polyethylene film over the heating mats with an overlap of 10-15 cm, and secure the edges. No backing required. Installation of the laminate is carried out as carefully as possible in accordance with the manufacturer's instructions from the far corner. After completing the assembly, you can install skirting boards around the perimeter, bring in furniture and install it in the places indicated on the plan.