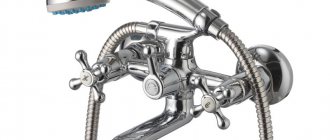
In any apartment a situation arises when it is necessary to replace the old faucet. Calling a specialist costs money. And you can do this simple job yourself. Connection options are studied in advance before the faucet is installed on the sink. Choose between rigid wiring or flexible wiring. Installing the faucet on the sink in one way or another depends on the model of the water distribution mechanism.
For example, it is recommended to choose a single-lever kitchen faucet with a high spout. We must not forget about the size of the washbasin. If the washbasin does not match, then drops of water will fly in different directions. The small size of the spout reduces the power of water pressure. For exclusive models, the installation method may differ from standard ones. Each device is supplied with instructions from the manufacturer for its installation.
When you can't do without replacing the faucet
Not all crane breakdowns require replacing it with a new model. Sometimes repairs can be made and the device functions well. But there are breakdowns that cannot be repaired.
- A broken faucet does not stop the flow of water. The water in the tap does not shut off in the “closed” position.
- A clogged faucet aerator significantly reduces the water pressure when supplied.
- The service life of a water hose is from 3 to 7 years. It is called an unreliable place, and it breaks and leaks.
- The faucet's attachment to the sink has broken and it's wobbling.
The listed breakdowns can be repaired, but it will be so problematic that it is better to install a new device.
- The device case burst.
- The model simply fell out of favor and seems outdated to the owners.
In this case, repairs will not help at all. A new mechanism is being installed.
Types and options for repairing breakdowns
Replacing the faucet is not always necessary. Sometimes it is enough to replace one element and the faucet will work properly again. Let's figure out what breakdowns of the kitchen faucet can occur during operation and how to fix them.
The most common malfunctions are of the following type:
- A leak has formed at the junction of the spout and the body. Due to the constant rotation of the spout, the rubber o-ring wears out and the valve begins to leak. To replace the gasket, you need to disconnect the spout, remove the old gasket, install a new one, wrap a sealing tape around the connecting thread and fix the part in its original position;
- leaking from under the joystick. The reason is a cartridge failure. The wear of the cartridge can be determined by the fact that the lever begins to rotate poorly, the water temperature begins to change spontaneously, and the water cannot be completely closed. It is necessary to replace the cartridge, for which you need to remove the cap from the mixer body, unscrew the screw and remove the lever and decorative cover. We take an adjustable wrench, unscrew the nut holding the cartridge, and remove it. We insert a new cartridge inside the body and assemble the mixer;
- leakage of a two-valve mixer: the rubber washer on the valve shaft has worn out or the valve head has collapsed. To eliminate the malfunction, remove the cap from the faulty valve, unscrew the screw fixing the valve, unscrew the head and replace it with a new one. If the crane cassette is in good condition, we only change the gasket.
There is nothing impossible in installing a kitchen faucet. You just need to stock up on the necessary knowledge and a set of tools.
You can learn more about the mixer installation process by watching the video:
Tips for choosing a faucet
- The water distribution mechanism is easier to install and replace later without removing the sink if it is selected with two pins instead of one large nut. Models whose price is average and above average are usually attached with pins. They can be installed and dismantled without disturbing the position of the washbasin.
- A cheap faucet comes with unreliable hoses. It is recommended that you purchase new hoses before installing the faucet on the sink. This will help avoid having to replace them quickly.
- An easy way to choose a reliable faucet is to choose by weight. Several models are selected and their weights are compared. The heaviest mixer will be made of brass. The rest are made of aluminum and its alloys.
- Non-standard models are more difficult to repair, as there may be problems with spare parts. Then only installing a new mechanism will help correct the situation.
Standard installation height
The installation height of the shower mixer is standardized by SNiP. The recommendations are based on static studies, but are calculated on average parameters of height and complexion.
- In many ways, the position of the device is determined by the height of the sink . This device is in any case placed higher than the bathtub. The standard distance of the washbasin from the floor (to the top of the side) is 80 cm, and the bathroom, also to the top of the bow, is 60 cm. The mixer is installed so that the spout moves freely over the washbasin and bathtub and makes it possible to wash your hands under the stream. According to SNiP standards, this is 100–110 cm from the floor.
- If the shower mixer serves only the bathtub , the mounting height is determined by ease of use. As a standard, the mixer is located at a height of 20 cm from the side or 80–85 cm from the floor.
- In a shower stall, the device only serves the shower . The height is determined by average standards and is 110–120 cm from the floor.
SNiP standards are designed for a standard pallet - steel or cast iron with legs. For modern acrylic and ceramic models, the height must be calculated individually, taking into account the installation method, type of support, and the height of the podium.
Selection of eyeliners
The tap is connected to the water supply system using flexible and rigid connections. Rigid hoses are reliable, and flexible hoses are easy to install.
The standard length of flexible hoses is 86 cm. This is enough to prevent the hoses from breaking. They are laid in a semicircle.
If the kit comes with short eyeliners, 30 cm long, then they will have to be sharpened. Extra connections and problem areas for leaks appear. Therefore, it is recommended to immediately purchase hoses of the required length. The eyeliner should not be stretched.
The compatibility of the mixer materials and connecting hoses is taken into account so that corrosion does not appear on the elements.
Equipment
After purchasing, you need to consider the bathroom faucet and its components. The package must contain:
- shower head
- flexible hose;/p>
- rod holder;
- tap and valves (lever mechanism);
- seals;
- nuts;
- reflectors - decorative elements that cover the point of contact with the wall;
- bushings and spout.
The kit should also include assembly instructions, following which you need to connect all parts of the structure. There is no need to touch the internal parts of the mixer; you just need to screw the elements to each other.
Algorithm for removing an old crane model
- Installing a faucet on a sink begins with shutting off the water supply in the riser. To make sure that it is absent, just open the tap.
- The old device is unscrewed from the hot and cold water pipes. After this, the threaded connection on the pipes is cleaned. If the threaded connections are stuck and they are difficult to unscrew, then the places are pre-treated with kerosene. After 20 minutes the thread unwinds.
- It is recommended to mark the location of the cold and hot flow pipes. Only after this is the eyeliner disconnected.
- The device is secured in place with a nut. It is unscrewed with a small adjustable wrench. Sometimes the mixer is secured with a pin or a pair of pins, onto which nuts are screwed for fixation.
Pros and cons of a faucet installed in the bathtub
Advantages:
- Minimum injury. Considering that in many models, after installation, few parts remain on the surface, it is almost impossible to get injured during water procedures.
- Aesthetics. All communications are mounted into the wall and are not visible on the surface.
- Ease of repair. The internal unit of the device has a simple design and can be easily repaired if necessary. Often repairs come down to replacing seals.
- Easy to clean. The number of visible elements is small, which means removing splashes and stains from chrome surfaces will not take time.
- Space saving. Reception is relevant in small rooms, since the minimum number of parts of the device visually increases the space.
The disadvantage is the need to make a professional wiring diagram and install pipes into the wall, which is not always possible to do yourself.
Attention! Some models designed to be placed on the wall are not cheap
Installation of a new model
- Before installing the bathroom faucet in the sink, the device is assembled. At the initial stage, a flexible hose is screwed into the mixer. Particular care is taken when working with rubber cuffs. They are located on the eyeliner fittings.
- Before screwing them in, it is recommended to immerse them in water. The mixer is secured at the bottom with stud fasteners. A ring-shaped rubber seal is installed.
- In the sink, hoses with hot and cold water supply are threaded into the hole. After this, the crane is installed in its place.
- A clamping nut under the sink or under the washbasin secures the position of the tap. A rubber gasket is placed between the washer and the sink to prevent leakage. After this, the clamping nut is screwed onto the stud. The mixer takes a more stable position.
- The tap nuts are tightened carefully. After they are fully tightened, the faucet is fixed to the sink.
1 – fastening pin; 2 – hot water supply hose with red streak; 3 – cold water supply hose with blue streaks.
Installation of the new device ends with connecting flexible hoses to the cold and hot water supply pipes. The nuts for supplying the hose are screwed onto the threaded connection of the pipes of the water supply system. The nuts have rubber seals. Therefore, they are twisted without using force so that they are not damaged.
The threaded connection is covered with FUM tape. This seals all connections. After connecting the flexible line, a check is carried out to ensure that the work was done correctly and that there are no leaks in all places where the connection was made. The water supply in the riser opens and the mixer lever is moved to the “open” position. The absence of leakage confirms the correct installation of the faucet on the sink.
To prevent the surface of the mixer from being scratched during installation, it is recommended to cover it with regular electrical tape.
If the tightness of the connections is not broken during use of the faucet, it will last for more than one year.
Problem #2: Having the necessary inventory
For me, this, in fact, was not a problem, since I always try to keep my workshop as complete as possible. But I advise everyone else, before installing any plumbing fixture, not just a faucet, with your own hands, check that you have the following tools and materials on hand:
| Name | Purpose |
| Adjustable and gas wrenches | Unscrewing and tightening threaded connections |
| FUM tape | Sealing of threaded connections |
| Spirit level | Maintaining the horizontal position of fittings and mixer |
| Hammer and grinder | Creating grooves for pipes |
| Pipe soldering iron | Connection of plastic pipes |
A gas wrench is the most important tool when working with plumbing.
Thread standards
The diameters of the supply pipes and pipes must strictly correspond, and the threads must have the same parameters. According to the standards, they must correspond to ¾-inch pipe threads. Mixer pipes can be of two types:
- With a union nut having a ¾ inch internal thread. This design is needed when cutting external threads on outlet pipes.
- With external thread. They are designed for installation in water sockets containing union nuts.
When using eccentrics, other thread parameters are sometimes used. Outlet fittings may have a ½" internal thread to accept an eccentric with a corresponding external thread. Its second end has a ¾-inch external thread, and is intended for screwing on the mixer union nut.
Work order
If you need to install a water socket in an old and not very strong wall, it is necessary to carry out preparatory work. To do this, all weak areas and seams are cleaned, defects are eliminated, and weak spots are strengthened with a special cement-based compound. Pipe installation begins only after the wall has completely dried.
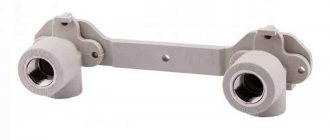
Most mixers have a center-to-center distance of 150 mm. This length should be taken into account when installing water sockets. But there are faucets that are slightly narrower or wider than others. There should be no problem here, since almost any mixer can be installed on a standard outlet using an adjustable offset of the eccentrics.
On a flat wall, holes for fastening water sockets are marked and drilled (at least 3 pieces, regardless of the material of the system). A small rubber gasket 3–4 mm thick and 7 x 7 mm in size must be glued to the installation surface on the back side of each water socket.
After this, the water sockets are attached to the wall, leveled according to the recessing depth and slope using self-tapping screws. The resulting gap between the installation platform and the water socket is filled with thick polyester putty.
Description
Western thuja "Golden Globe" is famous for its unpretentiousness and small crown size. These properties have made it popular with both amateurs and experienced landscape designers. Bright needles, colored in a non-standard way, make this plant suitable for:
- for a summer residence;
- for a country house;
- for a city street;
- for the park;
- for container gardening of terraces, roofs, and other places.
The dwarf variety produces a modest annual growth. But you can safely expect that the area will look bright, regardless of the season. The positive features of the plant are:
- no need for constant attention;
- the ability to maintain a spherical crown even with infrequent haircuts;
- ability to thrive with limited care;
- pronounced decorativeness;
- constancy of crown geometry throughout the entire development period;
- covering the tips of the branches with yellow needles;
- high probability of rooting after planting.
The description of this variety of thuja shows that with the onset of autumn, the surface needles acquire, instead of yellowish, a brownish-red, as if copper, color. In the next growing season, the original attractive colors return. But this only happens if the tree is immediately planted according to all the rules.
Arborvitae should be planted in sunny or partially shaded areas. In this case, care should be taken to cover the plant from cold winds. An adult tree reaches its largest size by the age of 15 or 20 years. At this moment, the crown grows to 1-1.2 m. The diameter of the crown exactly matches the growth of the trunk.
The attractive condition of a plant at any age is determined by the quality of the soil. It should have a loose structure. It is required that the soil contains a sufficient amount of nutritional components. At the same time, any stagnation of water (both precipitation, groundwater, and melt liquids) is unacceptable. It is advisable to choose areas composed of loam or improved sandy loam; Higher density soils will have to be improved by adding peat and sand.