A house with an attic is not uncommon. Many people choose such a construction solution because it not only allows them to obtain additional living space, but also helps transform the appearance of the building itself. Many projects involve the presence of an attic balcony, the advantages of which continue to be debated among construction professionals.
An attic with a balcony is not a luxury these days, but a useful necessity
Advantages and disadvantages of attic balconies
When a customer plans to make a balcony in the attic, this may be due to the following factors:
- the presence of a balcony on the second floor gives the house completeness;
- additional space can be used for relaxing and drinking tea;
- if there is a terrace or porch on the ground floor, then the balcony slab can act as a roof for such structures;
- in the event of a fire, the balcony section can become an additional means of evacuation (if there is a hatch or ladder).
A balcony makes living in the attic more convenient and comfortable.
However, it is worth mentioning the disadvantages of building a balcony in individual houses:
- the construction of such a balcony will require a lot of financial investment;
- the presence of an additional exit in the attic leads to a decrease in the thermal insulation of the room);
- in winter, snow will accumulate on the ceiling, in warm weather - water, so waterproofing will be required (which also requires additional costs);
- an open balcony is a source of dirt that will enter the room.
Of course, all the shortcomings can be eliminated, especially if there are additional funds and an irresistible desire to make the house unique.
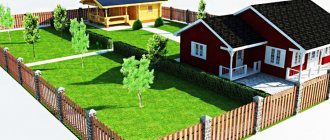
The attic balcony offers an excellent view of the site and the surrounding area, which is especially valuable if the house is located in a picturesque location
With a German flavor: beautiful gables of half-timbered houses
Half-timbered houses are a recognizable symbol of German and Austrian cities, and Central Europe in general. Framed “gingerbread” walls with exposed wooden beams are very aesthetically pleasing due to the contrasting combination of dark wood and light plaster. In addition, the frame beams of half-timbered houses are often installed in such a way that a unique pattern is created on the walls.
Decorating the gable of a house as a half-timbered structure is a very successful design solution that can be combined with any type of cladding: plaster, brick, natural stone. At the same time, it is very easy to make such a pediment, and additional costs are minimal - you only need to buy wooden boards, fasteners and paint and varnish for them.
Even very simple half-timbered gables of houses, decorated with straight boards, look elegant:
And if during construction you use natural stone, roughly processed wood and low-quality clay bricks, which look like ancient handmade material, you can achieve an amazing effect. A good example is the beautiful gables of private houses in the photo below. These techniques make homes look like they came straight out of a fairy tale.
By the way, a half-timbered pediment may not be decorative. The attic floor of a house made of brick or gas block can be made into a frame. It's much cheaper than building brick gables. In addition, a wooden frame is much lighter, therefore, the supporting structures, including the foundation, can be made less powerful. And a bonus to all this is the very decorative design of the pediment. An excellent “eco” solution in every sense.
Types of attic balconies
Designers have many “balcony” solutions for the attic floor, but in modern construction practice there are only three design options for bringing such an idea to life.
The attic may have two or more balconies, different in design and design
Roofing
In this case, the balcony is located on the roof side. Changes in the roof structure cannot be avoided here; one slope is modified to accommodate a balcony niche. To prevent precipitation from falling onto the balcony, a canopy with the same covering as the main roof is placed on top.
A roof balcony is a niche in the roof slope, fenced with walls and railings
It is possible to obtain additional area of the attic loggia; for this purpose, a small extension is made beyond the roof. If a large extension is planned, for example, for the construction of a large terrace, then metal, wooden or concrete supports will be required to strengthen it.
Pediment
The pediment is the upper part of the building's facade, bounded by a gable roof and having a triangular shape. The balcony located in this place is called a pediment balcony.
The pediment balcony is located in the front part of the attic
There are two subtypes of this design: internal and external (with offset).
Benefits of taking out:
- additional free space on the second floor, which can be used for recreation;
- the base of such a structure does not take up part of the interfloor ceiling (when snow melts or during heavy rain, drips can be avoided on the ceiling of the first floor).
According to professional builders, it is easier to make an internal balcony, since one of the fronts of the roof is located deeper in relation to the facade of the building to obtain the required balcony space. Such structures are rarely glazed, so it is worth thinking about waterproofing the base in order to prevent flooding of the first floor. Do not forget that the wall separating the inner room from the balcony does not rest on a supporting structure, and therefore should not be excessively heavy.
An internal balcony, recessed like a terrace, captures the usable area of the attic
There is another gable structure located under the attic roof, the base of which protrudes beyond the boundaries of the first floor. This option can be obtained using “hanging rafters”, which are selected in the lower part by columns. This is the most suitable solution, but requires considerable financial costs.
A protruding balcony can match the width of the house or be quite compact
Other
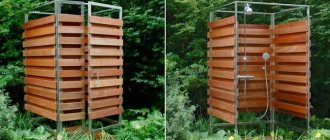
A relatively new solution in the field of roofing is a mansard roof with a balcony, the so-called balcony window. There are two provisions for this design. When closed, this is the most ordinary window, located in the same plane as the roof. If you open it, the structure transforms into a small balcony.
A balcony-window is a relatively easy way to organize direct access from the attic to fresh air
The operation of such a system is as follows:
- When you turn the handle, the window unlocks, allowing you to lift the upper part and push the lower part forward.
- In parallel with the extension of the lower part, railings appear in the side part, necessary to ensure safety while using the structure.
- The process of closing such a window occurs in the reverse order; first you need to close the lower part, and then the upper.
Metal-plastic windows are used as a basis. Compared with a conventional metal-plastic profile, this design is supplemented with reinforcement, which makes the structure more durable. If you choose high-quality fittings, then opening and closing such a system will not be difficult.
Such a hybrid can hardly be called a real balcony
The only disadvantage of the “balcony” option can be considered the location of the window itself. In the retractable state, there is free access to the room, so during rainfall the structure should be closed.
Design Features
In general, houses with an attic and a balcony cannot be called something new and unusual. Just like a second bathroom is no longer a novelty in domestic private homes.
But still, such a design, where the attic floor is complemented by a balcony, has its own characteristics. I would like to discuss the project in more detail, take a look at its strengths and weaknesses.
And if you like this option, you can order an individual project before construction, determine the area of the attic, allocate space for a balcony, and begin construction. Please note that the roof in this case requires increased attention. It is important that the roof protects from precipitation, as well as other external influences, doubly more effectively than when there is an ordinary non-residential attic under the roof.
A rooftop balcony is hardly a luxury. Rather, it is a necessity that can bring benefits. The design of a house with an attic and a balcony is more comfortable and convenient. Such solutions have several important features of the construction of the structure:
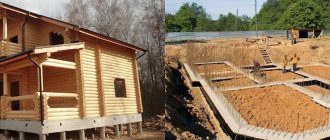
- Balcony in the original project
. It is best to build a house with an attic and a balcony by adding a structural element to the initial design. Attaching a balcony to an already built house is much more difficult. If you make a mistake, you can face serious consequences; - Side and front balconies
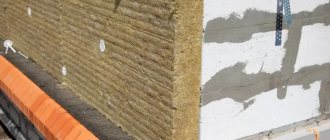
. They will be a continuation of the attic space. That is, the load-bearing elements are common. Because of this, part of the house is left unprotected. You will need to carefully approach the thermal insulation, as well as the waterproofing of the room under the roof; - Porch area
. It depends not only on your desire, but also on the dimensional characteristics of the attic, as well as on the side on which the balcony is located; - Weight
. An extension to a finished house requires minimizing the weight of the balcony. Therefore, it is better to make do with wood, light metals and plastic.
Knowing these nuances will help you correctly build and organize a house with an attic and a balcony.
Photos of interesting examples of interior design for a balcony in the attic
Examples of an attic with a balcony can be seen in the photo:
Small balcony with a beautiful view of the lake
Cozy seating area on the open attic balcony
Balcony-window, complemented by an area for outdoor recreation
Roof balcony equipped with sash windows
Home greenhouse on a glazed attic balcony
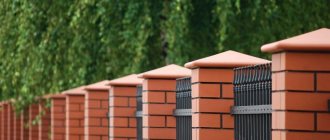
Beautiful gables of private houses with brick patterns
Decorating the gables of houses using brick patterns and reliefs is a design technique that appeared at the same time as brickwork itself. Most often, window openings are distinguished this way. As an example, let's look at the beautiful gables of the houses in the photo below. These are city cottages made of red brick. The windows are highlighted with arches and light-colored blocks.
The technique of highlighting window openings with bricks works not only on brick houses. A classic example is one of the houses in the village of Marie Antoinette in Versailles, the pediment of which is decorated in this way.
You can also use different shades of brick to make the masonry more varied.
Or even experiment with the direction of laying:
The main thing is that all these pediment design techniques do not require serious additional costs.
In this article I will talk about the features of attic balconies. I will consider their types, pros and cons. We will also look at options for arranging an attic with examples of successful kitchens, living rooms, offices and children's rooms.
Photo gallery: 50 design options for balconies in the attic
Calculation of the rafter system
The initial data for the calculation are taken from a previously developed project. For example, let’s look at a roofing diagram with an attic.
The design drawing indicates the dimensions, installation locations and material of all elements of the roofing system
The main indicator, calculated first of all, is the pitch of the rafters, depending on the planned finishing coating. So, to install ceramic tiles, the pitch of the rafters should be no more than 60 centimeters, and if you plan to install a plastic covering or soft roof, this figure can be increased to 120–150 centimeters. Again, you need to take into account the nature of the loads - a combination of the effects of wind and snow - and set the optimal angle between the roof slopes.
The procedure for calculating the number of rafters
For example, consider the installation of roofs for a house 10 meters long. As a first approximation, we take the distance between the rafter legs to be 80 centimeters. Then you will need them: 1000: 80 + 1 = 13.5. Since the number of rafters must be an integer, we round the result to 13. In this case, the exact distance between them will be 1000: 13 = 769 (millimeters). This is the exact value of the gap between the axes of the rafter legs .
hatch in the floor under linoleum in the basement in a wooden floor
When calculating the need for materials, you need to take into account their cutting ability. In the case of wood materials, their length can be 4 or 6 meters. During the design process, it is necessary to select the dimensions of parts taking into account the formation of the smallest amount of trim . Coniferous wood trimmings are unsuitable even for firewood for stoves .
Materials for truss structure
The traditional material for rafters in Russia is wood. Larch is considered the best option, however, due to price and availability, it cannot always be used. Therefore, beams made of coniferous wood are used. The size of the section depends on the design of the building.
Composite profiled wood materials are becoming increasingly common. These include:
In individual construction, wooden materials that mimic the shape of metal ones are increasingly being used.
A wood channel is stronger than timber and weighs less
The metal truss structure is susceptible to corrosion and requires regular maintenance
Installation of the roof truss system taking into account the formation of the attic
The rafter system of a gable roof can be formed in two ways:
The first option is a more productive and convenient way.
Assembling the roof trusses below
This work is done in the following order:
All roof trusses are made according to a single template, which is the first assembled structure
Video: assembling roof trusses “on the ground”
Installation of rafter elements
The rafters, as the main load-bearing element of the roof skeleton, must be securely connected to each other. Many different methods have been invented for this, including specific ones designed for certain types of buildings. The rafter system of a wooden house requires special attention. The beam is attached to the Mauerlat by a sliding device, and the ridge connection is made on a hinge. This is due to constant seasonal movements of the log house, which must be compensated.
Photo gallery: methods of connecting rafter legs
Installation of support posts and purlins
This is a responsible operation, because at this stage the surface of the front finishing of the walls and ceiling of the attic is formed. Therefore, the execution procedure is the same as when installing rafters:
The racks are attached to the purlins and the Mauerlat using metal corners
For the manufacture of all parts of the rafter system, timber of the same dimensions is used, usually measuring 50x150 or 40x150 millimeters.
Video: quick installation of the rafter system
Lathing
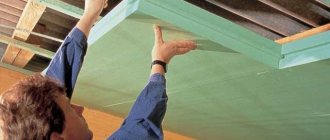
This is a mandatory element of the rafter system. In the case where a warm attic space is formed in the under-roof space, the sheathing is done twice:
In addition, counter battens are also installed, with the help of which the ventilation system of the under-roof space is organized.
The counter-lattice is placed parallel to the rafters and provides clearance for ventilation of the under-roof space
For the lathing, a board measuring 25x100 millimeters, edged or unedged, is used. Unedged boards must first be sanded. It is not recommended to use a board wider than the specified size. When warping, it can deform the finishing coating or damage the roofing pie.
The sheathing boards are fastened with nails at least 70 millimeters long and at least two nails for each intersection. This method increases the structure’s resistance to wind loads.
The spacing of the sheathing depends on the material of the finishing coating - for ceramic tiles and soft roofing it should be minimal (about five centimeters); for metal tiles or corrugated sheets, a distance between the boards of up to 70 centimeters is allowed.
A properly laid roofing pie must contain a ventilation gap between the insulation and the roofing material, which helps quickly remove moisture
Construction of a rafter system for a gable roof with an attic
The gable roof rafter system is based on a triangle - the most rigid figure.
First, the outermost trusses on the side of the gables are installed
After installing all the rafters, they are finally fastened at the joints with the Mauerlat and the ridge
Only the main elements of the rafter system are listed. Additional parts can be used to increase the strength of the structure.