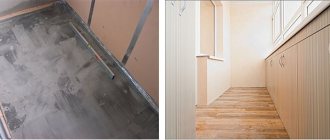
Many people try to expand the usable space in their apartment by adding a balcony. In warm regions, they even remove the door, combining the loggia with the living space.
However, simple insulation is not enough to ensure a comfortable temperature, so it is recommended to install a warm floor on the loggia. It will allow you to maintain an optimal microclimate and use additional space to create a recreation area, dining room or office.
In the article, we will look at the types of heating systems that can be laid on the balcony, their pros and cons, as well as how to install them yourself. Methods for preserving heat in a loggia by insulating walls, ceilings or floors are described.
Which heated floor is best to use on the balcony?
What type of warm floor heating is best to use for a balcony or loggia? This question is asked by many owners of these premises. There are different types of underfloor heating - water, cable, infrared film:
- Water is the most expensive device, consisting of pipes; it is often mounted in a screed.
- Electric cable - in it the cable acts as a heating element. The “pie” is also filled with concrete mortar.
- Infrared film - heating is produced by carbon plates; they emit ultraviolet waves.
A balcony is a protruding slab that cannot withstand heavy loads, so a heavy water structure is not suitable here. It is also not recommended to install an electric heated floor on the balcony under the screed. Infrared film is considered the most suitable; it weighs little and is easy to install.
In loggias, a water or electric model for screeding can be considered if the given loads on the slab are acceptable in a particular case. To do this, it is necessary to calculate the load level in advance.
Electric TP on the wall? It is possible or not, which type to choose and install.
To determine which heated floor is best to choose, we will consider each model in detail.
What to look for when choosing
The rules for choosing heated floors for a loggia or balcony are based on their characteristics. A balcony is essentially a reinforced concrete slab that is attached to the outside of the building. When installing the structure according to the rules, the balcony will be attached to the facade firmly and securely. A standard balcony occupies 3 square meters of area. A load of no more than 200 kg is allowed per 1 sq.m.
Therefore, it is prohibited to install a water version here. It is much more economical and safer to install electric or infrared.
These rules do not apply to the loggia. Any heating system is suitable here, since the loggia is part of the room, and not a separate stove. Its base is a single area with an adjacent room. Experts give preference to infrared heated floors as the easiest to assemble and economical coating.
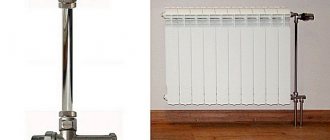
Water floor - its characteristics
A water floor is one of the types of heating systems. It is a structure made of pipes with a circulating coolant inside. It could be antifreeze or water. Heating elements are laid in a “snake” or “snail” pattern.
The floor “pie” consists of a base, a layer of hydro and thermal insulation, pipes, concrete screed, and a finishing coating.
Advantages and disadvantages
Despite the significant installation costs during operation, such a floor is the most economical, perfectly warms the room and does not take up useful space.
It is connected to the central heating (but this requires permission, which is time and money), or connected to an independent source.
But since during construction the hydrofloor is often filled with screed, it is not recommended to install it on the balcony due to its heavy weight. Also, it is difficult to adjust the entire system in such a room.
And due to pressure surges in the pipeline, installation of a pump is required - this is quite difficult. Another disadvantage of water structures is the risk of leakage, since it is difficult to find the cause and also eliminate it in such conditions.
The disadvantage of the system, if it is connected to a common riser, is the inability to turn it on when it gets cold. You will have to wait until the general heating of the house starts working or use a cold room.
Installation
Despite the fact that it is not recommended to install a water floor on the balcony, its installation on the loggia is possible. Indeed, unlike a balcony, a loggia is equipped with two supports at the bottom, so the structure can withstand a large load.
Watch the video on how to connect to central heating
Balcony features water heated floor from central heating
Before work, you need to stock up on materials, tools, and also develop a layout diagram for the heating elements.
The reinforced concrete slab must be flat, without holes or protrusions. If there are irregularities, the installation process should begin with it.
Step by step, do-it-yourself water heating installation looks like this:
- A thin leveling screed is poured.
- A layer of waterproofing (technical polyethylene) is laid; it must be laid extending onto the walls.
- Thermal insulation is installed - extruded polystyrene foam boards 30 - 50 mm.
- Damper tape is glued around the perimeter of the loggia - it will compensate for the thermal expansion of the screed.
- The pipes are placed according to the planned pattern, but for loggias a “snake” is more suitable; the standard pipe diameter is 20 mm. The pipeline is attached to the grooves of the plates, or with special fasteners. Seamless metal-plastic pipes are a must. They should be placed at a distance of 50 mm from the walls, in increments of 100 - 150 mm.
- Connection is made to the heating system or an independent source.
- A concrete screed is poured.
- The finishing coating is installed (only after the concrete has completely hardened) - a material with high heat transfer; you can cover the floor with linoleum, laminate, or tiles.
Before pouring concrete into the structure, you need to test the system.
You can lay water-heated floors on logs, which will be much faster and easier.
The logs are placed at a distance of 30 - 40 cm from each other. Waterproofing is laid under them, and thermal insulation material is placed between them. The pipes are placed in the grooves made, and sheets of plywood are laid on top of the logs. The finishing coating is laid on it.
Features and Benefits
The design of heated floors has many advantages over conventional radiators. Firstly, it is great for small spaces as well as large rooms. By evenly distributing warm air that does not cool over time, the most comfortable living conditions are created. The main advantages of heated floors include:
- The newest heating system is much more efficient than others. It generates more heat, providing a high level of comfort.
- Despite the huge amount of radiated heat, the heating element has a low temperature.
- Warm floors are a modern and aesthetic heating system. Radiators take up a lot of space and often look unattractive. In addition, the floor does not need to be decorated or maintained, since all elements are hidden under the flooring.
- You can regulate the temperature using installed sensors. The system is automated and functional.
- The main feature of heated floors is long-term operation. The water structure serves the most.
- You can install the system yourself without any skills or experience. No special equipment is required for installation.
- It’s pleasant to walk on a warm floor barefoot; your feet won’t freeze, even if it’s minus degrees outside.
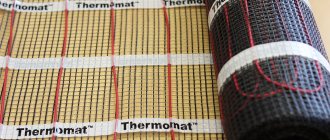
Heating mats and their types
A heating mat is essentially the same as an electric cable floor, but the wire is already fixed to a fiberglass mesh. The length of the mat is from 50 cm to 3 meters, the width is usually 50 cm. These heated floors operate on 220 W electricity. The device uses a cable with a diameter of 2.5 and 4.5 mm.
Electric mats use two types of wire:
- Single-core - both ends are connected to the thermostat, so it is more difficult to install heating with such a cable. The downside of the wire is that it emits an electromagnetic field; it is not recommended for installation in rooms where people spend a lot of time. Plus - the cost is not high.
- Twin-core - a more advanced look, suitable for a balcony. When placing it, it is not necessary to bring both ends to the regulator. Such a cable emits a minimum of electromagnetic waves, so it is not dangerous for people.
Electrical mats with any of these types of wires can last for more than one year.
A single-core cable is thinner than a two-core cable, has more power, and therefore warms up faster.
Advantages and disadvantages
The main advantages of electric heating mats:
- do not take away the height of the room, since the thickness of the “pie” is only about 2 cm;
- economical - electricity consumption is not significant;
- easy to install.
But the cost of mats is higher than the price of a regular cable floor.
The mats are recommended for heating for a short period of time; they are not intended for continuous operation. The product cannot be shortened. Therefore, having chosen a warm floor in the form of mats, you first need to measure the area of the balcony.
Installation
Apartment renovation in a new building. Do-it-yourself floor insulation on a loggia
Electrical mats must be installed carefully so as not to damage the cable.
The process consists of:
- drawing up a project - it reflects the wire laying diagram, the location of the temperature sensor and regulator;
- preparing the rough base - leveling and sealing uneven areas, clearing debris.
- laying thermal insulation - this is necessary to eliminate heat loss;
- pouring the screed - the concrete layer will serve as the base;
- placement of mats according to the pattern;
- installation of a thermostat and connection of the system;
- applying tile adhesive 2 - 3 mm and fixing the tiles - the adhesive must be applied evenly so that air voids do not form.
If you plan to lay a wooden covering on a balcony or loggia, then polystyrene foam is laid on top of the mats, on which the boards are laid.
Principle of calculation of floor systems
Before choosing any floor system, it is important to calculate the power of the heater and determine its required length.
To do this, you need to calculate the heat loss of the loggia. A lot of thermal energy comes out through window openings, so ensuring a temperature of +20-+23°C is quite problematic, especially in the winter season. Therefore, it is recommended to install heating equipment in heating mode.
You can calculate the heat loss of a balcony using an online calculator.
Before installing a heated floor system on a loggia, it is important to first insulate the room
The recommended temperature of heating mats, cable or IR film is +26°C. This mode is suitable for heat-insulating parquet floors. If tile, marble or other heat-conducting coating is used as a coating, then the recommended cable temperature is +28-+31°C.
Typically, loggias require 160-180 W per m2 for heating and 200-220 W per m2 for heating mode. Taking these recommendations into account, you can calculate the required cable length, laying pitch, and system power.
For example, a loggia has an area of 2 m2. The flooring is tiles, no screed is planned. Let's take the heating mode, which requires 200 W per m2. Next, we determine the heating area.
It is calculated using the formula:
Sgr=Stot-Spr, where
- Spr - the area occupied by cabinets and other furniture;
- Stotal - total area of the room.
Let's say the area occupied by furniture is 0.5 m2. Then Sgr=2-0.5=1.5. The heating mode is selected for the loggia, so the required cable power is 200 W per m2.
Then the recommended system power is 1.5 * 200 = 300 W per m2.
If a screed is not planned, choose a thin cable system that can be completely embedded in a layer of tile adhesive.
You can select a system with the required characteristics using tables describing the characteristics of the equipment.
Using the technical characteristics of the mats, you can determine the optimal model based on individual requirements (+)
Based on the table, we determine the thickness of the mat, its dimensions and length based on its area. In our example, the power of the mat is 0.25 kW, and the length is 17 m.
Next we look for the installation step. We calculate it using the formula:
h=(Sgr*100)/Lcab , where
- h —laying step;
- Lcable - cable length in meters.
We substitute the values into the formula and get: h=1.5*100\17=8.8 cm.
When laying mats or cables, remember that the distance from the walls should be 10 cm.
Heating electric cable
The heating element in the electric cable floor is a two-core 5 mm shielded cable, and the system is controlled via a regulator. The device operates at a voltage of 220 W, it heats the surface from +25 to +32 degrees.
The wire is placed in a concrete solution or tile adhesive mixture, although dry installation is possible.
Advantages of a heating cable:
- the size of the electromagnetic field emanating from the system is small and not dangerous to humans;
- since the design uses low-power cores, the service life is significantly increased;
- The presence of a screened film ensures electrical and fire safety and protects against damage.
A good choice for placement on a loggia or balcony would be electric heated floors with a tile finish.
The disadvantage of a cable device filled with a concrete mortar screed is the heaviness of the structure and the duration of installation.
Installation
Warm floor on the balcony
The principle of arranging an electric cable floor on a balcony is similar to the process of laying cable mats:
- you need to start with preparing the rough surface - cleaning and leveling;
- then you need to make thermal insulation - lay extruded foil polystyrene foam 20 - 30 mm thick;
- pour a concrete screed on top of the thermal insulation with a thickness of 10 - 15 mm - there will be no contact of the material with the insulation, and the risk of overheating will be minimized;
- lay down the mounting tape and spread the cable according to the planned layout - the wire is fixed with tape;
- install a thermostat and a temperature sensor - grooves must be made for the wires running from the floor to the control unit;
- Lay down the finishing coat only after the screed has dried.
The cable should be installed on a well-insulated loggia, otherwise you will simply heat the street. Before pouring the concrete mixture, you should check the system for functionality.
How to make a warm floor on a balcony using different methods
Among the available options for heating balconies and loggias, which are available for independent work, there are three main types:
- heating mats;
- infrared floor;
- cable system.
The first option, which involves the use of highly efficient heating mats, will suit many citizens. This system includes heating cables that are gradually attached in the form of a snake to a durable mesh.
Helpful advice! The laying step of a single or double-core cable is approximately 5 cm. Heating cores can be made of various durable materials. It is better to choose those that are characterized by a significant degree of resistance.
Heating mats that are safe for human health are installed under the tiles on the balcony in compliance with a certain technology. In this case, the thickness of the floor will be increased insignificantly. At most, its level will rise by only 1.7 cm (including tiles). Often a room is characterized by a complicated shape. In this case, the mats can be easily cut into suitable fragments. The integrity of the cable will not be affected as a result of these actions.
To install an electric heated floor, it is not necessary to seek help from specialists; you can handle this task yourself
How to make a warm balcony using heating mats
In this case, it is not necessary to resort to the services of hired workers from outside. When installing a heating mat system yourself, special attention should be paid to the preliminary steps.
A concrete base is quite suitable as a substrate. It should be thoroughly cleaned of dirt and dust. The primer will provide good adhesion. It is recommended to check the exact resistance values of the mats using an ohmmeter. This action should be performed before starting the main work. It is important to choose the right place to place the thermostat. An obligatory step is the installation of special grooves to the wall and floor.
The inner part of the channel is perfect for mounting the sensor. Experts prohibit placing this element in close proximity to the heating element. Only after completing all the described steps can you begin the installation. This process is a set of measures aimed at laying heating mats. They are placed in adhesive mastic, which allows the tiles to be secured in the best possible way.
Helpful advice! After the main work has been completed, it is imperative to check the system for functionality. We are talking about operating resistance indicators. The inspection should be completed by a thorough visual inspection of the surface. This will allow you to identify and eliminate even minimal kinks.
When installing heating mats, special attention should be paid to the preparatory stage
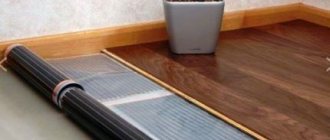
Turnkey warm balcony using infrared film flooring
The main advantage of this solution is its compatibility with a variety of floor coverings. Even wool carpet is no exception. The operating principle of an infrared floor is based on long-wave radiation, which is provided by reliable heating elements. This technology allows you to heat not only the floor itself, but also the objects surrounding it. Thanks to the effective transfer of secondary heat to the loggia, a comfortable temperature regime is ensured.
Film infrared flooring has a number of positive qualities. First of all, it does not lead to too significant energy costs. Installation and commissioning of such a system can be carried out in the shortest possible time. After turning on the equipment, the floor warms up efficiently within just 10-30 minutes. An electromagnetic field is still formed when using this technology, however, it is not too significant. Safety and reliability can also be considered the advantages of this system.
Installation of infrared film floor
Before placing laminate flooring on a heated floor on a balcony or any other floor covering, it is necessary to install infrared heating. The initial action is to level the base. Then you can lay material with heat-reflecting properties. The film should be carefully cut into equal lines. After this, it will be quite simple to install them on pre-prepared thermal insulation.
Before installing a heated floor, carefully read the manufacturer's instructions
The above steps allow you to begin installing the main thermostat and electrical contacts. Do not forget about insulation at the points where electrical components are connected. Widespread and affordable bitumen insulation is suitable for these purposes.
Helpful advice! The best way to secure the film lines directly to the reflective material is to use masking tape. During the subsequent installation of the finished floor, these strips will be stable and motionless.
Infrared heated floors on the balcony for laminate and other coverings must include detailed instructions. It is better to carefully read this information from manufacturers. Also, at the stage of choosing the optimal floor, you need to focus on the area of the balcony. In this case, the chances of creating an ideal microclimate are significantly increased. Such a film can easily be installed on walls and ceilings. Thanks to this solution, the balcony will not be afraid of even the harshest weather.
Do-it-yourself cable heated floor on the balcony
This technology for heating balconies and loggias is considered the most common. The main difficulty when working in such premises is the limited space. Because of this, a cable system is the most practical solution. It involves installing the cable under the finished floor. Only the thermostat remains visible. The presented device is responsible for regulating the heating intensity.
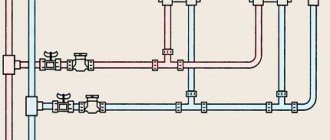
Connection diagram for cable heated floor
Positive aspects of the cable system:
- durability;
- reliability;
- strength;
- ease of maintenance;
- efficiency.
After the insulation of the balcony with a warm floor consisting of cables has been completed, the consumption of electrical energy will not increase much. The durability of the system is ensured by the reliable insulation of the heating conductor. This prevents it from oxidizing. To protect the cable, it is recommended to use a cement-sand screed. Additional protection is also provided by the floor covering, which is installed later.
If the loggia is combined with a living room, then this system will provide additional heating in the winter.
If a cable without a base mesh is used to install a heated floor, it must first be fixed
Self-installation of heated floors on the balcony
When working with electrical cables, it is very important to carefully approach the creation of a waterproofing layer. The insulation must also be of high quality. This stage of work is very important for maintaining heat. If you refuse insulation and waterproofing, then a significant amount of generated heat will go down. As a result, the ceiling of the lower floor balcony will actually be heated.
Helpful advice! The cement-sand screed should not contain even minimal air gaps. The optimal thickness for it is 4.5 cm. The heating cable should be laid in a zigzag manner.
The step-by-step instructions for a warm balcony with your own hands indicate that the cable must additionally be protected with a tie. Although it shouldn't be too thick. It is important to correctly determine the location for placing the thermostat. First of all, it must be accessible. You should not immediately start using the system after installation is complete. Operation of the heated floor can start only after 3 weeks. This period of time is needed for the screed to dry completely.
Related article:
Heated infrared film floors: review of models and installation details Pros and cons of IR film floors. Varieties, technical characteristics. Review of manufacturers. Installation of IR floors.
A highly efficient electric heated floor on a balcony is primarily necessary for those people who want to provide an ideal microclimate in their home. This technology also allows you to fully utilize the potential of the room itself. If you wish, you can study each option presented above and decide on the most suitable one.
When installing heated floors, special attention should be paid to waterproofing
Warm floor on the balcony: mounting layers of the structure
The very first step is to calculate the area that must be exposed to heating. If you make at least minimal errors at this stage, then in the future you will have to reduce the pitch of the cable being installed. After all calculations have been made, you can begin preparing the surface. It is on this that the selected layer of thermal insulation is subsequently laid. The optimal layer thickness is 50 mm.
The next layer after thermal insulation is metal mounting tape. The heating cable is installed on top of it. When carrying out all processes, it is imperative to maintain the safe distance specified in the instructions.
According to reviews, heated floors on the balcony cannot be achieved without strict control over the operation of the device. The thermostat is responsible for performing this function. It should be located on one of the walls. A temperature sensor and cable should be connected to it.
An example of a diagram of the installation layers of a heated floor structure
Helpful advice! The thickness of the screed should be within 30-40 mm. For ideal implementation of the work, the base with an already installed structure must be filled with concrete mortar. You can install the selected floor covering on the screed only after it has completely dried.
Additionally, you can install batteries on the loggia, which will make it much easier to ensure the ideal temperature regime.
Helpful advice! It is important to know that the installed cable heating system must ultimately occupy at least 70 percent of the total area intended for heating.
Infrared heated floor
Infrared electric floor is a popular model, especially for installation on a balcony. The design is two layers of polyester film with carbon plates inside.
The work of IR flooring is the generation of long-wave infrared rays. The film comes in different types, differing in power, heating temperature, thickness and area of application.
When choosing the power of a strip floor for a loggia, you should take into account the characteristics of the finishing material. At high power, it is recommended to lay ceramics.
Advantages and disadvantages
The main advantages of the film:
- environmental friendliness and safety for humans;
- the device does not worsen air quality, as it heats objects, not air;
- does not emit electromagnetic waves;
- does not affect the height of the room - the film thickness is only 0.3 mm;
- if one area is damaged, the entire film continues to function;
- durability, practicality, no repair required.
Due to the flexibility of the canvas, it is easy to install in a room of any shape and is easy to dismantle. The installation process is simple and not lengthy, since there is no need for a screed. Suitable for heating open spaces such as balconies, even in winter.
The main disadvantage of infrared floors is energy costs, but since most often balconies have a small area, they are not significant. The inability to place heavy furniture on the film is also one of the disadvantages of the model.
Installation
Insulation of the loggia Warm floor and electrics (PART 2) WE BUILD FOR OURSELVES
The film floor is installed on the loggia in several stages:
- the base is being prepared - it is important that it is level;
- insulation with a reflective layer (foil insulation) is laid, the joints between the sheets are glued with tape;
- openings are cut into the insulation for the contacts and sensor so that there are no protrusions;
- the infrared film is mounted, if necessary, it is cut strictly along special lines;
- contacts are connected and insulated with bitumen tape;
- a regulator and temperature sensor are installed;
- spread polyethylene over the film with a slight overlap;
- flooring is being laid.
This heating can be used immediately after installation.
Is underfloor heating compatible with laminate?
A balcony is usually a place of high humidity and temperature fluctuations, so you need to wisely choose a high-quality moisture-resistant laminate (not lower than class 33). It is imperative to take care of the waterproofing of the room itself. Therefore, if you plan to dry clothes on the balcony or set up a winter garden, it is advisable to choose a different finishing method.
Laminate flooring is suitable for a glazed balcony. Before covering it, it is necessary to insulate it so that the temperature does not drop below +5°C. Laminate flooring on the balcony looks stylish. This capricious material does not like sudden changes, so it is advisable to keep it indoors before installation.
For finishing, you just need a material that conducts heat well. When purchasing, you need to pay attention to the labeling. It should indicate that the specific type of laminate is recommended to be laid on a heated floor.
It is important to remember that temperatures above 26 °C cause the material to release unwanted fumes.
Temperature sensor installation
To regulate the temperature in a room heated by electric floors, you cannot do without a temperature regulator and sensor. The method of connecting devices is simple, it is the same for all systems, the main thing is to follow the instructions.
To install this device, you must:
- make a recess in the wall for the box;
- cut grooves for the wire in the wall from the floor to the location where the regulator is installed;
- install the device in the prepared opening;
- insert the sensor into the corrugated pipe and place it between the heating elements;
- connect the sensor and cable from the floor to the regulator.
The regulator should be placed close to the wiring - this will save on wires.
Operational benefits
In cold weather, the flooring evenly heats the air and prevents the apartment residents from freezing. The air temperature in the lower part of the room will always be warmer than in the upper part. The heated surface conducts and releases heated air well. This ability is determined by the correct operation of the structure.
Another advantage is the surface area, which is much wider than the radiator area. The system itself was invented in ancient Rome. Since then, it has undergone major changes and been modified to suit modern realities.
The heating design does an excellent job of heating loggias and balconies. The area of these premises is small, and so is the consumption of materials. And the comfort from having a heated floor is immediately noticeable.
Main advantages:
- A modified heating system does its job much better than a standard one. More heat is released into the atmosphere, making living in an apartment more comfortable.
- Considering the amount of heat that is released into the room, the temperature of the heating element is low.
- The design looks stylish and invisible to the eye, saving valuable square meters of living space. It also does not require special care; all elements are hidden under the cladding.
- The heat is regulated by the apartment residents independently. This happens using an automated control panel. It allows you to keep the air in the apartment in optimal condition for a person, regardless of weather changes.
- The flooring has a long service life; immediate replacement is not required; the structure can serve for decades.
- You can install a heating system yourself, even if you have never done this before. No special equipment is required for installation.
- One of the most pleasant feelings is coming home from the cold and standing on a warm floor with cold feet.
But the heating design also has its unpleasant sides.
Insulation of balcony floors
When a heated floor operates, a lot of heat is lost through the base slab. And if the neighbors below have an unheated balcony, then these losses will increase significantly. Therefore, the insulation of balcony floor slabs must be approached responsibly.
The technology and material for thermal insulation are selected taking into account the characteristics of the balcony and ceiling height. In private houses, where the ceilings are high and the loggias below are supported by columns, there are many options; any method will do.
In apartments, when choosing a material, you have to take into account the design features, even if this affects the quality of heating.
Insulation with expanded clay
To get the effect of insulating a balcony slab with expanded clay, its layer should be at least 5 cm, and preferably 20 cm.
Expanded clay is a hygroscopic material; when wet, its thermal insulation properties are lost, and it takes a long time to dry. There are several types, depending on the size of the fractions (from 5 to 20 mm) - sand or gravel. It has been used as a material for thermal insulation for a long time, since it is not expensive, and its characteristics are practically not inferior to modern insulation materials.
The larger the fractions, the higher the thermal properties of expanded clay, but the degree of shrinkage is greater.
Styrofoam
Polystyrene foam is an artificial material made from polymers; it is not afraid of moisture and is not destroyed by external factors.
But since it has a lower density, its thermal insulation qualities are lower. Foam plastic is less durable, so it is not recommended for floors, although it is often installed due to its low price.
Extruded polystyrene foam
Extruded polystyrene foam is a solid sheet insulator, standard thickness is 3 - 5 cm. The boards are durable and can withstand the weight of a person. This material makes it easy to install beacons and install a heating element.
Penoplex practically does not reduce the height of ceilings, but it costs significantly more than expanded clay and polystyrene foam. But since the average balcony area is 3 sq.m., the costs will not be significant, so it is better to use it.
The process of insulating a balcony slab with polystyrene foam is not complicated, it is similar to laying any heat insulator, so this work is easy to do yourself:
- the slab is leveled - large bulges are cut off, and depressions larger than 3 mm are filled with cement mortar;
- polyethylene is spread as waterproofing;
- damper tape is glued around the perimeter of the balcony, its width is 10 cm - it compensates for temperature expansion;
- sheets of expanded polystyrene are laid;
- a reinforcing concrete screed is poured in a layer of 5 cm, and a plastic mesh is used for reinforcement.
After the screed has dried, you can proceed directly to installing the heated floor.
Three self-installation options
We sort of figured out the types and purposes of the floors of balconies and loggias. Now, as I promised, step-by-step instructions will be given on how to install heated floors yourself.
Option No. 1. Water system
From a purely technical point of view, installing a water floor is no more difficult than the same cable floor. This structure can be installed using a concrete screed or dry, that is, between wooden joists.
I prefer concrete screed, since concrete itself is an excellent heat accumulator. If you already pay for permits and bother with installation, then it is better to do it firmly and with high quality.
Floors in general and the “Warm Floor” system in particular are installed after the installation of plastic windows and insulation of the walls, but even before the finishing wall cladding is installed. By the way, the same applies to ceiling work.
Installed floor on the balcony.
The base, that is, the reinforced concrete slab itself, must be perfectly level. There is one nuance here: on balconies and loggias, the slab is initially slanted slightly towards the street to allow water to drain.
In essence, this does not bother us in any way; the main thing for us is that the slab is absolutely flat, without bumps or depressions. Although if you still have to fill in the leveling screed, it is better to immediately bring it out horizontally.
When the lower concrete base is brought to zero, a layer of waterproofing is installed over it. I usually cover the floor with a continuous layer of technical polyethylene, it’s quick and not expensive. Waterproofing is done extending onto the walls so that the film is higher than the finished floor covering.
Fastening pipes with rigid clamps.
Next, thermal insulation is installed. My advice to you is, don’t mess with mineral wool insulation on your balcony. They can get wet, so they require additional protection. For walls and ceilings, I usually use foam plastic 50 mm thick, with a density of 25 kg/m³.
As for the floor, it is not so important what kind of material or type of heated floor you install on top. Believe me, at the moment, the best, proven and reliable option is slabs of extruded polystyrene foam with a thickness of 30 - 50 mm. In our country it is better known as Penoplex.
Of course, the price for extruded polystyrene foam is 3 times higher than for polystyrene foam and 5 times higher than for expanded clay. But, in the end, our balconies and loggias are not so large that we need to save so much.
Laying pipes with a snail.
The fact is that extruded polystyrene foam is a very durable board insulation. Currently, it is used to insulate airfield runways and toll highways. Accordingly, such insulation can withstand the weight of any screed, the main thing is that the base is level and the load is evenly distributed over the plane.
Laying extruded polystyrene foam.
Piping can be attached directly to extruded polystyrene foam. For these purposes, a flexible metal-plastic pipe with a cross-section of up to 20 mm is usually taken, and the pipe must be solid; adapters cannot be embedded in the screed.
The water floor can be laid with a snail and a snake. As a rule, our balconies and loggias are narrow and long, so in our case, snake laying is more suitable.
Pipe distribution on thermal insulation.
The pipe can be fixed on the slab with rigid plastic clamps; they are driven directly into the Penoplex, on top of the pipe. But I prefer to place a reinforcing metal mesh with a wire cross-section of up to 5 mm under the screed. And then tie the pipes to it with soft plastic clamps.
At the points where the pipework enters and exits the concrete screed, a plastic or metal corrugation is placed on the pipes so that the pipes are not accidentally broken.
The “Warm Floor” water system must be connected and tested before pouring the concrete screed. In other words, the pipes must stand under pressure 2 times higher than the design pressure for at least 24 hours.
Fixing the pipe to the reinforcing mesh with soft plastic clamps.
The thickness of the concrete screed under the water floor, if you count from the insulation, is 50 mm. The pipe should not be closer than 50 mm to the wall. And the distance between the coils of the snake is about 100 - 150 mm. Naturally, the pipes should not intersect.
Before pouring the concrete screed, a 10 mm thick polyethylene foam tape (Penofol) is attached around the perimeter of the balcony. It will provide a damping gap when the concrete monolith heats up and expands.
Of course, it is easier to work with self-leveling compounds, but they are expensive. Therefore, most people prefer to install beacons and pour a screed over them based on ordinary cement-sand mortar.
Waterproofing with polyethylene film.
Moreover, installing beacons on self-tapping screws for insulation is very simple. You will be able to walk on the screed in a week, and lay the finishing cladding in 28 days.
Setting up a water-heated floor between the joists is a little easier. If the concrete base slab is crooked, you do not need to make a bottom leveling screed, just place wedges under the joists.
The logs are laid with a frequency of no more than 30 - 40 cm. The height of such lathing is about 70 mm. This takes into account 50 mm of insulation and 20 mm of the thickness of the metal-plastic pipe. Naturally, a layer of polyethylene is laid under the sheathing.
Installing a temperature sensor.
In this case, it is not necessary to use extruded polystyrene foam; you can get by with regular polystyrene foam. After all, the entire load will fall not on the insulation, but on the wooden logs. The insulation itself is laid between wooden joists, and the gaps are filled with foam.
In order to lay the pipework, we will have to cut a series of 20x20 mm grooves in the logs with a hacksaw and chisel, along the thickness of the pipe. But in order to lay the finishing cladding, be it laminate, linoleum or carpet, you need to lay sheets of plywood or OSB with a thickness of 10 mm or more on top.
Laying the floor between the joists.
The only advantage of the dry method of installing a water floor is its high maintainability. Its efficiency and heat transfer are lower than that of the option with a concrete screed.
Option number 2. Electric heated floors
An electric heated floor is usually called a system based on the use of a heating cable. Until relatively recently, craftsmen were laying twin heating cables. Its diameter reached 5 mm and the entire route had to be attached to the insulation individually, with metal brackets.
Electric mat.
The distance between the turns here was maintained according to the same principle as with a water floor, that is, about 100 - 150 mm, the cable was also laid in a snake.
At the moment, so-called electrical cable mats are more popular. In essence, this is the same cable, only half as thin and attached to a fiberglass mesh. Such mats are not much more expensive, but they are much more convenient to attach to the base.
Aligning the screed with the beacons.
Hydro and thermal insulation is installed here in the same way as the water version. As for the concrete screed, I recommend pouring it under all finishing coatings with the exception of floor tiles.
Cable mats under tile floors.
The minimum thickness of such a screed is 20 mm. To prevent the cable from being damaged by an accidental crack, it is better to lay a metal reinforcing mesh under the mats. It is not necessary to fix the mats on the reinforcement; they will not go anywhere anyway.
Tiles can be laid directly onto mats using construction adhesive. Since we mean extruded polystyrene foam below, it is better to use Ceresit CT83 glue, it is designed specifically for this material. Naturally, the adhesive layer must be at least 10 mm thick; it is applied to the tile and to the base with a comb spatula.
Any such electrical system must have a control unit. It includes a temperature sensor and a direct control panel. The temperature sensor itself is mounted between the turns of the cable and a wire is led from it to the control panel.
Installation of the control panel.
And the control panel is installed next to it on the wall, in about the same box as a socket or switch. A groove is made in the wall for laying wires.
If you plan to install electric cable heating in a screed, then the cable power is selected at the rate of 200 W per 1 m² of heated floor. In the case when the mats are laid under tiles, 140 - 160 W per 1 m² is sufficient.
Any type of electric floor is installed exclusively on the working surface of a balcony or loggia. That is, there is no need to mount it under furniture or in hard-to-reach places.
Beacons installed for pouring screed on top of the pipework.
If you have enough knowledge and you have a good idea of the diagram and order of connecting the wires, then of course you can assemble everything from separate parts. For hobbyists, ready-made kits are now sold, which contain detailed instructions and all the details down to small fittings and insulating materials.
Option No. 3. Infrared system
Without exaggeration, this system can be called the most popular at the moment. Its installation is so simple that even an amateur can install such a film system on his balcony in a few hours.
Infrared floor film.
Some experts recommend not installing powerful thermal insulation under such a system, citing the fact that the system works on a completely different principle. This is certainly true, but with the heaters turned off you will have “icy” floors. Therefore, I strongly recommend installing extruded polystyrene foam and not looking for adventures.
Infrared floor connection diagram.
As you probably already understood, before the installation of thermal insulation, any heated floor is installed in the same way. Before installing the infrared film itself, the extruded polystyrene foam is completely covered with foil insulation. Isolon is a foamed polymer sheet covered with foil.
Sealing isolon joints with foil tape.
After this, all joints of the fabric are carefully taped with foil tape. At the places where the film is connected, for the contacts, as well as for the temperature sensor, holes are cut out with a knife in the isolon. This is necessary so that the thickness of the entire coating is the same.
Contacts are pressed and insulated with bitumen insulation.
The film is cut along the marked dotted lines, placed on the isolon and connected to the control panel in a parallel circuit. The contacts are crimped and insulated with pieces of bitumen insulation. The temperature sensor and control panel are installed in the same way as in the case of cable mats.
A layer of polyethylene is laid over the infrared film to protect it. It is no longer necessary to glue the joints here; it is enough to make an overlap of 100 mm.
In general, the developers claim that almost any floor covering, except tiles, can be laid on such a film. But as far as I have seen, usually a laminate or parquet board is installed on an infrared floor.
Control panel connection diagram.
Insulation of walls and ceilings
To maintain comfortable conditions in the loggia, without wasting heat, it is imperative to insulate the walls and ceiling.
To do this, you can use various thermal insulation materials: mineral or polymer, sheet or roll, hard or soft.
Mineral wool
Mineral wool is made from basalt rocks. Pros: low thermal conductivity, fire resistance and affordable price.
However, it is hygroscopic and requires additional protection, so it is not recommended for insulating walls and ceilings on the balcony.
Styrofoam
Polystyrene foam is produced by foaming synthetic masses, resulting in a light and porous product.
It has a low level of thermal conductivity, does not rot and is easy to install.
Expanded polystyrene
Expanded polystyrene is a type of polystyrene foam, but a more modern and improved model. It is an excellent heat insulator, easy to install, lightweight and inexpensive.
Today, polystyrene is one of the most commonly used thermal materials, so let’s consider the process of insulating walls and ceilings on a balcony or loggia from it.
The method of attaching the insulation to the walls depends on their finish:
- on PVA glue or other composition that contains an aggressive solvent;
- using special wedging fungi;
- on wooden slats or metal profiles.
The following finishing is possible on top of the insulating material:
- installation of reinforcing mesh, with puttying, painting or wallpaper;
- cladding with plastic panels or siding.
How to install a heating structure
The process of installing a water floor is more complicated than others, since it will require checking the pipes before laying them and covering them with screed. The other options are simpler in this regard, but they heat up less than a water floor.
Installation of a water system
Purely technically, installation is carried out according to the same scheme as for electric floors. Installation is carried out on a concrete screed or between wooden joists. Concrete is considered stronger, plus it serves as an excellent heat conductor and retains it for a long time.
Water heated floor
The floor on which work will be carried out must be perfectly level. It is important to take this nuance into account, since during construction, external structures are made at a slight slope so that water does not linger on the roof, but flows calmly down. For a water structure, an additional layer of waterproofing is required.
The material that provides protection from water should extend beyond the floor and be slightly higher than the final coating.
For the flooring itself, a flexible metal-plastic pipe is used. It is fixed to the thermal insulation with small clamps. A rubber corrugation is installed at the place where the clamp covers the pipe. This protects the folds from sudden refraction.
Important: before installing the final screed, the pipe must be tested. To do this, water is run through it under strong pressure and observed for 2 days.
The pipe is laid in coils or snails. The distance between the pipes is 10-15 cm. They should be no closer than 5 cm to the wall. Intersections are not allowed.
A polyethylene tape is laid along the perimeter of the wall so that there is a damping gap when the screed shrinks. The screed is made from a self-leveling material or from a mixture of cement and sand using beacons. Afterwards, wait for the composition to dry completely (7 days) and lay the final cladding (after 1 month).
Dry installation is done on wooden logs. It is not necessary to level the surface for them; just insert the wedges. Logs are placed every 30 cm. The height of the structure is about 7 cm (the width of the insulation and pipe is taken into account).
Polyethylene is placed on the thermal insulation, and lathing is placed on it. The insulation is laid between the joists, securing the free space with polyurethane foam. In order for the pipe to pass through all the joists, grooves must be made at the joints. A layer of plywood is laid before the facing covering.
Cable system installation
The method of laying the cable is the same as for the water pipe. For convenience and ease of installation, you can use special electric mats. This is a thin cable that is supported by fiberglass film. They are easier to attach to thermal insulation.
Connection diagram for cable heated floor
A layer of metal reinforcing mesh is laid in front of the mats. There is no need to secure the mats. The tile covering can be laid directly on them using special glue.
The cable is installed similarly to a water pipe. At the bend points it is intercepted with clamps, which are fixed into thermal protection. A screed is poured on top and tiles are laid.
Features of operation
There are several points that need to be taken into account when installing heated floors on the balcony in order to extend the life of the system and its efficiency:
- do not install heated floors on an uninsulated balcony, insulate the floor tiles, walls and ceiling - this will allow you to avoid wasting heat;
- use lightweight thermal insulation material, install from inside the room;
- use a moisture-resistant topcoat.
To summarize, it can be noted that the most suitable models for electric balconies are infrared film or cable mats. Although under certain conditions other types have the right to exist.
Currently, in order to increase the usable area and increase the functionality of the balcony, it is not only glazed, but also insulated, and heating is installed - warm floors. With a well-chosen heating system, you can use the balcony room at any time of the year.
Features of the floor for the balcony
The most important issue when arranging a balcony is the possibility of reducing heat loss. First of all, it begins with the installation of double-glazed windows and insulation of the ceiling and walls. Having completed these works, you can start searching for a heat source. It is unrealistic to move radiators onto the balcony by extending the heating system for a city apartment. Therefore, the only option left is floor heating. Which of the existing systems should you choose?
But the balcony floor has its own characteristics. Firstly, it is not insulated during the construction of the building. Secondly, it has a small area, which can make it difficult to lay heating cables. Thirdly, it is not designed for heavy weight. Therefore, not all types of heated floors available on the construction market can be used to insulate a balcony.
In addition, heated floors have the following advantages:
- is safe for the health of residents of an apartment or house;
- has high reliability and long service life;
- slightly increases the thickness of the floor;
- allows you to distribute heat rationally and comfortably.
Warm floors provide optimal temperature conditions at which the floor covering warms up.
The systems are suitable for installation under tiles, laminate, linoleum, and carpet.
Types of heated floors for a balcony or loggia
To obtain the optimal effect from installing heated floors, you should take care of the complete insulation of the balcony and loggia: installation of plastic windows and doors, insulation of walls and panels.
For the consumer, an advantageous option is the ability to choose the type of heated floor.
Thanks to heated floors, you can create an ideal comfort zone even with a covering such as tiles.
In such a case, it is appropriate to use heating cables combined into systems or mounted in mats.
Single- and double-core heating elements are installed in a cement screed, the thickness of which should not be less than 4.5 cm.
This installation eliminates the appearance of gaps for air to enter, which eliminates overheating and system breakdown.
If the permissible load on the surface does not allow creating a screed of the required thickness, you can use Russian Heat heating mats.
Such a warm floor on a loggia or balcony is mounted directly into the adhesive layer onto which the tiles are attached.
It's always nice to walk barefoot on a warm tiled surface.
Infrared film flooring helps create a good microclimate.
Film heated floors can be laid directly under the finishing floor covering, which they warm up, and do not require pouring into a screed.
It is thanks to warm floors that a balcony or loggia can be transformed into a comfortable place for rest and relaxation, or a study or sports area can be set up.
High-quality heated floors, be it infrared heating film or Russian Heat mats, make it possible to install upholstered furniture on the balcony.
Interior items will not deteriorate due to cold, humidity or mold and mildew.
Disadvantages of a hydronic floor heating system
A water heating floor system is also a controversial option. Experts focus on the following disadvantages:
- the efficiency of the system largely depends on the thermal conductivity of the floor covering;
- has restrictions for installation in apartment buildings due to the risk of leakage;
- not suitable for installation on wooden beam floors;
- requires a concrete “floating” floor screed;
- when installing on the ground floor, additional floor insulation with heat-saving materials is required;
- characterized by a complex and labor-intensive process of developing and installing the system;
- when there is a leak, serious difficulties arise associated with repair;
- water as a coolant leads to large heat losses.
In addition, a water floor is considered one of the most expensive types of heating, which stops many homeowners.
DIY installation
All three varieties are quite easy to install. The cable is a special circuit that is mounted under the finishing coating. Be sure to install thermal insulation on the balcony. It is better to leave the thermostat in an accessible place so that you can always make your loggia cozy without putting too much effort.
Almost anyone can install heated floors using instructions or master classes on the Internet. This significantly reduces installation costs.
But still, it is better to entrust the wiring itself to specialists; they will be able to connect everything on time and indicate the exact time frame when the heated floor can be put into operation.
Electric heated floor installation technology
As practice shows, arranging the floor using electric mats can be considered the most acceptable option for a balcony with tiled cladding. Next, we will consider the main installation stages that you can use when organizing the system yourself.
We prepare materials and tools
Materials you will need:
- heating mats;
- penofol;
- damper tape;
- construction tape;
- wire with aluminum or copper core;
- tile;
- metal mounting mesh;
- tile adhesive;
- corrugated pipe;
- crosses for tiles;
- components for screed - cement, sand, water, plasticizers.
List of tools and devices:
- scissors or nippers;
- pliers;
- mallet;
- hammer;
- multimeter;
- thermostat;
- temperature sensor;
- building level;
- putty knife;
- tape measure and ruler;
- tile cutter;
- hammer drill with a slotting attachment;
- container for preparing glue and solution.
Drawing a diagram
The electrical diagram is the basis for installing a heated floor. The master must clearly see the location of all heating elements and controllers, and also have an idea of the interior items with which the balcony will be furnished.
When drawing up a diagram, it is necessary to take into account that power units are not recommended to be located in those areas where it is planned to install bulky furniture or equipment. They can place excessive stress on the coating, damage the heating element and block heat transfer.
The use of mats frees the installer from mathematical calculations regarding the laying step - the manufacturer has already taken care of this. It is enough to determine the power of the heating elements and their area.
It is not prohibited to lay mats diagonally and cut them into sectors. Laying can be done in such a way as to focus on heating particularly “problem” areas. When developing the scheme, you should take into account a distance of 10 cm from the walls along the entire perimeter.
You need to consider the location of the thermostat regulator and temperature sensor. They must be powered from a public network, so it is necessary to provide access to the outlet and wiring.
Hidden wiring is considered the safest, so you will have to groove the wall and run an electrical wire through the channel.
We calculate materials
The main consumables when organizing an electric heated floor will be heating mats. Manufacturers offer products of different capacities, which can be selected to suit your own needs and the characteristics of the room.
Even a balcony with installed multilayer double-glazed windows remains a rather cold and damp room, so it will require high-power mats. Per 1 m2 you will need from 140 to 180 W, but this is if the heated floor will be the main source of heating. For an auxiliary heating system, you can choose low power mats - about 80 W.
Next, it remains to determine the number of mats (length of stripes). To do this, you will need to calculate the area of the heated floor - multiply its length by its width and subtract the area of areas that will not be heated (furniture, appliances). Then we divide the floor area by the area of the strips - but it is better to take the material with a reserve for defects, trimming and errors in calculations.
Checking the electrical wiring
Any heating system, even a low-power one, requires reliable wiring that will withstand the load, operate stably and ensure safe operation of the heating elements. In both old and new houses, the electrical wiring may not correspond to the calculated power of the heated floor, so you cannot do without checking the network.
The basis of the calculations will be the cross-section of the cable - the thicker it is, the greater the load it will withstand. The power of the cable will depend on the power of all devices that will be connected to it. A low-power cable that is too thin will quickly burn out and may cause a short circuit. If the wiring power is low, it is necessary to replace it with a new one that will correspond to the heating load.
It is better to give preference to a cable with copper rather than aluminum conductors. It has better electrical conductivity and lasts many times longer.
We carry out thermal insulation
High-quality floor insulation will protect the balcony from the penetration of cold and help increase the efficiency of the heating system. The optimal thermal insulation material in this case will be penofol, laid with the foil side up.
The entire surface must be glued with penofol, laying the strips joint to joint and gluing with tape. You need to lay the material so that it extends to the bottom of all the walls - this will make it warmer. The edges of the thermal insulation will also have to be protected - a damper tape laid around the perimeter of the balcony floor is suitable for these purposes.
A metal mounting mesh is placed on top of the heat-insulating layer, which will serve as the basis for the mats.
Installing sensors and thermostat
It is best to mount the thermostat in an area that will be accessible for control, for example, next to an outlet. But the temperature sensor is installed inside the system - it must respond to changes in floor temperature indicators. The sensor is connected to the thermostat via a cable laid in a pre-made groove. It is recommended to place the device in a corrugated pipe, which will protect it from damage.
The location of the sensor is chosen so that it is centrally located between the turns of the cable, while the floor end of the corrugation is sealed with sealant.
Testing the system
The control check will consist of measuring the resistance of the mat. You must first familiarize yourself with the device's passport data, where the factory resistance should be indicated. The resistance value during home measurements may differ from the data in the documentation, but no more than 10%. Measurements are made with a multimeter device, which will also allow you to determine the phase of the cables if the corresponding marking is missing.
We attach the heating elements
Mats are the easiest heating elements to install. Their interior is equipped with adhesive tapes that securely fix the device to the substrate, preventing it from moving.
If necessary, the mats are cut, taking care not to damage the cable.
The heating elements are laid over the area according to the previously developed scheme. The system is then connected to the network, connected to the sensor and thermostat. At this stage, it is necessary to check the functionality of the entire circuit and eliminate any detected faults.
Filling the screed
It is best to cover heating mats with a cement-sand mortar. You can use crushed stone as a filler, and add any plasticizer to make the composition elastic.
Slaked lime, PVA glue, liquid soap, shampoo, washing powder or egg white will help increase the plasticity of the solution.
The surface of the mats is covered with a layer of no more than 3 cm with the solution, so as not to interfere with the spread of heat from the heating elements. It is necessary to achieve an absolutely even base - this will make it easier to lay the tiles and avoid distortions and cracks in the cladding.
Laying tiles
It is allowed to start finishing the floor with tiles after 2-3 days - as soon as the cement layer has set.
To begin with, markings are applied to the floor in such a way that there are as few cuts as possible, and the entire tile is placed in the most “noticeable” places. Tilers recommend starting installation from the center of the room, focusing on two perpendicular lines drawn through the middle of the floor.
Tile adhesive diluted according to the instructions is applied to the floor in a small amount and the back side of the tile is covered with it. The mixture is spread over the surface with a notched trowel and the tiles are glued to the floor, lightly tapping with a mallet to level.
Next, glue the second tile, observing the thickness of the adhesive layer and focusing on the building level. To maintain the distance between the tiles, plastic crosses are used. According to this scheme, all whole elements are laid, and then trimmed ones.
Installing a heated water floor on the balcony: pros and cons, installation features
The water method of heating a balcony floor is the most effective, and at the same time, the most expensive type of insulation. It is characterized by the following advantages:
- Saving space on the balcony. Usually this room is quite small in size: by installing water heating, you can save space that was planned to be left for side radiators;
- One-time installation and maintenance costs. After installing a water heated floor, there is no need to spend extra money on its maintenance;
- Money savings. This type of coating does not require increased energy costs;
- Efficient heating. With proper planning, the floor will warm up evenly over the entire area.
Schematic diagram of a water heated floor with a collector system
Unfortunately, heated floors on the balcony also have several significant disadvantages:
- Difficulty with initial installation. This process is long, costly and requires the master to have truly professional knowledge in this area;
- The problem is troubleshooting. If the hydraulic system breaks down and water leaks from the radiator pipes, a complete opening of the coating will most likely be required, since it is virtually impossible to pinpoint the location of the leak;
- Slow adjustment of heating temperature;
- The need to install additional equipment. Since the pressure in the water riser is not stable everywhere, it may be necessary to install a water pump.
How to install a water floor?
The process of creating a warm balcony with your own hands with water heating is carried out in several stages. First, preparatory work is carried out, cleaning from dust, debris, and primary treatment of the floor before installation. To do this, dismantle the old screed and carry out horizontal leveling of the coating. Then an insulating material capable of absorbing water is laid on the cleaned layer - this will make it easier to solve problems when liquid leaks from the heating system.
In the photo: the main pipe for underfloor heating is being laid
After installing waterproofing, it is necessary to install coatings that provide floor insulation. The types of the second layer of insulating coating depend on what heating method is planned to be used: connection to a common water heating system or installation of a separate collector. In the first case, ordinary foamed polyethylene and expanded polystyrene are used, in the second, a combined coating of expanded clay and expanded polystyrene is used.
Options for laying heating pipe coils
The choice of pipes (their size and diameter) and additional equipment (manifold, boiler and other additional devices) depends on the area of the balcony and the method of connecting the hydraulic heating system.
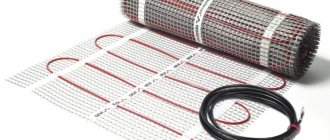
Electric heating mat
A special type of cable flooring that is successfully used on balconies and loggias. Essentially, these are the same single-core or double-core cables, only attached with a snake to a base mesh. This simplifies installation and no screed is required. This mat is easy to install using your own tile adhesive. Once the glue has hardened, the mat can be used immediately.
A heating mat is a single-core or two-core cable floor that is “packed” into a mat
Heating mats are suitable for porcelain stoneware, laminate, parquet, linoleum, and carpet. They are considered an ideal option for tiles.
They differ from conventional cable flooring in simpler installation. However, mats are half as expensive as cable floors - with a power above 180 W they cost from 2,500 rubles. per sq. m.
Is it possible to install underfloor heating from central heating in an apartment?
A floor heating system using coolant is one of the best ways to distribute heat evenly throughout the entire room.
Using modern materials and following installation technology, you can achieve optimal temperature conditions.
But this only applies to systems with autonomous heating.
Owners of apartments with a centralized heating system have wondered more than once - is it possible to install a water-heated floor connected to heating pipes?
It should be immediately warned that according to current legislation, modernization and changes in the pipeline layout in apartments with central heating are prohibited. However, there are many craftsmen who can perform this procedure unnoticed even by inspection authorities.
However, during the operation of such systems, problems arise not only in a single apartment, but in the entire house as a whole. So this system is recommended for owners of their own houses with central heating, but this is the exception rather than the rule.
Possible problems and their causes
The first thing encountered when designing this type of underfloor heating connection is the difference in water temperature in the system.
For radiator heating, the coolant temperature ranges from 70°C to 90°C. Heated floor pipelines are designed for 45-50°C. Consequently, with a direct connection, failure of the entire system is inevitable.
If this system is detected by the inspection bodies of the housing office, penalties and dismantling of all heated floor equipment will necessarily follow.
But, if, nevertheless, the desire to increase the efficiency of central heating is great, then there are theoretical schemes for implementing such a connection.
Theoretical connection diagram
To connect underfloor heating to central heating, it is necessary to install a heating point with a circular pump. This point will connect the water from the heating system with the tap water to achieve the optimal temperature.
If the apartment has only one entrance and exit of the heating main, then connecting the heated floor can be done according to the principle of connecting radiators. For a larger number of risers, a separate calculation is required.
PVC plastic pipes can be used as the pipeline material. However, it is quite problematic to arrange them in a snake for uniform heating of the floor. For this, corner connectors are used, which affects the reliability of the system.
Since the technology requires filling the entire floor area, in the event of a leak, prompt dismantling work will be problematic.
There is an option for parallel connection from the radiator return pipe. In this case, it is necessary to provide for the installation of shut-off valves (tap) both at the inlet and outlet.
The safest, but most labor-intensive way is to install an autonomous underfloor heating system with closed water circulation. The coolant can be heated through a heat exchanger, which is installed on the central heating pipe.
But the efficiency of this system will be low due to large heat losses.
Flaws
- It is illegal to install such a system.
- High probability of breakdown.
- Inability to adjust the floor heating temperature.
- The emergence of areas of uneven distribution of coolant throughout the entire heating system of the house.
- The complexity of the process.
As an alternative, you can consider installing an electrical underfloor heating system. It's easy to install and completely legal. In addition, electric heated floors do not need to be filled with cement screed.
Of course, this will result in additional energy costs. But they will be much less than fines for illegal connection to central heating.
Source: dearhouse.ru/sistemy-otopleniya/teplyj-pol-ot-centralnogo-otopleniya/
Installation of film (infrared) heated floor
In terms of ease of installation, infrared heated floors hold the lead among all systems, since they do not require screeding. Step-by-step progress of work:
- Lay out the heat-reflecting pad;
- We lay out and install infrared films into the system, including a warm baseboard;
- Install the regulator and temperature sensor;
- Lay the substrate;
- We carry out finishing coating and install skirting boards.
Film heated floors are quickly installed, used immediately after installation, and are characterized by uniform heating of the floor surface. For covering in this system, it is best to use laminate and other wood materials: boards, parquet, and carpet.
Film heated floors are characterized by low energy consumption and a service life of up to 50 years.
If one of the sections fails, the system will continue to operate, and repairs will not be difficult. The higher cost of materials is offset by low operating costs.
Electric flooring
Another type of flooring that can be used on balconies is electric flooring. Usually, specialists are hired to install it, since it has its own specifics.
Thanks to differences between rooms and balconies of 10-12 cm, a large thermal insulation layer can be made. The main heat source of an electric deck is the wire, which transforms electricity into heat.
The heating cable is reinforced with glass fiber, sometimes consisting of two wires that conduct current, a copper conductor, a polyester film, an aluminum screen and a PVC layer.
Installation of an electric floor is carried out in several stages. First, the space is insulated to enhance the heating effect. Then a suitable thermal insulation section is selected and each layer of cable laying is reinforced with mounting tape. A temperature sensor is placed in a corrugation between the turns of the wire. The cold end of the heating section, together with the wire from the temperature sensor, is connected to the thermostat. Such a device must be installed by an experienced specialist. Then a screed (3-5 cm) is poured over the cable and connected, waiting for the surface to harden naturally.
Typical installation scheme for a warm cable floor.
You can easily do without a screed by installing a warm floor on top of a wooden, well-insulated subfloor. Video below.
Such a heating system is considered quite complex and somewhat labor-intensive to install, but if you make these floors on the balcony, you can get a large and uniform level of heating around the entire perimeter of the room. In addition, such flooring can protect against drafts on the balcony, since warm air will create a temperature barrier.
Related article: Open balcony in a country house
Advantages of tiles when laying heated floors
Tile is a cold floor finishing option that requires special solutions when organizing the interior of a balcony or loggia. But at the same time, this is an ideal coating option specifically for installing a warm floor system.
What are its advantages:
- fire resistance - does not melt or deform under high temperatures;
- stability - does not change its properties and characteristics with frequent temperature changes;
- wear resistance - thanks to calcination and the application of a protective layer, it does not wear out, crack or fade in the sun;
- inertness – tolerates the effects of active biological and chemical agents well;
- optimal thermal insulation – compatible with any type of coolant;
- durability – high-quality tiles can last for decades;
- environmental friendliness - ceramics are made from safe materials that, when heated, do not emit unpleasant odors or chemical fumes.
When choosing floor tiles, you should pay attention to its coating - it should be textured and non-slip.