What is a self-leveling floor and where is it used? What are the different types and how do different types of coatings differ? This article will answer these and other questions related to how to fill a self-leveling floor and choose it correctly.
Only those who know how to properly fill a self-leveling floor can create such realism Source popolu.ru
general information
The poured floor appeared on the building materials market relatively recently. Before reaching private apartments and houses, self-leveling self-leveling flooring has gone through a difficult journey. Initially, this building material was intended for use under suspended loads. Such floors were poured in shopping centers, laboratories and industrial premises.
Such places are characterized by increased demands on the floor covering in terms of wear resistance. Ultimately, the introduction of new materials and the development of the technological process for producing floor mixtures made it possible to use it in residential premises.
Quite often, people who have little understanding of the issue confuse self-leveling floors and screeds with the self-leveling effect. Meanwhile, leveling the floor with a self-leveling mixture is the final correction of the surface before laying the topcoat. They can be used - laminate, linoleum, tiles, parquet, self-leveling flooring and so on.
What can you paint with?
After one difficulty – pouring, another challenge arises – painting frozen self-leveling floor coverings. Thanks to the application of paint and varnish, you can refine the design of the area, and it will be strong and at the same time durable.
An important point: thanks to the coating, the surface will be protected from the formation of cracks and chips, and will extend the period of use.
Alkyd or epoxy mixtures can be used. Moreover, they can provide an anti-slip result. This can have a positive effect on the comfort of use. Another advantage is that a floor covering with such a coating cannot become dirty for a long time; dirt can settle on it in a less intense manner. The antistatic result contributes to this.
Types of self-leveling floor
Self-leveling floor mixtures are currently the most widely used. They can be found ranging from factory premises to cozy apartments. In many ways, when choosing a self-leveling coating, one is guided not only by the desired strength, but also by the material from which the base of the mixture for pouring is made. There are several basic modifications of self-leveling floors.
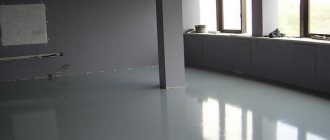
Liquid floor perfectly levels any surface Source vyboroved.ru
Polyurethane
This coating is based on polyurethane. This material is characterized by increased resistance to compression and tension. It is also characterized by the following qualities:
- resistance to chemical environments;
- resistance to mechanical loads;
- elasticity.
Due to its great flexibility, cracks do not form on the material. This floor is used both in industrial buildings and in buildings intended for public use. The composition is applied to almost any surface, from:
- concrete;
- wood;
- metal
During operation it shows increased resistance to wear.
Epoxy
Epoxy self-leveling flooring has a special resin as its main composition, which is activated by a hardener. Epoxy resin flooring is much harder than polyurethane flooring. This factor makes the epoxy floor somewhat less resistant to impact loads. Floor coverings made of this material are installed in places with high traffic, usually public buildings.
Meanwhile, such floors are becoming increasingly popular in private construction. This is explained by the wide range of colors and the ability to fill in various patterns. The final surface can be glossy or matte. However, working with this material requires a certain professionalism and experience.
Self-leveling polyurethane floor screed Source otdelkagid.ru
Epoxy-urethane
This type of self-leveling floor combines the best qualities of epoxy compounds and polyurethane. The final coating is not only resistant to impact loads, but also has excellent resistance to chemical environments.
In addition, the combination of the main components allows you to fill not only in closed locations, but also in the open air. The combination of great durability and resistance to temperature changes makes these compounds very popular among consumers.
Methyl methacrylate
This polymer self-leveling floor is characterized by an increased pouring speed. In just a couple of hours you can create excellent coverage. The composition hardens in about an hour, and the final strength gain occurs within two hours.
This material is practically not inferior to compositions made from polyurethane or epoxy resin. Moreover, it surpasses them in resistance to sub-zero temperatures. You can install flooring even in the relatively cold season.
However, methyl methacrylate flooring also has its disadvantages:
- taking into account the specific nature of the work, only highly qualified workers can do it;
- high price for this type of coating;
- During work, harmful substances are released and good ventilation is required.
These negative qualities are quite conditional and if you need to carry out work in the shortest possible time, then this coating is the optimal solution.
Polymer self-leveling floor Source stroychik.ru
Cement-acrylic
In this type of coating, the base is a poly-acrylic polymer with a quartz filler. The finished floor practically does not slip when walking. For this reason, such coatings are installed in locations with high humidity:
- car washes;
- swimming pools;
- bathrooms;
- saunas.
One of the main advantages of cement-acrylic coatings is the ability to fill a fairly thick layer - up to 12 millimeters. This allows you to install floors while minimizing preparatory work to level the base. We should not forget about the excellent adhesion of these compounds, which maintain integrity even in the presence of cracks in the base.
See also: Catalog of construction companies that specialize in finishing and paint materials
What reasons lead to dust formation?
During the operation of a concrete floor covering, its top layer takes on various loads, chemical and mechanical influences, because of this, the destruction of concrete begins, resulting in the formation of cement dust.
Even if concrete has high strength properties, without proper processing and the use of reinforcing compounds it will be subject to the negative effects of abrasive substances, which will lead to surface abrasion, reduced strength and dust formation. If the concrete is of poor quality, it will be subject to corrosion processes, which also leads to dust formation.
There are other reasons why a concrete floor becomes dusty, but those described above are the most common. However, there is a solution to the problem - treating the surface of concrete floors using special compounds. But why to do this is another question, we will answer it below.
Special compositions for dust removal
Choosing a self-leveling floor
When choosing a liquid floor, first of all, the location where it is poured is taken into account. Based on this indicator, preference is given to one or another composition. For example, mixtures made of epoxy resin or polyurethane are most suitable for residential buildings. At the same time, pouring epoxy floors is used in bathrooms, given the high resistance to moisture of such coatings.
3D floor in the bathroom Source dekoriko.ru
For rooms intended for direct living, it is better to use polyurethane mixtures. The thickness of the fill should be within two millimeters. A thinner coating will be less resistant to abrasion, and a thick one will incur unnecessary costs.
Separation by appearance
According to this parameter, self-leveling floors are usually divided into three main categories:
- plain;
- with patterns;
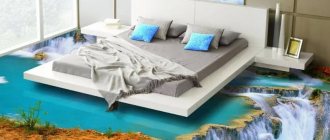
- 3D.
The first type of flooring is available on the market in a wide variety of color shades. The surface can be matte or glossy and they blend easily into any decor. Patterned floors come with pre-made stencils. You can also order an individual drawing or do it yourself.
3D floors create the illusion of a three-dimensional image and two main methods are used for this:
- printing the design on vinyl film;
- applying the image to a previously prepared base using acrylic paints.
Using film when pouring 3D floors is less labor-intensive and much cheaper than the second method.
Finish floor
This concept deserves special attention, since without clarification of specific details, it causes some confusion. To avoid this, it is necessary to distinguish between leveling the base and filling the floor itself. If, after applying the cement screed, a liquid floor is poured, then it can be called finishing. However, as a rule, a finishing coating in the form of linoleum or other material is laid on the cement screed.
3D floor in the living room Source delaypol.com
When pouring a self-leveling floor, many of its varieties require application in several layers. For example, a floor with a picture is applied in the following order:
- base;
- drawing;
- protective covering.
Based on this, such a floor can have its own finishing layer.
Impregnations for dust removal
In the fight against concrete dust, this is the simplest job.
There are mineral and polymer impregnations.
Mineral compounds create glassy compounds in the concrete screed, giving the surface additional strength and the impossibility of peeling off cement dust.
Organic ones also penetrate into the pores of concrete and strengthen it, increasing wear resistance.
Mineral impregnations , or fluates, are improved over time. If, when using sodium silicate, the impregnation interacted with the base for a very long time (up to 6 months) and required careful rubbing, then modern impregnations based on lithium polysilicate complete penetration into the base and hardening in half a month.
At the same time, such a dust-removing impregnation will last as long as the screed itself, and during its application it will not require either rubbing or dealing with excess liquid.
Organic impregnations are:
The first type of impregnation is best done where there will be a floor covering on top, or where the load on the surface is small.
Polyurethane is more durable. The downside is that they have a strong unpleasant odor when applied and dried.
Epoxy impregnation is the most durable, but also the most expensive.
When applying impregnations yourself, carefully read the instructions for use, since each type is prepared for use in a special way.
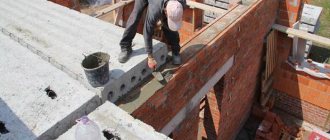
Self-leveling floor device
The base for pouring can be a concrete screed, a floor made of metal, wood or ceramic tiles. The main thing is that the base is relatively smooth and free of unnecessary coatings in the form of paint, varnishes and the like.
Base
To use a liquid floor to level a concrete floor, the base is prepared, it is carried out in several stages:
- the recesses are sealed with cement mixture;
- the cracks are opened and also filled with the mixture;
- the projections are cut down and sanded;
- thorough cleaning of dust is carried out;
- a primer layer is applied to increase adhesion;
- If not all the pores of the base are filled, after the first layer of primer has dried, apply the next one.
After the preparatory work, they begin pouring.
Topping
Toppings are unique mixtures of cement, fine filler and binding components.
The main component is the filler; the strength of the coating depends on its quality. This can be quartz sand (used in rooms where the load on the surface is low); corundum topping (for heavy loads) and metallized (for industrial floors with excessive loads).
Large areas will require special sanding equipment. If the room is small, you can get by with smaller machines and even converted grinders.
Grinding is done on fresh concrete and in the old way.
The new screed is first approached a week after installation, when the top layer has already hardened and can be removed to reveal stronger layers. Then you should wait until the concrete has completely hardened, about a month, and repeat the treatment.
As for the old coating, we still need to see if it’s worth sanding; maybe it would be more profitable to fill in a new solution.
Grinding goes through three stages:
If polishing is also applied, the result will be an ideal, almost mirror-like surface. It will be dust-free, moisture-resistant, chemical-resistant, and easy to clean.
Calculation of self-leveling floor consumption
The price of mixtures for self-leveling floors can reach significant values. For this reason, it is very important to correctly calculate the required amount of composition. This will help not only to carry out work in compliance with technology, but also to save the budget from unjustified expenses. Calculations are made based on the consumption of self-leveling floor per 1 square meter and taking into account the specific nuances of the room.
Self-leveling floor with an abstract marbled pattern Source masterskayapola.ru
Owner reviews
The pros and cons of such floors indicate that attitudes towards them are ambiguous. Everyone talks about the perfectly flat surface of this floor.
Some buyers express doubts whether the self-leveling floor will be slippery, since it is very smooth. But owners say that the floor slips no more than tiles. In any case, they do not have any special problems in this regard.
Some people complain that the floor has changed its color from its original color. This can happen if you use a cheap, low-quality compound, which is often made in utility rooms or basements. Therefore, buyers are not advised to chase cheap goods. It is better to buy products from well-known companies with a good reputation, many of which have been on the market for a long time. Good reviews about the mixtures, Tikkurila
Video description
About calculating the amount of mixture for a self-leveling floor in the video:
Final calculations
As a rule, provided that the base is well prepared, calculations are made based on the data specified by the manufacturer of the self-leveling floor. As an example, we will give the procedure for calculating the required amount of mixture to fill a layer of 2.5 millimeters. At the same time, the manufacturer indicated that for 1 millimeter, when pouring 1 square meter, 1.5 kilograms of the composition are needed. The calculation requires three steps:
- The area of the filled plane is calculated. With the correct geometry, it is enough to multiply the width of the room by its length. Complex contours are divided into rectangular sectors and their area is summed up.
- The required thickness is determined using a level. In the case of a relatively flat surface, you can use a standard or laser building level. In case of significant deviations in height, it is necessary to use a water level.
- All received data is recorded and double-checked.
Let's assume that the width of the room is 4.7 meters and the length is 5.9 meters. Therefore, the area of the room will be:
As mentioned above, it is planned to pour a layer of 2.5 millimeters at a mixture consumption of 1.5 kilograms per millimeter. So per square meter you will need:
For the entire room:
When calculating, it is necessary to take into account the density of the composition. We provided approximate indicators for this parameter above, but for more accurate calculations you should check the data provided by the manufacturer.
Self-leveling floor with colonial-style ornaments Source polsdelat.ru
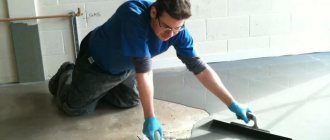
How to apply?
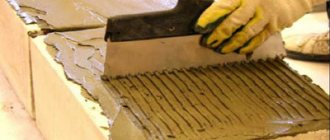
Inspect the floor, clean if necessary, and repair with epoxy putties. Vacuum the surface.
Next, the impregnation should be distributed over the floor as evenly as possible, without “puddles” or unfilled areas. Level the liquid using a soft roller or brush.
If silicate impregnation is used, it will have to dry for about an hour. After it has become viscous, the composition is diluted with water, and the surface is covered with a new one again. To better rub the impregnation into the base, trowels can be used. After twenty minutes, the floor should be thoroughly rinsed with clean water.
With lithium impregnations everything is simpler. They are simply carefully distributed over the surface and allowed to dry.
Required Tools
You can fill the self-leveling floor with your own hands using the following tool:
- bucket or other container for mixing 20-25 liters;
- needle roller;
- drill or special mixer with an attachment;
- squeegee for drawing out the solution with an adjustable gap;
- wide spatula;
- special paint shoes;
- polyethylene film;
- level.
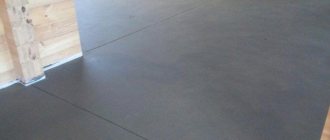
Preparing the base
The matte self-leveling floor is applied to a specially prepared base. Optimal compliance is created by a concrete screed. If a room or office previously used a different type of covering that is difficult to dismantle, you can concrete the floor with cement-sand mortar. For a perfect fit it is necessary to create a flat horizontal surface. If there are cracks or depressions, they must be filled with repair compound. Next, all irregularities are removed by grinding. This procedure also allows for better penetration of the primer. After completing all repair work, it is necessary to remove dust, and if there are oil stains, degrease the surface.
At this stage it is also necessary to create optimal humidity in the screed (3-4%, no more). If these are recently poured concrete floors, then complete drying occurs only after 4 weeks. Therefore, it is impossible to proceed with further actions earlier.
Manufacturers
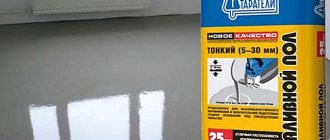
The best compositions for making cement-based screeds.
- “Prospectors” – gives greater thickness, can be used for significant unevenness. It can be used both outdoors and inside houses, at high humidity, and after complete hardening it is very durable. The manufacturer also has a quick-hardening mixture with the addition of gypsum - less durable, but optimal for finishing living rooms.
- "Osnovit Skorline" - includes various polymer additives, is used in living rooms, and is characterized by rapid drying.
- “Unis Horizon” is a fast-hardening mortar, ensures commissioning within 3 hours after pouring, and can be used in damp rooms.
- "Volma" - used in conditions of high humidity.
- Knauf is a well-known manufacturer of high-quality cement mixtures used on various types of substrates (including wood).
Knauf self-leveling floor
In addition to conventional mixtures, decorative ones are popular - such compositions are laid in three stages - a base, a layer with the addition of decorative elements, and a finishing layer.
A wide variety of cement-acrylic mixtures allows you to make the right choice for a room with any conditions.
Possible mistakes
Proper installation requires careful attention to all work carried out. Certain points to take into account:
- too high humidity of the base surface;
- increased content of dust and dirt;
- poorly carried out degreasing of the surface;
- fragility of the base surface, presence of cracks;
- poorly mixed filling solution;
- non-compliance with technology, violation of the sequence and timing of laying layers.
Poor preparation of the base and violation of installation technology can lead to cracking of the self-leveling floor.
To avoid problems in the future, it is worth carrying out the work correctly
Features of cement-acrylic mixtures
The composition usually includes the following components:
- cement as a binder;
- acrylic, other polymer fillers;
- special fine sand;
- additional additives, usually mineral.
There are a large number of different options for fills, differing in composition, hardening conditions, suitability for various types of substrates, and decorativeness.
There are a large number of different fill options