In this article we will show you how to connect your Internet cable that has broken or simply needs to be extended. It’s clear that you don’t need any special knowledge to connect the wires. Therefore, we decided to give you practical tips and recommendations on how best to connect a network cable and show you what connection methods are available. Now, perhaps, let’s move on to considering several connection options, and you yourself can decide which one is most suitable for you.
Method No. 1: Twist the wires by hand
For this method you will need electrical tape, a knife and your hands, from the right place. In almost any home these items are always available.
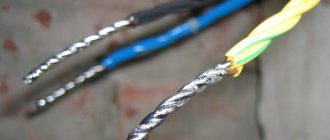
- The first thing to start with is to take both ends and remove the protective outer braid from them.
- Now unwind all the wires individually and remove the insulation from each.
- Twist all the wires strictly according to color. In this action, twisting must begin with the insulation, as in the photo.
- It is advisable to trim the sharp ends of the twisted strands, but not necessary.
- We isolate each color of twist separately, and at the end all together.
Maybe
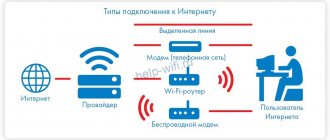
How to split an Internet cable
Network users often wonder how to split an Internet cable. Such measures may be required in several situations:
- when moving a laptop around an apartment/house, i.e. when you need to connect it to the Internet in different rooms;
- if you have several computers/laptops and need to connect them to the Internet.
The problem is solved in different ways.
- In both cases, the easiest way out is to buy a Wi-Fi router. But not everyone wants to connect to the network this way.
- If a cable connection is required, then the most reliable option is a switch. Its advantage is that all devices connected through it gain access to the Internet at the same time. Moreover, there can be as many such devices as there are ports in the network equipment.
- An adapter-splitter is another convenient and inexpensive option. But you can connect only two computers to the World Wide Web through it, no more.
- Some network users suggest manually branching the Internet cable. To do this, you need to attach two wires of the same color to each core, insulate everything well and separate the wires in the room. But this method does not guarantee the quality of the connection, so experts do not recommend using it. In addition, you can only connect to the network with such a cable one at a time; two computers will not work at the same time in such a situation.
Method No. 2: We make twisting with soldering
This option will, of course, be more reliable than the first. It is performed as follows.
- We do everything the same as in the first option until the moment when it is necessary to insulate each color of the core with electrical tape.
- Having twisted all the wires according to color, take a soldering iron and start soldering. There is nothing complicated about this; even a person who picks up a soldering iron for the first time can cope with it.
- After soldering, we insulate each twist separately with electrical tape, and then all together.
This twist will last much longer, so if you have a soldering iron, we recommend using it. That's all, now you know how you can connect twisted pair cables to each other using a soldering iron.
See also: How to find out if there is bluetooth on a laptop.
Connecting LED strip
Most LED strips operate on 12 V or 24 V. If there is only one line of crystals, 12 V is required, if there are two, 24 V. Any DC source that produces this voltage is suitable: battery, power supply, battery, etc.
Diagram for connecting the LED strip to a 220 V network via a power supply
To connect the tape to a 220 V household network, a converter or adapter is required (also called blocks or power supplies, adapters).
Recently, tapes have appeared that can immediately be connected to a 220 V network. They are all sealed in plastic tubes - 220 Volts is no longer a joke. They are also cut along the intended lines and connected using a special connector, which is inserted into the conductors. A cord with a built-in rectifier is connected to the connector (this is a diode bridge and a capacitor).
Connecting a special LED strip to a 220V network
This tape differs from the usual one in that small sections (20 pieces) with LEDs are connected not in series, but in parallel, and also in such a way that the diodes are directed towards each other. Due to this, we obtain the required voltage of 220 Volts or so. The alternating current is converted to direct current using a diode bridge, and the ripple is damped by a capacitor.
Connection diagram for LED strip without power supply
In principle, such a tape can be assembled from a regular one, but you will need to take care of the insulation: touching an element connected to a household network without an adapter is fraught with serious consequences.
How to connect several LED strips
Each of the tapes, depending on the modules used and the number of elements per meter, consumes a different amount of current. The average parameters are given in the table. Knowing how long you want to mount the backlight, you can choose an adapter that will deliver the required current.
Table of current consumption by LED strips powered by 12 V
Sometimes the required length of the tape exceeds 5 meters - when it is necessary to illuminate the room around the perimeter. Even if the power supply can supply the required current, two or more five-meter strips cannot be connected in series. The maximum permissible length of one branch is the 5 meters that come in the reel. If you expand it by connecting the second one in series, a current many times higher than the calculated one will flow through the tracks of the first tape. This will lead to rapid failure of the elements. The track might even melt.
If the power of the power supply is such that several tapes can be connected to it, separate conductors are drawn to each of them: the connection diagram is parallel.
How to connect several LED strips to one power supply
In this case, it is convenient to place the power supply in the middle, for example, in a corner, and two strips on either side of it. But it is often cheaper to buy several less powerful adapters than one more powerful one.
Connecting RGB strip via controller
First the power supply is connected in series, then the controller. They are connected to each other by two wires. There are already 4 conductors coming out of the controller, which are routed to the corresponding contact pads of the RGB tape.
Connecting an RGB LED strip via a controller
Exactly the same as in monochrome tapes, and in this case the maximum permissible length of one line is 5 meters. If a larger length is required, then two bundles of wires, 4 pieces each, depart from the controller, that is, they are connected in parallel. The length of the conductors can be different, but it is more rational for the power supply and controller to be in the middle, with two backlight branches extending to the sides.
Method No. 3: Use scotch-lock to connect the twisted pair
Scotch-lock is a small connector made of durable plastic that is not afraid of environmental influences. It is filled with a special hydrophobic gel, thanks to which oxidation will not occur inside the connector.
This connector is a very convenient thing, the only drawback is that it is difficult to find on sale. Prices start from three rubles and above.
- Remove the main braid from the cable and, color by color, without removing the insulation, insert the two wires into the adhesive tape.
- Take pliers and squeeze. If possible, ring the created connection with the tester.
What can cause wire extension?
A good reason that forces you to lengthen the network cable is moving a personal computer, laptop or TV (with Smart TV) to a distant room (for various reasons). If the apartment has reinforced concrete walls and the same ceilings (and the majority of such living spaces) the Wi-Fi network does not work satisfactorily. In this case, the only real salvation is a wired connection. And to do this, you first need to make the cable longer.
Another reason is a simple rupture, which requires repair. This especially applies to situations where the twisted pair is not laid hidden (under drywall or in the wall), but lies on the floor, unprotected. Then it’s a matter of time before it’s time to damage the cable and you can simply press it down firmly with a chair leg.
If there are small children in the family, then in a playful impulse they can break the wire. And animals actually love to chew on everything that remains ownerless - cables, cords, etc. Perhaps pets find their interests in this.
Those owners of computer equipment who prefer economical consumption, instead of buying one long “cord”, try to buy several short pieces, which turns out to be cheaper in the end. And then all that remains is to connect them together. For example, from the same three two-meter sections, a full-fledged working 6-meter wire is obtained.
How to extend the internet cable yourself
Note! Even when you simply move the router to a new location, in any case you need to extend the cable that goes from the entrance to the apartment.
Method No. 4: Use an adapter or splice
If you need to connect two cables that are crimped, then the ideal option is to buy a special adapter, see the picture below.
If a wire is broken or extended, a twisted pair splicer will help. You just need to insert the network cable on both sides according to the colors and use a thin screwdriver to press all the wires in until they stop. An example is given below.
See what to do if it says: Authentication error when connecting to wifi on an Android phone.
How to check the quality of an Internet cable crimp?
So, the connectors on the LAN cable are installed. How can you now verify the reliability of the connection being created?
There are several ways.
- The simplest one is to connect the LAN cable directly to its destination. That is, if after switching the devices everything began to work normally, then you can congratulate the technician on the successful completion of the installation.
- Professionals evaluate the quality of crimping and the condition of laid communication lines using special devices - LAN testers.
These devices usually consist of two blocks, that is, you can check a cable whose opposite connectors are located in different rooms. It’s even easier, of course, to check the patch cord with it.
One example of a LAN tester
Both the main unit and the additional remote unit have ports for connecting connectors. After connecting the cable, the power is turned on and the device begins to scan each wire, which is indicated by numbered light indicators. If there is a break in the line, then it is immediately noticeable which of the wires is faulty. Or, in our case, which contact of the connector is crimped poorly.
A LAN tester is the privilege of professionals, but at home you can try using a regular multimeter. It is set to ringing (with sound indication) or to a minimum resistance, for example, 200 Ohms. And then they check each wire of the same color on two adjacent Internet cable connectors.
Internet cable wires ringing after crimping connectors
Such an audit will not take much time. True, the tester probes must be thin in order to accurately fall on specific connector contacts of the same name. This can be solved either by sharpening them, or by temporarily installing thin wire tips.
If some wire does not ring (among those that are significant for a particular connection), then you will have to redo it.
How to test an Internet cable with a multimeter if the connectors are located far away from each other (for example, in different rooms). Nothing too complicated either.
If you look at the circuit diagram of the ports of switching devices, you will see an induction coil connecting the wires of one pair (for example, green - white-green). That is, there must be conductivity between them.
Approximate diagram of the port arrangement for switching devices with a LAN cable
This means that you can insert one connector into the port of any of the devices (it is better to do this with the device turned off), and then check the line conductivity on the second connector. Typically, for home lines (up to 100 megabits), it is enough to test only two pairs. Check the resistance between orange and white-orange, green and white-green.
Of course, there will be resistance (calculated in units of Ohms), and it depends largely on the length of the cable
But what’s important is that it should be approximately the same for both couples. If the difference is large, or the resistance is very high, and even more so if the line does not ring at all, you should look for defects in the work performed and redo it again
This verification is described in more detail in the video below:
Conclusion
The easiest way is twisting; it does not require special skills, tools or effort. But still it is not suitable for providing high-speed Internet.
If you are aiming to obtain high-quality data transmission, then it is better to purchase a factory-made cable and connect it to the necessary devices according to the instructions. It will be safer and better quality.
Sources
- https://rusenergetics.ru/raboty/obzhim-vitoj-pary-konnektorom-rj-45
- https://skomplekt.com/vitaya-para-kategorii-obzhim-sovetyi/
- https://www.asutpp.ru/obzhim-vitoj-pary.html
- https://sovet-ingenera.com/elektrika/provodka/kak-soedinit-vituyu-paru-mezhdu-soboj.html
- https://www.bazaznaniyst.ru/sposoby-soedineniya-vitoj-pary/
- https://lanportal.ru/lan/kak-soedinit-lyuboj-internet-kabel-vituyu-paru-mezhdu-soboj.html
- https://eserver24.ru/stati/5-sposobov-soedinit-vituju-paru
- https://nastroisam.ru/kak-udlinit-internet-kabel/
Coupler
This technology is considered the best option for home repair of cable lines. The result of such work will be a neat connection of the cores, which can not be hidden from prying eyes. The coupler is a compact box equipped with 16 terminals. This technology is used in the design of network sockets.
The ends of the LAN cable are inserted into the box on both sides. This allows you to connect them in the correct order, according to color. Using a screwdriver, the edges of the wires are securely fixed in the blade contact and covered with a lid. The advantage of this method is the absence of loss of Internet signal transmission speed and the absence of the need to use special devices for repairs.
Extend the cord using a connecting adapter
This method is universal and can be used to connect the main cord from the provider, or to combine the cord of a PC, modem, router, etc.
Such adapters are called joyners, they are quite simple in design, they look like a double-sided connector for a power cord plug. To use this adapter, it is necessary that the ends of the cables be crimped and equipped with connectors. This operation can be done using special devices or ordinary household tools.
Using this method, in the process of purchasing a network cable, you can ask to crimp it directly at the service center; this operation is performed in all stores that sell such products. Having an adapter and crimped cables, the further connection process is quite simple, you need to connect the cables to the connectors of the adapter and that’s it, the work is finished.
As an analogue, you can use adapters of the coupler type; they are quite convenient, and even much easier to operate than adapters of the joyner type, since when using them there is no need to carry out such an additional operation as crimping the cable. They are often confused with splitters; special attention should be paid to this point.
General information
Very often there is a need to wire a home network of devices with Internet access. Solving the problem is very simple, since you need to purchase a router, configure it and connect all devices to it. In this case, cable crimping is necessary. There are two ways out of this situation: seek help from a specialist or perform the crimping yourself. Crimping a network cable is inexpensive, but in some cases it can be unprofitable, since you need to adjust and wait for a specialist to arrive.
In some cases, for convenience, you need to use your home network, since it is not very convenient to run with a flash drive from one computer to another and download your favorite show or movie. To do this, you need to know how to properly crimp a twisted pair with 8 cores.
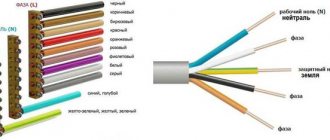
Twisted pair categories
Alexander Bell is considered the creator of the twisted pair cable, who proposed a twisted pair wire to protect a telephone line from interference caused by adjacent telegraph wires or power lines. This twisted pair of wires was used successfully for almost 100 years until it was replaced by modern types of copper cable.
Twisted pair. General form
Like any telecommunications equipment, international standards have been developed for copper cables. In this case, ISO/IEC 11801. In addition, there is the EIA/TIA 568 standard, which is valid in the United States and its satellites. These standards have been supplemented several times and today there are 8 categories of twisted pair cables:
- Category 1 (Cat1). The same twisted pair of Alexander Bell wires. Used only in analog telephony.
- Category 2 (Cat2). A two-pair cable designed for Arcnet and TokenRing networks and providing transfer speeds up to 4Mbps. Discontinued in the early 2000s.
- Category 3 (Cat3). The first cable is 4 pairs. Designed for 10Base-T Ethernet networks. Out of production in the 2000s.
- Category 4 (Cat4). 4-pair cable for Token Ring networks, 10/100Base-T. Out of production, but found on older networks.
- Category 5 (Cat5). The first cable capable of transmitting information at speeds up to 100 Mbps. Almost completely supplanted by its successor.
- Category 5e (Cat5e). Improved version of cat5. The most popular category today. The cable is capable of transmitting data at speeds up to 1 Gbit/s. It is found in two versions: two-pair and four-pair.
- Category 6 (Cat6). Introduced in 2002. The throughput of twisted pair is 10Gbps. The first cable capable of operating at 10Gbps, albeit over a short distance. Considered as a possible alternative to cat5e.
- Category 6A (Cat6a). Modification of the Cat6 standard, introduced in 2008. The throughput of twisted pair Cat6a - 10Gbps is maintained at distances of up to 100 meters. The actual analogue of Cat5e for 10GE networks.
- Category 7 (Cat7). Introduced in 2002 along with Cat6. The standard was initially positioned as a more powerful version of Cat6, capable of transmitting 10Gbps over a distance of over 50 m, but with the advent of Cat6A it lost its relevance.
- Category 7A (Cat7a). Deep modernization of Cat7, designed to work with 25GE. The bandwidth of this cable also allows you to transmit a 40GE signal, but only over a distance of 1-15 meters.
- Category 8 (Cat8). The newest standard, introduced in 2016. This four-pair cable is capable of transmitting a 40GE signal over a distance of up to 42 meters. Cat8 is divided into 2 categories: Cat8.1 - standardized to work with RJ-45 connectors and is backward compatible with Cat6A cables.
- Cat8.2 – designed for connectors such as TERA (developed by Siemens Company), GG45 (developed by Nexans), and ARJ-45 (developed by Bei Fuse Ltd). These connectors are proprietary and the prospects for their use are still vague.
Types of twisted pair
In addition to categories, copper cables are distinguished by design. The following types of cable are distinguished:
- UTP is a cable with a simple sheath, without armor or protective shield (unshielded twisted pair). Usually installed indoors.
- FTP – shielded twisted pair (foil shield).
- STP - Here each pair of wires is placed in a protective shield and a wire mesh armor is laid between the two shells.
- S/FTP, also known as SSTP, is a double shielded cable. The first one braids each pair separately, the second one covers the entire bunch.
- U/STP – similar to STP, but without external armor.
- SFTP - This shielded twisted pair cable has the thickest cable of all. It has three screens: an internal one covering paired wires and two external ones. One is made of foil, the other is made of wire mesh.
The differences in performance are by no means limited to cable design. The materials from which it is made also play a role. Thus, conductors made of pure copper have better conductivity characteristics compared to their counterparts made of copper-plated aluminum. Another thing is that copper conductor is much more expensive than aluminum.
Shell materials should also be differentiated. The most popular shell today is polyvinyl chloride (PVC). A cable with such a sheath is marked with the letters PVC and is most often painted gray. It is intended for installation indoors. This casing is very cheap, but burns well and has limited resistance to heat and cold.
Another popular cable sheath material is polyethylene (designated PE). It is used in cables for outdoor installation. Outdoor twisted pair cables withstand temperature changes well and are not afraid of dampness. In a number of options it is equipped with a support cable. This allows you to stretch the cable between the supports without the risk of damaging the conductors.
In recent years, twisted pair cables with a sheath made of a low-smoke, halogen-free compound (LSZH marking) for indoor installation have been gaining popularity. It burns poorly and does not emit harmful substances. Therefore, if strict fire safety requirements are imposed on lines or premises, this should be chosen. Yes, it is more expensive than PVC, but it is more durable and safer.
There are also rarer cable sheaths. For example, the FRNC marking means that the cable sheath is fireproof and corrosion resistant. The polyurethane (PUR) shell offers excellent resistance to oil and repeated bending. Such cables are used in robotics and other areas with special requirements for conductors.
Category and containment
The twisted pair category is very important. To connect to the Internet or conduct communications for a computer network, you should use a category of at least CAT5. In exceptional cases, CAT6 and CAT6a are suitable. Category designations are embossed on the shell. There are a total of 7 types of categories for twisted pair:
- I - 1 pair (bandwidth 0.1 MHz): used in telephone communications.
- II - 2 (1 MHz): networks with data transfer rates up to 4 Mbit/s.
- III - 4 (16 MHz): 10 and 100 Mbit/s.
- IV - 4 (20 MHz): up to 16 Mbit/s.
- V - 4 (100 MHz): 100 Mbit/s (2 pairs are used).
- Ve - 4 (125 MHz): 100 Mbit/s (2 pairs) and 1 Gbit/s (4 pairs).
- VI - 4 (250 MHz): from 1 to 10 Gbit/s.
- VII - 4 (600 MHz): shielded up to 10 Gbit/s.
You might be interested in: Types and types of cable channels for electrical wiring and their installation
Twisted pair also differs in the shape and color of the sheath. The common type of power cord is gray sheath. The orange (bright red) color of the sheath indicates that the power cord does not support combustion. The latter type of wire makes sense to use in areas prone to fire. In addition, twisted pairs are flat and round. They do not differ in technical characteristics.
The Ethernet cable consists of 2 (4 wires) or 4 (wires) pairs. At speeds up to 100 Mbit/s, 2 pairs can be used. If the data transfer rate is in the range from 100 Mbps to 1 Gbps (1000 Mbps), then all 8 wires (pairs) should be used. When designing your home network or connecting to the Internet, you should take these features into account. It is better to stretch 4 pairs at once, since if the information transmission speed increases above 100 Mbit/s, you will have to re-tighten the cable.
Secure the connector
Frame: Electronics&Computers / YouTube
Next, you need to fix the plug, which is needed so that the cable does not accidentally pull out and you are not left without the Internet. This can be done later, but it’s better not to put it off: this way you won’t have to hold the wires while crimping.
To do this, unfold the plug with the contacts facing up and place it on a table or other hard surface. Make sure the outer shell fits slightly deeper than the retainer. If this is not the case, pull out the wire and shorten the wires a little. Using a screwdriver, press the small tab in the recess at the edge of the connector to press the cable.
Telephone connectors
Telephone connectors are represented by three types of modules - RJ11, RJ14, RJ25. There is complete confusion in understanding the markings of these connectors. That is why it is best to make your choice based on the number of knives that each jack contains. In general, the main types of connectors are characterized by the same form factor and purpose (telephone line switching):
RJ11 (6P2C) – connects a two-wire cable;
- RJ14 (6P4C) – connects a four-wire cable;
- RJ25 (6P6C) – a six-core cable is connected.
Depending on the situation, telephone jacks may use cables with fewer wires and a smaller form factor. These include the RJ9 (4Р4С) module, designed for connecting handsets to the device itself.
Terminals
One simple way is to use special terminals. To do this, it is enough to have terminals, a knife and pliers on hand.
- As with regular crimping, we simply strip the wires.
- We take the first pair and put it inside the terminals. Next, press with a little force with pliers;
- We do this for every couple. Here I also used twisting of the non-exposed part, as in previous methods.
Joyner RJ-45
Let's look at how to extend the Internet cable to the router correctly without using soldering. It is best to use an RJ-45 joyner for this. This device is a special coupling with which you can connect crimped wires. This method is now very popular among professional craftsmen.
The joyner adapter has one RJ-45 connector on each side. This allows you to connect the end of the cable crimped into the connector into the device and extend the Internet line. This device should not be confused with a splitter, which has only 1 input and 2 outputs. It is used to separate an 8-core line into two 4-core cables. This allows you to connect two personal computers in parallel.