Instead of metal pipes in private buildings and apartments, similar products made of polypropylene are widely used when installing utility lines. They are lighter weight and have a longer service life.
However, even such high-quality modern material can leak. To reduce the likelihood of repairing polypropylene pipes or quickly eliminating an emergency situation, you need to have information regarding the reasons for the leakage of polymer pipelines.
The first signs of a pipeline leak
In most cases, leaks in utility lines are immediately noticeable. After all, puddles appear on the floor and other structural elements of the building. However, minor leaks are not always so obvious.
Heating pipe is leaking
If the leak is small, it can be determined by the following signs:
- PP pipes become wet;
- drops that look like dew appear in the area of the fittings;
- the pressure in the pipeline system drops sharply.
If any of the above situations occurs, the owner of an apartment or house needs to pay attention to the water supply network. Perhaps it's time for a renovation.
A leak that is not eliminated, even in the form of a small trickle of water, will cause irreparable harm. Moisture can get on electrical appliances, penetrate electrical cables, or ruin just-completed renovations for neighbors on lower floors.
Mixer device
Ball valves, regardless of their location and manufacturer, always have the same design, which greatly simplifies repairs. It is enough to figure it out once and then solve all the issues without any problems. Mixers of this type consist of the following parts:
- The handle is a rotary type, fixed with a screw that can be unscrewed with a small hexagon.
- The faucet cover covering the work area is usually spherical in shape.
- A rod, the fastening of which is sealed with a washer and nut.
- A spout through which water is supplied.
- The body, inside of which the rod moves and the cartridge is located.
- A ball-type cartridge that is held inside by rubber seats.
- Seals that prevent water leaks.
By the way!
The system works very simply: when you lift the lever, the cutouts in the cartridge and the holes in the seats are aligned and water flows into the spout. Due to rotation, the cavities shift, changing the proportions of hot and cold water. This allows you to set the optimal temperature in just a few seconds.
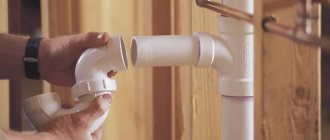
How to fix a leak in a polypropylene pipe
The indisputable advantage of polymer pipes is their simple installation. Therefore, even a beginner can perform repairs with minimal skills and a set of tools. Moreover, a professional technician can handle the problem.
Plumbing work
Repair work begins with identifying the defective area. Typically, an emergency situation occurs in the area of joints. Connections in pressure and non-pressure systems are the most vulnerable points.
The first step is to shut off the water supply to the entire system or to a separate section of the pipe. Then the optimal method for eliminating the leak is selected. The malfunction must be eliminated in a minimum time period, eliminating the crack or hole efficiently.
The next stage usually involves dismantling the problem area. It may also be necessary to disassemble the threaded connection to reassemble it better. In some cases, you have to unscrew the American ones to replace the O-rings.
Connections in pressure PP systems are created using soldering. Docking is performed using a special welding machine. It is called a soldering iron or iron. Work is carried out with dry parts to avoid further depressurization.
Do-it-yourself plumbing and heating valve repair
Each house or apartment has a plumbing supplying cold and hot water, as well as a heating system consisting of pipes and radiators. To repair or replace individual sections of pipelines, the liquid must be shut off, which is done using a valve. It is recommended to constantly monitor the condition of the device and, if necessary, promptly repair the valve. Otherwise, in emergency circumstances, you can flood not only your apartment, but also the premises located below.
Valve in need of repair
Valve device
Two types of valves can be installed on plumbing and heating systems:
The working element of a ball valve is a ball located inside the body. The ball has a through hole. If the valve is open, then the ball is turned with its hole towards the flow of water. In the closed position, the ball turns its blind side towards the water. The locking element is rotated using the handle.
Ball valve device
The shut-off element of a valve valve is a valve with a gasket located on a spindle, which is lowered and raised by turning the handle.
Valve device
Possible malfunctions and ways to eliminate them
The device requires repair if:
- The valve does not shut off the water. The causes of the malfunction may be:
- wear of the sealing gasket that serves as a locking device,
- disconnecting the shut-off valve from the spindle,
- spindle bend,
- contamination of the valve with deposits contained in the water,
- the valve is leaking or dripping. The main reasons for such a malfunction may be:
- formation of a crack on the device body,
- absence or insufficient quantity of stuffing box.
Replacing the gasket and cleaning the housing
To repair a valve with your own hands when the gasket is worn out, you will need the following tools and materials:
- adjustable wrench,
- a piece of plumbing rubber,
- scissors,
- pliers,
- knife,
- linen thread or other sealing material.
The gasket is replaced according to the following scheme:
- Using an adjustable wrench, you need to unscrew the valve axle that secures the valve spindle,
Disassembling the valve to replace the gasket
- use pliers to unscrew the nut securing the gasket,
- the washer and the failed gasket are removed,
- a piece of rubber is cut out, the dimensions of which are slightly larger than the dimensions of the valve,
- a hole is made in the center of the cut piece of rubber,
- the rubber is placed on the valve and secured with a nut,
- Excess rubber is trimmed around the valve using scissors. The finished gasket must fully match the dimensions of the valve,
Attaching a new gasket to the spindle
- Using a knife, the valve body is cleaned. It is recommended to carefully remove all deposits not only in the device body, but also in the threaded connection,
- the crane axle is mounted on the thread,
- The connection is sealed, after which the device can be completely fixed.
Sealing the threaded connection with flax thread
Replacing the stuffing box
If a faucet valve is leaking, then in most cases the problem is the absence or excessive sealing of the stuffing box. For repairs you will need:
- an adjustable wrench or wrench of the appropriate size,
- stuffing box,
- knife or flat screwdriver for sealing.
In this situation, you can repair the valve yourself according to the following scheme:
- shut off the water supply to the system,
- remove the rotation handle,
- unscrew the fixing nut. When loosening the locking, it is recommended to keep the spindle in one position,
- remove the sealing ring securing the packing,
- use a knife or screwdriver to remove the old packing,
The process of replacing the stuffing box to eliminate a leak
- apply and compact new sealing material,
- Reassemble the faucet in reverse order.
If a valve is leaking and the cause of the leak is a crack in the valve body, then you can:
- completely replace the valve,
- seal the crack with special materials.
Crack in valve body
Among the materials used to seal cracks, cold welding agent can be distinguished.
Tool for cold welding of metal
Detailed instructions for use of the product are indicated on the packaging. The general usage pattern is as follows:
- the place where the crack needs to be repaired is cleaned of dirt and degreased with acetone,
- the composition for application is prepared,
- the finished mixture is applied to the crack and distributed evenly over the surface,
- The composition is expected to dry completely, after which the welding area can be cleaned and painted.
Causes of leaks
In non-pressure systems, emergency situations arise due to improper operation, poor-quality installation and manufacturing defects. A connection made incorrectly always causes network depressurization.
I drilled a polypropylene pipe into the wall, what should I do?
Polypropylene is not difficult to damage due to mechanical stress. Most often, leaks in a free-flow system occur precisely because of external interference. Mechanical stress negatively affects rubber sealing elements, which are used to make most connections in non-pressure networks.
In systems under pressure, accidents occur for the following reasons:
- physical impact;
- incorrect installation;
- non-compliance with recommendations during operation;
- increased blood pressure;
- erroneous assembly;
- use of low-quality materials.
Often, a violation of the tightness of the PP system occurs during repair and construction work. Often installers or builders drill into pipelines.
The cause of the emergency can also be factory defects, because there are polymer pipes made in China.
PP products have a durability of 50 years. This is exactly the guarantee that bona fide manufacturers of certified products issue.
Polypropylene tap - a modern solution for your communications
Faucets made of polypropylene cause distrust among many buyers due to the fact that they consider the material to be unreliable and short-lived. Meanwhile, modern technologies ensure the highest quality manufacturing, thanks to which such cranes are not inferior in properties to metal products, and in some respects even surpass them. This article will discuss the main features of this type of product and the criteria for selecting quality models.
Taps and fittings for polypropylene pipes meet the highest quality standards if they are manufactured in accordance with the technology
Advantages of this product group
Taps for polypropylene pipes can be very different: steel, brass, or made of the same material as the main communications. It is the latter option that we will consider in more detail, especially since it has a number of undeniable advantages:
A polypropylene faucet is an excellent solution for most types of communications
Important! Another important advantage is the fact that the locking mechanism is made of high-quality stainless steel, this guarantees the durability of the structure and its resistance to adverse influences.
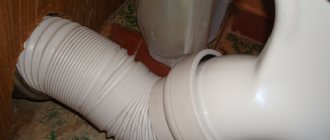
How to repair a hole in a polypropylene pipe
When repairing a polypropylene system, the most reliable way is to replace the leaky section. To do this, the emergency section with the hole is cut out from the communication line.
Plumber inspects a piece of pipe
Then a new assembly is assembled on the ground or a piece of pipe of the required length is simply prepared. It is already soldered in place when using PP couplings.
In practice, it is not always possible to use a special welding machine to solder part of a pipe or an entire assembly. In this case, other methods of plugging holes in the system are used.
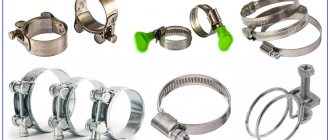
Clamp
One of the options for eliminating a leak is to use a clamp with screw clamps. This is a temporary way to stop a leak. The clamp is used in conjunction with a plastic waterproof sealing material. This option allows you to completely eliminate leakage.
The advantage of using a clamp clamp is that water can flow freely through the system. In this case, nothing will interfere with the movement of the liquid. This method is implemented quickly without stopping the system.
The disadvantage of this method is the inevitable weakening of the screw connection. Therefore, it is necessary to periodically check the area and tighten the clamp.
Cold welding
Cold welding is often used to fill holes. Its quantity depends on the volume of repair work. At the beginning, the component is kneaded by hand or mixed in the required proportions. Then the substance is applied to the damaged area. The leak is eliminated after the cold weld has hardened.
Adhesive bandage
You can fix a hole in a polypropylene pipe using an adhesive bandage. The method is implemented by using 2 clamps together with a material that is impregnated with a special glue - a 2-component composition. It is recommended to use rubber or bandage along with cement for sewer lines.
The advantage of this method is the ability not to turn off the water in the system. The disadvantage of the method is the impossibility of using an adhesive bandage in a network with high pressure.
Sealant and tapes
A good option is to use sealing tape. The adhesive material allows you to quickly seal a leak through a small hole. It is necessary to apply the tape in several layers.
You can also use a special sealant. It also allows you to quickly glue a crack that has formed at the junction of plastic pipes. However, this option is a temporary measure to eliminate the leak.
For high-quality implementation of any of the methods, you must first degrease and clean the surface with the defect.
In practice, the following main types of sealants are used:
- a neutral, gun-applied product suitable for use on all pipes;
- silicone universal composition intended for sealing socket sewer connections;
- acid sealant, not used on fragile pipes and for repairing systems that move acids.
The most difficult thing to eliminate is a leak in heating networks. Thermal circuits are often laid in a closed way. Therefore, before sealing a hole in the pipe, you need to accurately determine the location of the damage. To do this, you have to open walls, floors and other building structures.
Replacing a plastic valve on a pipe
Watch my master class with step-by-step photos on how to replace a valve on a plastic pipe with your own hands.
Valve leak detection
Plastic pipes are deservedly considered the most durable in operation. But plastic valves often fail. Especially if, in pursuit of savings, valves are purchased not as solid cast ones, but as soldered ones, which are cheaper, as in our case.
A soldered valve is installed on the hot water pipe. It is possible that during operation the hot water was turned off several times, the valve either cooled down or warmed up, and as a result it delaminated at the joint and began to drip. My master class in the section - DIY bathroom renovation.
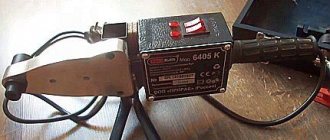
To replace a valve that has become unusable with your own hands, you will need the following tools: A soldering iron for plastic pipes with a set of nozzles. $20
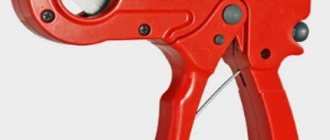
Scissors for cutting plastic pipes. $5-10 New solid plastic valve, coupling, piece of plastic pipe. $5-7
Let's start repairing the valve on a plastic pipe
We independently shut off the hot water supply and return using our own riser. If you do not have access to a water shutoff, contact the management company.
If there is a drain outlet on the riser, drain all the water from the riser through it.
We cut out the old valve with scissors, cut the pipe as close as possible to the valve itself.
Draining water from the riser
If there is no drain outlet on the riser, we blow out or pump out the remaining water from the riser using a hose, and wipe the pipe dry inside and out.
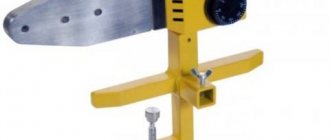
Using a screw, we attach the graphite tips of the required size to the body of the soldering iron.
Move the slider to 230 degrees and turn on the soldering iron.
While the soldering iron is heating up, we cut off a piece from the new pipe, a little longer than necessary, in this case 30 cm.
Important: When soldering polypropylene pipes and fittings, the multi-colored stripes that determine whether the pipe is hot (red) or cold water (blue) should not be visible.
Also, pay attention to maintaining right angles, horizontal and vertical directions.
Repair of polypropylene pipes in hard-to-reach places
It is not always convenient to carry out repair work directly at the accident site. The difficulty lies in using a soldering iron, since the process is carried out in a limited space.
Plumbers work
In this case, to perform welding, perform the following steps:
- The tool is prepared and checked.
- Burrs, dust, dirt and grease are removed from the surfaces being welded. Degreasing is performed with wipes soaked in solvent or white spirit. The substance used must be completely dry.
- The soldering iron heats up to 260 °C.
- The hot pipe nozzle is removed using a gas wrench and quickly put on the pipe in a hard-to-reach place. At the same time, the fitting is heated on the soldering iron.
- The nozzle is removed from the pipeline element in a limited space, and the connecting part is removed from the tool.
- The heated PP parts of the pipeline system are joined.
The repair process in difficult places can also be carried out using a classic fitting with a union nut - an American one. It can be easily installed and removed. This fitting allows you to quickly remove the system assembly for repair or complete replacement. American provides a high level of tightness.
Manufacturers produce American fittings with internal, external threads and mixed types. They are made from various alloys, including steel and brass. American ones are produced in the form of plugs, crosses, tees and adapter couplings.
Necessary tools for work
To do the work yourself, you only need a few tools. All of them are available for free sale, and those who periodically do something with their own hands most often have this tool in stock:
- Adjustable plumbing wrench. It can be used to unscrew connections of different diameters.
- Medium size pliers.
- Flathead and Phillips screwdrivers.
- A set of hexagons (or one key to the size of the screw securing the lever).
- A flashlight if you need to look at something without taking it off.
It is also worth stocking up on rags to wipe away any spilled water and clean the elements from dirt. If you have to clean the inside of the faucet, an old toothbrush may come in handy.
Correct check of radiators before the heating season
Battery checks should be carried out in the summer. Immediately after the heating season, it is recommended to perform pressure testing. To do this, increase the hydraulic pressure in order to identify weak points. If leaks are detected, they are repaired.
Checking radiators should consist of several stages:
- Thorough external cleaning of radiators . Dirty batteries weaken the system and cause unpleasant odors. In addition, uncleaned batteries can become sources of harmful microorganisms that can bring illness into the home. When servicing equipment, detergents should be used.
- Cleaning the batteries inside . To do this, you can use dust brushes with a long handle. You can buy periscopic devices on the market to get to the most inconvenient corners. It is advisable to carry out internal cleaning at least every 5-7 years.
- Adding water . When the radiators are already clean, you can begin ventilating the heating equipment. During downtime, a large number of air pockets could appear that block water circulation. The air should be completely expelled from the system.
Poll: Do you carry out annual inspection and pressure testing of your heating system?
Battery leaks in heating systems occur quite often. You always need to be prepared for this. Scheduled maintenance of the heating system guarantees uninterrupted operation for a long time. But it’s still better to always play it safe and keep the necessary tools and supplies at home in case of breakthroughs. The equipment must be monitored at all times to avoid unpleasant consequences.
Depressurization of the radiator wall or fin
This kind of damage brings big trouble. It is extremely difficult to fix a problem when the battery is leaking, but for a short time you can find a way out of the situation. The method is quite simple.
The small hole on the battery needs to be enlarged. Before doing this, you need to turn off the water and reduce the pressure. Using a drill, make a hole larger than it was. A wooden peg is inserted into the drilled hole. When exposed to water, it swells and stops water leakage.
You can also use a self-tapping screw with a rubber washer instead of a peg.
Of course, leaving the battery in this state for a long time is dangerous; the section must be urgently replaced with a new one.
Scope of application
Polypropylene taps are used in all areas where the disadvantages of the material do not appear:
- water supply;
- heating;
- plumbing;
- sewerage;
- technical pipelines;
- food processing systems;
- agricultural structures.
In almost all areas where pipe lines are present, polypropylene structures are found.
Tap or valve
A PP ball valve is a convenient type of shut-off valve, but the lack of flow control in some situations is a serious drawback.
Expert advice
Here are some recommendations that will allow you not only to carry out the work quickly and efficiently, but also to choose a reliable mixer that will work for a long time. You need to remember the following:
- Before buying a mixer, you should read reviews from people on thematic resources. There you can find out which companies' products are reliable and which models are better not to purchase.
- You should not buy models from the most budget segment; most often they do not last long. You can also compare products by weight: the heavier it is, the better the quality of the metal used.
- It is best to purchase a set of seals along with the mixer, if ready-made sets are available. This will allow for quick repairs in most cases.
- Be sure to install a filter at the water supply inlet to the house. Even the simplest option of rough cleaning significantly extends the service life of the ball valve, since contaminants do not enter the system.
- It is best to conduct a preventive inspection and replace some components at the first sign of malfunction. For example, the faucet may begin to move much more tightly or, conversely, the lever will turn too freely. Also a sign of a problem are extraneous noises or difficulty setting the appropriate temperature if everything was fine before.
- To avoid scratching the nut when unscrewing with a spanner, it is worth placing a rag, this will protect the chrome coating.
- After turning off the inlet tap, drain the remaining water from the system. When disassembling, use a rag, as some liquid always spills.
So, the faucet is leaking in the kitchen, what should I do in the bathroom?
First, you need to turn off the water in the riser. This will stop leaking and save you from unnecessary expenses. If the shut-off valve on the riser has not been used for a long time, and the pipes are metal, then it is possible that the valve is pretty rusty. In this case, you must first treat it with machine oil, and then try to carefully tighten it using a lever.
After this, you should determine why the faucet is leaking.
One of the most common causes of leaks is a worn valve gasket. Over time, the gasket becomes thinner, allowing water to seep into places where it shouldn't be. The thinning of the gasket is accelerated by the habit of over-tightening the faucet. Thus, a vicious circle is created: due to leaking water, you try to tighten the tap more, which leads to even more wear on the gasket.
The solution to this problem is to replace the gasket. You can easily find a new one at any hardware or tool store. Large-scale disassembly of the tap to replace the gasket is not required - just remove the valve. Let us remind you that before this you must turn off the water.
In most cases, in the center of the valve (behind the decorative plug) there is a mounting bolt, unscrewing which you can remove the valve. After this, you will have access to the gasket, which needs to be replaced with a new one. Wrap a little sealant (fiber or polymer) over the gasket and install the valve in place.
The second most popular problem is the wear of the sealing liner of the oil seal. This malfunction is easy to establish: the valve leaks in the area of the gland nut while the valve is open. There are no leaks when the valve is closed. This malfunction can also be eliminated by replacing the sealing insert.
If you notice a leak in a new, newly installed faucet
There may be two reasons: installation errors or manufacturing defects. Since the taps themselves are sold pre-assembled, the only place where you can make a mistake is the connection to the pipeline. Accordingly, leaks will be there. If the tap itself is leaking, most likely it is a fault. Then there is only one option left - to return the faucet to the store.
Note that all of the above concerned conventional valve taps. Leaking ball valves are a much more serious problem, mainly due to the complexity of the valve design. To eliminate such leaks, it is recommended to contact specialists. However, it is worth noting that ball valves leak much less frequently than conventional valves, since they do not have many weak points, such as the same gaskets.