Two years later everything was a blur. Again he decided to redo it, but now he came to me for advice. In general, I went and looked at what happened there. Then we sat down with him and over a cup of tea I told him how to choose the right pipe, what slope to make and, in general, all sorts of nuances and points to control the team that will do all this.
Then, when he left, I decided to write an article for the site. Maybe it will be useful to someone. Read, share on social networks.
Options for pipes in the ditch at the entrance to the site and rules for their installation
It is advisable to lay a drainage pipe at the entrance to the site, since property owners often dig a hole around the perimeter of the territory to collect and drain rain and melt water.
The ditch located at the entrance to the site is an obstacle because it cannot be filled in, because it is needed to remove sediment from the road and prevent waterlogging.
But at the same time it interferes with the passage of vehicles. If a pipe is laid in a ditch for a drive-in, the system will perform its function without interfering with traffic.
Creating a Project
The quality of the design determines how effective the drainage communications will be. The design of drainage systems takes into account the following points:
- The degree of susceptibility of soil-forming rocks to soil leaching;
- The permeability value of some types of soil;
- Presence of tectonic deformations;
- Structure of groundwater;
- Location and power of sources feeding ground flows.
The drainage system design takes into account the following rules:
- The slope from the top of the pipe to the drainage devices is 0.5-0.7%;
- The system contains means for monitoring the operation of drainage and flushing devices;
- The lower part of the pipe is installed 20 cm below the foundation location (if the drainage is located next to the house).
It is desirable that the drainage system on the site have inspection wells. They are installed at pipeline turning points. During design, calculations of the drainage system are also performed.
Schematic project on a suburban area
Skilled summer residents drain the site with their own hands. Here you need to know that there are two types of drainage: surface and deep. The choice depends on the purposes for which the structure is being created. You can use drainage only near the house so that the soil does not wash out under the foundation. Another option is to create canals on the site to improve the landscape. The method is used when plants have too much water and waterlogging occurs (if there is a body of water nearby or it rains several times a week).
Features of choosing a pipe in a ditch for a drive
It is very important to choose the right type of pipe products. In this case, you need to rely on what load the product can withstand.
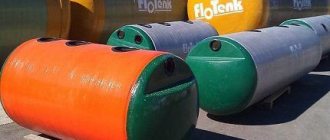
There are several options, each of which should be familiarized with:
- concrete;
- reinforced concrete drainage system;
- corrugated plastic construction;
- steel drainage system;
- plastic products.
The concrete product has a drawback - over time it begins to collapse. Crossings with reinforced concrete pipes are durable and reliable, but strict adherence to installation technology is required. One of the main advantages is its large size and, accordingly, significant throughput.
Before creating a structure made of reinforced concrete, it is necessary to lay a sand cushion. It is advisable to make its top layer from crushed stone and sand.
In this case, the risk that the structure will break under the influence of gravity is minimized. The main disadvantage of reinforced concrete is labor-intensive installation.
The drainage structure made of this material is quite popular; its disadvantages include its heavy weight and high price.
Corrugated plastic pipes for ditch are lightweight, affordable, reliable, resistant to deformation and rust. They have high capacity, are easy to install, are safe and can support significant weight.
They are also characterized by high ring rigidity. You will not have to spend a large amount of money for installation, for the reason that this does not require auxiliary equipment. You can do the work yourself.
Advantages and disadvantages of materials
Unlike concrete, plastic products are inexpensive and lightweight.
They are not subject to corrosion, breakage and last for many years. Therefore, a plastic pipe in a ditch does not cause problems during installation and makes it possible to save on work. However, it is highly not recommended to use used plastic pipes when creating a drainage system - they may not withstand the weight of heavy vehicles, for example, a truck.
A distinctive feature of steel drainage structures is reliability and strength. However, they also have a drawback - they are susceptible to corrosion, which destroys the pipes.
Despite this, the service life is quite long. These products are able to withstand impressive weight, and installation does not require the intervention of specialists. Pipes with thick walls, despite the influence of corrosion, can last for many years.
When choosing a pipe for a ditch to enter a site, you need to pay attention to strength, weight and other characteristics. As in the case of plastic products, it is highly not recommended to buy used pipes - their service life will be shorter.
Corrugated pipe products with large diameters are also available on sale. The product is made in such a way that the structure is able to withstand heavy loads, and its service life is very long.
Plastic is not susceptible to corrosion and the influence of aggressive substances. Installation of such pipes is easy. A big plus is the low cost of the products.
Advantages of plastic pipe products:
- High temperature resistance. The operating mode for them ranges from -20 to +70 degrees, although the maximum range is from – 60 to + 100 degrees.
- Good chemical resistance. Therefore, they are used for industrial wastewater.
- Impact resistance. This is especially important at temperatures below 0 degrees. A corrugated pipe in a ditch is much preferable to a smooth one in case of transportation and installation in the winter season.
- High ring stiffness. This indicator is at least 8 kN/m2, which corresponds to operational class T. The products are suitable for installation under highways and heavy soils.
- Convenient and inexpensive transportation. This is possible due to the low weight of polypropylene pipes.
- Easy installation. Corrugated double-wall pipes can be easily connected to smooth-walled PP and PVC pipes. They can be attached to concrete and polymer wells. Installation can be done without heavy lifting equipment.
- Easy cutting. A polypropylene plastic pipe in a ditch for entry can be successfully cut with a regular saw.
- The service life of the products reaches 50 years.
Sometimes site owners themselves create access structures for ditches. In this case, take a standard large-diameter plastic pipe and place it in the hole.
Afterwards, a belt is arranged around the product - to create it you will need a reinforcing mesh. The structure is then filled with concrete. The duration of operation will be several decades, and the price of the structure will be low.
Installing pipes in the ditch at the entrance on your own
You can cope with this work yourself. To do this you will need the following materials and tools:
- drainage structure;
- crushed stone;
- sand;
- shovel;
- materials for wrapping the product.
Water will only flow through the pipe. If it flows through the embankment, then after some time the soil will be washed out, the embankment will collapse and the work will have to be done again.
First, a trench of a suitable size is prepared, into which sand about 10-15 centimeters thick is poured. This creates a protective layer for the structure. Afterwards, a special material is laid for wrapping the products.
Crushed stone 10 centimeters thick is poured on top. And only after this a drainage structure is installed. It is usually discharged into a nearby ditch or sewer system.
The next layer is crushed stone again, but already 15 centimeters thick. Next, wrapping material is used and sand is poured. At the last stage, the structure is covered with earth.
Laying plastic pipes under the road does not require much time. The work is not difficult, you do not need to have any special skills or abilities. However, if the weight and size of the pipes are significant, special equipment may be required.
Source: trubaspec.com
Horizontal directional drilling method
When the width of the road surface exceeds 10 meters, it is better to use another technology - horizontal directional drilling, or HDD for short. The maximum pipe diameter for this operation is 1200 mm, but private developers do not need such figures. It is possible to lay any highways - both metal and plastic. For horizontal directional drilling, the master will need a special drilling rig designed for this job.
It is installed in the place on the side of the road where the entrance to the pipeline route will be located under the road. To drill a hole, a monitor and locators are used: this equipment will make it possible to avoid even minimal deviations from the given trajectory. HDD is a method that is used to lay communications under any (artificial, natural) objects, at any depth.
Laying a pipeline using a drilling rig also consists of several stages.
- First, they examine the site of future work and study the communications diagram, then prepare trenches and install equipment.
- Then a pilot well is drilled. For punching, a drill head is used, which consists of a pipe and a conical tip made of hard alloy. It has holes designed to supply bentonite drilling fluid. Its tasks are to reduce friction, cool the head, and bring soil to the surface. The body of the working tool is connected to a tubular flexible rod, which is activated by hydraulic jacks.
- After the pilot well has been installed, it is expanded. Before this operation, the drill head is disconnected, and a reverse-action expander - a rimmer - is installed in its place. In order for the hole diameter to be sufficient for the pipeline, the diameter of the expander must be 1.5-2 times larger. The rimmer is rotated and pulled in the direction of the drilling rig.
The last stage is stretching the pipeline. To do this, attach a nozzle with a swivel to the pipe using a hinged earring, which will prevent rotation of the element. The other end of the swivel is connected to the rimmer, after which the pipeline is pulled into the well.
Yes, this is a possible alternative, but it will require additional investment. If anyone is wondering how much it will cost to rent equipment, they say that “hiring” the installation along with the staff will cost on average 1000-1400 rubles per hour. Prices, of course, can rise.
Selecting and laying pipes in a ditch for a check-in?
The laying of drainage sewerage under surfaces with high traffic load (a special case is a pipe in a ditch at the entrance to the yard) must be carried out in compliance with certain requirements.
Incorrect choice of material and errors during installation work can lead to a decrease in the amount of groundwater and precipitation passing through the system, cause erosion of the road surface and cause emergency situations.
Materials for installing drainage through the entrance to the courtyard
When choosing which pipe to put in the ditch separating the roadway from the courtyard, you first need to find out about its ability to withstand significant loads.
Even if you only have passenger vehicles, you cannot exclude the possibility of having to drive a KAMAZ loaded with construction materials into the yard. Therefore, the first rule requires choosing pipes with maximum rigidity and load-bearing capacity.
Today, you can choose structures from various materials that can organize efficient and safe passage of water through the embankment before entering the courtyard.
The most commonly used options are:
A metal drainage pipe into a ditch - such a device has been used for quite a long time. Even taking into account the tendency of metal to corrosion, such culverts can last 30-40 years.
This is explained by the fact that thick-walled elements of large diameter are used for these purposes, and additional waterproofing of the pipe can provide reliable protection against corrosion.
The main advantage of the material is its ability to withstand significant loads. Such a pipe will not be pinched even when passing heavy loaded equipment.
Concrete driveway pipes are no less often used, allowing large amounts of water to pass through without causing damage to the road surface. Such elements have significant weight, so installing them in domestic conditions is not always advisable, as this will entail additional costs for lifting equipment.
It is much easier to install homemade reinforced concrete pipes in a ditch. To do this, you will need an ordinary plastic sewer pipe (it is better to choose the largest diameter, or use several pipes, it depends on the expected water flow in the ditch).
Installation of such a water flow system is carried out as follows. Plastic pipes are laid on the prepared base, which will act as a kind of sleeve.
A reinforcing frame made of a metal rod is tied around the pipes; it is desirable that it be located around the entire surface of the main plastic element. In this case, after pouring the concrete, you will get a monolithic structure that can withstand significant loads.
A concrete pipe into a ditch can be replaced with reinforced concrete trays, but this is only possible at shallow depths. Such trays are covered with decorative grilles and are often used as elements of landscape design.
The installation of such a system is especially relevant for the drainage of rainfall through the road surface. It should be noted that such structures can be fragile, so their installation is quite labor-intensive and requires the use of special techniques for installing the structure. Typically, the installation technology is recommended directly by the manufacturer of such reinforced concrete products.
Today, the best option to arrange the entrance to the site through a ditch is to use special corrugated drainage pipes.
What is a puncture under the road?
Soil puncture is nothing more than punching (pushing) the soil in the horizontal direction. This option guarantees that the integrity of the road surface will not be compromised. In addition, this process does not require excavation of land. It allows you to lay pipes with a diameter of up to 550 mm, so it is equally suitable for laying water, gas, sewerage, and electrical cables under the road surface.
The desire to avoid unnecessary expenses when laying communications is quite reasonable: construction costs are not small, and horizontal drilling using equipment is relatively inexpensive, but it will still take some money. If you do the work yourself, you can achieve significant benefits - from 30 to 40%. The trenchless installation process itself consists of several stages. This:
Due to the work, the soil under the road becomes denser, but the surface itself remains intact. When the road width is large - over 10 m - a special drilling rig designed for HDD is used. A shorter puncture length makes the work much easier, especially if it is done manually.
The use of plastic drainage pipes for driveways
Corrugated plastic pipe in a ditch can be used even under significant loads.
The profile of its cross-section makes it possible to distribute all the forces created during external influences over the entire surface of the product. Thanks to this, the load-bearing capacity of such a pipe is significantly increased.
In addition, such elements have other advantages over concrete and metal structures:
- Light weight with significant load-bearing capacity and strength.
- Simple installation technology; there are a variety of fittings that simplify the assembly of the line.
- Low cost compared to other elements.
- Resistant to corrosion and aggressive liquids.
- Such a pipe through a ditch will last at least 50 years (if the installation technology is followed).
Metal culverts
Metal structures have a corrugated body and are the most durable. Such culverts can withstand enormous loads, however, such pipes have one big drawback - they are susceptible to corrosion.
Metal pipes are susceptible to corrosion, so they are used as temporary structures
Helpful information! Due to rusting, metal culverts are typically used as temporary structures.
The most popular use of such pipes is a temporary passage under a highway. Passages are made to drain water from one side of the road to the other. This need often arises in the event of a blockage or collapse of the main culvert. In addition, a metal pipe can be used as a protective case for a polymer pipeline that is resistant to corrosion.
Corrugated iron culverts are also used to reinforce the walls of boreholes. Sometimes a permanent structure is still installed from such pipes, however, this happens extremely rarely.
Metal drainage channels are assembled from individual segments. Assembly is usually carried out at the installation site. It is also worth noting that such pipes can have almost any finished shape. This is due to the fact that they have corrugated walls that can bend. If the metal sheets have a protective anti-corrosion layer, this design can last up to 50 years. The cost of installing a metal drainage channel is 20–30% lower than a reinforced concrete one.
Rules for laying pipes through a ditch
First of all, you need to understand one simple truth - the design of the drive through the ditch should ensure the passage of water only through the drainage pipe. Water seepage through the embankment material will lead to erosion of the road surface and the occurrence of emergency situations.
Laying the pipe in a trench (ditch) must be carried out in the following sequence:
- The walls of the ditch are leveled, it is advisable to make the slopes inclined.
- At the bottom, preparation is made for a drainage pipe. In the simplest case, it could be a sand cushion, but it will be better if you decide to pour a footing (a reinforced concrete base with a thickness of at least 10-15 cm).
- The pipe is laid on the prepared base and sprinkled with crushed stone, a layer of about 30 cm, in this case it is worth using granite material of medium fractions.
- The bulk of the ditch crossing should be made of a waterproofing material such as clay. In this case, it is necessary to compact the soil. Therefore, before laying the pipe in a ditch, make sure you have a supply of material and devices for tamping.
- Before laying the roadway, it would be a good idea to install a layer of high-density geotextile. It will help redistribute the load created by transport over the entire area of the lintel in the ditch. The embankment slopes can be reinforced with the same material.
- At the end of the work on constructing an entrance to the site through a ditch, additional protection of the embankment can be provided. This can be done by simple concreting, laying turf or any other available methods.
Whatever material the pipe for entering the site is made of, when choosing, the main thing is to correctly determine its cross-section. It should ensure the free passage of groundwater and rainwater at their maximum intensity.
In addition, measures should be taken to prevent the formation of blockages in the pipe, which is especially important for large passage widths. Water flowing in a ditch usually carries with it mountains of debris; the easiest way to trap it near the pipe is to install decorative grilles.
Preference should be given to metal products, they have increased strength. It is quite easy to remove blockages formed at the mouth of the pipe using a shovel.
The use of plastic corrugated pipes together with geotextiles is the easiest way to construct an embankment through a ditch to enter the site.
HDPE pipes are able to withstand the load even from loaded vehicles, while ensuring the free passage of water through the body of the embankment.
Source: vsetrybu.ru
Which pipe is better for drainage when constructing an entrance to a site: an overview of all options
Hello, dear readers! A ditch at the entrance to the courtyard of a private house or cottage performs an important function. It is into it that rain and melt water flows, which can damage the road surface of the roadway.
The pipe in the ditch must be installed correctly. Otherwise, it will not withstand external pressure and will collapse, or the drainage of precipitation and groundwater will not be fully carried out.
They will wash away the entrance embankment and cause an emergency. This article will tell you how to properly lay a pipe in a ditch.
If you liked the article, please share it
Previously on the topic:
Share
Materials and types
The weight of the earth puts pressure on the pipes laid in the ditch. Even if a concrete bridge is poured on top of them, it only redistributes this load, but cannot completely eliminate it. Therefore, for hidden installation, pipes with a sufficient level of ring rigidity are required.
In addition, they are negatively affected by groundwater, rain or melt water, and the cyclical nature of winter freezing. This means that the material used to make such products must be resistant to corrosion and able to withstand low temperatures.
The following types of pipes are suitable for such work:
- Metal.
- Concrete.
- Reinforced concrete.
- Made of plastic.
Metal
The steel pipe for laying in a ditch can be of different diameters and lengths, but it must be thick-walled and of good quality.
Metal products with such characteristics, despite the likelihood of corrosion, will last at least 30-40 years. However, due to the large weight of metal pipes, lifting equipment will be required during their installation.
Concrete
Concrete pipes are placed in ditch more often than others, since they have a large capacity.
Concrete perfectly resists the effects of aggressive environments, withstands significant loads and serves for a long time. However, due to the large weight of such structures, their independent installation is unlikely to be feasible.
Reinforced concrete
They are manufactured at reinforced concrete factories by vibrocompression from heavy or fine-grained concrete, reinforced with reinforcing cages made of steel rods of classes A-1 and A-III.
Reinforced concrete products ensure free transportation of wastewater and are suitable for any climatic conditions. The length of the segments ranges from 6 to 10 m.
Among reinforced concrete pipes, according to their load-bearing capacity, there are 5 groups with a permissible height of backfilling with soil of no more than 2, 4, 6, 8 and 10 m. For laying in a ditch, you can take a pipe from group 1.
It is capable of withstanding the pressure of a soil layer up to 2 m high. For most regions of our country, where soil freezing is no more than 1.5 m, this will be sufficient. Products of group 2 have a higher load-bearing capacity.
They can be laid to a depth of up to 4 m. However, such structures are quite fragile, so they must be laid on a sand bed and protected from weight loads with a layer of sand on top.
Plastic
For underground installation, corrugated plastic pipes are produced, which are much lighter and cheaper than other analogues. Their throughput and ring rigidity are sufficient for placement in a ditch.
They do not rust, are durable and easy to install. They also need to be placed on a sand cushion with a layer of geotextile, and covered with sand and crushed stone on top.
Tips for choosing a pipe
In addition to choosing the pipe material, it is important to correctly determine its diameter.
Correct calculation of the channel cross-section will allow melt and rain water of any intensity to freely pass beyond the site. If there is a danger of large debris getting into the cavity of the structure, then protective steel grilles must be installed on both sides.
Considering that reinforced concrete structures are labor-intensive to install, and metal structures are susceptible to corrosion in damp conditions and are also expensive, the best option for installing a drainage ditch would be a plastic corrugated pipe. It is easy to cut and installed without the use of special equipment.
For a ditch, you can take a sewer two-layer corrugated pipe made of polypropylene PP (PP) (Pragma) or high-strength polyethylene (Corsis Pro) with a smooth inner surface and a structured outer wall. These materials perfectly withstand external pressure and low temperatures, do not rust, and are resistant to aggressive environments.
Criterias of choice
When purchasing a pipe for driving through a ditch, you should take into account the following indicators:
- Ability to withstand heavy loads. Trucks and special equipment can enter the construction site, so such a product must have high mechanical strength to withstand the pressure of heavy vehicles and embankment material weighing several tens of tons.
- Trench dimensions. The volume of passing wastewater directly depends on them. To ensure that the drains do not erode the embankment, but completely leave the ditch, the pipe must be of a suitable diameter.
- Cost indicators. There are many types of pipes on the construction market that can be used for laying in ditch. The choice often depends on the financial capabilities of the owner.
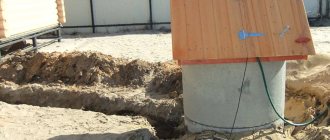
Preparatory work before installation
At the very beginning, before installing the culvert, a site is selected where construction will subsequently begin. After the required location has been selected, it is cleared of foreign objects (grass, branches, debris, etc.).
Next, all components of the future culvert pipeline are laid out in the correct sequence for subsequent assembly. Before assembly, it is necessary to carry out appropriate markings and determine the axis of the product, as well as the contour of the pit. In addition, before preparatory work, all necessary calculations (including hydraulic calculations) are performed. All this is necessary to ensure that no unforeseen situations arise during the installation process; the normal operation of the culvert pipeline in the future also depends on it.
Design
When drawing up a project, it is important to correctly determine the width of the entrance to the site. It must be at least 4 m to allow passage of not only cars, but also trucks.
An additional one meter of protective zone must also be provided on each side. This means that a product with a length of 6 m must be placed in the ditch. The diameter is selected based on the amount of wastewater.
In spring, melt water should fill the pipeline no more than ¼ of the volume. Typically, a product with a diameter of 300 to 500 mm is installed.
The ditch profile should have the shape of an inverted trapezoid with a flat bottom and be 10–20 cm wider than the laid structure on each side. To prevent the pipe from being sucked into the ground during operation, the bottom is deepened by 25 cm.
The resulting pit is filled with crushed stone and compacted. The depth of the ditch should be at least 150–170 cm, depending on the thickness of the layer that freezes in winter.
The pipe itself in the ditch must have a strictly horizontal position or be located with a slope of 2 cm in the desired direction. Sometimes a concrete bridge is poured over the top of the trench to distribute the load.
Standard moving option
Crushed stone is used for the base, and it is laid and compacted not only at the bottom of the ditch, but also on slopes. Concrete can be prepared on site and poured into prepared formwork. If the wall thickness is less than 400 mm, then a frame made of reinforcement is required. The wall thickness must be at least 25 cm.
Above the pipe, near the masonry or concrete wall, it is worth making a gap of 5–10 cm, which is sealed with soft insulating material. This will prevent the wall from affecting the ends of the pipe if there is slight subsidence, and will protect it from breaking into two parts. Particularly important for concrete collectors.
To prevent the car from sliding off, you should raise the wall above the roadway by 15 cm.
Required tools and materials
In addition to the pipe itself, the following materials are needed:
- Crushed stone.
- Sand.
- Geotextiles.
- Concrete.
- Reinforcement and binding wire.
- Boards for formwork.
- Nails.
- Paving slabs or asphalt concrete mixture.
- Curbs.
- Two decorative grilles to protect the pipe cavity from blockages.
- Moisture-loving plants for beautifying the entrance: irises, asters, vines, peonies, etc.
To dig a trench you need an excavator with a bucket capacity of 0.4–05 m3, and to lay heavy pipes made of metal or reinforced concrete - a truck crane. In addition to special equipment, you will need the following hand tools and accessories:
- Shovels - bayonet and shovel.
- Manual tamping.
- 2 buckets.
- Container for preparing concrete mixture.
- Vibrator for uniform concrete placement.
- Hammer.
Laying technology
The step-by-step installation technology is as follows:
- Marking the area for the ditch and trough of the driveway embankment.
- Digging a trench with sloped walls and cutting the soil around it to a depth of 35–40 cm.
- Cutting pits along the bottom of the trench and on the side walls.
- Compaction of soil at the bottom of pits.
- Filling the lower pit with crushed stone with layer-by-layer compaction.
- Construction of a crushed stone cushion 15–20 cm thick.
- Laying a layer of geotextile to prevent sand from going into the ground.
- Installation of a sand cushion 15–20 cm thick across the entire width of the ditch.
- Pipe installation.
- Installation of formwork and knitting of reinforcement cage for concrete caps.
- Pouring concrete into formwork with compaction using vibrators.
- Filling the ditch with a layer of sand 10–15 cm thick.
- Wrapping the edges of the geotextile fabric.
- Filling side pits with crushed stone.
- Backfilling of the trench with sand and soil with layer-by-layer compaction.
- Installation of a sand cushion under the embankment along the ditch.
- Laying geotextiles on a sand layer.
- Construction of a crushed stone base for the road.
- Road surface devices for crossing a ditch.
- Installation of curbs.
- Dismantling formwork from the ends.
- Layout of the site and layout of the flower bed.
- Planting and watering plants.
Basic mistakes when laying pipes in a ditch
- Ditch section of insufficient depth.
- Laying the pipe directly on the ground, backfilling with local soil.
- Lack of layer-by-layer compaction of underlying layers.
- Using coarse crushed stone for backfilling. Under the pressure of heavy equipment, the edges of the crushed stone can damage the outer surface of the pipe, causing the wall to rupture.
- Installation of a pipe with a slope in the opposite direction.
- Small thickness of sand layers.
- Lack of protective structures on the sides of the ditch and embankment.
Ways to build a parking lot
Parking using crushed stone
This method is low-budget. This kind of car parking at the dacha has excellent water throughput, and, in addition, it does not crack. A negative aspect of such a parking lot can be considered an uneven surface, which will make it very difficult to clear snow from it in winter. The thickness of the base layer should be 0.2 meters. For the main surface layer, a mixture of sand and gravel is used.
Parking using paving bricks
For this type of parking, a mixture of sand and gravel is used; it is installed with a slight recess under the paving bricks. This material creates a smooth surface, without the formation of dust and cracking of the canvas in winter.
Paving bricks can pass water well, so it does not stay on the surface for too long.
Some builders recommend laying paving bricks on cement. But after a certain time, the cement will begin to crack, which will lead to poor water infiltration. The traditional technology for laying paving bricks is on sand or its mixture with gravel.
To prevent the destruction of the parking lot over time, its main (bearing) layer is created in the pit. You need to pour about 0.1 meter of sand into it and compact it well.
compacting sand for a parking lot at the dacha
When calculating the depth of the pit, the thickness of all its layers is taken into account. The sand and gravel mixture requires careful compaction. A layer of geotextile is laid on top of it, as well as in the middle.
It is important that in the autumn-spring period the supporting layer is under no circumstances exposed to moisture. If this does happen, and the parking lot itself is located in a low area, then you should take care of the drainage system and good drainage in advance
Concrete parking lot
A concrete parking lot is one of the most durable and long-lasting options. When arranging it, the most varied cladding can be used. The base of such a parking lot is very strong, which allows the use of stone - natural or artificial - for cladding. This coating is laid using a special tile adhesive, which has good resistance to frost.
Concrete parking lot project
To prevent rain or floods from creating problems in the parking lot, when pouring the concrete mixture, you need to provide slight slopes for water drainage. And in order to avoid compression of concrete during temperature fluctuations, expansion joints must be made on its surface every five meters.
How to save an embankment from erosion
To protect the embankment from erosion, its sides and longitudinal slopes are reinforced with various materials:
- For the construction of the sides, natural stone, white sand-lime brick or reinforced concrete slabs are used. Brick or stone walls are placed on both sides of the ditch. In this case, the ends of the pipe are left free. If it is necessary to strengthen the sides with concrete, then first install formwork with supports. A reinforcement cage is installed between the walls of the formwork, then the structure is filled with concrete. A week later, after the concrete mixture has set, the formwork can be removed from the top.
- Along the ditch, the slopes are reinforced with crushed stone and poured with cement mortar, carefully compacting each layer.
Foundation installation
If the foundation consists of prefabricated reinforced concrete slabs, then the first step is to install the links that will form the head of the future culvert. The blocks are laid down to the level of the sole, and then work is done to fill the sinuses to the same level.
Concrete blocks or slabs are used to install the foundation
Let's consider the main stages of arranging a monolithic foundation:
- First of all, you need to make or purchase ready-made formwork.
- Next, the concrete solution required for pouring is prepared.
- At the third stage, the concrete solution prepared in advance is poured into the formwork.
- When the solution hardens, it is necessary to dismantle the formwork and fill the formed sinuses.