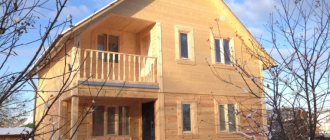
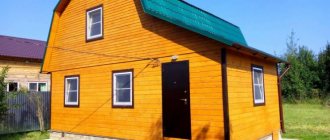
Frame house-building technology is very popular in the construction of buildings for various purposes on private land plots. For example, even in a small area it is possible to erect a frame residential building measuring 6 by 3, insulate it, and install all the necessary communications. Moreover, such housing can be used not only for recreation in the summer, but also for permanent residence, incl. in winter.
Advantages and disadvantages of such houses
Having built such a house for himself, the owner can take advantage of the following advantages:
- Relatively low costs for building a house.
- Modest living costs.
- For construction, it is enough to choose a small plot of land.
- Higher strength and reliability of the building.
- High-quality thermal insulation.
- The layout in such a house is done as ergonomically as possible. When choosing it, you need to familiarize yourself with the photo of the 6 by 6 layout used in various cases.
There are the following disadvantages when using such projects:
- A miniature house is not suitable for a large family.
- As the number of residents grows, there are minimal opportunities to accommodate more people.
A compact, cozy home is more attractive to those who prefer a more modest lifestyle.
Classic scheme
This is the easiest and most elegant option. Order cards with the names of guests from the designer who creates invitations for you. So that no one gets confused, everything should be extremely simple and clear: one table - one card, it is better to choose a font so that even older guests can read everything without difficulty. You can place these “postcards” at the entrance to the banquet hall on a wooden easel or in a beautiful frame.
Photographer: Roman Ivanov
Choosing the appropriate number of floors during construction
The most common designs of such houses are one-story and two-story. It is customary to make a choice this way:
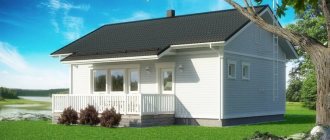
- The one-story option is convenient for use as a summer house or for temporary stay. The layout of a 6 by 6 one-story house should take into account the composition of the family.
- Two-story homes of this size offer all the benefits of compact homes, but provide enough space for most living conditions.
Sometimes they build houses with an attic. It is usually used only during the warm season.
We plan seating in advance
Preparing a seating chart is not something you can easily finish the night before your wedding. This is a serious issue, by solving which you can save yourself from numerous problems during the wedding evening. Seating planning should be done in three stages:
- • After the guest list has been compiled and the venue has been selected, feel free to sit down and draw up the very first, “raw” seating plan. It’s worth figuring out how many people will sit at one table, how many tables there will be, how you can divide the guests so that they have fun with each other. The furniture arrangement and the number of tables, and therefore the menu and decor, depend on the first seating plan.
- • After guests have received invitations and answered yes/no by the specified date, a more accurate seating chart can be drawn up. Remove from the plan those who cannot come and distribute the remaining guests according to their age, degree of relationship, hobbies, etc. This is usually done at least 2 weeks before the celebration. It is this seating chart that should be sent to the organizer and decorator to prepare the chart and seating cards.
- • It happens that one of the guests, due to unforeseen circumstances, cannot come, but someone invites their significant other with them, and you find out about it just a couple of days before the wedding. At the time of such clarifications, a few days before the celebration, the final seating plan should be drawn up. All changes must be communicated to your team, and the final list must be sent to the host and banquet manager of the venue.
The sooner you start making a plan, the easier it will be to make adjustments later and keep the numerous cost items associated with seating under control.
Save Saved
Save Saved
Save Saved
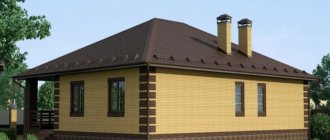
Using gas blocks
This building material provides a healthy microclimate for residents. Since aerated concrete blocks are relatively light, this makes them easy to transport. Their installation is relatively simple.
Such walls are characterized by high fire safety. The cost of construction using aerated concrete blocks is significantly lower compared to using bricks. Over time they may crack. Such a house needs a strong foundation. For such a house it is necessary to carry out facade finishing.
Wall installation
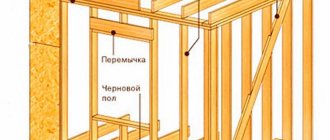
After the logs were laid, we began installing the walls. The distance was made a multiple of the insulation; the material chosen was 100x50 mm timber. The assembly of the house frame proceeded as follows. At the corners of the frame building and between them, load-bearing frame posts were installed, which were aligned and secured with temporary jibs from the outside.
We installed the top trim on the frame racks. Here you need to once again carefully check the horizontal and vertical positions of the supporting structure of the frame mini-house. Now you can install the remaining wall posts, focusing on the distance of the floor joists. Secure the entire structure with corners and screws.
Advice:
Fastening with nails is cheaper, but it is unreliable because the wood often cracks. It is recommended to select metal corners and fasten them using self-tapping screws and a screwdriver.
We started installing the upper floor joists. They were laid in grooves in the same way as the floor joists, the only difference being that the floor joists were longer. This is provided in order to later attach the roof rafters. The frame racks were strengthened with jibs.
At this stage, construction was suspended for 10 days due to the drilling of a well. Upon completion of the work, construction continued.
From frame panels
The construction of such houses requires the least cost. Such a building can be erected in less than a week. Wooden walls can retain heat well. In such houses there is no need to carry out interior decoration.
Pipes and wires can be hidden inside shields. If you buy ready-made frame panels, they can be used to make only a frame house. Such houses require additional ventilation. A house made of frame panels will last approximately 100 years.
Roof installation
After a short break we moved on to installing the roof. First they made the overlap. It is important to lay the timber strictly on the wall posts of the frame house to ensure the strength of the structure. The ceiling is laid with a projection of more than 40 cm from the outer wall - this will protect the walls of the mini-house from rain.
Six farms were assembled right on the ground. The trusses were built from the same timber from which they were made, and were guided by the standard size of metal tiles. The trusses were fastened with metal plates.
Advice:
To add rigidity to the structure, it is recommended to additionally secure the rafters with metal plates. You can purchase them or make them yourself from a sheet of galvanized iron using a jigsaw.
After installing the truss, we moved on to roofing work: waterproofing and sheathing. Waterproofing material was placed over the entire roof area and secured with bars. These bars are assigned several tasks: to maintain waterproofing, create a ventilation gap above the roof and serve as the basis for the counter-lattice.
The sheathing must be done staggered to avoid ruptures of the roofing material in the event of shrinkage and warping of the lumber. To create a cornice, the lathing should be laid with an extension of 30-40 cm. Next, a counter-lattice was installed for laying the metal tiles.
It was time to lay the metal tiles, and here we encountered some difficulties. The installation of metal tiles should begin by placing the first sheet in the lower corner of the rectangular slope directly onto the sheathing and fastening it with a self-tapping screw.
Note:
It is important to remember that metal tiles should be laid parallel to the eaves.
When installing the next sheet, you need to pay attention to the line that the edges form. It must be perfectly level, otherwise there is a possibility that the structure will collapse. All other sheets are attached in the same way. And finally, we sewed up the gables with sheet moisture-resistant material.
Houses made of wooden beams
They are highly environmentally friendly. Such a building does not require the installation of a particularly strong foundation. Houses made of timber are relatively cheap. Usually they are not much more expensive than panel ones.
Such houses have a healthy and pleasant microclimate. There is no need for additional interior or exterior finishing.
Disadvantages include fire hazard, vulnerability to fungus or insect pests. To get rid of such problems, building materials are impregnated with special solutions.
Bottom frame frame
We made the bottom trim from 150x100 mm timber. The bottom trim is the first layer of timber; it is necessary to fix the future structure on the foundation. Also, the strapping acts as a reference point for the walls and floor.
Advice:
Traditionally, the bottom frame is made from softwood. The builder can choose from a timber, a board or a bunch of boards and a log. If a bunch of boards is used, then it should be secured with screws or nails of different lengths and in a checkerboard pattern.
The size of the bottom trim should be 5-7 cm smaller than the foundation in order to install the ebb and make the outer cladding of the house. We laid out the prepared timber with the quarters cut out on the foundation, checked the dimensions, compared the diagonals and the horizontal level. You can assemble the harness using self-tapping screws or wood glue-sealant.
Advice:
In order for the connection of the lower trim to be sufficiently strong and rigid, it is recommended to make it in a “quarter”
The gaps between the lower beams and the foundation were sealed using a gasket made of polystyrene foam. As expected, the entire timber was treated with Senezh antiseptic.
At first it was planned to build the building according to the “platform” principle, but during the construction process they decided to build it according to a different principle.
We attached the logs made of antiseptic timber “in a quarter” to the bottom trim with self-tapping screws and glue-sealant. We also made the basis for the future floor: along the lower edge of the floor joists, bars were attached, on which a subfloor made from edged boards was laid. The entire structure must be antecepted.
What can you add to the house?
Due to the fact that there is a very small living space here, the use of extensions and additional premises is popular. The use of a veranda is popular, as is the installation of attics.
Layout projects for 6 by 6 houses may include a veranda. If the owner plans to use the extension, he must choose its location.
Some people make a veranda next to the kitchen, others use it as a spacious hallway. In order to increase the amount of usable space, you can make an extension along one of the walls.
The layout of a 6 by 6 house with an attic is more profitable. The attic floor is a converted attic that is intended for living. In fact, it adds an entire floor to a small house. When completing a house, you need to be sure that the foundation can easily support the increased weight of the building.
If the house has an attic floor, then its owner receives the following benefits:
- Significant increase in the usable area of the building. In some cases it can become double.
- Windows at roof level will allow natural lighting into the room.
- To heat an attic, you will need less heat than for the same area in the house.
By using an attic and making a veranda, you can get a house with a larger living area, while saving money.
We don’t overload tables
How often do we face the problem “we can’t separate the guests, so instead of the required 10 people, we have 12 at the table”! Of course, it sounds harmless, but it’s better to think 10 times before making such a decision.
WEDDYWOOD PARTNERS
Each table, regardless of seating plan, is designed for a certain number of people for a reason. For a comfortable seat at the table, there should be at least 60 cm per person, and with an increase in the number of people, this space is reduced to 40 cm. This means that guests will sit at the table literally elbow to elbow, and the chairs will be back to back, which will It’s inconvenient for both them and the waiters.
In addition, a large number of guests at the table complicates serving, because there will be much less space for plates, cutlery and food. What to do? Review the seating plan or completely change its type: you can, for example, replace round tables with rectangular ones, and add a smaller table to the rectangular ones.
Save Saved
Save Saved
Save Saved
Layout features
The composition and location of the premises depend on the composition of the family living in the house. Here, due to the small size of the house, it is especially important to carefully consider the layout of the premises.
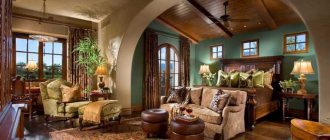
If two adults live here, then you can choose a layout that includes an entrance hall, a kitchen and a room separated by a partition with a door. The room can be divided by a screen into a sleeping area and a part that should be used as a living room.
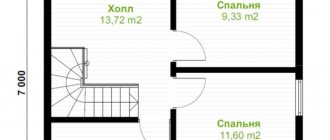
If there are children in the family, then a two-story house is more suitable for them. The layout of a two-story house 6 by 6 provides that in this case there will be bedrooms on the second floor, and below there will be a kitchen, living room and hallway. When choosing the best layout for a 6 by 6 house, you need to consider the maximum number of options.
It is convenient to use a stove to heat a private house. Given the compact size of the building, it can effectively heat the entire volume of the house.
A compact house, having a small area, has important advantages that were mentioned in the article. The rationality of decisions made is of great importance during its construction.
You need to choose the most suitable material for building a house and ensure the most convenient layout. If possible, you need to consider questions about building a veranda and equipment
attics.
With your own hands
Having decided to make banquet cards with your own hands, remember two points:
- it is necessary to start production in advance in order to have time to prepare all the signs for the ceremony;
- be sure to make several spare cards so that, if necessary, you can enter the guest’s name manually at the banquet.
The simplest option is classic paper postcards. Using scissors, cut out a rectangle of the desired size. Then they bend it in half and decorate it with prepared decorations, securing them with glue, double-sided tape or a stapler. Use a hole punch to make a hole and attach the guest's name to the ribbon.
Materials
Decorations for banquet cards are selected individually. Ribbons, rhinestones, sequins or beads are perfect for a classic wedding. If the celebration is decorated in a marine style, then pebbles, shells, and corals are used for decoration. Decorations in the form of flowers, bows or appliqués will be appropriate at any wedding. To make a pointer with your own hands you will need:
- paper or cardboard;
- regular scissors;
- glue;
- Double-sided tape;
- curly scissors;
- decorative ornaments;
- hole puncher.
Select a template
When choosing a template, pay attention to the stylistic and color design of the ceremony.
Signs can be made in the form of birds, animals, favorite TV characters of the bride and groom, or have any other shape. The choice of the appropriate option depends on the imagination, needlework skills and sense of taste of the newlyweds.
Download ready-made templates
You can view seating cards online. The selected option is printed on a printer. Ready-made layouts for printing usually do not require additional decoration , however, if desired, you can decorate them yourself. If you have a limited budget, give preference to ready-made layouts that are presented on the Internet. Designer signs will cost much more.
Below are several options for beautiful templates that can be downloaded for free from our website:
Design
When developing a design, several important points are taken into account:
- Banquet cards should be combined with other wedding accessories;
- If the wedding is decorated in a certain color style, it is also used when decorating cards;
- Guests' names are written legibly. If the text is printed on a computer, you must use a large font;
- The size of the indicators should be in harmony with the overall design of the table;
- On the table, cards should not get in the way and limit access to treats.
Advice! Cards are secured using double-sided tape, glue, decorative clothespins or stickers.
Materials
When making a house, the following natural and available materials may be useful:
- eggplants, zucchini, pumpkins;
- chestnuts, acorns, pine cone scales;
- unnecessary boxes from shoes or household appliances;
- clothespins, wooden cuttings, tree branches;
- cardboard, paper, plasticine, etc.
Below are the most popular options for houses that are not difficult to make with your own hands.