When decorating the exterior, everyone wants to have a beautiful, unique façade and insulate the house from the outside. Façade thermal panels with clinker tiles fully cope with these tasks. Recently they have gained particular popularity. After all, they are high-quality and inexpensive building materials that immediately perform all the necessary functions: they provide a decorative appearance with a large selection of assortments, insulate homes, and save money on the family budget both for the purchase of thermal panels and for further heating of the interior.
And the main thing for many consumers is their low price and ease of installation. To install the panels, you do not need to be an experienced builder; it is enough to follow the basic rules for the construction of building cladding with these various panels.
General information about panels
All panels can be classified according to different criteria:
- Based on materials of manufacture: metal, composite, plastic, impregnated wood, polymers.
- By format - long slats, rectangles, narrow slats, square.
- In appearance - maximally simulating stone, wood, brick, plaster, painted slabs, etc.
- In terms of thermal insulation - with insulation: thermal panels, sandwiches with built-in insulation, without insulation.
More often, when finishing the exterior of a house, the choice falls on panels with insulation, because such finishing immediately carries multifunctional tasks:
- home insulation;
- stylish decor;
- saving energy for heating the house.
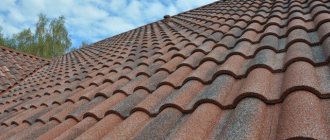
What is clinker?
The name of the tile is due to the main external decorative element - clinker - clay tiles with complex manufacturing technology by firing at a temperature of more than a thousand degrees. Then, using a special technique, these heavy-duty slabs are completely embedded in polystyrene foam or polyurethane foam. Experts have proven that it is almost impossible to tear off such tiles; this requires a jackhammer and a force of more than three hundred kilograms. Tearing of tiles is extremely rare, and this defect can be easily eliminated using polyurethane foam.
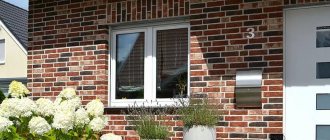
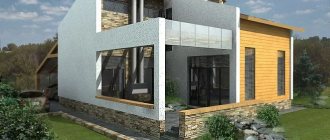
Façade example
A distinctive feature of the tile is its complete external correspondence to natural stones, wood, untreated or burnt stone. brick and so on. Today, modern equipment and new technologies make it possible to make the most unusual and versatile types of tiles - for the most demanding and picky consumer. Durability and uniqueness, as well as its low cost, make tiles the most popular building material today.
Preparing tools
To work you will need:
- level;
- roulette;
- construction pencil;
- drill or hammer drill;
- screwdriver;
- a grinder with a diamond blade or a hacksaw for concrete;
- mason's jointing for grouting.
Types of tile insulation with clinker tiles
Such tiles can be used both in panels with and without thickeners. All facade panels with clinker tiles can be divided into main types.
We insulate and immediately decorate
Clinker tiles with or without plaster are durable and are offered in a wide range of imitation natural materials and colors;
- At the base there is self-leveling foam , which differs from the usual one in its immunity to temperature changes and moisture;
- Thermal panels with mineral wool as the main insulation material;
- Fiber cement - heavier and mainly used for finishing the base;
- Plastic - made of soft plastic with cells.
In addition to clinker tiles, other types can be used in panels:
- porcelain stoneware;
- glazed tiles.
Clinker tiles plus thermal insulation material provide a panel with high performance characteristics - insulating, protective and decorative . First of all, the reliability and durability of the panels is due to their multilayer construction, which may include:
- expanded polystyrene;
- polyurethane foam;
- Styrofoam;
- OSB is a multilayer material made from shavings and wood chips;
- clinker tiles.
The combination of tiles and base makes this façade insulation material popular and constantly in demand.
Preparatory work before installation
Before attaching thermal panels, it is necessary to make a thermal calculation, determine the “dew point” - the place where condensation forms at a certain temperature and humidity. If you insulate a house with thermal plates without proper calculations before installation, there is a risk of shifting the dew point inside the wall of the house, which will inevitably lead to the accumulation of condensation and, as a result, rot and mold.
It is important to correctly calculate the required amount of materials. Consumption is measured as follows: the wall area is divided by the area of one thermal panel. There is no need to take away areas occupied by openings (windows, doors, stained glass windows) - this is a sufficient supply of material.
About manufacturers of thermal panels with clinker tiles
When choosing a panel, you should also pay attention to the manufacturer, because it is well-known brands that can give us peace of mind that we have purchased high-quality material for finishing facades.
A wide variety of modifications and imitations
The most popular manufacturers of facade thermal panels with clinker tiles in Russia are manufacturing plants that use both their own technologies and foreign ones. Some of them purchase the tiles themselves from foreign companies. and the panels are already manufactured at home - also using high technologies and according to European standards.
Table 1. The most popular manufacturers in Russia.
| Company name | A country | Distinctive qualities |
| ShomBurg | Germany | Time-tested quality, but high cost |
| Forska | Russia | Makes only panels, purchasing tiles from the best European factories |
| U.M.B. | Russia | The latest technologies, more than 15 years of production experience |
| MFM | Russia | Huge variety of textures, colors, sizes |
| Termosit | Russia | High technology, long-term operation of panels |
| Fried | Russia | A common type of product connection is tongue-and-groove |
| Regent | Russia | Foreign-made tiles, fastening and base - our own |
| FTP Europe | Russia | Produces its own products and sells products from other factories |
| Ermak | Russia | Individual sizes and decor, tiles from different foreign manufacturers |
| Plitprom | Russia | Many years in the manufacturing market, high-precision modern European equipment is used in the work |
| Foreland | Russia | release of several models, for example, EUROK, Utes, Elbrus |
These panel manufacturing companies have long established themselves in Russia on the good side; their materials have special characteristics in terms of reliability and long service life.
Among the foreign brands you can highlight: ADW, STROHER, FOSHAN REDLION CERAMIC CO, ABC, STROHER, FELDHAUS - if you see these brands, then also count on high European quality and durability. If in doubt, you should consult with specialists; they will suggest those manufacturers whose price fully corresponds to the quality, and you do not have to buy a pig in a poke.
"Plitprom"
was one of the first to produce thermal panels on the Russian market. Uses high-precision European equipment, which guarantees a good connection of products during installation. Supplies facade panels with German brick-like clinker tiles in various colors and sizes (cost per square meter - from 1,200 rubles).
| Model | Dimensions, mm | Insulation thickness, mm | Cost pcs., rub. |
| D 12 (12 × 36.5) | 750 × 656 | 40, 60, 80 | From 1,750 |
| FK (12 × 36.5) | 750 × 656 | 40, 60, 80 | From 1,750 |
| FN4 (12 × 36.5) | 750 × 656 | 40, 60, 80 | From 1,750 |
| LDN4 (12 × 36.5) | 750 × 656 | 40, 60, 80 | From 1,750 |
| SL4 (12 × 36.5 | 750 × 656 | 40, 60, 80 | From 1,750 |
Facade thermal panels with clinker tiles - characteristics
Easy to install and durable facade panels are very economical in price. If you compare the finished slab with insulation in cost, then it is less than installing all its components separately:
- Styrofoam;
- its installation on a grid;
- finishing with plaster or other material;
- additional protective materials and means;
- sealants.
Prices for thermal panels
Thermal panels
Video - Visual installation of thermal panels
The slab has everything, and its installation is very convenient - the slabs are applied with glue, resin or fixed with dowels and liquid nails. And there is no need to build frames and meshes to install the tiles. Everything is attached with resins and adhesives, which additionally creates an external sealing of the coating.
And another important thing for home owners who decide to decorate their building with facade panels is the stylish appearance of the building , which is sometimes indistinguishable from natural finishing materials: sandstone, marble, brick, granite and so on. If a well-known brand is chosen or the panels are purchased from a reliable company that is a representative or produces the tiles itself. There is no need to worry - such companies are fully responsible for the quality of the material and attach all the accompanying documents to the product:
- warranty cards;
- certificates;
- instructions, etc.
How to choose
The selection of thermal panels is carried out according to certain criteria. We decide on the type of insulation from which multilayer plates are produced:
- Expanded polystyrene (PSB) - expanded polystyrene panels provide low cost, but production should only be in factory conditions. This guarantees compliance with the linear dimensions of the thermal panels. Otherwise, problems may arise during installation, and the low quality of the PBS will also not allow you to obtain the expected result in energy saving.
- Extruded polystyrene foam (EPS) - is characterized by chemical resistance and durability, resistance to high temperatures. But such material does not allow steam to pass through.
- Polyurethane foam (PPU) - thermal panels on polyurethane foam must also be factory-made. In this case, they will be inexpensive, strong and durable. Handicraft products are characterized by discrepancies in linear dimensions, which in the future threatens the appearance of cracks and problems during installation.
The structure of a thermal panel on polyurethane foam
The undeniable advantages of such panels
Clinker tiles are gaining popularity as a decorative layer, since in appearance they are practically indistinguishable from natural stones:
- bottle;
- marble;
- granite;
- quartz;
- limestone;
- dolomite;
- sandstone;
- brick.
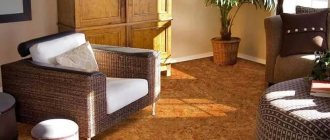
Variety of textures
The range of types of tiles has been expanded to include various tree species, that is, imitating them:
- spruce;
- Red tree;
- pine;
- oak;
- ash, etc.
Note! Externally, it is identical to the listed materials, but the cost is several times less than the natural components of facade finishing. The panel looks expensive and stylish, and this is often the main criterion for purchasing just such a facade for your home.
Ease of installation - obvious
In addition to the variety of forms and external factors, the advantages include:
- seamlessness, integrity of the coating;
- low price;
- stylish decor;
- save heat in the house as much as possible;
- not subject to external influence;
- durable;
- are excellent sound insulators;
- safe and environmentally friendly;
- easy to install and dismantle;\
- not exposed to moisture and temperature;
- they are used for up to 50 years or more - without restoration or repair;
- They imitate natural finishing materials as much as possible and look expensive;
- The range of sizes is also huge - from 4 cm thick to 12-15 cm ;
- decor - a choice for every taste.
Interesting! You can choose a panel of any shade, any stone - according to texture and degree of processing, any type of wood. You can come up with a facade design yourself and mix styles, using, for example, panels with marble and sandstone on the plinth. Or take one stone with different shades and use it to decorate the walls. It will be both original and stylish. Also, the panels are alternated with plaster or painting - this is also a matter of taste of the owner of the building.
DIY making
Before starting work, you need to understand the structure from which the future material will be created.
Thermal panels are made of three layers: facing, metal profile and insulation:
The production of terpopanels is carried out as follows:
Necessary equipment for panel production
Equipment is the main part in making terpanels with your own hands.
This issue requires special attention.
A craftsman familiar with this type of equipment may notice that the manufacturing machines are similar to those that produce polystyrene foam.
This is not surprising, because both technologies use the technique of foaming over polystyrene granules.
Thus, in the home workshop there will be two directions at once: the first for the creation of foam plastic, and the second for the production of clinker tiles.
To make polystyrene foam you will need the following tools:
- special dispenser for raw materials;
- sediment to create foam;
- set of forms;
- Vacuum type installation;
- steam generator;
- pre-foaming device.
To carry out work on creating clinker tiles you will need:
- oven for firing products;
- Press forms.
If it is not possible to purchase a device and tools for creating polystyrene foam, then it can be purchased ready-made from other manufacturers. Such a purchase will significantly increase the financial costs of production.
You can purchase an expensive machine and produce more than three hundred parts per day. If we are talking about producing panels not for sale, but for your own site, you can buy small equipment capable of producing one hundred products per day.
Equipment can be purchased both from foreign manufacturers and from production facilities in large cities. It is possible to buy tools secondhand, but then the risk of receiving a low-quality product and incurring the costs of repairing it will increase.
Before making your own, you need to calculate how much such a solution will cost. To decorate your own home, most likely, it will be cheaper to buy ready-made, high-quality panels.
By the way! It will be interesting to know: Facade clinker tiles in Tomsk
Watch the video to see how thermal panels of varying complexity are produced by professionals:
A little more expensive, but more reliable
There is a huge variety of facade thermal panels with clinker tiles, depending on the method of fastening and their reliability. They can be either two-layer, or a third additional layer can be added in the form of a metal or foil gasket. If you have the opportunity to pay a slightly higher price, then you can purchase panels with a third rigid layer, with tongues and grooves, with built-in fastening metal plates, with a sleeve for plastic fasteners, etc.
Tongue and groove panels
All these devices slightly increase the cost of the slabs, but they guarantee durability of use, and are also more easily and simply installed on the facade of any building.
Production of thermal panels
Therefore, even an amateur can do the installation of thermal plates using simple instructions for use. This does not require special education or skills. But still, experts recommend getting advice from builders with experience - after all, there are many nuances that can ultimately affect the purchase of a panel of one or another fixation rigidity.
Types of products
There are several different classifications based on the characteristics of the product.
Based on location, the material is divided into 2 groups:
- façade thermal panels – are large in size;
- basement - thermal panels with clinker tiles have smaller dimensions and greater thickness.
Based on the type of insulation, the following groups are distinguished:
- based on extruded polystyrene foam - has excellent thermal insulation properties. However, its “behavior” as a substrate for tiles has not been fully studied. The material shrinks, which means premature destruction of the finish; moreover, reliable fastening of the clinker is only possible here using the “dovetail” type;
- polyurethane foam - can withstand much higher temperatures - up to +180 C, unlike +60 C for polystyrene, is not afraid of moisture and does not shrink. The downside is that it is not resistant to ultraviolet radiation, but for a thermal panel this is not of significant importance;
- mineral wool is much less common, because despite its excellent thermal insulation qualities and complete fire safety, it is afraid of moisture. In this case, you will have to install additional waterproofing, which will cost you both time and expense.
Based on their structure, there are 3 types of thermal panels:
- two-layer - that is, consisting of insulation and clinker;
- three-layer – the structure is strengthened by a backing made of moisture-resistant OSB chipboard. This thermal panel is more rigid, but also more durable;
- four-layer - although clinker is a non-flammable material, and the insulation and board are impregnated with fire retardants to give the materials the ability to self-extinguish, the fire safety of the product is still in question. To solve this problem, add a fire-resistant layer between the OSB board and the insulation.
Another difference was the reason for the classification according to the method of attaching the tiles to the insulation. Due to the different properties of materials, different techniques are used:
- glue – suitable for polystyrene foam. In this case, a panel is made with special recesses for the tiles. The clinker is placed on the glue and left to set under pressure. This method is cheap, which has a positive effect on the price, but it is also the least reliable.
- “Dovetail” - such fastening is only possible when using polystyrene foam. Here, clinker is made in a special form - with a trapezoidal groove, into which expanded polystyrene is pressed. This product is more expensive;
- pressing - the method is used when using polyurethane foam. The clinker is placed in a mold, filled with material and held under pressure until the insulation hardens.
Installation of facade thermal panels with clinker tiles - step-by-step instructions
There are practically no difficulties when decorating a house with this type of material. But in order for the external facade to delight you with its freshness and beauty for many decades, follow the stages of finishing work and their rules:
Stage 1. The choice of panels with clinker tiles should be based on their weight and the quality of the walls of the house. It is necessary to take into account the load that the walls will receive during installation, also take into account the type of foundation and the additional load that will fall on it after installing the panels, most often this applies to three-layer panels with metal sheets and inserts.
Easy installation - anywhere
Stage 2. Before installing blocks with clinker tiles, consider the type of installation - gluing, installation work with lathing.
Stage 3. Install only metal with the sheathing , since even stained wood succumbs over time to the negative effects of moisture and temperature changes.
Metal sheathing is a more reliable option
Stage 4. Prepare tools: hacksaw or grinder, hammer, level, tape measure, screwdriver, marker.
Necessary tool
Prices for popular models of screwdrivers
Screwdrivers
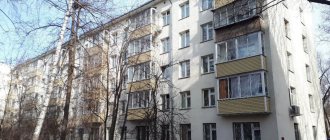
Stage 5. If the building is old and the walls are not particularly strong, then they should first be strengthened with reinforcement and plastering. Leveling the walls.
Preparing the walls
Stage 6. In old buildings or with low load-bearing capacity, lighter slabs with insulation and clinker tiles should be chosen.
Advice! It is important that the design and decor are to your taste, so immediately decide which tile to choose.
Step 7. Measure the area of the walls and calculate the number of panels - taking into account the size of each of them.
Stage 8. For the base, use more reliable types - made of metal with decorative plaster, or pressed cement and wood decor, brick (there are many options), also made of metal.
An example of the design of a façade plinth
Stage 9. The base should be additionally treated with sealants - taking into account the moisture and quality of the soil, as well as the proximity to the foundation of groundwater.
Stage 10. Install the panels using protective materials and deep penetration disinfection solutions to prevent the appearance of mold, fungi, and insects.
Stage 11. In openings, window joints, doorways, communication pipe exits - sealing and installation should be carried out more carefully , we cut the panels using a grinder and adjust them.
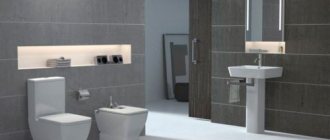
Window opening design
Note! Door and window openings are decorated using facing tiles, cement-sand mortar or a ready-made decorative solution.
Stage 12. We make markings before installing the sheathing in increments of 40 cm. We begin laying from the bottom line.
All irregularities must be eliminated starting from the first line
Stage 13. Attach the corner elements.
Corner elements
Stage 14. With the tongue-and-groove connection we use corner elements, which are purchased separately. If the panels have fasteners, we use them.
Panel with groove fastening system
Stage 15. Fasten the slabs from any corner from bottom to top . We distribute the glue evenly over the entire area of the slab, and make glue dots in the center and corners. When fixing, press for 10 seconds, then let sit for 5 minutes .
Glue is used to fix the panels
Stage 16. We make the next row with an offset - this will provide additional strength to the finish. constantly check the correct installation using a level .
If you allow a misalignment, it will be difficult to correct it
Prices for building levels
Construction levels
Stage 17. A day after gluing the slabs, they are additionally secured to the seams with special dowels.
Stage 18. Grouting is done by applying the grout mixture to the entire surface of the panels, after which, about a day later , wipe the decorative areas or the entire surface with a sponge.
If you don’t want to do the grouting yourself, you can purchase more expensive slabs with ready-made grout from the manufacturer.
Grouting joints
Stage 19. Do all the work without haste and worry. It is important to choose climate conditions so that the weather is dry and warm . So that all materials fit properly and no unforeseen circumstances arise - in the form of panels moving away from the walls.
It is better to follow the chronology in accordance with the plan. Because if you forget to prepare the tools, then after marking and installing the sheathing you will lose time looking for a roller or brush for the sticker.
Advice! Everything should be at hand during installation and available – in full. It’s better to buy more panels than to rush for missing ones or place an order in an online store and wait for one or two panels.
Video - Installation and insulation of the facade with clinker thermal panels
Calculation of materials for home finishing
Before starting work, it is important to correctly determine how many clinker panels with insulation, as well as other materials and consumables, will be required. Then the purchased goods will be enough for finishing, and you won’t have to urgently look for the rest of the batch. But at the same time, there will not be a large amount of surplus left (on which money has already been spent).
To calculate how many panels you need, you need:
- Find the surface area of each wall. To do this, multiply the height by the length.
- Add up all the results.
- Subtract the sum of the areas of doors and windows. This will give you the total surface area.
- Divide it by the number of square meters in one package - 4.55.
- Add about 10% for overlaps, cuts, etc.
To calculate the number of starting bars:
- Calculate the perimeter of the building.
- Then the width of the doorways is subtracted from it.
- Add another 5%.
- Divide by the length of the bar (3 meters).
To calculate the number of corner elements:
- Measure the height of the house in all external corners.
- Add these numbers up.
- Add 5% to stock.
- Divide by the height of the panel.
After this, they calculate how much fasteners need to be purchased. Consider that you will need at least:
- 5 hardware for a regular panel;
- 4 for corner;
- 10 for the starting bar.
About the pros and cons of panels
By following all these settings, you can achieve excellent results in the external insulation of your home and receive undoubted bonuses from this:
- quick and easy installation;
- low thermal conductivity;
- heat saving;
- non-flammability;
- tightness;
- reduction in electricity costs;
- without toxic compounds and any level of danger to human health;
- style and originality on the outside;
- low costs;
- durability of the new façade.
Grouting joints
Among the disadvantages, experts note the frequent mixing of layers of two-layer slabs due to different densities of the material, so when purchasing, make sure that all panels are homogeneous, otherwise you will have to do additional work after installation - for example, grouting the panels.
Finishing the facade with clinker is outwardly indistinguishable from cobblestone, flat, rocky, burnt stone, wood, brick, metal, etc. - that is, from the decor that you have chosen, such insulating boards give the overall facade an original, expensive look.
Therefore, today you should not overpay for natural stone on the facade - panels with these tiles will completely replace natural components, both visually and practically - their quality is no worse than natural building materials.
Creating a metal sheathing
It is not difficult to close the space where the pile supports are installed. Any man who does not have in-depth knowledge in the field of construction and finishing can cope with the task. But, before carrying out work, it is necessary to landscape the ground floor, insulate the floor, in order to then perform reliable installation of the panels. A variety of materials are used for these purposes.
You can close the free space between the piles with different materials. The most common way is to buy rectangular profile pipes to create sheathing. A frame is constructed from metal products using power tools and a welding machine. The created design will be reliable and durable. After completion of the work, the iron supports must be painted with an anti-corrosion solution to prevent rust.
Don't make a mistake with your choice
To find your panels, you should know simple rules:
- Buy only from licensed companies.
- Check certificates.
- Read installation instructions.
- Study general characteristics.
- Obtain guarantees in case of breakdowns or defects.
- Read the opinions of other people who have already used this type of façade finishing on the forums.
- Take into account the climatic conditions of your region.
- Consult with specialists.
You can study general recommendations for installing facade panels with your own hands in more detail in our separate article.
If everything is done correctly, then facade thermal panels with clinker tiles will last for many years without breakage or deformation, which will help maintain home comfort, a comfortable stay in your own walls, and also save money on finishing materials and on paying for electricity to increase heat in the house.
And everyone who comes to visit will not be able to distinguish that on the walls of your house there is only an imitation of high-quality expensive wood or natural stone. Save wisely - buy facade thermal panels with clinker tiles - an excellent substitute for expensive natural materials.
Some installation tips
In order not to have to overcome difficulties during the installation of the base material, the surface of the base should be pre-prepared. Irregularities should not exceed 5 mm.
- The starting bar should be fixed strictly horizontally, but at a slight distance from the blind area, in order to avoid subsequent deformations from possible seasonal movements of the soil.
- The panels must be fastened through all mounting holes available in them.
- The fastener caps should be slightly recessed, but not too tight.
- The joints of adjacent panels and all seams between the tiles are filled with grout. The color of the grout can be matched to the color of the tiles, but this is not a necessary condition. If the panels already have factory grout, then you will have to select the tone specifically for it. To create an even, concave shape of the seam, use a special hand tool or simply a piece of old electrical cable of suitable diameter.