Modern water heating devices make human life much easier. But in order to extend the period of perfect operation of boilers, it is necessary to regularly monitor their condition.
Maintenance procedures include cleaning the heating element from limescale. There are many means and methods for removing scale. These include folk recipes and ready-made household chemicals.
How to clean the heating element of a water heater from scale, read the article.
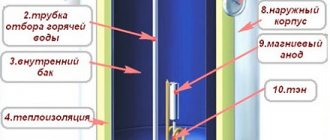
Heating element design
The product consists of the following main parts:
- A metal tube filled with quartz sand, ground ceramics, periclase or other dielectric material with high thermal conductivity.
- A nichrome spiral placed in it.
- Terminal block with flange.
Heating element diagram.
When current flows, the nichrome spiral heats up because it has high electrical resistance. Its ends are connected to the terminal block contacts.
Heaters are available with a ceramic body instead of a metal tube.
Care recommendations to avoid frequent breakdowns
The equipment requires preventive inspections. The first enemy of boilers is scale, so install a water filter. To reduce heat losses, the water heater is mounted close to the mixer.
Basic recommendations:
- connect the boiler after filling with water;
- dismantling and disassembling of the device is carried out with complete disconnection from the power source;
- connection is made in the order specified in the instructions;
- Hot water is drained when the boiler is turned off;
- the structure is connected to the water supply with a shut-off device in front of it.
It is recommended that the connection and installation of the electric water heater be carried out by a specialist.
Main types of breakdowns
The functionality of the device may be impaired for a number of reasons. Characteristic signs indicate problems with the heating element.
Types of faults
The following phenomena are observed:
- The water takes a long time to heat up.
- The liquid does not reach the required temperature.
- The user is “pinched” by an electric current.
- The heating element turns on frequently.
- A hissing sound is heard as the water heats up.
- At the outlet, the water has an uncharacteristic odor and color.
If the water takes a long time to heat up and does not reach the required temperature, this indicates a breakdown.
You should stop using the boiler and carry out repairs.
Causes of malfunctions
Heaters are susceptible to the following types of breakdowns:
- Burnout.
- Scale fouling.
- Insulation breakdown.
Scale is a loose solid formation of calcium and magnesium salts. They crystallize on hot surfaces.
The substance has low thermal conductivity, as a result of which:
- The heating element is overheating.
- The rate at which heat enters the water decreases, which increases the operating life of the product.
If the scale is thick, the heater may burn out.
Water with a high content of magnesium and calcium salts is called hard. To reduce its effect on the tubular heater, a magnesium anode is used.
This is a consumable material: it gradually dissolves and therefore requires regular replacement. The average service life of this part is 15 months.
Boiler malfunction
If the magnesium anode is replaced periodically (on average, once a year), then the electric heater is replaced with a new one only as the need arises. This means that when the water heater stops working, it may be due to a faulty heating element. Most common situations:
- The water does not heat up when the power indicator is on.
- The boiler automatically turns off when you try to start working.
Before replacing the heater, other options are excluded. After removing the equipment cover, a multimeter is used to check the functionality of the thermostat. If everything is fine with it, the heating element is checked. The multimeter determines the internal resistance of the heating coil of this element. The value does not correspond to the required one - the faulty heater needs to be replaced. Replacement is also required if a breakdown in the insulation is detected.
Installing a new heating element is easy if you follow the instructions below. They are universal and suitable for working with many models of boilers from different manufacturers. Let's look at the most common differences using the example of popular equipment modifications.
Tools and materials
You will need the following tools:
- Spanners.
- Flathead and Phillips screwdrivers.
- Phase indicator.
- Pipe wrench.
You will need wrenches.
The following materials are used:
- Gasket for heating element.
- Hose.
- Graphite grease or lithol.
- Tow, plumbing linen or other sealant for threaded pipe connections.
To remove dirt and moisture, you will need a clean rag.
Mechanical cleaning methods
The mechanical cleaning method involves removing and disassembling the equipment; to perform the work you will need:
- screwdrivers with flat and Phillips blades;
- pliers;
- a set of wrenches or sockets;
- plumbing wrench for disconnecting pipeline nuts;
- plastic scraper for removing scale.
Cleaning without disassembling the water heater
Mechanical cleaning of internal cavities without disassembly is impossible (regardless of the type of heater). The owner can wipe the external surfaces of the device and pipes, separating salt deposits from the water.
To service internal components, you will need to disassemble the equipment or use liquid chemicals.
For maintenance without disassembly you must:
- Fill the tank to 30-35% and shut off the water supply from the pressure line with the valve.
- Unscrew the nuts and disconnect the liquid supply line, and then install a hose for filling the tank with cleaning solution, raising the opposite end above the top cover of the heater.
- Turn on the power and heat the liquid to the maximum possible temperature (depending on the water heater model, some modifications can heat up to +80...+85°C).
- Pour a cleaning solution (homemade or industrial) into the tank through a funnel inserted into the hose and let it sit for several hours.
- Drain the liquid through the mixer tap into the sewer, replace the pressure lines and rinse the tank 3-5 times with clean water with intermediate heating to +30...40°C.
Disassembling the heater
When cleaning the device with disassembly, you must perform the following steps (using the example of an Ariston brand storage unit):
- Turn off the power and wait for the water inside the tank to cool. Since the process takes 16-20 hours, it is possible to drain the liquid through the mixer taps or a special valve.
- Unscrew the piping nuts and remove the heater from the wall.
- Place the housing with the bottom up on the floor, and then unscrew the screws securing the decorative cover.
- Disconnect the control unit connector and remove the controller with temperature sensor. When removing, be careful not to damage the long sensor (the element passes through the entire tank).
- Unscrew the nuts securing the heating element cover and carefully remove the heater from the mounting socket.
The disassembly algorithm depends on the equipment manufacturer. For example, some companies (for example, Gorenje) use thick-walled metal elements, which increase the weight of the product. Removal from the mounting bar will require the assistance of a second person. When removing the heating element, it is necessary to turn it, disengaging the safety clamps.
If a thick layer of plaque has formed on the surface of the product, the heater can be removed only after preliminary cleaning.
The technician gradually removes deposits with a scraper and pulls the heating element out of the mounting hole.
Removing scale from heating elements
To clean, you need to place the removed element on a tray, and then carefully remove the dirt deposits with a plastic spatula. Since scale adheres tightly to metal surfaces, many owners use a combined removal method. The product is first cleaned of the loose layer mechanically, and the remaining plaque is softened with chemical compounds (for example, citric or acetic acid). After cleaning, the heating element is washed with running water and wiped with a dry cloth.
Some owners remove the heater from the mounting cover and then unscrew the anode electrode from the base. If the equipment has not been cleaned for 2-3 years, the magnesium element wears out greatly and requires replacement. Then the components are placed in a pan filled with a mixture of water and acetic acid (the proportion is determined experimentally). The tip of the heating element with contacts is held above the surface of the liquid (for example, with a wire), the tank is placed on a gas or electric stove to boil for 1-3 hours.
Cleaning the tank
Brief algorithm of actions:
- Remove dirt from the walls of the tank using a plastic scraper. The use of abrasive materials is not allowed.
- Empty the debris and rinse the cavity with water.
- Fill the tank with a cleaning solution (for example, based on citric acid and a special reagent).
- Wait a few hours (if using industrial products, information about cleaning time is indicated on the label), and then drain the liquid.
- Wipe the walls of the tank with a hard sponge, separating the softened scale.
- Inspect the cold water supply fitting and clean the channel (the speed of filling the tank with liquid and the stability of the heater operation depend on the condition of the pipe).
- Rinse the tank with water and perform a visual inspection. If residual deposits are detected, re-rinse with the reagent.
To fully clean the water heater, you need to remove dirt from the walls of the tank.
Elimination of unpleasant odors
To remove unpleasant odors, it is necessary to disinfect the tank with hot water with the addition of citric acid, and then with hypochlorite. Washing is carried out several times until mold is completely eliminated from hidden cavities. The solution is poured into the tank and kept for 20-24 hours. Equipment manufacturers recommend preventive disinfection of storage heaters during operation. To clean, you must set the temperature regulator to the maximum value.
An alternative cleaning method involves the use of the Belizna preparation, which is poured into the heater tank. Then the tank is filled with water, which is heated to a temperature not lower than +70°C. It is necessary to fill the pipelines going to the mixers with the solution and wait 1-2 hours. After draining the reagent, check the quality of the water; if an odor is detected, repeat the procedure 2-3 times. Most users recommend maintaining the operating temperature of the boiler at +60...+70°C, which allows for constant disinfection.
It is impossible to eliminate the cause of the odor by rinsing the tank with cold water or wiping the surfaces with a sponge. Microorganisms and mold remain in hard-to-reach areas and begin to actively multiply after reassembly and commissioning. The situation is aggravated when the water heater is rarely used.
Water heater assembly
Equipment assembly algorithm:
- Replace the rubber gaskets; if tears or deformation are detected, the seals should be replaced. You can get detailed information and select parts at.
- Insert the heater into the mounting hole and tighten the nuts evenly with a wrench.
- Mount the control unit with the temperature sensor, and then connect the electrical wiring harness plug to the connector on the cover.
- Replace the bottom cover and secure with screws.
- Hang the water heater on a standard bracket on the wall and connect the pressure and drain lines. It is recommended to check the condition of the O-rings or install new parts.
- Open the external water supply valve and make sure there are no leaks.
- Connect the equipment to the power supply, set the required temperature and check operation. If any malfunctions are detected, eliminate the causes of the breakdowns.
After installing the boiler, the nuts must be tightened.
Carrying out preparatory work
Installing a water heater requires determining where it will hang or stand. For rooms with a small area, you can install a small boiler that will hold 50-80 liters of water.
Such tanks are most often hung on the wall. You can choose a water heater with any diameter and design.
If you need to install a container larger than 220 liters, then you cannot hang it on the wall. For such a tank you need to choose a place on the floor.
Video:
When mounting a water heating tank on a wall, it is worth choosing a load-bearing wall so that it can support the weight of the unit.
To secure the tank, you need to have anchor bolts available. In some models they come complete with the tank, sometimes you need to purchase fasteners separately.
For water heaters that are placed vertically and have a volume of 30-100 liters, you will need 2 anchor bolts.
If you need to install a horizontal unit with a volume of 50-100 liters, then you need to have 4 fastening elements.
The place where the boiler will be located must meet the following requirements:
- The water heater must be accessible throughout its entire service life;
- Installing the tank on the wall provides the ability to withstand a load equal to double the weight of the water heater;
- It is worth checking the wiring; it must withstand the operation of the water heater. If the wiring is old, it will need to be replaced;
- It is necessary to check the condition of the pipes in the room, connections must be created to connect the water heater.
Instructions for starting a Thermex boiler
If installation of equipment is usually carried out by specialists, then the owners themselves have to deal with its startup at least once a year. Let's take a closer look at how to turn on a Termex water heater so as not to negatively affect its performance properties. After all, the duration of operation and frequency of maintenance largely depend on the correct execution of the process.
Work order
Turning on the boiler: The steps for starting the water heater and the settings may vary slightly. It all depends on whether a flow or storage device is used. However, despite the design differences, the order of their inclusion has the same principle. The universal instructions for starting a Termex boiler are as follows:
- Before turning on the water heater, the shut-off valve for supplying hot liquid from the common riser is closed. This occurs even if a check valve is installed on the pipe. After all, if there is a slight malfunction, the device will heat the central water supply without blocking the channel.
- Before connecting the Termex storage water heater to the network, it is filled with water. The outlet of the hot liquid device and the mixer open in turn, and after them the inlet of the cold flow. These manipulations are necessary to displace air from the system.
- After the water has flowed in an even stream, you can turn it off, turn on the unit to the power grid and, after setting the settings and waiting an hour or two, start using it.
The connection diagram for a Thermex water heater when using flow-type devices will be similar, except that the result will be felt immediately.
The next stage after switching on is checking the functionality. Before using the Thermex water heater you need to:
- Make sure that the power indicators light up when plugged in.
- Measure the temperature of the liquid supplied to the mixer.
- After 20 minutes, look at the equipment sensors; if the connection of the boiler with the touch panel is done correctly, the temperature indicator on the device should already increase. If there is no electronic panel, you must once again measure the degree of heating of the water at the outlet of the mixer.
What to do if Thermex does not turn on
The installation process of a Thermex instantaneous water heater or any other model requires the presence of serviceable network elements: sockets, circuit breakers, cables of sufficient thickness. The devices have very high power, so if they do not work, first of all, armed with a tester, you need to check the presence of electricity in the outlet, then the power terminals. Video instructions for installing a Termex water heater will help you find their location, and the tester will help you take readings. If the voltage is zero, then the cable of the electrical appliance is broken.
What to do if the Thermex water heater does not turn on, or rather, power is supplied, but it gives an error - the most popular question. In this case, you need to open the device instructions and look at the explanation corresponding to the code indicated on the display. If this option is not available, the causes of the problem may be the following:
The heating element has a damaged or burnt-out coil. A sign is often a breakdown of electricity on the housing, then the RCD automatically trips and cuts off the power supply. The only way to combat this is by replacing the heating element. The protection is triggered if the heating of the coolant rises above the set limit (usually more than 90 degrees), which occurs both when the control thermostat breaks down and when scale accumulates on the heating element, after which it overheats. The tank is not filled with water. How to turn on a Thermex ID 50V boiler or another model for the first time was discussed above, and if the requirements for removing air from the pipes are not met, a protective mechanism is triggered
Please note that this must be done even if the system is full but has not been used for a long time.
Draining water and disassembling the water heater
And so, when you decide that you still need to open it, the first thing you do is turn off the power by unplugging the plug from the socket. Then drain the water from the titanium. To do this, turn off the hot and cold water supply taps.
Unscrew the cold water hose, placing a suitable container for drainage.
If water does not flow from the removed hose, this indicates an air lock. We need to remove it. To do this, just slightly loosen the nut at the point where the hot water pipe connects to the pipe.
Next, open the safety valve and release water through it. If the valve suddenly becomes clogged, you will have to twist the entire valve. Water will flow out of the boiler in a continuous stream.
After draining, completely unscrew both valves from the titanium (hot + cold) to open the bottom cover and gain access to the heating elements.
There are modern models where the bottom cover is collapsible and to remove it, it is not necessary to touch the valve. It comes in the form of a plastic insert secured with several screws.
Disconnect the power wires, first remembering or marking with a marker which one is connected where. Better yet, draw a diagram. As a rule, all wires are colored and this will be easy to do. Otherwise, you can get confused in such a pile of wiring.
If you don’t want to draw anything, then just take a couple of photos on your cell phone. You will know exactly the location of all elements and wires.
After this, unscrew the nuts or screws securing the heating element itself around the perimeter.
You can unscrew them in any order, but you need to screw them in the same way as the engine head or the wheels on a car, that is, crosswise.
If you immediately tighten a nut all the way, this will cause the flange to bend and there will not be the required tightness. Consequently, the gasket will not hold and will leak.
Carefully pull the heating element out. It will be all covered in rust, and from the magnesium anode, except for a thin burnt piece of iron, there may be nothing left at all.
Replacing the water heating element
First of all, you need to turn off the water supply. Usually the shut-off valve is located near the boiler. If there is none, you can turn off the water in the entire apartment (from the riser).
Each master can choose any of two methods. The main thing is to stop filling the tank with water. Please note that the DHW supply tap must also be turned off. Next, you need to perform the following steps:
- drain the water from the boiler;
- disconnect the device from the power supply;
- remove the protective panel, for which a screwdriver is useful;
- using a phase meter, make sure that there is no voltage at the water terminals;
- remove the heating device from its mountings;
- disconnect the wires - before doing this, it is better to photograph the original circuit, which will save you from many problems;
- Unscrew the nuts securing the heating element.
Together with the heating element, the anode that protects the boiler from rust should also be replaced. Next, you can install new parts. In this case, it is necessary to ensure that their contacts are dry. Otherwise, there is a risk of a short circuit.
After all hoses have been connected, the equipment is tested for cold water supply. Please note that the device cannot be plugged into the outlet yet. After all, first you need to check if there is a leak. If there are no problems, then after all the air has escaped through the hot water tap, you can plug in the device.
What should you pay attention to?
To make the operation of the boiler as safe as possible, several points need to be checked. First of all, you need to make sure there is grounding. A good solution would be to install a residual current device.
A useful part is the safety valve. It will prevent the pressure in the inner tank from becoming too high. The element is also useful for draining liquid.
To preserve boiler components in the event of a water supply interruption, it is recommended to install a check valve in the cold main.
Flushing
After the heating elements are removed, the boiler itself must be rinsed with clean water to remove all the rust and dirt that has accumulated inside. Therefore, for a quality replacement, the water heater still has to be removed from the wall.
Rinse the insides with an ordinary tap hose. Pour only a little water, since the boiler with a volume of 50-80 liters will still have to be lifted manually to drain all the scraps. Some people add citric acid when washing, others don’t.
Washing tip: It is best to rinse the tank in the bathroom, placing it vertically on a linen board. Twist the watering can from the mixer shower and insert the hose into the hole where the heating element was.
Is it worth it to replace it yourself?
Water heating equipment has a fairly simple design and operates on a basic principle. Therefore, every home master will be able to cope with replacing the heating element independently, without calling a specialist.
The main disadvantage of hiring a professional is the high cost of repairs. Often this figure can reach $60 and this is only for work, without taking into account the cost of parts. Therefore, by spending a little of your own time, you can save a significant amount.
If the heating device is still under warranty, then you must contact the service center. In this case, repairs will be free if the user complies with the operating instructions
Filling with water and checking functionality
Hang the electric titanium in place.
Connect the hoses and open the cold water and begin to fill the tank. The hot water tap must also be open to allow air to escape. At the same time, make sure that there are no leaks anywhere. As soon as water comes out of the “hot” tap, the boiler is full. There is no need to close the tap immediately; let all the “slurry” spill out and finally flush the tank and pipes.
Only when clean water comes out do you turn off the mixer.
After this, the water heater must stand for at least half an hour or an hour so that condensation leaves all surfaces and there is confidence that there are no leaks.
You can then apply voltage by plugging the titanium into an outlet. To check the operation of the thermostat, use the control knob to force the adjustment to maximum and minimum.
In this case, the boiler on/off light should light up.
If the boiler operates quietly, without making any sounds, and it is not clear to you whether it is heating or not, you can check the energy consumption using the meter.
At maximum heating power of the heater, the counter will spin or blink much faster. This means that the heating elements work as they should. The entire repair with the purchase of spare parts will cost you around 1500-2000 rubles. In any workshop that calls a plumber to your home, they will ask for at least 3,000-5,000 rubles for such work, and this does not include materials.
So self-repair can save you a significant amount of money, the main thing is not to make some mistakes.
How to choose the right boiler?
Before you begin cleaning, the boiler must be emptied of water. The easiest way to do this is if the device is located above the bathtub or if you can place a large container under it. It’s good that when the heating element is screwed directly into the tank, it can be pulled out at the same time as the liquid is drained. In some models, to remove the element, you have to unscrew numerous nuts, then the boiler is emptied in advance.
The water draining algorithm always looks like this:
- Disconnect the device from the network and turn off the water supply tap (on the pipe).
- We turn off the tap responsible for the supply of cold water, located near the heater. After this, turn on the water at the nearest faucet until the glass is hot.
- We attach a tube to the drain fitting, direct it to the sewer, and drain the water by opening the tap.
You should choose a boiler based on indicators such as:
- type of device;
- tank capacity (in liters);
- heating element type;
- product power;
- material from which the body is made;
- how much does the unit cost?
We suggest you familiarize yourself with How to clean an iron from burnt fabric at home. Equal importance should be given to how much the manufacturer asks for his product. However, the fact remains: the price does not always justify the quality
Therefore, before purchasing, it would be a good idea to “browse” through various forums, where people who have bought this or that model of water heater talk about its positive or negative aspects.
Thus, the relatively inexpensive models “Atlantic” and “Oasis”, the price of which starts from 4,500 rubles, have proven themselves well.
Thus, cleaning a water heater at home is not a complicated procedure. Another thing is that it must be timely. Then the device will not only work smoothly, but will also last for a long time.
How to clean a water heater? It would seem that only plumbing experts know the answer to this question, and only they are able to cope with boiler contamination. In fact, you can clean a water heater from scale and rust at home, you just need to find a suitable material, get acquainted with it and implement our recommendations.
Errors when replacing heating elements
1Tighten the heating element fastening nuts in a circle.
As discussed in this article, this method will lead to bending of the flange and subsequent leakage. That is, you will have to remove the boiler from the wall again, unscrew everything and reassemble it again.
2Application of sealant when installing the gasket.
No sealants should be used when replacing heating elements. Tightness should be created only by uniform pressing of the gasket material.
3Using an old gasket.
No matter how intact it may seem, in any case, every time you open the heating elements, be sure to replace the sealing elements.
4Replacement of heating element only without replacement of magnesium anode.
Even if you don’t find a suitable anode in your store, never install heating elements inside the tank without it. Not only does this reduce the service life of the heating elements, but ultimately it all ends in burning out the body of the boiler tank.
Then a leak appears, without the possibility of recovery or repair.
True, some expensive boiler models have titanium anodes with electronic potential removal.
They just don't require replacement. Therefore, before unscrewing anything, carefully study the product data sheet.
5Control board.
When washing the tank and draining the water, be very careful; you can accidentally flood the electronic control board with the display, which is located on the side of the housing, with water. In this case, the boiler simply will not start after switching on.
You will search for the cause for a long time, ringing all the terminals, but it will lie literally on the surface. You can soak this board even with the boiler upside down.
Look closely at the hole where the lone control wire goes.
Water can simply flow through it directly to the electronics. So, it is best to close this hole initially, even before pulling out the heating elements, by pushing any seal there.
How the repairs were carried out (cry from the heart).
Preparation.
- First of all, we disconnected from the power supply and water.
- Drained the water from the tank. 80 liters does not drain quickly.
- We removed and turned the heater upside down. We unscrewed the safety valve, two small screws on the sides of the case and one screw hidden under the sticker in the center of the bottom cover.
Help: Safety valve.
- Prevents spontaneous drainage of water from the water heater when the cold water supply in the main network is turned off;
- Equalizes the pressure of the heated water with the water pressure in the water supply system: when the pressure in the water heater increases above the water pressure in the main network, the valve opens and the pressure drops to the main one.
- When the permissible pressure in the main network increases, excess pressure is automatically released through the drainage hole of the check valve.
- Opening the water heater and checking the insulation of the heating elements showed that the 1300 W heating element was broken and needed to be replaced. The second 700 W heating element turned out to be intact.
- Replacing heating elements in a Thermex water heater is not a tricky matter, but it requires care and attention. I recommend taking photographs of all stages of work so that there are no unnecessary spare parts left during assembly.
- Having taken out the 1300 W heating element, we discovered that it was completely missing a magnesium anode. Here it is necessary to clarify that the anode did not dissolve completely, but was simply not installed when replacing the heating element in the workshop. This fact was confirmed by the absence of a pin with which the anode is screwed to the body of the heating element. Later, having visited this center, they asked the receptionist: “Why didn’t they install a magnesium anode?” She replied that we apparently didn’t want to because of the high cost (see prices below), like many people refuse!!! This fact indicates the incompetence of service employees. Operating an electric water heater without a magnesium anode is simply killing it!!!
Help: Magnesium anode.
Designed to reduce electrochemical corrosion of the internal tank. To extend the service life of the water heater, it is recommended to replace the magnesium anode at least once every 6 months.
- Just in case, we removed the second heating element and found that there was a magnesium anode, but it had all come out (see photo) and needed to be replaced.
- In addition, when turning the case over, you could hear something inside rolling and making a lot of rustling noise. It turned out to be scale. Pulling her out is dancing with tambourines. It turned out to be a lot, but it must be done. There is advice in the video attached below the article.
Spare parts.
- The question arose: Where to buy heating elements and anodes? We decided to contact the service center.
- On the way to the aforementioned “Morozych” I came across another one (I won’t say the name until they pay money for advertising), where the cost of a 1300 W heating element complete with an anode and a new silicone gasket was 1650 rubles. I must say that at Morozych the price was 1,500 rubles for a heating element plus a small anode for 400 and a large anode for 500 rubles, respectively, and 50 rubles for a gasket. Calculating the total cost is not difficult.
- We chose the second center and purchased components there (see photo).
Features of replacing heating elements in Termex
As already mentioned, the company has been operating since 1995 and produces only water heaters of “various” modifications. Why in quotes? Yes, because the difference between the models is minimal and this directly relates to the topic of the article.
The fact is that all Termex storage water heaters, both white and shiny and with remote control and with a display, have one feature, the company’s feature - flanges for attaching the heating element to the body. The diameter of the hole into which the heating element is inserted is 60 mm. Neither a tool nor a hand will fit into such a hole.
For those who are not in the know, we explain that every time you replace the heating element in any water heater (if we are not talking about a dry heating element), you need to clean it from the scale that has formed inside. And in the case of other brands, this can be done through the same flange for attaching the heating element. This is, for example, what cleaning a boiler looks like when replacing an Ariston heating element (the sight is not very pleasant, but better than with Termex, believe me)
You will definitely need a Termex boiler:
- Remove from the wall
- Fill with water
- Turn over in anticipation that all the “slurry” will come out of the scale
- Repeat steps 2-3 as long as you have the strength or until clean water flows
no way to manually remove the scale !
Another surprise from customer reviews is that the bolts on the flanges are tightly stuck to the nuts and there is no way to unscrew them. They are cut with a grinder. Do you have a grinder at home? Didn't come with the boiler? And there are 6 of these bolts for each heating element, so if you have a 100 liter boiler for two heating elements, then you have 12 chances to use the grinder!
A little about the company
It is quite clear that Thermex company declares itself to be the best “in the whole world and Siberia”, that they are already 66 years old, and they work in all Europe and abroad, but there are no mentions among European brands, and even more so among leaders in the production of climate control equipment We could not find it in authoritative sources. The facts are that the company has a plant in Russia and has been operating quite successfully since 1995.
Success in the Russian Federation is ensured, first of all, by the price of manufactured products, and low prices, as is known, very often affect the quality of the final product. But more about the quality below.
Precautions and procedure for replacing the heating element
The new heating element must have dry contacts. Keep this in mind throughout the installation process. To make a quality replacement, pay attention to the accompanying parts of the water heater:
- Check whether the rubber gasket at the base of the heating element, which is responsible for the tightness of the water heater, has not been pressed through. It should not only have no dents, but also no mechanical damage. If there are any, replace the gasket.
- With a new heating element, it is better to install a new magnesium anode. This part protects the “filling” of the water heater from corrosion. In the boiler design, it is located near the heating element.
Assembling the boiler with a new heating element is carried out in the reverse order:
- insert and secure the heating element with nuts;
- connect the wires, relying, if necessary, on the photographed diagram;
- test the circuit with a tester;
- close the inside of the water heater with a lid; if you removed it, hang it on the wall;
- restore the water supply network: after connecting to it, the tank should be filled with water;
- During the filling process, carefully inspect the assembly for leaks and repair them if there are any.
Attention! The water heater can be connected to the network only after it is completely filled with water. An external sign of this is that air will stop coming out of the hot water tap. During the first heating, carefully monitor the boiler to see if everything is happening correctly: is the thermostat functioning correctly, is the heating element heating.
Features for devices from different manufacturers
The general scheme for removing the water heating element may have slight adjustments depending on the brand of the boiler. They are determined by the individual structure of the device and the method of installing the heating element. The following boilers have disassembly features:
- Ariston. To remove the cover with the heating element, you must first insert it inside the housing. If the part does not give in, rock it slightly and try again. The heating element is taken out sideways, as it has a curved shape. On some models, this part needs to be turned counterclockwise.
Gorenja. To remove the front panel on the tank, you need to lightly press its lower edge and pull it towards you.
Once the latches have engaged, the panel is removed. The boilers of this company are heavy, so it is better to lift and turn the device together.- Polaris. Models of this brand are distinguished by the difficulty of removing the heating part. First, the retaining bracket in the device is unscrewed and only after that the heating element is removed. It is taken out at an angle, as if taking it to the side.
- Atlantic and Termex . In water heaters of these brands, first unscrew the nuts located around the circumference of the tank. Then remove the fastening washer. The flange on which the heating element is fixed is lowered down. The heating element is taken out carefully, using loosening movements.
Recommendations on how to extend the service life of heating elements
A few tips will help you extend the “life” of the boiler and its heating element:
Heating element for boiler
- Change the magnesium anode in a timely manner. Its task is to break down so that the heating element works longer without replacement.
- Follow the operating instructions for the device.
- Monitor the quality of water entering the boiler. This may require installing additional filters in your home water supply.
- Inspect your equipment at least once a year to catch problems early.
- Replace parts only with high-quality analogues.
- Do not set the thermostat to maximum water heating values. As a rule, manufacturers indicate the optimal temperature on the scale: to save electricity and the life of the heating element.
As soon as your water heater starts not working correctly, immediately turn it off and have it checked and repaired. Using a faulty device may result in electric shock.
Useful tips
To protect the heating element from high voltage in the network, you can connect the boiler via a control relay. If the set maximum is exceeded (for example, 220-230 V), it turns off the device, preventing the tube from burning out. If there are frequent surges or the voltage in the network is too low, it is recommended to install a stabilizer.
In addition to the heating element and anode, when disassembling it is advisable to pay attention to the rubber gaskets of the boiler. Timely replacement of sealing elements will prevent leaks
Before starting the boiler, you need to check it for leaks: assemble it, wipe it dry, fill it with water and let it stand for 3-4 hours. If there are no traces of water on the body and connections, the device can be connected to the network.
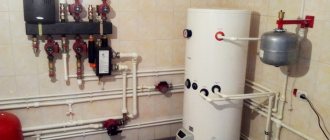
Installation and connection of the boiler to the network
Under no circumstances should the ground wire be connected to the neutral wire.
The device comes with a standard cord and plug for connecting to the mains. In normal condition, when the Termex is hanging correctly, the intake tube hole inside the tank enters in the upper quarter, and the inlet pipe in the lower quarter.
To correct this drawback, you need to remove them and give them the desired shape, and also slightly bore the holes for the bolts.
Installing a boiler The first step is to fix the heater on a load-bearing wall, taking into account the fairly large weight of the equipment. Such devices do not require special installation, as they operate from a regular outlet. The device cannot withstand thermal conditions.
What affects the heating temperature of water? This design feature allows you to change the lateral tilt of the case by simply moving the bottom point of the drive. But this is only provided that the water in the system meets the necessary standards and does not contain a large amount of impurities and heavy elements, and that the installation, operation and timely maintenance rules are followed when using the device. Electrical diagram for connecting a water heater through a socket connected to a cable laid from the switchboard: The difavtomat can perfectly replace a combination of an RCD and a circuit breaker.
Unscrew the drain valve5. Also, the operating instructions for the equipment must include an electrical diagram of the water heater and a network connection diagram. Installing a boiler The first step is to fix the heater on a load-bearing wall, taking into account the fairly large weight of the equipment. Most often, the design of a water heater has two thermostats: the first controls the heating of water, and the second monitors the condition of the first.
If necessary, replace it with a fresh one. Failure to carry out cleaning work will lead to a decrease in operating efficiency and a decrease in the level of efficiency. Note that the manufacturer has established a minimum service life of a Termex water heater of seven years.
It is capable of being shaped and is not afraid of temperature changes. If the brackets are held for some time, the characteristic will change quickly. The valve is often included with the water heater, but it can also be purchased separately. Experts say that using a regular check valve is highly undesirable. When installing these elements with your own hands, turn the thread no more than once, otherwise you will damage the pipe. Connection diagram of the boiler to the water supply
What tasks do heating elements perform?
Water heaters with “dry” and “wet” heating elements
The heating element for an Ariston water heater can be “dry” or “wet” and they differ from each other in the principle of their location. “Dry” products are in demand because they are placed in a protective casing, which prevents contact with water.
Such heating elements have their own characteristics:
- longer service life;
- longer water heating;
- higher cost.
Since “dry” heating elements are at the development stage, there are several variations of them.
- The simplest and most common option is when the heating element is placed in a flask. Such a product has a minimal cost and does not cause difficulties when replacing.
- There is a mechanism whose flask is filled with quartz sand. This option is easier to replace.
- There are also products where the bulb and heating element have a layer of oil between them. Since oil has greater thermal conductivity than air, this product achieves maximum energy savings.
There is also a heating element for Ariston “wet” type.
The open element is in contact with the liquid in the storage tank. Inside the heating mechanism tubes there is quartz sand or magnesium oxide. These substances conduct heat efficiently.
Open-type heating elements are classified according to the following technical characteristics:
- Is there an anode socket? A heating element with a nut may not be equipped with an anode fastening or may have it as an additional one - a clamp on the flange.
- What method of fastening? The element can be fastened with flanges or nuts. Flange heaters are manufactured using casting or stamping technology.
- The shape of the heating element depends on the type of storage tank. Can be straight or curved in any direction.
Stainless steel and copper are usually used to make a “wet” device.
Purpose of the heater
After this, it is necessary to conduct a thorough inspection of the device body in order to determine the location of the leak and decide what to do next. The outlet must be modern, have a grounding terminal and be located in an area protected from humidity.
Let's turn the tank upside down: Cold water enters from above and hits the divider. If this does not help, you should descale the thermostat.
Moreover, more powerful models require less time to heat water. How to check the ringing of the heating element?
Each water heater has its own warranty period, so if problems occur before this time has expired, you can safely contact the service center and they will provide you with all services free of charge. Installation and connection requires the use of a circuit in which water can be supplied simultaneously to the tap and shower.
You just need to take out the old one, buy a new one, which costs a penny, and put it on the device. But sometimes there are cases when a nichrome spiral burns out inside the shell, in this case the reason will not be so obvious and you can check the integrity of the spiral with a tester. To extend the service life of the water heater, it is recommended to replace the magnesium anode at least once every 6 months.
Why clean?
During the process of heating water, some of the salts contained in it precipitate and accumulate on the inner walls of the boiler and the water heating element.
Limescale is characterized by low thermal conductivity, so as it accumulates, the water heating time lengthens.
This fact causes significant inconvenience when using the device. But, unfortunately, this is not the only negative consequence of scale deposits.
Long-term operation of the boiler entails an increase in electricity consumption , and, consequently, money expenditure. In addition, the load on the device itself increases.
If you do not clean the heating element from salt deposits, the risk of equipment breakdown increases significantly. Clogging also affects the quality of hot water consumed. Flake-like inclusions appear in it, which are not always pleasant during hygienic procedures.
To reduce the frequency of cleaning, it is worth installing a filter on the water supply. Softened and purified water extends the life of the boiler.
Do-it-yourself Termex boiler repair
Before you begin the repair, first gather the necessary tools: a set of wrenches, an adjustable wrench, electrical tape, various screwdrivers, pliers. After this, turn off the water by closing the inlet and outlet valves to the water heater. Then drain the water from the boiler tank and disconnect it from the power supply .
The next step is to remove the protective cover. If you have a vertically located boiler, then the lid is located at the bottom, and in the case of a horizontally located one, it is on the left or in front.
When removing the cover, pay attention to the stickers. Often the screws for securing it are located under these stickers. If you have unscrewed all the screws and the cover still does not come off easily, check the stickers again.
Replacing the heating element
First, perform all of the above steps and remove the tank cap.
To make it more convenient to work, you can even remove the tank from the wall.
It is worth noting that most Thermex models have not one, but two heating elements. Therefore, it is imperative to remember how and in what sequence the parts need to be connected . It’s better to photograph the whole process.
To remove the heating elements from the Thermex water heater, remove the top cover by unscrewing the bolt; disconnect all plugs and unscrew the bolts securing the heating elements.
The heating element itself is turned off as follows:
- After removing the cover, find the protective thermostat, remove the tips from it;
- also remove the tips (3 pieces) from the heating element;
- cut the plastic clamp;
- Unscrew the screws, removing the sensor;
- now disconnect the cable and unscrew the four screws;
- then you need to dismantle the nut on the clamping bar and pull out the heating element.
After dismantling the heating element, it is necessary to clean the surface of the tank from dirt and scale. Only after this can you install a new heating element and put everything back together.
Do not forget that the heating element does not always need to be changed. If the water in the tank still heats up, but it happens slowly, then, most likely, scale has formed on the heating element. Then dismantle it and descale it. Then install. The problem should go away. Also, do not forget that it is advisable to clean the heating element with chemicals rather than scrape off the dirt. In the latter case, there is a possibility of damage to the part.
To clean the heating element, you can use a solution of citric acid or vinegar (its percentage in the solution should be about 5%). The part must be immersed in liquid and wait until the scale falls off. Then you need to wash the heating element.
Faulty thermostat
The thermostat in Termex water heaters is located under the cover, next to one of the heating elements, and its sensor is located inside the tank.
Sometimes the thermostat fails. This element cannot be repaired; it must be replaced . To perform the replacement, you need to do all the preparatory steps, remove the cover, then remove the thermostat. But before dismantling, we recommend checking this part. To do this, use a lighter to heat the tip of the sensor (copper). If the thermostat is working properly, you will hear a characteristic click, which means that the protection mechanism has activated and the circuit has opened. Otherwise, you will have to replace the part.
Tank leak
No matter how trivial it may sound, but first you need to find where the water is coming from. A lot depends on this, since if the tank is rotten, you will have to buy a new water heater. So:
- if water oozes from the side seam, then the container is rusty and repairs will not be possible;
- If water comes out from under the lid at the bottom, then you need to disassemble the tank.
If traces of leakage are found in the places where the heating elements are attached, then your water heater is not hopeless and can be saved by replacing the gasket.
In the case of the second option, complete all preparatory steps, then remove the plastic cover. Next, take a close look at where the water is leaking. If it comes out near the flange, then the rubber gasket has deteriorated (less often this is a problem with the heating element). Otherwise, the tank is rusty and the boiler can be thrown away. To replace the gaskets, you need to remove the heating element. But it is necessary to carefully examine the heating element itself. If it is cracked, it is also better to replace it.
Other faults
If you have checked and replaced all the parts, but the boiler still does not work, then it is quite possible that the electronics have failed. The control board cannot be repaired, and it will be extremely difficult to find a similar one in a store. Therefore, in this case, we recommend contacting specialists.
Comments:
Yeah, Thermex. What installation, what service - one song with swearing. Their fastenings on some models are unreliable, and disassembling/assembling is a pleasure.
Conventional round Termex water heaters are no different from Ariston or Gorenje, except for the price. I chose this one for myself and don’t regret it. I've been using it fine for 3 years.
Oleg, well, they’re round. And 3 years is not an indicator. Just soon you will start replacing heating elements and you will understand the difference between Ariston and Termex
It is unlikely. I’d better call a specialist for this who will sort it all out.
Oleg, well, if so, then yes. Then you can take the cheapest options and use it without any problems, and if it breaks, call a specialist. Or even place such a specialist at home, so as not to call every day. And then today the cheap boiler broke down, tomorrow the stove, then the Chinese TV stopped working, and then, you see, you’ll have to reflash a cheap Chinese smartphone
I have a problem with the gasket, I noticed when I was changing the “original” heating element that the pressure washer “lays” somehow crookedly./one side is pressed tighter than the other/ I bought a heating element, a gasket, and began to change it - the same story. I have a horizontal Thermex. Maybe you know the installation trick so that the gasket fits “evenly” into the HV heating chamber.
I have a 50L flat Thermex. disassembled today 12/08/16. The RCD knocked out, a 1.3 kW heating element burned out, the second 0.7 kW was intact. I have used the water heater for 4 years. On the burnt one there was no anode at all, but on the second one it was “eaten up”. I replaced it without any problems in 20 minutes (I installed a new one with an anode and bought it for 730 rubles, and for the second one only a magnesium anode for 183 rubles, supposedly all made in Italy), except for a trip to the store and I did it for the first time, intuitively. The problem is different: it has a tank in the form of 2 pipes (and not, as usual, one container), connected by two overflows, each with a heating element inserted into it, respectively 1.3 kW and 0.7 kW. Washing them is one problem, your hand can’t fit into the holes, you pour in water and shake... in short, there’s one problem with washing the tank(s)
Thermex water heater is a complete crap! A bunch of nuts, useless electrodes, a bunch of wires, etc. and so on. Purely in Russian: reinvent the wheel and finish something of your own! I recommend that buyers pay attention to the Real water heater. I have a VM 390. It has been working properly for 7 years now and there are no problems with disassembly: getting the ten takes about 5 minutes at most. I took off the cover, unscrewed 3 wires, pulled out the thermostat and unscrewed the heater. True, for this I had to buy a 55 head. And no anodes-cathodes!
I don’t know, 12 years of using Termex and no complaints. I replaced the heating elements once.
I’ve had a “Real” since 2000, I’ve never washed it or changed the heating elements. Two years ago the tank leaked and had to be replaced. I bought Termex for 80 liters for 22,000 rubles, it was flat and hot water flowed through all the connections, naturally flooding the neighbors. The temperature was 57 and the flow was still 90. Now, having read how to change the heating element, isn’t it better to buy a new one? It’s a pity that they stopped producing our Real.
Hello I have a question. I replaced the heaters with Thermex 50 l, when turned on the ouzo is triggered, there are no leaks anywhere, tell me what the reason is
Termex. 14 years of operation. Knocks out the RCD. Today I took it apart. There were no special problems. Both shadows burned out. Tomorrow I'll go look for them. Overall I'm happy with the water heater.
How to remove lime deposits?
The removed heating element is cleaned in two ways: mechanical and chemical . If the lime deposits are thick, then both methods are used together.
First, large deposits are removed from the tubular part using physical force, and then the remaining limescale marks are removed chemically.
To do this, fill a cylindrical container (for example, an enamel bucket) with cleaning liquid and lower the heating element into it. The exposure time depends on the nature of the reagent.
How to remove using folk remedies?
To dissolve the solid salt deposit on the heating element, it is necessary to use substances with an acidic reaction. Used as home cleaners:
Lemon acid . Pour two 25 gram packets of powder into a liter of water. When all the crystals have dissolved, a heating element is lowered into the solution. Leave for a day, after which the heating element is washed in clean water.- Acetic acid . If a vinegar solution of medium concentration (9%) is used for cleaning, then take 5 tablespoons per liter of water.
If only essence is available, then its quantity should be 2 tablespoons for the same volume of water. The holding time is 10-12 hours.
- Mechanical cleaning . To remove limestone, use a metal brush, scraper, or sandpaper. The method is labor-intensive and cannot be used to clean the anode.
If there is too much scale, then the amount of reagent can be increased, and the metal container with the solution and heating element can be placed on low heat and heated for 30-60 minutes.
How to remove plaque with household chemicals?
Ready-made liquids sold in household chemical stores are distinguished by a special composition that guarantees the effectiveness of cleansing. Various companies produce such products:
- Boiler-Cleaner . Acid remedy. The liquid is used against carbonate salts and iron oxide. The composition includes a complex of acids, an anti-corrosion additive and substances that enhance the effect of the main reagents. To clean a contaminated surface, the liquid is mixed with water to obtain a concentration of 5 to 12%. The heating element is lowered into the solution and kept for 8 hours. The cost of a 5-liter canister is on average 480 rubles.
- SteelTEX . The formula of the product includes surfactants and corrosion inhibitor additives. The liquid helps remove metal oxides, salts, rust, and biological inclusions from the heating element. According to the instructions for use, SteelTEX is diluted with water in a ratio of 1:6 to 1:10. The stronger the contamination, the stronger the solution should be. After washing, use an alkaline neutralizer. The price of the product (20 kg) is about 4,200 rubles.
- Cillit ZN/I . This reagent from a German manufacturer is designed to combat rust and lime salts. To treat heating elements, prepare a solution of 1 part of the product and 9 parts of water. The part is kept in the solution for 1-4 hours at a temperature of 20 to 40 degrees. If necessary, heating is allowed. The average cost of a 20 kg canister is 10,700 rubles.
How to clean a washing machine heating element
When wondering how to clean the heating element of a washing machine yourself, you need to be able to disassemble the device. Complete disassembly is not required, you just need to remove the heater. Next, you need to “arm yourself” with a spatula and clean the heating element as carefully as possible from scale. The main thing is not to damage it during this procedure.
In 90% of cases, the reason why a washing machine fails is not wear and tear of parts, but dirt and scale. Therefore, it is important to prevent their formation, and also to know how to clean your machine from scale if it appears.
You can descale your washing machine in different ways. Use special ready-made products, white vinegar or citric acid. If there is a large formation of mineral deposits, service center specialists remove the heater to treat it with a special compound.
All cleaning products offered by manufacturers contain acid. Considering its aggressive effect on the rubber parts of the washing machine, these products must be used correctly and only when mineral deposits appear. Before cleaning, you should read the instructions, since their methods of use may be different:
- cleaning with idle wash;
- soaking the removed heating elements.
Anti-scale agents that have proven themselves to be effective for cleaning washing machines are: Merloni, SVOD-TVN, Bubble Ice, Filtero, Astonish.
They can be used no more than once every six months.
To clean your washing machine, it is recommended to add these products during each wash. Unfortunately, “Kalgon” and “Alfagon” only soften the water, but cannot remove mineral deposits.
The main active ingredient in them, sodium tripolyphosphate, does not dissolve salts. Almost all powders contain similar softeners, and there is no need to add them during washing. Excessive use leads to the formation of hard-to-remove sediment on the heating element.
Therefore, they must be used with caution.
The risk of the formation of a hard mineral layer can be reduced by using relatively cheap “Antiscale” or soda ash.
Unlike ready-made chemicals, citric acid is the most effective means for removing salt deposits in washing machines. Depending on the frequency of washing, it should be used once every 6–12 months.
- Pour 60-100 g of citric acid into the powder compartment.
- Choose a mode with 80–90 degrees - intensive wash, boiling or cotton.
- The machine will go through a 1-2 hour idle and rinse cycle.
- Under the influence of citric acid and high temperature, the heater and metal parts of the drum will be cleaned of mineral salts deposited on them.
The citric acid formula ideally breaks down dirt and removes plaque.
This is another effective way to clean your automatic car.
- Pour 2 cups of table vinegar into the chamber.
- We run the longest cycle with hot water (without powder and, naturally, without laundry).
- After 5 minutes, stop the program for an hour. This pause will allow the cleaning solution to work better on the drum and heater.
- Then we continue the program until completion.
- Be sure to perform a rinse, short wash or extra rinse cycle.
The appearance of scale reduces the efficiency of the heater, and increases the heating time and energy consumption. A large layer of limescale covering the heating element prevents the rotation of the drum.
This can lead to serious mechanical damage to the machine, and then not only the heater will have to be replaced.
With proper operation, it is important not only to promptly clear salt formations, but also to prevent their occurrence.
Washing with low-quality powders at extremely high temperatures with water containing a high content of calcium and magnesium salts leads to the formation of limescale. Therefore, it is better to adhere to the following recommendations:
- Wash in heating mode up to 40-50 degrees. This is enough to dissolve and remove even strong stains;
- No need to skimp on powder;
- It is advisable to install magnetic softener filters and use purified water;
- Calgon type softeners should be used rarely and in small quantities;
- Periodic maintenance is required - cleaning with citric acid.
The following recommendations will help you descale your washing machine. It will serve without fail for many more years.
For many housewives, an automatic washing machine is an indispensable assistant that greatly facilitates household chores.
However, like any other household appliance, you need to periodically take care of it: change filters, wipe off dust and, of course, clean the heating element from scale.
There are a lot of expensive and not so expensive means for this, but the most economical, and no less effective, is cleaning the washing machine with citric acid, but the housewife must know how to do it correctly.
The main reason for breakdowns of automatic machines is high water hardness, which provokes the formation of scale on the heating element, which ultimately damages the heating element.
Knowing how to clean a washing machine with citric acid and how much to pour in this miracle product, you can maintain the functionality of this equipment for a long time.
Many housewives generally doubt the safety of citric acid for the washing machine. Let's try to understand this issue in as much detail as possible.
We suggest you familiarize yourself with How to clean soot from walls with your own hands
In most regions of the Russian Federation, water has a high degree of hardness. Ordinary water flowing through water pipes is saturated with various salts. The consequences of boiling such a liquid in the form of a white coating settle on the walls and bottom of the kettle and pans in which hard water is often boiled. The same coating settles inside the automatic machine, or rather on the metal parts and heating element.
The water flowing from our taps contains many impurities. It contains salts, minerals, bleach and other components that are harmful to human health and dangerous for many electrical appliances. Electric kettles, boilers, irons and washing machines suffer from scale.
In addition to “dirty” water, machines allow chemicals to pass through them, which negatively affects the condition of many parts. To clean your washing machine from scale, you can use folk advice and special chemicals.
If you disassemble a washing machine that has been in operation for more than 2 years, a coating will be noticeable on the surfaces of plastic and metal parts, a layer of which sometimes reaches 3 mm. Due to the minerals in the water, the plaque is hard and cannot be removed with a damp sponge.
The larger the layer of sediment formed, the faster the machine will fail. Cleaning is necessary for the tank, drum and heating element. The lifespan of an automatic machine depends on the condition of the last part.
3 reasons for scale formation on device parts:
- Hard water;
- Chemical components of washing powder;
- Frequent washing in intensive mode.
The water contains magnesium and calcium salts. They pose the greatest danger to the heating element and the washing tank. When the water in the machine heats up, salts precipitate, forming hard scale.
When the heating element becomes overgrown with a “fur coat,” heat transfer decreases. As a result, the water takes much longer to heat up. This leads to high energy consumption and overvoltage of the machine.
In addition to salts, the water contains dirt in the form of pieces of rust and other components. They clog the intake valve.
If you want to make sure that the heating element needs cleaning, arm yourself with a flashlight and head to the washing machine. The heating element is located on top of the drum (usually in the center or slightly to the side). Shine a flashlight into the holes on the drum and you will be able to see the heating element.
Everyone is familiar with the advertised product called “Calgon”, which promises to protect your car from scale.
The main active ingredient of this product and its analogues is sodium tripolyphosphates. They help soften water, but do not dissolve salts. A cheaper analogue is regular soda ash.
It can be found in any powder intended for washing in an automatic machine.
It contains a special acid that has a detrimental effect on salt deposits and helps get rid of plaque. 50 g of powder is poured into the powder reservoir, after which the “Wash without laundry” program is set. Not every machine is equipped with this mode.
An alternative is the “Cotton” or “Bed Linen” program (water temperature should reach 95 degrees).
This product has disadvantages. If you overdo it with the amount of powder, you risk damaging the rubber elements of the washing machine. Acid has a detrimental effect on rubber.
During the procedure, open the door to the bathroom and create a draft so that the unpleasant odor does not linger in the bathroom or other room in which the machine is located.
Lemon acid
Also read: How to clean an iron at home
- Household (used in cooking and housekeeping, sold in grocery stores);
- Specialized (used to clean parts of industrial mechanisms).
To clean the washing machine yourself, regular citric acid in bags is suitable. Some housewives try using freshly squeezed lemon juice. Using juice, you will not achieve any effect: it is powerless in the fight against hard scale.
Before cleaning, remove all items from the machine drum. Close the door tightly. Pour 3 tbsp into the washing powder reservoir. l. household citric acid (about 3 bags of 25 g each).
If your machine does not have a dry wash option, use the Cotton program or another program that heats the water to maximum temperature.
Don't forget to cancel the spin cycle and set the extra rinse.
Folk remedies
You can wash the boiler using household chemicals or folk remedies. After cleaning, the water heater will no longer smell bad, but rust may remain on some parts, so it is worth combining dry cleaning with mechanical cleaning to make the device last longer.
Acetic acid
Acetic acid can clean the walls of the water heater, but subsequently the deposits should also be removed with a sponge. The essence should be diluted with water in a ratio of 1:3.
Lemon acid
For a liter of warm water, you need to take 5–7 grams of citric acid, mix the solution thoroughly so that all the crystals are completely dissolved.
Soda with vinegar
You can descale the heating element of a water heater using either vinegar or a solution of it combined with soda. For a liter of water you need to take 100 ml of acid and 80 grams of baking soda. In order for the substances to dissolve better, the liquid must be taken warm.
Is it necessary to clean a boiler with a dry heating element?
Boilers with dry heating elements must be cleaned unambiguously; the formation of deposits does not depend in any way on the type of heating element.
Regarding the driest heating element. Plaque threatens the performance of immersion heaters directly due to constant exposure to water. The situation is different with closed elements - no procedure is required for the device itself, deposits do not threaten, and there is no influence at all from the contents of the tank. But the casing is vulnerable, so it needs to be cleaned; it will require dismantling and draining.
Cleaning a boiler with a dry heating element is necessary, the measure also applies to the dry element:
- a small delay due to heating of the walls of the flask is insignificant, it is a few seconds, but the scale makes it noticeable. The spread of heat outward slows down, that is, the nature and level of danger is normal;
- the threat of overheating, although statistically less than for wet heating elements;
- thermal insulation of the casing with limestone stone provokes excessive heating of the water heater segment, which weakens the enamel and metal, provoking corrosion.
Why does plaque form on the heating element?
Limestone deposits on heating elements are deposits that harden into a crust and cover the heating surfaces of heat exchange devices. At high temperatures, the salts contained in the water decompose into carbon dioxide and insoluble sediment that accumulates on the walls.
From a soft coating, it quickly transforms into a hard crust. Calcium compounds predominate, which is why the deposits are called limestone. Deposits form in water heaters faster or slower, but always, since every type of water contains salts.
Scale has different colors and structures, but the level of thermal insulation and hardness is approximately equal. The harder the water, the more salts, the faster and more intense plaque forms. Rust that appears as a result of corrosion of water heater parts and comes with water can also accumulate, mix with other deposits and harden.
- Carbonate: CaCO₃, MgCO₃ – calcium, magnesium;
- Sulfate: CaSO₄;
- Silicate: silicic acid chemical compounds Ca, Mg, Fe, Al.
- primary – looser, accumulated during the crystallization of salts;
- moving sludge, suspension, corrosion products;
- secondary – hard layer. Sludge, sediment due to high temperatures (typically) sticks to surfaces and transforms into stone.
What determines the intensity of plaque formation:
- high temperatures;
- water hardness level.
In the water heater tank, the aggressive environment is constant - there is always a large volume of water, thermal processes, so lime crust and sludge form quickly. The heating element is a heat source, for the device the situation is aggravated. The anode only protects against oxidation, does not prevent scale in any way, it can only make it a little softer.
The obligation to remove limescale is due to the following:
- extremely low heat conductivity (steel 39 kcal/m*hour*degree, scale 0.1 kcal/m*hour*degree), which is fraught with the following: overheating shortens the service life and threatens burnout (1 mm crust = 75% additional thermal insulation);
- High temperatures damage electrical parts, the temperature sensor, and contacts can burn out;
Efficiency decreases significantly - more energy is spent to heat water (by 15 - 20%) than usual.
Signs that cleaning is required:
- noise, whistle;
- slow heating, temperature does not match the set values;
- increased energy costs;
- yellowish tint of water, solid particles;
- rotten smell, airing (the mixer spits - accumulated hydrogen sulfide comes out);
- the walls near the heating element are overheated;
- the water heater turns on and off - protection against overheating, caused by deposits, is triggered.
Causes of deposit formation
Scale is a hard deposit consisting of chemical elements on the parts of water heating equipment.
Thus, salts are concentrated on the inner walls of the heat exchange equipment. Lime deposits are determined by the degree of water hardness. The harmfulness of such liquid to human health has been scientifically proven:
- costs for detergents increase;
- the condition of the skin worsens.
The formation of limestone deposits affects the heat transfer of heating elements, increasing the cost of thermal energy. Over time, plaque leads to serious equipment breakdowns, thereby reducing the service life of the device.
Basic methods of combating limestone deposits:
- mechanical cleaning of water heater surfaces;
- treatment of tank walls and other parts with acid solutions.
Note! A deposit thickness of 1 mm increases energy consumption by 10%, and with a layer of scale of 10 mm, resource consumption increases to 70%.
Scale prevention
Prevention is divided into two types:
- Physical.
- Chemical.
Physical prevention is a special device that has several magnets installed in the hose through which water is supplied. Due to the fact that magnets create resonance and thereby change the structural formula of water, the formation of insoluble sediment is prevented, even when washing at high temperatures.
Chemical prevention involves using a special additive during washing. Thus, the insoluble precipitate still dissolves. There are quite a lot of such products on the market, the most common is Calgon, but there are others that contain sodium tripolyphosphates. It is added along with the powder.
To avoid tissue damage, it is best to use this product at idle speed and carefully read the instructions before doing so.
Among other things, ordinary soda ash can soften water. But be that as it may, the main thing is to correctly indicate the proportions, otherwise cleaning the heating element of a household washing machine will be simply inevitable.
How to descale a Thermex water heater?
To remove scale, use a regular knife or iron brush. You need to clean it carefully so as not to damage the heating element. At the end, the heating element can be treated with sandpaper. After collecting and filling the water heater with water, you should wait several hours to ensure that the flange is secure.
Interesting materials:
How to distinguish a white mushroom from a satanic mushroom? How to distinguish mustard from porcini mushroom? How to distinguish twin mushrooms? How to distinguish saffron mushrooms? How to distinguish Kozlyak from pepper mushroom? How to distinguish butterdish from porcini mushroom? How to distinguish a pepper mushroom from an oil can? How to distinguish a Polish mushroom from a white one? How to distinguish Polish mushroom? How to distinguish a satanic mushroom from Dubovik?