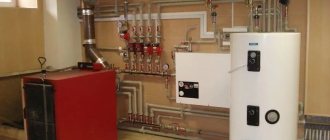
Energy saving is now the most popular topic on the Internet. Of course, everyone wants to save money, especially in the current economic conditions. Calculation of heat losses plays the most important role in this case. Heat loss in the simplest sense is the amount of heat that is lost by a room, house or apartment. They are measured in Watts. Heat losses occur in the house due to the difference in external and internal air temperatures.
During the transitional and cold period of the year, the temperature on the streets drops, and the temperature difference between indoor air and outdoor air increases. And as we already mentioned, no one has canceled the Second Law of Thermodynamics, so the heat from your houses and apartments tends to leave it and warm the cold environment. To reduce these heat losses, houses are insulated in various forms, from polystyrene foam and ventilated facades to modern thermal insulation materials in the form of putty. The main task in our profession is to maintain comfortable microclimate parameters in the room. And first of all, we calculate heat losses to compensate for them.
Why do heat loss calculations?
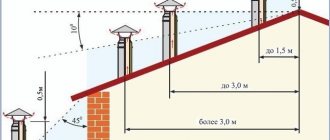
When do they calculate heat loss in a house? Calculation of heat loss is mandatory when designing heating systems, ventilation systems, and air heating systems. Design temperatures are taken from regulatory documents. The external air temperature value corresponds to the external air temperature of the coldest five-day period. The internal temperature is taken either from the one you want or from the norms; for residential premises it is 20+-2°C.
The initial data for the calculation are: external and internal air temperature, the design of walls, floors, ceilings, the purpose of each room, and the geographic area of construction. All heat losses directly depend on the thermal resistance of the enclosing structures; the greater it is, the less heat loss.
To ensure comfortable living conditions for people in a room, it is necessary that the heat balance equation be true
Qп+ Qо+ Qс+ Qк= Qср+ Qос+ Qр+ Qpeople,
where Qп – heat loss through the floor, Qо – heat loss through the windows, Qс – heat loss through the wall, Qк – heat loss through the roof, Qср – heat gain from solar radiation, Qос – heat gain from heating systems, Qр – heat gain from appliances, Qpeople – heat gain from people .
In practice, the equation is simplified and all losses are compensated by the heating system, regardless of water or air.
Requirements for thermal insulation material
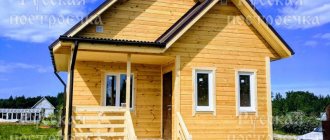
The frames of houses built using “Canadian” technology are assembled from OSB boards or wood. To prevent the insulation from causing damage to structures, it must have sufficient vapor permeability - at least 0.32 Mg.
Fiber heat insulators – mineral wool materials – absolutely meet this requirement. Popular synthetic insulation materials, such as polystyrene foam and polymer-based analogues, cannot be used in wooden structures for two reasons:
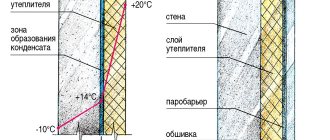
- Firstly, due to the lack of elasticity, the heat insulator will not be able to adapt to temporary deformations of the wood (shrinkage, increase in volume). The result is the formation of cracks and cold bridges.
- Secondly, polystyrene foam and its analogues do not allow wood to “breathe”. This leads to moisture accumulation, mold and rotting of structural elements.
When choosing how to insulate a frame house, in addition to vapor permeability, you should also take into account the additional properties of the heat insulator. The following indicators are welcome:
- fire safety;
- environmental friendliness;
- low thermal conductivity;
- resistance to shrinkage;
- minimal water absorption.
Heat loss calculation
Having received the initial data, designers begin calculations. Let's consider the main types of heat losses and formulas for their calculation. There are heat losses: through walls, through the floor, through windows, through the roof, through ventilation shafts and additional heat losses. Thermal resistance for all structures is calculated using the formula
Rst =1/ αв+Σ(δі / λі)+1/ αн,
where αв is the heat transfer coefficient of the inner surface of the fence, W/m2 °C; λi and δi – thermal conductivity coefficient for the material of each layer of the wall and the thickness of this layer in m; αн – heat transfer coefficient of the outer surface of the fence, W/m2·os;
Coefficients α are taken from the standards, and are different for walls and ceilings.
So, let's begin:
First of all, let's look at heat loss through the walls
The design of the walls has the greatest influence on them. Calculated using the formula: Coef. n-correction factor. Depends on the material of the structures, and n=1 is accepted if the structures are made of piece materials, and n=0.9 for the attic, n=0.75 for the basement floor.
Example: Let's consider heat loss through a 510 mm brick wall with 100 mm mineral wool insulation and a 30 mm decorative finishing ball. Internal air temperature 22ºС, external -20ºС. Let it be 3 m high and 4 m long. The room has one external wall, placement to the South, the area is not windy, without external doors. First you need to know the thermal conductivity coefficients of these materials. From the table above we find out: λk =0.58 W/mºC, λut =0.064 W/mºC, λsht =0.76 W/mºC. After this, the thermal resistance of the enclosing structure is calculated:
Rst=1/ 23 +0.51/0.58+0.1/0.064+0.03/0.76+ 1/ 8.6 = 2.64 m2 ºС/W.
For our area, such resistance is not enough and the house needs to be better insulated. But that’s not about that now. Heat loss calculation:
Q=1/R·FΔt·n·β=1/2.64·12·42·1·(10/100+1)=210W.
ß is additional heat loss. Next, we will describe their meaning and it will become clear where the number 10 comes from and why divide by 100.
Next comes heat loss through the windows
Everything is simpler here. Calculation of thermal resistance is not necessary, because it is already indicated in the passport of modern windows. Heat loss through windows is calculated according to the same scheme as through walls. For example, let's calculate the losses through energy-saving windows with a thermal resistance of Ro = 0.87 (m2°C/W) of size 1.5 * 1.5 and oriented to the North. Q=1/0.87·2.25·42·1·(15/100+1)=125 W.
Heat loss through ceilings includes heat removal through roof and floor coverings. This is mainly done for apartments where both the floor and ceiling are reinforced concrete slabs. On the top floor only losses through the ceiling are taken into account, and on the first floor only through the basement floor. This is due to the fact that the same air temperature is assumed in all apartments, and heat transfer from apartment to apartment is not taken into account. Recent studies have shown that large heat losses occur through non-insulated junctions between floors and enclosing structures.
The definition of heat leakage through a ceiling is the same as for a wall, but additional heat loss is not taken into account. The coefficient α is taken differently: α in = 8.7 W/(m 2 K) α in = 6 W/(m 2 K), the temperature difference is also the same, because in the basement or in a covered attic the temperature is taken within 4-6ºС. We will not describe the calculation of thermal resistance for the ceiling, because it is determined by the same formula Rst = 1/ αв + Σ ( δі / λі ) + 1/ α. Let's take a ceiling with a resistance of 4.95 and take the air in the attic +4ºС, the ceiling area is 3x4 m, inside 22ºС. Substitute into the formula and get: Q=1/R·FΔt·n·β=1/4.95·12·18·0.9= 40 W.
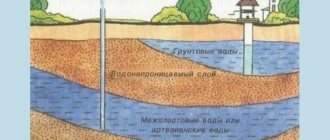
Calculation of heat loss through the floor on the ground
It is a little more complicated than through the ceiling. Heat losses are calculated by zone. A zone is a strip of floor 2 m wide, parallel to the outer wall. The first zone is located directly next to the wall, where the most heat loss occurs. It will be followed by the second and other zones, up to the center of the floor. For each zone, its own heat transfer coefficient is calculated. To simplify, the concept of resistivity is introduced: for the first zone R1=2.15 (m2°C/W), for the second R2=4.3 (m2°C/W), for the third R3=8.6 (m2°C/W) W)
Example There is a room in which the floor is on the ground, the floor size is 6x8 m. The temperatures are still the same. First, let's divide the floor into zones. We got two of them. Find the area of each zone. For us it is 20 m2 for the first zone and 8 m2 for the second. Then we set the conditional resistances R1=2.15 (m2°C/W), R2=4.3 (m2°C/W), substitute into the formula: Q=(F1/R1+F2/R2+F3/R3)( tout - tin) n=(20/2.15+8/4.3) 42 1= 470 W.
Additional heat loss
They are taken into account only for walls and windows, that is, structures that are in direct contact with the environment. There are four types of additional heat loss: orientation, windiness, the number of walls and the presence of external doors. They are expressed as a percentage and subsequently converted into an additional heat loss coefficient. If the room is oriented to the North, East, North-East, North-West, additional heat loss is 10%, when to the South, West, South-West, South-East, 5% is added. If the building is located in a windy area, another 10% of heat loss is added, and when in an area protected from the winds, only 5%. If the room has two external walls, then additional losses are 5%, when there is only one, there are no additional losses. If there is a door in the external wall, you can calculate the loss through it, but it is easier to add 60% if the doors are triple, 80% if the doors are double and 95% if they are single. For example: A room has two external walls, located in a windy area, one wall faces South, the other faces North, there are no doors. Then the additional losses are 10% + 5% for orientation + 10% for wind + 5% since there are two walls. And that 30%, in order to add them to the main heat losses, needs to be converted into a coefficient β = 30% + 100% = 30/100 + 1 = 1.3 and substituted into the general formula.
Heat loss for ventilation
They are not taken into account if air heating is being designed or a ventilation unit with air heating is used, since the air entering the room is already warm and no heat is wasted on heating it. But if the installation is not heated, it is necessary to take into account the heat consumption for heating the incoming air. The simplified formula looks like this:
Q=0.337·V·Δt
where V is the room in m3, Δt is the difference between external and external temperatures.
The sum of all heat losses constitutes the total losses of the room.
Ventilation measurement
Another important component of calculating the heat loss of a room is the amount of energy spent on heating the ventilation air. It can amount to up to 30% of total losses, so it must be calculated and added to the result of the main calculations. The formula for such a calculation is taken from a physics textbook to determine the heat capacity of air: Q air. = c * m * (tв - tн).
The energy spent on heating ventilation air is calculated using the formula
Here is a breakdown of the main indicators:
- Q air — the amount of energy spent on heating the air is measured in W;
- tв - average internal temperature measured in degrees Celsius;
- tн - the lowest temperature outside is measured in degrees;
- c - heat capacity of air is 0.28 W / (kg °C);
- m is the mass of air entering the room from the outside, measured in kg.
To more accurately calculate the mass of incoming air, use a simple formula: multiply the volume of all calculated rooms by the air density. The volume is calculated using internal data, multiplying the length, width and height of the rooms, and then adding all the volumes into one. The air density value is found in a special table, where it is indicated depending on the temperature. The starting temperature is taken to be the lowest external indicator for the area.
To determine the final result, the total values of two basic formulas are added. The result obtained will be the most accurate indicator of the building's heat loss.
Calculation of heat losses in Excel
The process of calculating heat losses at home takes quite a lot of time, so we created a template for ourselves in Excel with which we make calculations. We decided to share it with you and you can use it by following the link. Here we will write out the instructions for use.
Step 1
Follow the link and open the program file. You will see a table like this:
Step 2
You need to fill in the initial data: room number (if you need it), its name and temperature inside, the name of the enclosing structures and their orientation, the dimensions of the structures. You will see that the area counts itself. If you want to subtract the window area from the walls, you need to adjust the formulas, since we do not know where your windows will be recorded. Our space is being taken away. You also need to fill in the heat transfer coefficient 1/R, temperature difference and correction factor. Unfortunately, they are filled out manually. In the example, we have an office with three external walls; one wall has two windows, another has no windows, and the third has one window. The wall structure will be as in the example where we calculated R, eat k=1/R=1/2.64=0.38. Let the floor be on the ground and divide it into zones; we have two of them and calculate the losses for two zones, then k1 = 1/2.15 = 0.47, k2 = 1/4.3 = 0.23. Let the windows be energy-saving Ro = 0.87 (m2°C/W), then k = 1/0.87 = 1.14.
The picture shows that the amount of heat loss is already visible.
Step 3
Unfortunately, additional losses are also filled in manually. You need to enter them as a percentage; the program itself will convert them into a coefficient in the formula. And so, for our example: Walls 3 means +5% heat loss to each wall, the terrain is not spindle therefore +5% to each window and wall, Orientation to the South +5% for structures, to the North and East +10%. There are no external doors, therefore 0, but if there were, the percentages would only be added up to the wall in which there is a door. We remind you that additional heat losses do not apply to the floor or ceiling.
As you can see, the loss of premises has increased. If you already have warm air entering the room, this is the last step. The number written in column Q is your desired heat loss of the room. And this procedure must be carried out for all other premises.
Step 4
In our case, the air is not heated, and in order to calculate the total heat loss, we need to enter the area of our room 18 m2 in column R, and its height 3 m in column S.
This program significantly speeds up and simplifies calculations, even despite the large number of manually entered elements. She helped us more than once. We hope it will become a helper for you too!
Example of calculating wall thickness
The thickness of the insulation of a frame house for permanent residence using the example of the Moscow region (this calculation was given above) was 150 mm when using mineral wool with a density of 50 kg/m3. Since most manufacturers produce this insulation in thicknesses of 50 and 100 mm, you will have to put insulation in either three layers of 50 mm thickness, or two layers of 100 and 50 mm. This will not change the thermal conductivity coefficient.
OSB with a thickness of 12 mm with an air gap of 50 mm and plaster of 5 mm was chosen as the external cladding.
The interior is lined with 13 mm plasterboard.
Total: 150 + 12 + 50 + 5 + 13 = 230 (mm).
Now, based on these data, you can now calculate the foundation, but you need to understand that this is just a mathematical calculation and it does not take into account problems that may arise during installation of the structure.
Online foundation calculator
To find out the approximate cost of various types of foundations, use the following calculator:
To make sure that there is no draft anywhere in the house, the structure is checked with a thermal imager Source sargorstroy.ru
The best glass wool for insulating a frame house
The production uses the same raw materials that are used in glass production. Many companies use waste glass to obtain a melt from which they form filaments. This helps reduce production costs. Glass wool fibers are longer than those of basalt thermal insulation, which can cause breakage and slight changes in structure.
Isover Warm House-Stove
Form-stable slabs 1170x610x50 mm are designed for installation between rafters and load-bearing frame elements. A distinctive feature is increased elasticity, which ensures a tight fit and the absence of cold bridges. This allows one person to work, performing insulation at a high professional level.
The material belongs to the NG group, is safe for health, and does not emit volatile organic substances into the environment. Thermal conductivity is one of the best in its category, allowing you to reduce heating costs when permanently living in a cottage. Supplied in a thick film that protects from high humidity and UV radiation.
Advantages:
- Does not generate dust;
- Does not break during installation;
- Low price;
- Good level of sound insulation;
- Vapor permeability.
Flaws:
- Can absorb moisture.
Ursa Terra 34 PN Pro
The products of a European brand with 70 years of experience are environmentally friendly and safe for health. Produced automatically with control of 20 parameters and binder consumption. They are produced in the form of slabs 1000x610x50 mm, which protect well from heat loss and external noise. Terra's proprietary polymer substance is used to bind the fiber.
The material has good elasticity, which simplifies installation work in the frame or in the space between the rafters. Refers to non-flammable substances, the fiber structure is reinforced, which reduces the level of dust. Thermal insulation is biostable and does not decompose under the influence of aggressive substances.
Advantages:
- Low water absorption;
- Good vapor permeability;
- High thermal conductivity;
- Retains properties at temperatures up to 220 degrees.
Flaws:
- Not detected.
Rating of insulation for frame houses
When compiling the review, products from brands with a good reputation were considered. Technical characteristics, structure, ease of installation, and availability of certificates were studied. Feedback from property owners, opinions of builders and heating engineers were taken into account. The main attention was paid to the following parameters:
- Composition – they produce insulation based on mineral wool, basalt wool, polystyrene foam;
- Thickness – a wide range of sizes is welcome;
- Thermal conductivity - the lower the coefficient, the less insulator needed;
- Water absorption – should have minimum values;
- Fire safety is an advantage of non-combustible materials.
Uneven density, mechanical defects, the ability to support combustion and absorb a large volume of water - insulators with such defects were excluded from our rating.
Polystyrenes
Quite often today, rigid insulation based on polystyrene, produced in the form of molded slabs, is used to insulate frame walls. The most famous of them are polystyrene foam (expanded polystyrene) or extruded polystyrene, the latter including “Polyspen”, “Penoplex”, STYROFOAM. In some of their properties, these materials are superior to many mineral wool insulation materials, as they have a lower thermal conductivity coefficient and higher compressive strength, as well as lower water absorption. Their service life is quite comparable to the life of the building; they do not shrink. Extruded polystyrene foam is characterized by a complete lack of water absorption, but cheap foam plastics can absorb moisture - it penetrates between the granules and, with repeated freezing and thawing, destroys the material.
The most important disadvantage of all polystyrenes is their flammability, combustibility and smoke-generating ability in accordance with GOST 30402, GOST 30244 and SNiP 21-01-97.
Despite a number of positive qualities that give reason for some experts to call polystyrene derivatives almost universal insulation, both polystyrene foam and extruded polystyrene have serious disadvantages that cast doubt on the advisability of using these materials in a number of cases. One of them is related to their fragility: when using polystyrenes, it is difficult to seal the joints of plates due to their rigidity and non-ductility. In addition, this type of insulation is very popular with rodents, who love to chew it and make passages and holes in them.
And frame walls filled with varieties of polystyrene cannot be called environmentally friendly due to the styrene included in this insulation, which, when released into the air, negatively affects the body of people breathing it
In addition, one of the main properties of these insulation materials - very low vapor permeability - means that the walls of the house will not “breathe”; when insulated, a “thermos effect” is created, which is especially important to prevent in your home. The choice of this material as a filler for the walls of a residential building must be approached carefully from the point of view of fire safety.
Expanded polystyrene boards are classified as combustible materials (flammability groups G1-G4). However, low-flammable materials also pose some danger from an environmental point of view. To reduce their flammability, hexabromocyclododecane (HBCDD), which is a persistent toxic substance, is added to the composition. The only reassurance is that this toxicant most likely does not evaporate and does not dissolve in water. However, the European Chemicals Agency puts it at the top of the list among the most dangerous substances, which means there is still reason to think about it.
What is especially unpleasant is that all polystroles, without exception, when burned, emit to one degree or another suffocating smoke, which includes toxic substances - carbon monoxide, benzene and others. The material class for flammability (G1-G4), smoke formation (D1-D4), flammability (B1-B4) and toxicity of combustion products (T1-T4) is indicated in the fire safety certificate, which is issued on the basis of a test report on the material. For comparison: mineral BASALT wool is a non-combustible material - NG group.
In conclusion, I would like to add that, of course, there are tasks for which the use of polystyrene has practically no alternative, for example, insulation of foundations in the ground, but when insulating the outer part of any building, primacy remains with basalt insulation
It is important in each specific case to choose a material that will solve a specific problem.
What to choose is up to you.
What is the best insulation for a frame house?
Professional builders and heating engineers know which insulation is best to use for the walls of a frame house, and which should be chosen only for floors or pitched roofs. A correctly made decision allows you to increase the service life of structures. The VyborExperta.ru team recommends purchasing the following insulators, taking into account the scope of application:
- Heat Knauf Cottage Thermo Plate 037 – for small country cottages;
- Isoroc SuperWarm - for insulating walls and pitched roofs;
- Rockwool Light Butts Extra - the choice of the owner of a large mansion;
- Penoplex Comfort - for floor insulation on the ground;
- Isover Warm House-Slab - for budget construction.
All materials presented in the review are worthy of attention, but only the most convenient and warm insulators received the title of best thermal insulation in their class.